 ASVAB Camp
The assembly challenge
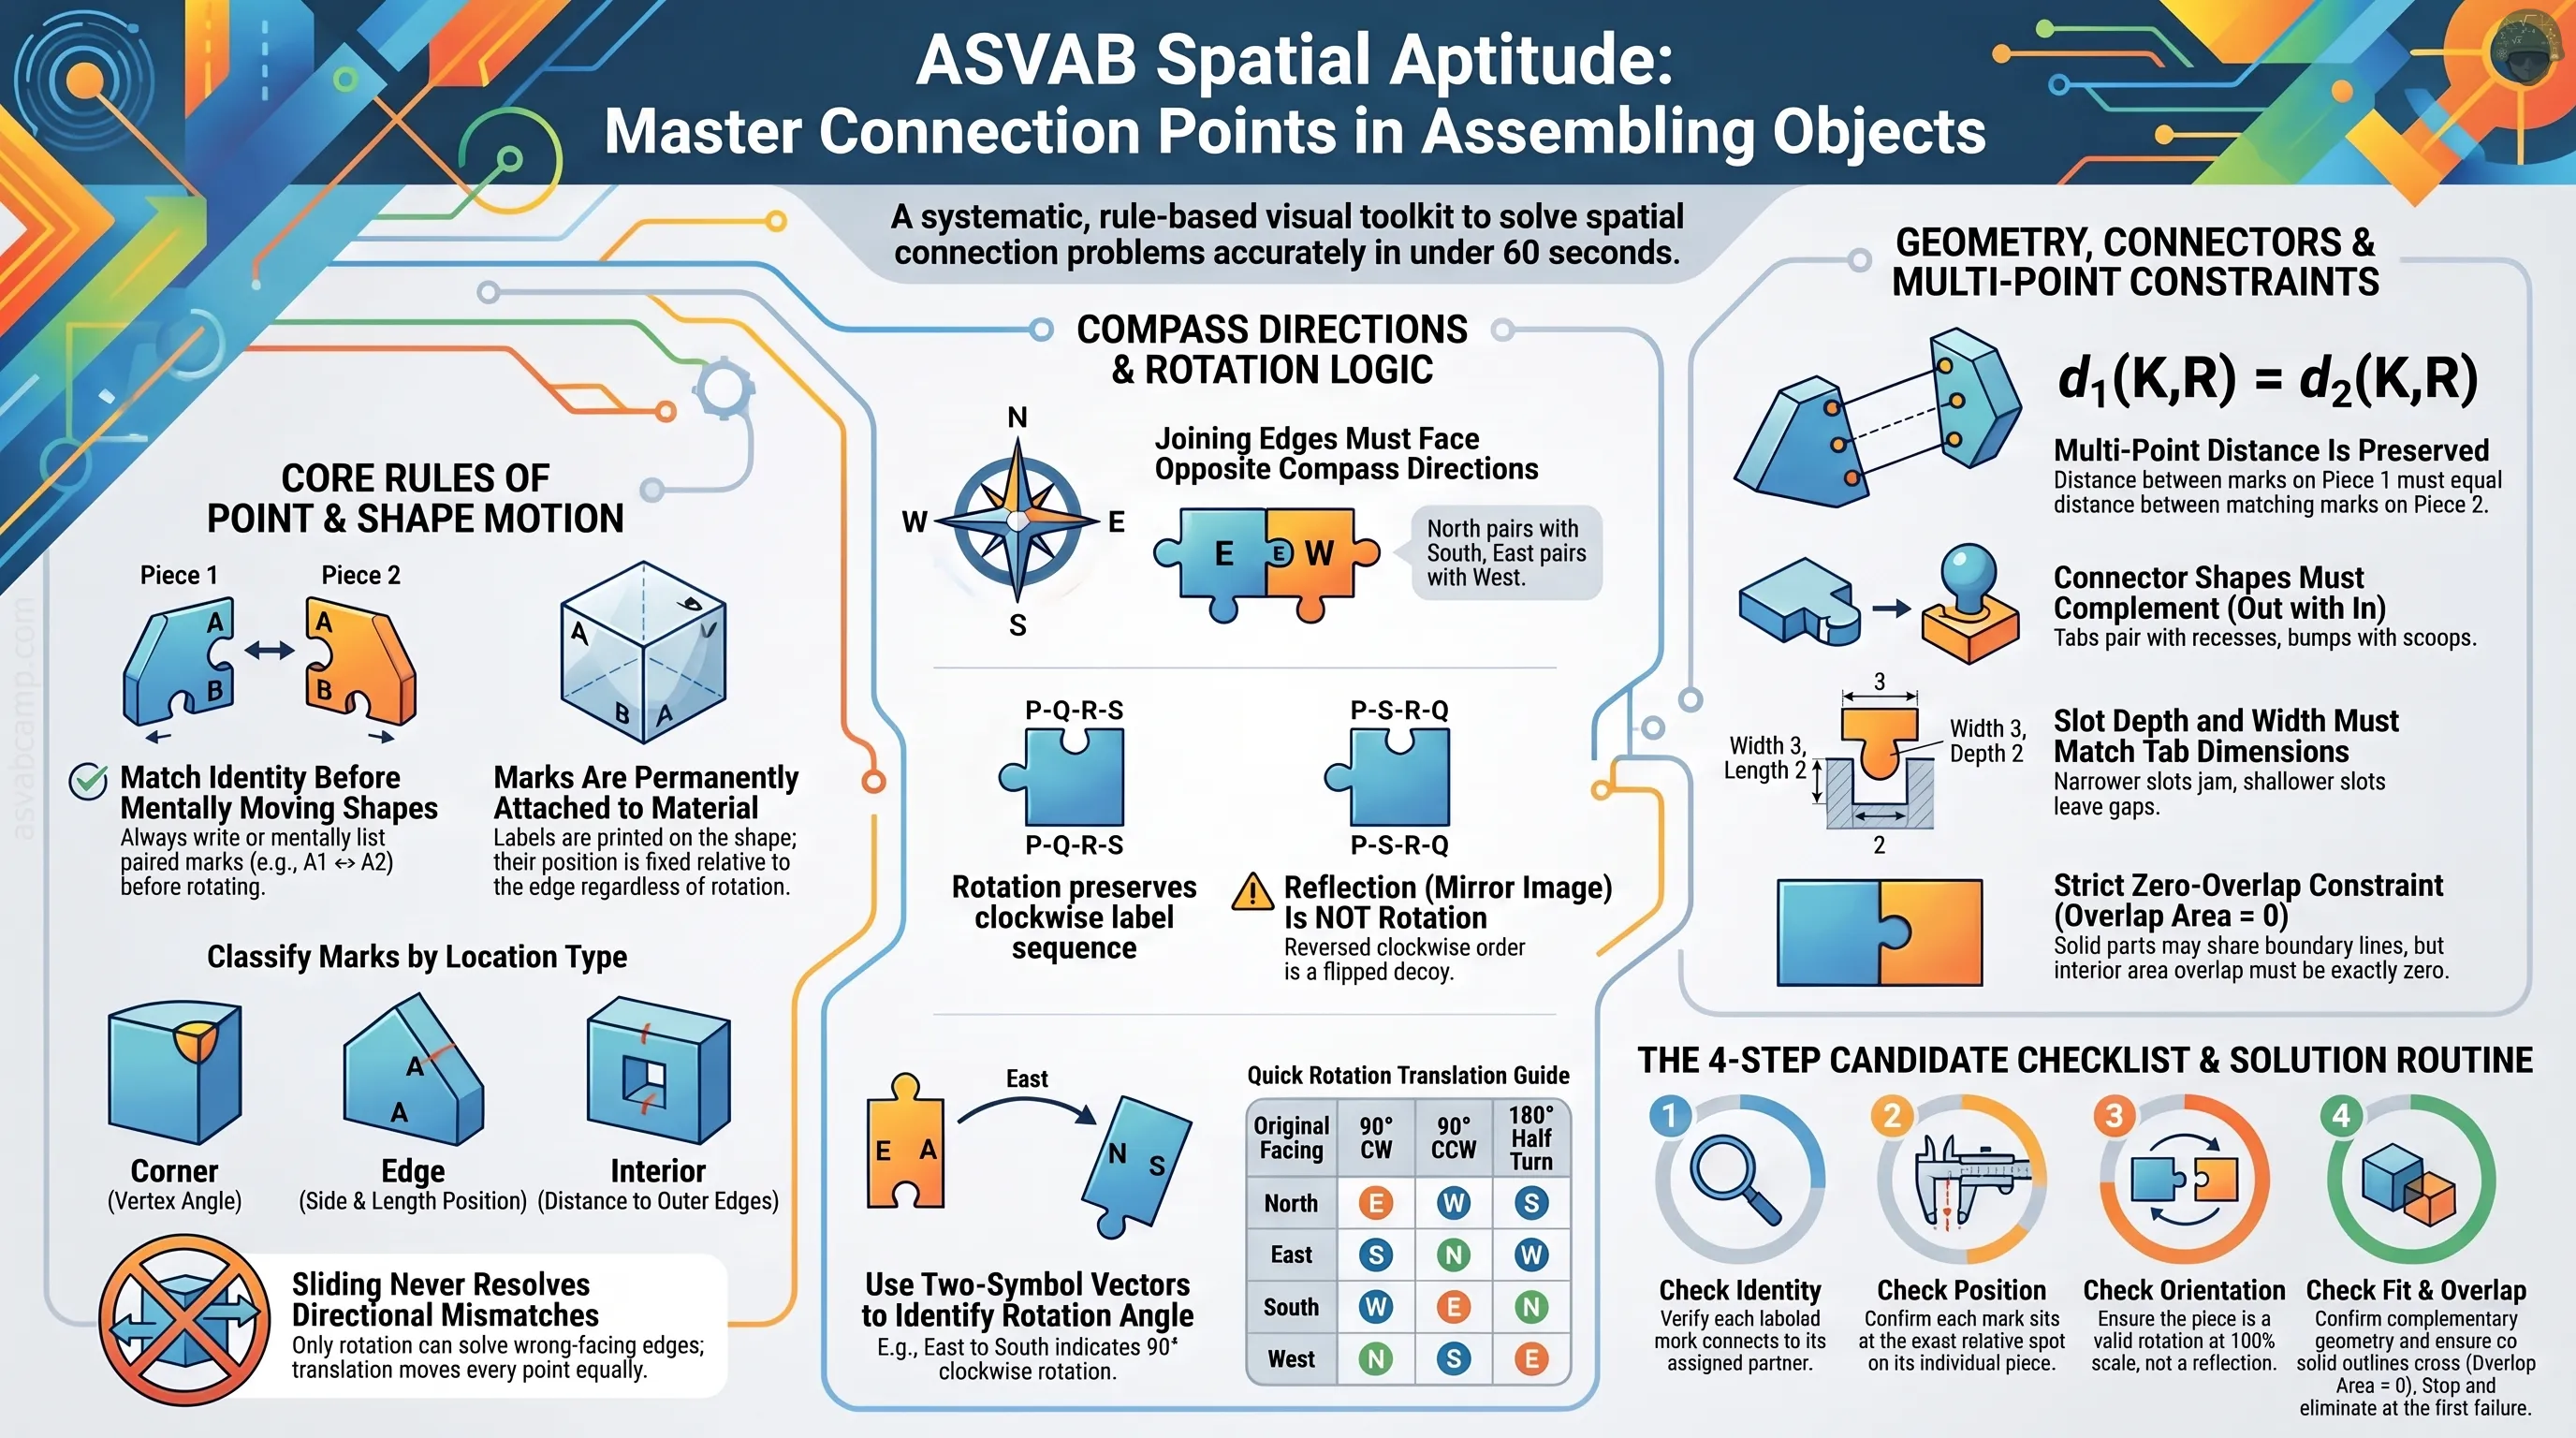
In a connection item you see two or more separate pieces. Each piece carries one or more labeled points, usually letters such as A and B, and either the letters themselves or a drawn line shows which point on one piece belongs with which point on another.
Your job is to pick the answer drawing in which every labeled point lands exactly where it should, each piece keeps its exact shape and size, and nothing overlaps. This lesson gives you a repeatable way to check each choice instead of guessing from a quick glance.
Why this skill is tested
The Assembling Objects subtest measures how well you can picture parts moving and fitting together in your head. That ability matters in work where people read wiring diagrams, follow assembly drawings, load cargo, or repair machinery, because a part installed a quarter turn off or mirrored can fail.
Connection items isolate that skill. The drawings are simple, but the wrong answer choices are built to look almost right: a dot slid a little along an edge, a piece flipped instead of turned. A systematic check protects you from those near-miss decoys, and the same habits speed up the shape-fitting items too.
Connector questions on the test
On the test, one kind of Assembling Objects question shows a box with two flat shapes. Each shape has one point marked with a letter, and a separate line carries the same two letters on its ends. You choose the figure in which the line runs from the lettered point on one shape to the lettered point on the other. In the answer figures the shapes may be turned to any angle, but they never change size or shape and are never flipped over.
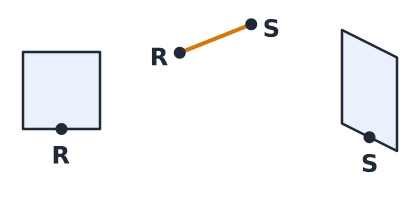
Here point R is at the middle of a side of the square, and point S is at the middle of a short side of the parallelogram. In the figure below, B is the only choice that joins exactly those two spots with neither shape flipped. The shapes are turned, but each point keeps its place on its shape.
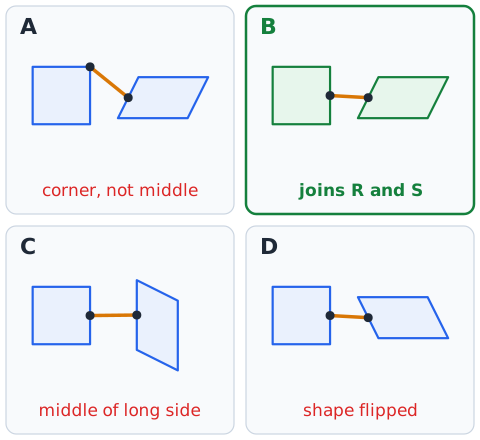
Work one letter at a time. Name the first point in words (a corner, the middle of a side, the center, the top of a curve), then look at where the line meets that shape in every figure and cross out each figure where it lands on a different kind of spot. Repeat for the second letter, and finally make sure both shapes are the same shapes as in the box. Because the shapes can be turned, describe a point by its place on the shape, never by up, down, left or right.
Objectives and success criteria
By the end of this lesson you should be able to do four things. First, match each labeled point or edge contact to its partner without changing either piece's shape. Second, decide which rotated orientations of a piece are legal and reject mirror images. Third, confirm that every required contact is made, that connector shapes such as tabs and notches complement each other, and that no two solid parts overlap. Fourth, do all of this in about a minute or less per item.
The connection model
Think of every piece as a rigid object carrying fixed marks. A mark can be a dot on the outline, a letter beside a corner, or a short edge segment. A connection instruction says which mark on one piece goes with which mark on another.
In some items the paired marks must touch, which you can write as
the two points share one location in the finished figure. In others a straight line runs from one mark to the other, and the correct choice shows that line ending exactly on both marks. Either way, a correct assembly satisfies every pairing at the same time.
Match identities before motion
Before you mentally turn anything, list which marks must pair: A with A and B with B, or a line from A to C. Only then decide how each piece must move.
If you start rotating shapes first, you can end up with a neatly aligned picture that pairs the wrong marks, such as a point placed at the correct corner of the wrong piece. A quick identity list, for example and , gives you a fixed target to test each answer choice against, and it takes only a few seconds to write or picture.
Marks are attached to material
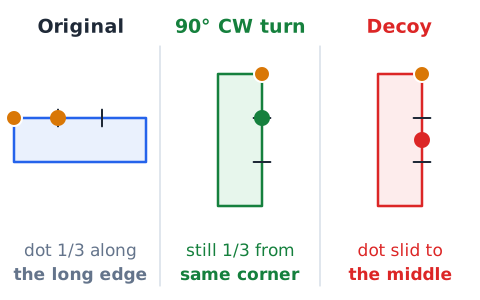
A label is printed on the piece, not floating in space. When the piece turns, the label travels with the exact spot it marks. If a dot sits one third of the way along the long edge of a rectangle, it stays one third of the way along that same edge after any rotation.
A common decoy shows the piece turned correctly but the dot slid to the middle of the edge or onto a neighboring edge. Always ask where the mark sits relative to the piece's own corners, not relative to the page.
Different meanings of a point
A labeled point can play different roles. It can be a contact that must touch its partner, an anchor where a connecting line must begin or end, or a pivot that stays fixed while the piece turns around it. Read the item to see which role applies.
If a line connects point A on one shape to point B on another, the line must start precisely on A and end precisely on B; ending near the point, or on the right edge but the wrong spot, is not enough. A point names one location, not a whole side.
Edge, corner, and interior
Classify each mark by where it sits. A corner mark is at a vertex, where two edges meet, so you can identify it by the angle there, such as a sharp 30 degree corner versus a square 90 degree corner. An edge mark lies along one side; note which side and how far along it. An interior mark lies inside the shape, away from the outline.
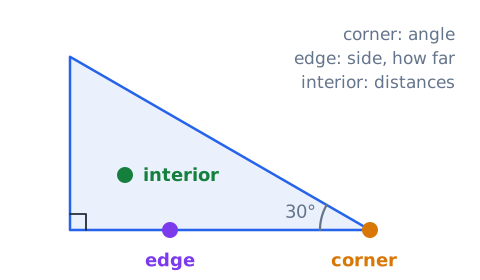
Each class has its own signature: corner marks are checked by angle, edge marks by side and position, and interior marks by their distances to nearby edges. Matching the class alone often rules out several choices at once.
Four side names
To talk about orientation, give the sides of the page compass names: north is the top, south the bottom, east the right, and west the left. Each edge of a piece can then be named by the direction its outer face points, so a square plate has a north edge, an east edge, a south edge, and a west edge.
After a rotation those names are reassigned, but the edges themselves keep the same order around the plate. Naming sides this way turns a fuzzy picture into a short statement you can check.
Opposite-facing contact
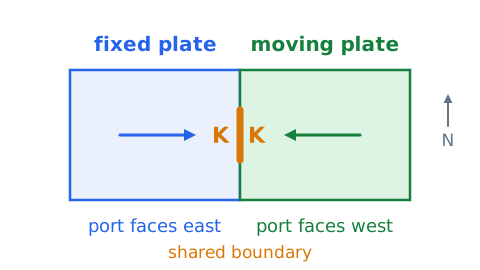
When two flat pieces join side to side, the touching edges must face in opposite directions. In the figure, the two ports marked K meet at one shared boundary. The fixed plate's port is on its east edge, so the moving plate must present its west edge there.
The rule is simple: the partner faces the opposite of the fixed direction. North pairs with south, and east pairs with west. Any choice in which both K edges face the same way cannot be a true contact.
A compass is a constraint tool
Once the fixed piece's port has a direction, you know which direction the partner port must face, and that tells you how far the partner must turn.
Suppose a loose piece has its mark on its north edge, but the fixed piece needs a partner facing west. North must become west, which is a 90 degree counterclockwise turn. You have reduced a visual puzzle to one required turn, and you can ignore every choice that shows the loose piece in any other orientation. The compass does not draw the answer for you; it removes options.
Rotation preserves order
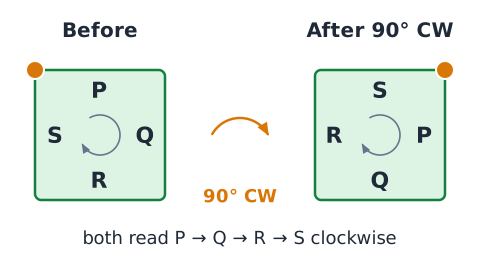
A rotation moves the whole piece as one solid unit. In the figure, the edges labeled P, Q, R, and S keep the same order around the plate before and after the quarter turn, and the orange corner moves along with them. Only their compass directions change.
This gives a fast test. If the original reads P, Q, R, S going clockwise, a valid rotated copy must also read P, Q, R, S clockwise, starting from any edge. A copy that reads P, S, R, Q clockwise has been flipped, not turned.
The quarter-turn table
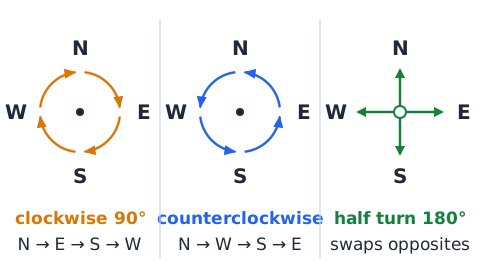
For a clockwise quarter turn, , each edge direction moves one step clockwise: north becomes east, east becomes south, south becomes west, and west becomes north.
A counterclockwise quarter turn reverses this: north becomes west, west becomes south, south becomes east, and east becomes north. A half turn, , swaps opposites: north with south and east with west. Three clockwise quarter turns, , equal one counterclockwise quarter turn.
Rotating about a pivot
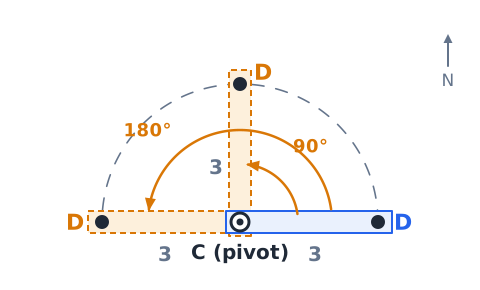
Sometimes a piece is pinned at one labeled point and swings around it. The pivot does not move; every other point keeps its distance from the pivot and sweeps through the same angle.
If point C is the pivot and point D is 3 units east of it, a 90 degree counterclockwise turn puts D 3 units north of C, and a 180 degree turn puts D 3 units west of C. Use the pivot as your anchor: confirm it is still in place, then confirm that each other mark is the right distance away in the right direction.
Sliding does not solve a directional mismatch
Sliding a piece, called translation, moves every point the same distance in the same direction. It changes where the piece is, but never which way its edges face.
If a port faces north and the target needs a port facing east, no amount of sliding fixes the problem; only a rotation can. So when a choice shows the correct facing directions, a slide may finish the job, but when the directions are wrong, reject the choice no matter how close the marks appear.
Reflection is not rotation
A reflection flips a piece over, like viewing it in a mirror. It reverses the order of labels around the outline: clockwise P, Q, R, S becomes counterclockwise. No rotation can do that.
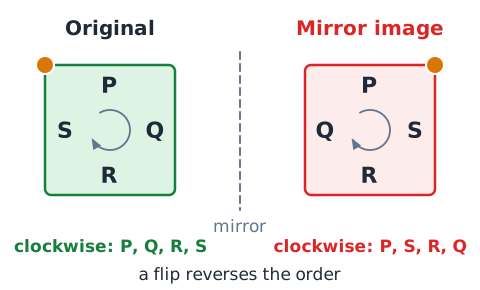
Unless an item says otherwise, treat each piece as a flat shape that may be turned and moved but not flipped. A mirrored copy is then a wrong answer even though every edge length and angle looks right. The easiest mirror check uses a lopsided feature, such as a notch near one end of an edge: confirm it is still beside the same corner after the turn.
The contact checklist
Run the same four checks on every answer choice and stop at the first failure. Identity: each mark is paired with the correct partner. Position: each mark is at the right spot on its own piece, on the same edge or corner and the same distance from a corner as in the original. Orientation: each piece is a rotation of the original at its original size, not a mirror image. Fit: connector shapes complement each other and no solid parts overlap. A choice that passes all four is your answer.
One contact may be insufficient
Matching a single point fixes location but leaves the piece free to spin around that point. With only A touching A, the second piece could point up, down, left, or right and still satisfy that one requirement. So a choice can get the first contact exactly right and still be wrong.
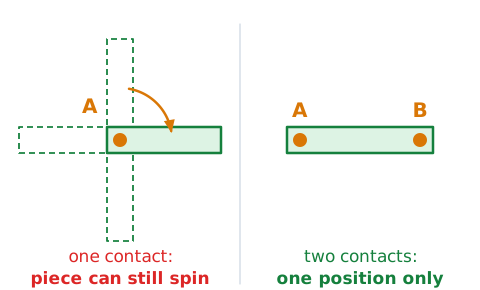
Look for the extra information that fixes the turn: another labeled point, a required facing edge, or a connector shape. In general, a flat piece is pinned down by one point plus a direction, or by two separate points.
Multiple contacts and spacing
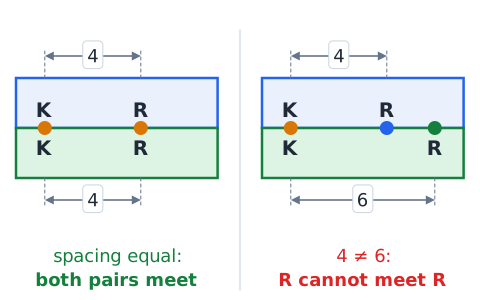
When two contacts are required, both must hold in the same arrangement. In the figure, the K marks must meet and the R marks must meet at once. Because each piece is rigid, the distance from K to R on a piece never changes as it moves.
So both pairs can meet only if that distance is equal on the two pieces:
If one piece has K and R 4 units apart and the other has them 6 units apart, no legal motion lets both pairs touch.
Scale is normally preserved
Pieces keep their size. A choice that shows a piece enlarged, shrunk, or stretched in one direction is not a legal version of it, even if the outline looks similar.
Compare ratios rather than judging overall size. If the original's long edge is twice its short edge, the candidate must also show a ratio of 2. Marks keep their fractional positions too: a dot one quarter of the way along an 8-unit edge sits
units from the corner, and it must still sit 2 units from that same corner. Decoys often change one proportion slightly.
Compatibility and connector type
Matching letters is necessary but not enough; the connector shapes must also work together. A protruding tab pairs with a recess, a bump pairs with a scoop of the same curve, and a flat edge pairs with a flat edge.
Two tabs pointing at each other cannot both fill the same space, and two recesses facing each other leave a gap instead of a joint. Before checking positions, sort each connector as sticking out, cutting in, or flat, then pair out with in and flat with flat.
Tab-to-slot geometry
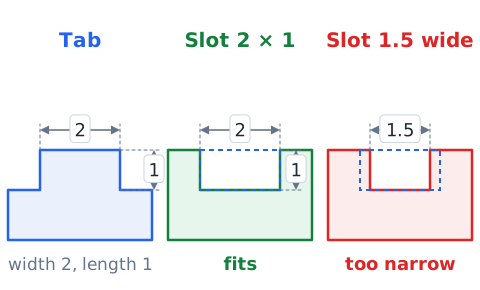
The figure shows a tab entering a recess. For a clean joint, the recess must be as wide as the tab and as deep as the tab is long; in these drawings the two normally match exactly.
If a tab is 2 units wide and 1 unit long, a slot 2 units wide and 1 unit deep accepts it, while a slot 1.5 units wide does not. Matching letters printed beside the tab and slot never override this: if solid material would have to pass through solid material, the joint is impossible.
Mirror traps at a notch
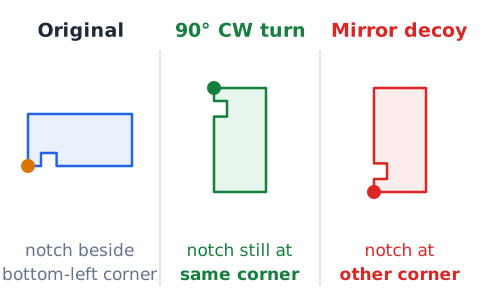
A notch placed off-center on an edge is a strong orientation clue. Suppose a notch sits near the left end of a piece's bottom edge. After any rotation, it stays near the end that joins the same neighboring edge.
A mirrored decoy moves the notch to the other end of that edge. To check, name the corner closest to the notch in the original, here the corner where the bottom and left edges meet, and confirm the notch is beside that same corner in the candidate, wherever it now points.
Sequence of two joins
When three pieces connect in a chain, solve one join at a time. Fix the middle piece, place the first piece against it using its labeled contact, then place the third piece using the remaining contact. Each placement may need its own rotation.
Working in sequence prevents a common error: getting the first join right and assuming the third piece only needs to slide over. After both joins, scan for overlap between the first and third pieces, which never touched during your checks.
A graph of contacts
For items with several pieces, sketch a tiny graph: each piece is a dot, and each required contact is a line between two dots, labeled with the mark names. Three pieces in a chain give two lines; a central hub with three neighbors gives three lines from one dot.
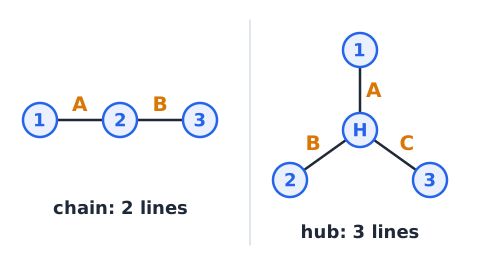
The graph tells you how many contacts the correct answer must show, which piece joins which, and which piece makes a good fixed reference, usually the one with the most lines. If a choice shows a contact that is not in your graph, or misses one that is, reject it.
Point matching versus surface matching
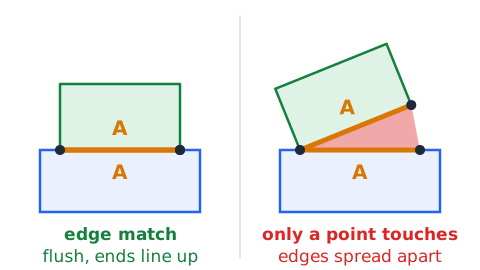
Some instructions name a point; others name an edge segment. Matching a point means two exact locations coincide, or a line ends on one exact spot. Matching an edge means two segments lie against each other along their full shared length, so their lengths must agree and their ends must line up.
A choice can make two points touch at a corner while the edges meant to sit flush actually spread apart at an angle. Read whether the requirement is a point or a segment, then check the right kind of match.
The order of two marks
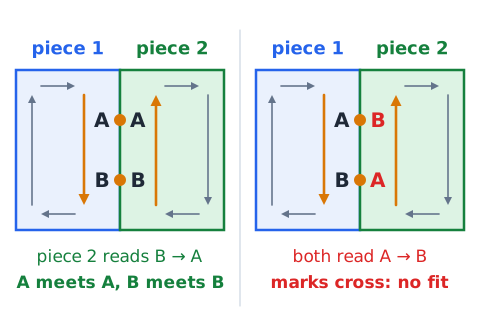
If an edge carries two marks, say A and B, note which comes first as you walk around the piece clockwise. When that edge meets a partner edge, the two pieces travel the shared boundary in opposite directions.
So if piece 1 reads A then B clockwise, the partner must read B then A clockwise along its matching edge. If both pieces read A then B clockwise, the marks cannot line up without a flip.
No-overlap constraint
In a correct assembly, pieces may touch along edges or at points but never share any interior area. Overlap often hides near a joint: a corner of one piece can cut into the body of the other even when the labeled points meet perfectly.
Check by tracing each outline near every contact and asking whether one outline crosses into the other. For solid parts the rule is strict:
Any choice with even a small shared region is impossible.
Shared line and tangent contacts
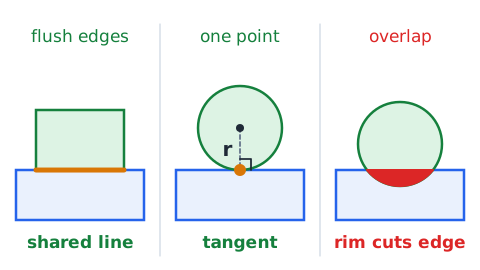
Two kinds of touching are legal. In a shared-line contact, straight edges lie flush along a common segment. In a tangent contact, a curved edge touches another edge at a single point without crossing it, like a wheel resting on a flat road. Both have zero overlap area.
A circle drawn so its rim cuts across a straight edge, rather than just touching it, overlaps. For a circle of radius r resting on a straight edge, the center must sit exactly r away from that edge, measured straight across at a right angle.
Reading candidate orientations
For each answer choice, work out how each piece has turned compared with its original. Pick one distinctive feature, such as the longest edge, the sharpest corner, or a labeled point, and see where it now points.
If the longest edge faced south originally and faces west in the candidate, the piece turned 90 degrees clockwise. Then predict where every other mark should be after that same turn and compare with the drawing. One turn must explain every mark on the piece.
One-symbol method
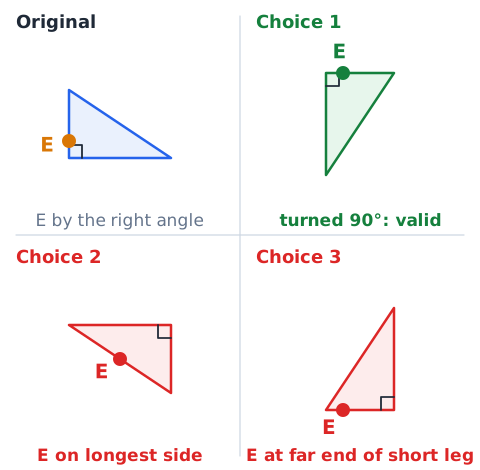
When a piece has only one labeled point and a lopsided outline, use the point plus one outline feature. Note the edge the point sits on and the nearest distinctive corner.
For example, point E sits on the shorter leg of a right triangle, next to the right angle. In any valid candidate, E must still be on the shorter leg and still beside the right angle. If E appears on the longest side, or at the far end of the shorter leg, away from the right angle, the piece has been altered or flipped.
Two-symbol method
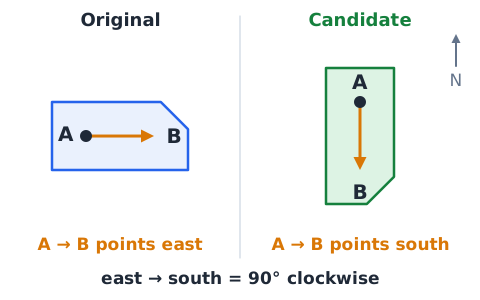
When a piece has two labeled points, picture an arrow from the first mark to the second, say from A to B, and note its direction on the original, perhaps east. In each candidate, see where that arrow points now.
That single comparison gives the rotation: east to south means a 90 degree clockwise turn. Then confirm the arrow's length is unchanged, that the outline turned by the same amount, and that one lopsided feature is on the correct side of the arrow, which catches mirror images.
Cycle notation for four contacts
For a square piece with a mark on each side, list the marks clockwise starting from north, for example (F, G, H, J): F north, G east, H south, J west.
A clockwise quarter turn sends each mark one step clockwise, so the new list from north is (J, F, G, H). A half turn gives (H, J, F, G). Every rotation is a cyclic shift of the same list, so any candidate whose clockwise reading is not a shift of (F, G, H, J) has been flipped or relabeled.
Worked example: east-facing receiver
Problem: A fixed block has a socket T on its east edge. A loose block has the matching plug T on its south edge. How must the loose block turn?
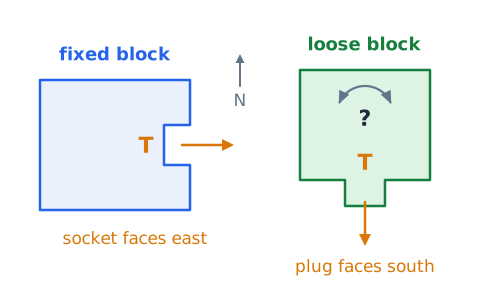
Step one: the plug must face the socket, so it must face west, the opposite of east.
Step two: change south into west. By the clockwise table, south becomes west after one clockwise quarter turn.
Answer: rotate the loose block 90 degrees clockwise, then slide it so T meets T on the fixed block's east side.
Worked example: north-facing receiver
Problem: A base plate has contact M on its north edge. A cap piece has its M on its east edge. Find the turn.
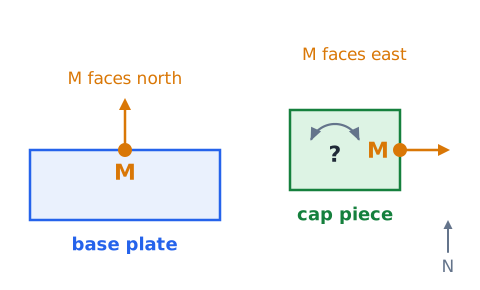
Step one: the cap sits on top of the base, so its M must face south.
Step two: change east into south. Clockwise, east becomes south in one quarter turn.
Answer: rotate the cap 90 degrees clockwise. Check: a counterclockwise quarter turn would send east to north, pointing M away from the base, so a choice drawn that way fails.
Worked example: two labeled contacts
Problem: Piece 1 has marks A and B on its east edge, A 1 unit below the top corner and B 4 units below it. Piece 2 has A and B on its west edge, 3 units apart. Can both pairs meet with no turning?
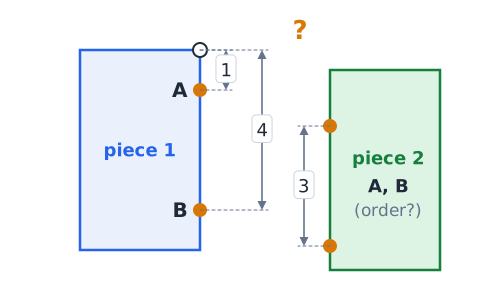
Step one: spacing on piece 1 is
units, equal to piece 2's spacing, so distance allows it.
Step two: on piece 1, A is above B, so on piece 2 A must also be above B.
Answer: yes, provided A is the upper mark on piece 2.
Worked example: a mirror decoy
Problem: An L-shaped piece has a long arm running north from its corner and a short foot running east from the same corner, with mark G at the foot's tip. Choice 1 shows the arm running north and the foot running west. Choice 2 shows the arm running east and the foot running south, G at its tip.
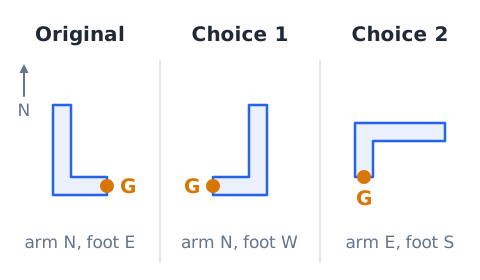
Step one: only a zero turn keeps the arm north, and that keeps the foot east, so Choice 1 is a reflection.
Step two: a 90 degree clockwise turn sends north to east and east to south, matching Choice 2.
Answer: Choice 2.
Worked example: oversized tab
Problem: Tab V is 3 units wide and 2 units long. Three slots labeled V are offered: slot 1 is 3 wide and 2 deep, slot 2 is 2 wide and 2 deep, slot 3 is 3 wide and 1 deep.
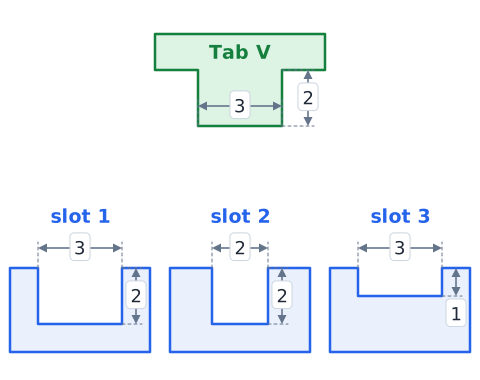
Step one: slot 2 is 1 unit too narrow, so the tab would hit its walls.
Step two: slot 3 is 1 unit too shallow, so the tab would hold the pieces 1 unit apart and break flush contact.
Step three: slot 1 matches both width and depth.
Answer: slot 1.
Detecting hidden overlap
Overlap often hides behind correct-looking contacts. Watch three places. First, corners beside a joint: a corner of one piece can poke into the other just next to the matched points. Second, the far end of a rotated piece: after a turn, a long arm may swing into space already filled by a third piece. Third, curved edges, which can bulge past a straight edge.
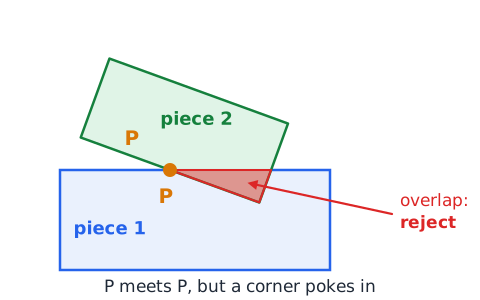
A quick test is to imagine shading each piece a different color. If any spot would need two colors at once, the choice is wrong.
Handling curved connectors
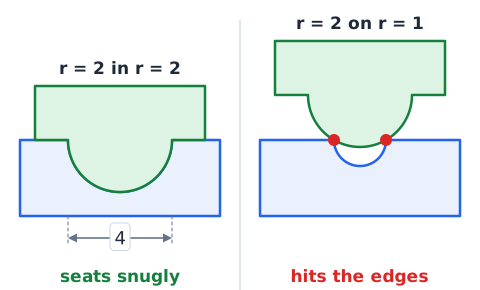
A curved connector pairs a bump with a scoop. For a snug fit, both arcs must have the same radius and bend in opposite senses: one bulges out and the other caves in. A bump of radius 2 units will not seat in a scoop of radius 1 unit; it hits the scoop's edges.
Arcs also have an opening width. A half-circle bump of radius 2 spans
units, so its scoop must also be a half circle with a 4-unit opening.
Handling triangular connectors
A V-shaped tab needs a V-shaped notch with the same tip angle and the same depth. A 60 degree point fits a 60 degree notch. In a 90 degree notch it leaves gaps along both walls, and in a 45 degree notch it jams against the walls before it is fully seated.
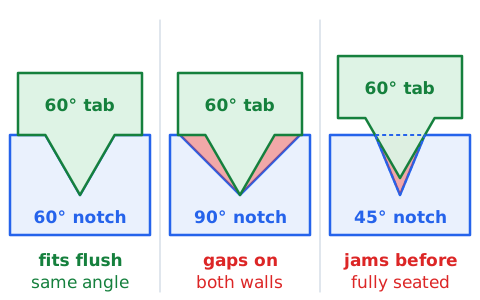
If the triangle is lopsided, the steeper side of the tab must line up with the steeper side of the notch. That gives you one more orientation clue, and it rules out mirrored choices.
Using negative space
Sometimes it is easier to study the empty space a piece must fill than the piece itself. Trace the gap in the fixed part, such as a corner cutout or a slot, and ask what shape would fill it exactly. Then look for that outline on the loose piece.
If a fixed block has a square cutout 2 units on each side, only a 2-by-2 square protrusion fits there. Thinking about the hole first often reveals the required orientation at once.
Recovering from uncertainty
If two choices still look correct after a first pass, return to the checklist and hunt for the smallest difference between them. Compare one feature at a time: which edge carries each mark, how far a mark sits from a corner, the clockwise order of labels, and the relative lengths of edges. One of these will differ.
If time is short, cross out every choice you have proven wrong and pick from the rest rather than leaving the item blank.
Avoiding invented assumptions
Use only what is drawn or stated. Do not assume a piece may be flipped, stretched, or cut, and do not assume two marks match just because they sit in similar spots; the letters decide.
Equally, do not add rules that are not there. If an item asks only for two points to meet, a point contact is enough even if the edges do not sit flush. Do not reason from real objects either, such as a hinge that bends; the pieces are rigid flat shapes. Base every rejection on a specific rule you can point to.
When multiple configurations can work
Sometimes the rules allow more than one arrangement. When a straight line joins point A on one shape to point B on another, the line may run in many directions and have different lengths, so many layouts satisfy it. Likewise, a mark at a corner can touch its partner with the piece angled several ways.
Only one choice will be fully valid, so your goal is to eliminate the others, not to predict one exact picture. A choice with zero violations is correct even if it differs from the layout you imagined.
Timed solution routine
Use the same routine on every connection item. Spend a few seconds on the pieces: name each mark, note its edge or corner, and spot any lopsided feature. Next, scan the choices and drop any with wrong letters, a missing contact, or a clearly changed shape. Then check orientation on the survivors with one feature per piece, watching for mirror images. Finally, check connector fit and overlap. If you are stuck after about a minute, eliminate what you can, choose, and move on.
Representing contacts as constraints
Write each requirement as a short rule you can test. A point contact is an equality of locations,
An edge contact adds a direction rule: the two edges face opposite ways. A spacing rule says distances between marks agree,
An orientation rule says each piece appears as a rotation of its original, often by , , or , never as a reflection. A fit rule says the overlap area is 0. A correct choice satisfies every rule at once, and one failure is enough to reject a choice.
Check your thinking
Question: A fixed piece has a port on its west edge. Which way must the partner port face? Answer: east, the opposite direction.
Question: A loose piece's mark faces north and must end up facing south. What turn works? Answer: a half turn of 180 degrees.
Question: Piece 1 has two marks 5 units apart; piece 2 has the same marks 4 units apart. Can both pairs meet? Answer: no, rigid pieces keep their spacing.
Question: A choice reverses the clockwise order of labels. Is it a rotation? Answer: no, it is a mirror image.
What comes next
You now have a toolkit for connection items: pair marks by identity first, keep each mark tied to its spot on the piece, use compass directions and the quarter-turn table to find the required rotation, reject mirror images, confirm spacing and connector fit, and make sure no solid areas overlap. Later lessons apply the same checks to items where several pieces combine into one outline, and add timed practice so the checklist becomes automatic under pressure.
 English ▾