Put the connection-point method to work on 40 original questions. Each item gives you parts with labeled points or connectors and asks you to identify the assembly that keeps every required contact, preserves the part shapes, uses a legal rotation, and avoids overlap. Several candidates are deliberate decoys, including mirrored notches and tabs that are slightly too large.
A fixed plate has its connection port on its south edge. Another plate must join it at that port. Which direction must the second plate's matching port face?
Show the answer
Answer: A
Correct answer: North. Two flat edges can lie against each other only if they face each other, which means pointing in opposite directions. Picture the fixed port facing south: the partner must approach from the south side and face back toward it, so it faces north. A tempting error is matching the same label, south to south, but two edges pointing the same way turn their backs on each other. East or west would leave the ports at right angles.
A (correct): Touching edges face opposite ways, and the opposite of south is north, so this port can meet the fixed one.
B: East is only a quarter turn away from south, not its opposite, so the ports would sit at right angles.
C: West is a quarter turn away from south rather than opposite it, so the edges could not lie against each other.
D: Two ports that both face south point the same way, so they could never touch along a shared boundary.
Question 2 of 40 · easy
A square plate has a mark on its west edge. The plate is turned 90 degrees clockwise. On which edge is the mark now?
Show the answer
Answer: D
Correct answer: North. A clockwise quarter turn moves every edge one step clockwise: north to east, east to south, south to west, and west to north. The mark on the west edge therefore ends up on the north edge.
A: South is where west goes after a counterclockwise quarter turn, the reverse of the turn described.
B: East is where west ends up after a half turn of 180 degrees, not a quarter turn.
C: The mark is printed on the plate and travels with it, so it cannot stay on the west side after a turn.
D (correct): In a clockwise quarter turn each edge moves one step clockwise, and the step after west is north.
Question 3 of 40 · easy
A loose piece has its port facing north, but the fixed piece needs that port to face east. Which move gives the port the required direction?
Show the answer
Answer: D
Correct answer: Turning the piece 90 degrees clockwise. Sliding never changes the direction an edge faces, so a turn is required. By the quarter-turn table, a 90 degree clockwise turn changes north into east.
A: Moving it straight in any direction keeps the port facing north; only a turn changes its direction.
B: Sliding moves the piece without changing which way any edge faces, so the port would still face north.
C: A counterclockwise quarter turn sends north to west, the opposite of the direction needed.
D (correct): A clockwise quarter turn sends north to east, which is exactly the direction needed.
Question 4 of 40 · easy
A plate carries a mark on its east edge. The plate is given a half turn of 180 degrees. On which edge does the mark end up?
Show the answer
Answer: B
Correct answer: West. A 180 degree turn swaps opposites: north with south and east with west. The mark on the east edge therefore moves to the west edge.
A: South is where east goes after a single clockwise quarter turn, which is only half of the turn described.
B (correct): A half turn swaps opposite edges, so the east edge becomes the west edge.
C: North is where east goes after a counterclockwise quarter turn, not a half turn.
D: Only a full 360 degree turn returns the mark to the east edge; a half turn moves it.
Question 5 of 40 · easy
Reading clockwise from its top, a square plate has edges labeled P, Q, R, S. Which clockwise reading of a candidate drawing shows the plate flipped over instead of turned?
Show the answer
Answer: B
Correct answer: P, S, R, Q. Every rotation keeps the labels in the same clockwise order, only starting from a different edge. P, S, R, Q runs the labels in reverse order, which is the sign of a mirror image.
A: This is the original order shifted by three places, so it is a legal turned copy.
B (correct): This reverses the clockwise order of the labels, which only a reflection can do, so the plate has been flipped.
C: This is the original order shifted by one place, which is what a quarter turn produces.
D: This is the original order shifted by two places, which a half turn produces.
Question 6 of 40 · easy
A flat rectangle measures 9 units wide and 3 units tall. Pieces may be turned but keep their size. Which candidate could be a legal turned copy of it?
Show the answer
Answer: C
Correct answer: 3 units wide and 9 units tall. A turn may swap which side runs across and which runs up, but both lengths stay the same. A rectangle 3 units wide and 9 units tall keeps the 9 and 3 unit sides, so it is the original turned a quarter turn.
A: The long side has shrunk from 9 to 6 units, changing the 3 to 1 ratio of the original.
B: The short side has grown from 3 to 4 units, so the piece has been stretched, which is not allowed.
C (correct): A quarter turn swaps width and height while keeping both lengths, so this is the same rectangle turned.
D: This is a square, so the short side has been stretched to match the long side.
Question 7 of 40 · easy
A tab sticks out 1 unit from a piece and is 4 units wide. Which slot gives a clean joint for this tab?
Show the answer
Answer: A
Correct answer: A slot 4 units wide and 1 unit deep. For a clean joint the slot must be as wide as the tab and as deep as the tab is long. The tab is 4 units wide and 1 unit long, so the slot must be 4 units wide and 1 unit deep.
A (correct): The slot matches the tab's 4 unit width and 1 unit length, so the tab fills it exactly.
B: The width matches, but the slot is 1 unit deeper than the tab is long, leaving an empty gap at its bottom.
C: The slot is 1 unit narrower than the tab, so the tab would hit the slot's walls.
D: This mixes up width and depth; a 4 unit wide tab cannot enter a 1 unit wide opening.
Question 8 of 40 · easy
Two connectors carry the same letter. Which pair of connector shapes can form a proper joint?
Show the answer
Answer: D
Correct answer: A tab facing a recess. Matching letters is not enough; connector shapes must complement each other. A protruding tab fits into a recess, pairing out with in.
A: Two recesses leave an empty gap between the pieces instead of a joint.
B: A bump against a flat edge cannot sit flush; a bump needs a scoop of the same curve.
C: Two tabs pointing at each other would both need to fill the same space, so they collide.
D (correct): A shape that sticks out pairs with a shape that cuts in, so the tab fills the recess.
Question 9 of 40 · easy
In a correct assembly of rigid flat pieces, how much interior area may two pieces share?
Show the answer
Answer: D
Correct answer: None at all. Solid pieces may touch along edges or at single points, but they can never occupy the same space. The overlap area must be zero.
A: Matching labels never excuse overlap; the fit rule must hold along with the label rule.
B: Tabs fill recesses, not other solid material, so no allowance for overlap exists.
C: Even a small shared region means solid material is in the same place twice, which makes the choice impossible.
D (correct): Pieces may touch along edges or at points, but the shared interior area must be exactly zero.
Question 10 of 40 · easy
An item requires only that point A on one piece touch point A on another piece. Why might a choice with the two A points touching still be wrong?
Show the answer
Answer: B
Correct answer: One contact still lets the piece spin around that point. Matching a single point fixes where the piece is but not how it is turned. The piece could still be flipped, changed in shape, or turned so it overlaps, so the rest of the checklist still applies.
A: One shared point fixes location only; the piece can still spin around that point into a wrong position.
B (correct): With only one point fixed, the piece could point in many directions, so other details such as shape or overlap must still be checked.
C: Point contacts are legal; the problem is that one point alone does not fix how the piece is turned.
D: A mark can sit on an edge, a corner, or inside a piece; where it sits does not make a contact invalid.
Question 11 of 40 · medium
A fixed block has a socket on its north edge. A loose block has the matching plug on its west edge and must sit on top of the fixed block. How must the loose block turn?
Show the answer
Answer: C
Correct answer: 90 degrees counterclockwise. The socket faces north, so the plug must face the opposite way, south. A counterclockwise quarter turn changes west into south, so the loose block turns 90 degrees counterclockwise.
A: Left alone, the plug faces west, a quarter turn away from the south direction it needs.
B: A half turn sends west to east, which is sideways to the socket rather than facing it.
C (correct): The plug must face south, and a counterclockwise quarter turn sends west to south.
D: A clockwise quarter turn sends west to north, so the plug would point away from the socket.
Question 12 of 40 · medium
A square plate has one mark on each edge. Reading clockwise from north, the marks are (A, D, G, K). After a half turn, what is the clockwise list starting from north?
Show the answer
Answer: B
Correct answer: (G, K, A, D). A half turn swaps north with south and east with west. G, the old south mark, moves to north; K moves from west to east; A moves to south; and D moves to west, giving (G, K, A, D).
A: This reverses the clockwise order, which describes a flipped plate rather than any rotation.
B (correct): A half turn shifts every mark two places, so the old south mark G is now on the north edge.
C: This is the result of a counterclockwise quarter turn, a shift by one place the other way.
D: This is a shift by one place, which is what a clockwise quarter turn gives, not a half turn.
Question 13 of 40 · medium
A piece is pinned at point C and swings around it. Point D is 5 units north of C. After the piece turns 90 degrees clockwise about C, where is D?
Show the answer
Answer: B
Correct answer: 5 units east of C. The pivot C stays in place and D keeps its 5 unit distance. A clockwise quarter turn changes north into east, so D ends 5 units east of C.
A: The direction is right, but every point keeps its distance from the pivot, so D stays 5 units away.
B (correct): Clockwise, north becomes east, and D keeps its 5 unit distance from the pivot.
C: South is where north goes after a half turn, which is twice the turn described.
D: West is where north goes after a counterclockwise quarter turn, the wrong direction.
Question 14 of 40 · medium
On piece 1, marks K and R lie along one edge, K 2 units from a corner and R 7 units from that same corner. Piece 2 also has a K and an R that must meet piece 1's marks at the same time. How far apart must K and R be on piece 2?
Show the answer
Answer: A
Correct answer: 5 units. Both pairs can meet only if the K to R distance is the same on both pieces. On piece 1 that distance is
7 - 2 = 5
units, so piece 2 needs K and R 5 units apart.
A (correct): Rigid pieces keep their spacing, and the K to R spacing on piece 1 is 7 - 2 = 5 units.
B: This adds the two corner distances instead of subtracting them.
C: This is R's distance from the corner, not the spacing between K and R.
D: This is K's distance from the corner, not the distance between the two marks.
Question 15 of 40 · medium
A dot sits one third of the way along a 12 unit edge, measured from that edge's left corner. The piece is then turned 90 degrees. How far is the dot from that same corner now?
Show the answer
Answer: A
Correct answer: 4 units. A mark keeps its fractional position on its own edge after a turn. One third of 12 units is
12/3 = 4
units, so the dot stays 4 units from the same corner.
A (correct): One third of 12 is 4, and the mark travels with the piece, so it stays 4 units from the same corner.
B: This is the dot's distance from the other end of the edge, not from the corner named.
C: This uses the 3 from one third as a distance instead of finding one third of 12.
D: This places the dot at the middle of the edge, the classic slid-dot decoy.
Question 16 of 40 · medium
A connector is a half-circle bump with a radius of 3 units. Which partner connector will seat it snugly?
Show the answer
Answer: C
Correct answer: A half-circle scoop with a 6 unit opening. A bump pairs with a scoop of the same radius bending the opposite way. A half circle of radius 3 spans 2r = 2 x 3 = 6 units, so the scoop must be a half circle with a 6 unit opening.
A: Two bumps both bulge outward, so they cannot nest into each other.
B: This opening is 3 units too wide, which would leave gaps around the bump.
C (correct): A scoop caves in to match the bump, and its opening equals the bump's full width of 2 x 3 = 6 units.
D: A 3 unit opening matches the radius, not the full width of the bump, so the bump would hit its edges.
Question 17 of 40 · medium
A circle with a radius of 2.5 units rests on a straight edge, touching it at one point without crossing it. How far is the circle's center from the edge, measured straight across?
Show the answer
Answer: C
Correct answer: 2.5 units. A circle resting on a straight edge touches it at one point, so its center is exactly one radius away. The radius is 2.5 units, so the center is 2.5 units from the edge.
A: This is half the radius, so the circle's rim would cut through the edge and overlap it.
B: This is the diameter; at that height the circle would float one radius above the edge.
C (correct): For a tangent contact the center sits exactly one radius from the edge, which is 2.5 units.
D: With its center on the edge, half of the circle would cross into the other side.
Question 18 of 40 · medium
Along one edge of piece 1, mark A comes before mark B as you walk around the piece clockwise. That edge must join a matching edge on piece 2 so both pairs meet. In what clockwise order must A and B appear on piece 2's edge?
Show the answer
Answer: D
Correct answer: B first, then A. When two edges meet, the pieces travel their shared boundary in opposite directions. Since piece 1 reads A then B clockwise, piece 2 must read B then A clockwise along its matching edge.
A: The order matters: the wrong order puts A against B no matter how the piece is turned.
B: If both pieces read A then B clockwise, the marks can only line up after a flip, which is not allowed.
C: Two different marks at one spot would mean zero spacing, which cannot match piece 1's spacing.
D (correct): Joined edges are traced in opposite directions, so a clockwise A then B on one piece needs B then A on the other.
Question 19 of 40 · hard
On a piece, an arrow drawn from mark A to mark B points south, and a small notch sits on the piece's east edge. In a candidate drawing, the arrow from A to B points west. If the candidate is a legal turned copy, on which edge must the notch be?
Show the answer
Answer: C
Correct answer: South. The arrow from A to B changed from south to west, which is one clockwise quarter turn. The same turn applies to the whole piece, and a clockwise quarter turn sends east to south, so the notch must be on the south edge.
A: The notch would stay east only if the piece had not turned, but the arrow changed direction.
B: North is where east goes after a counterclockwise quarter turn, but the arrow shows a clockwise turn.
C (correct): The arrow shows a 90 degree clockwise turn, which sends the east edge to the south.
D: West is where east goes after a half turn; the arrow moved only one quarter step.
Question 20 of 40 · hard
Four pieces W, X, Y, and Z must be assembled. W meets X at mark A and also at mark B, W meets Y at mark C, Y meets Z at mark D, and X meets Z at mark E. How many separate contacts must the correct choice show?
Show the answer
Answer: A
Correct answer: Five. In a contact graph, every required contact is its own line between two pieces. W and X share two lines (A and B), and C, D, and E add one line each, for
2 + 1 + 1 + 1 = 5
contacts.
A (correct): Each named mark is its own required contact: A, B, C, D, and E make five.
B: This counts one fewer than the number of pieces, as if they formed a simple chain.
C: This counts the pairs of pieces that touch but treats the two W and X marks as a single contact.
D: This adds a contact that is not required; a choice showing an extra contact should be rejected.
Question 21 of 40 · medium
Plate A is fixed in place and has connection port R on its east edge. Plate B lies face-up with letter K on top, M on the right, R on the bottom, and T on the left. B may be turned only in quarter-turn steps and may not be flipped. Which picture shows B turned so that its R meets A's R?
Show the answer
Answer: C
A's port faces east, so the touching edge of B must face the opposite way, west, and that edge must carry R. B's R starts on its bottom (south) edge, and moving it south to west takes one clockwise quarter turn, so B must turn 90 degrees clockwise. Only that picture puts R on B's joining edge, against A's R.
A: Turning B 180 degrees clockwise puts the letter M on the joining west edge and leaves R facing north, so the R connectors do not meet.
B: Leaving B unturned puts the letter T on the joining west edge and leaves R facing south, so the R connectors do not meet.
C (correct): A 90 degree clockwise turn carries R from B's south edge to its west edge, right against A's R port.
D: Turning B 270 degrees clockwise puts the letter K on the joining west edge and leaves R facing east, so the R connectors do not meet.
Question 22 of 40 · medium
A fixed plate A carries port M on its north side. A second plate B, seen from above, is marked M (top), K (right), S (bottom), and V (left). B can be rotated in 90 degree steps but never turned over. In which picture do the two M connectors line up across the joint?
Show the answer
Answer: A
A's port faces north, so the touching edge of B must face the opposite way, south, and that edge must carry M. B's M starts on its top (north) edge, and moving it north to east to south takes two clockwise quarter turns, so B must turn 180 degrees clockwise. Only that picture puts M on B's joining edge, against A's M.
A (correct): A 180 degree clockwise turn carries M from B's north edge to its south edge, right against A's M port.
B: Leaving B unturned puts the letter S on the joining south edge and leaves M facing north, so the M connectors do not meet.
C: Turning B 90 degrees clockwise puts the letter K on the joining south edge and leaves M facing east, so the M connectors do not meet.
D: Turning B 270 degrees clockwise puts the letter V on the joining south edge and leaves M facing west, so the M connectors do not meet.
Question 23 of 40 · medium
Port P is on the west edge of plate A, which does not move. Plate B stays face-up; its edges read R at the top, P at the right, T at the bottom, and L at the left. Turning B by multiples of 90 degrees is allowed, flipping is not. Which picture joins B's P to A's P?
Show the answer
Answer: D
A's port faces west, so the touching edge of B must face the opposite way, east, and that edge must carry P. B's P is already on its right (east) edge, so B needs no turn at all; it slides straight into place. Only that picture puts P on B's joining edge, against A's P.
A: Turning B 270 degrees clockwise puts the letter T on the joining east edge and leaves P facing north, so the P connectors do not meet.
B: Turning B 90 degrees clockwise puts the letter R on the joining east edge and leaves P facing south, so the P connectors do not meet.
C: Turning B 180 degrees clockwise puts the letter L on the joining east edge and leaves P facing west, so the P connectors do not meet.
D (correct): Left unturned, B already has P on its east edge, so it meets A's P port directly.
Question 24 of 40 · medium
Plate A stays put, with its Q port on the south edge. Plate B has Q on its top edge, J on its right edge, M on its bottom edge, and R on its left edge. If B may only be spun a quarter turn at a time and must stay face-up, which picture correctly mates the matching Q connectors?
Show the answer
Answer: A
A's port faces south, so the touching edge of B must face the opposite way, north, and that edge must carry Q. B's Q is already on its top (north) edge, so B needs no turn at all; it slides straight into place. Only that picture puts Q on B's joining edge, against A's Q.
A (correct): Left unturned, B already has Q on its north edge, so it meets A's Q port directly.
B: Turning B 180 degrees clockwise puts the letter M on the joining north edge and leaves Q facing south, so the Q connectors do not meet.
C: Turning B 270 degrees clockwise puts the letter J on the joining north edge and leaves Q facing west, so the Q connectors do not meet.
D: Turning B 90 degrees clockwise puts the letter R on the joining north edge and leaves Q facing east, so the Q connectors do not meet.
Question 25 of 40 · medium
Fixed plate A has port X facing north. Plate B starts with top B, right X, bottom N, left C. You may rotate B in 90 degree steps, but you may not flip it. Which picture puts B's X edge against A's X port?
Show the answer
Answer: D
A's port faces north, so the touching edge of B must face the opposite way, south, and that edge must carry X. B's X starts on its right (east) edge, and moving it east to south takes one clockwise quarter turn, so B must turn 90 degrees clockwise. Only that picture puts X on B's joining edge, against A's X.
A: Leaving B unturned puts the letter N on the joining south edge and leaves X facing east, so the X connectors do not meet.
B: Turning B 180 degrees clockwise puts the letter B on the joining south edge and leaves X facing west, so the X connectors do not meet.
C: Turning B 270 degrees clockwise puts the letter C on the joining south edge and leaves X facing north, so the X connectors do not meet.
D (correct): A 90 degree clockwise turn carries X from B's east edge to its south edge, right against A's X port.
Question 26 of 40 · medium
Two square plates must join at a single port. Plate A is held still and its port, H, points east. Plate B shows T along its top, H along its right side, G along its bottom, and P along its left side. B must stay face-up and can turn only by whole quarter turns. Which picture shows the H connectors joined?
Show the answer
Answer: C
A's port faces east, so the touching edge of B must face the opposite way, west, and that edge must carry H. B's H starts on its right (east) edge, and moving it east to south to west takes two clockwise quarter turns, so B must turn 180 degrees clockwise. Only that picture puts H on B's joining edge, against A's H.
A: Leaving B unturned puts the letter P on the joining west edge and leaves H facing east, so the H connectors do not meet.
B: Turning B 270 degrees clockwise puts the letter T on the joining west edge and leaves H facing north, so the H connectors do not meet.
C (correct): A 180 degree clockwise turn carries H from B's east edge to its west edge, right against A's H port.
D: Turning B 90 degrees clockwise puts the letter G on the joining west edge and leaves H facing south, so the H connectors do not meet.
Question 27 of 40 · medium
Viewed from above, plate B reads H, L, S, Y on its top, right, bottom, and left edges. It has to be fitted to plate A, which cannot move and has port S on its south edge. Without flipping B, and turning it only in 90 degree steps, which picture gets the matching letters to touch?
Show the answer
Answer: C
A's port faces south, so the touching edge of B must face the opposite way, north, and that edge must carry S. B's S starts on its bottom (south) edge, and moving it south to west to north takes two clockwise quarter turns, so B must turn 180 degrees clockwise. Only that picture puts S on B's joining edge, against A's S.
A: Leaving B unturned puts the letter H on the joining north edge and leaves S facing south, so the S connectors do not meet.
B: Turning B 270 degrees clockwise puts the letter L on the joining north edge and leaves S facing east, so the S connectors do not meet.
C (correct): A 180 degree clockwise turn carries S from B's south edge to its north edge, right against A's S port.
D: Turning B 90 degrees clockwise puts the letter Y on the joining north edge and leaves S facing west, so the S connectors do not meet.
Question 28 of 40 · medium
An assembler must attach plate B to plate A. A is clamped down; its D connector is on its west edge. B's top edge says D, its right edge T, its bottom edge Q, and its left edge M. The assembler may rotate B a quarter turn at a time but cannot turn it upside down. Which picture shows a correct join?
Show the answer
Answer: D
A's port faces west, so the touching edge of B must face the opposite way, east, and that edge must carry D. B's D starts on its top (north) edge, and moving it north to east takes one clockwise quarter turn, so B must turn 90 degrees clockwise. Only that picture puts D on B's joining edge, against A's D.
A: Turning B 180 degrees clockwise puts the letter M on the joining east edge and leaves D facing south, so the D connectors do not meet.
B: Turning B 270 degrees clockwise puts the letter Q on the joining east edge and leaves D facing west, so the D connectors do not meet.
C: Leaving B unturned puts the letter T on the joining east edge and leaves D facing north, so the D connectors do not meet.
D (correct): A 90 degree clockwise turn carries D from B's north edge to its east edge, right against A's D port.
Question 29 of 40 · medium
Letter V marks the port on the east edge of fixed plate A. On plate B, the edge letters are W (top), T (right), V (bottom), R (left). B keeps its printed face up and turns only in 90 degree steps. Which picture shows B oriented so the V edges touch?
Show the answer
Answer: B
A's port faces east, so the touching edge of B must face the opposite way, west, and that edge must carry V. B's V starts on its bottom (south) edge, and moving it south to west takes one clockwise quarter turn, so B must turn 90 degrees clockwise. Only that picture puts V on B's joining edge, against A's V.
A: Turning B 180 degrees clockwise puts the letter T on the joining west edge and leaves V facing north, so the V connectors do not meet.
B (correct): A 90 degree clockwise turn carries V from B's south edge to its west edge, right against A's V port.
C: Leaving B unturned puts the letter R on the joining west edge and leaves V facing south, so the V connectors do not meet.
D: Turning B 270 degrees clockwise puts the letter W on the joining west edge and leaves V facing east, so the V connectors do not meet.
Question 30 of 40 · medium
Each picture shows plate B turned some amount before being pushed against plate A. A never moves and has port F on its north side. Before turning, B is labeled Z on top, F on the right, K on the bottom, and N on the left. No flipping is allowed. Which picture correctly connects port F?
Show the answer
Answer: C
A's port faces north, so the touching edge of B must face the opposite way, south, and that edge must carry F. B's F starts on its right (east) edge, and moving it east to south takes one clockwise quarter turn, so B must turn 90 degrees clockwise. Only that picture puts F on B's joining edge, against A's F.
A: Leaving B unturned puts the letter K on the joining south edge and leaves F facing east, so the F connectors do not meet.
B: Turning B 270 degrees clockwise puts the letter N on the joining south edge and leaves F facing north, so the F connectors do not meet.
C (correct): A 90 degree clockwise turn carries F from B's east edge to its south edge, right against A's F port.
D: Turning B 180 degrees clockwise puts the letter Z on the joining south edge and leaves F facing west, so the F connectors do not meet.
Question 31 of 40 · medium
Plate A, which is fixed, offers port J on its west edge. Plate B lies printed side up with C at the top, L at the right, P at the bottom, and J at the left. Allowed moves for B are quarter-turn rotations and sliding; flipping is not allowed. In which picture is B's J seated against A's J?
Show the answer
Answer: B
A's port faces west, so the touching edge of B must face the opposite way, east, and that edge must carry J. B's J starts on its left (west) edge, and moving it west to north to east takes two clockwise quarter turns, so B must turn 180 degrees clockwise. Only that picture puts J on B's joining edge, against A's J.
A: Turning B 270 degrees clockwise puts the letter P on the joining east edge and leaves J facing south, so the J connectors do not meet.
B (correct): A 180 degree clockwise turn carries J from B's west edge to its east edge, right against A's J port.
C: Turning B 90 degrees clockwise puts the letter C on the joining east edge and leaves J facing north, so the J connectors do not meet.
D: Leaving B unturned puts the letter L on the joining east edge and leaves J facing west, so the J connectors do not meet.
Question 32 of 40 · medium
A wiring panel A is bolted in place with connector B on its south edge. A small module B, face-up, has connectors G, B, D, and H on its top, right, bottom, and left edges. The module may be rotated in 90 degree steps but not flipped over. Which picture plugs the module's B into the panel's B?
Show the answer
Answer: B
A's port faces south, so the touching edge of B must face the opposite way, north, and that edge must carry B. B's B starts on its right (east) edge, and moving it east to south to west to north takes three clockwise quarter turns, so B must turn 270 degrees clockwise (the same as one quarter turn counterclockwise). Only that picture puts B on B's joining edge, against A's B.
A: Leaving B unturned puts the letter G on the joining north edge and leaves B facing east, so the B connectors do not meet.
B (correct): A 270 degree clockwise turn carries B from B's east edge to its north edge, right against A's B port.
C: Turning B 180 degrees clockwise puts the letter D on the joining north edge and leaves B facing west, so the B connectors do not meet.
D: Turning B 90 degrees clockwise puts the letter H on the joining north edge and leaves B facing south, so the B connectors do not meet.
Question 33 of 40 · hard
Plate B must be placed beside fixed plate A so that the two U marks meet. A's U is on its east edge. B's letters, going top, right, bottom, left, are U, A, W, R. B may be turned clockwise or counterclockwise in quarter turns but stays face-up. Which picture is correct?
Show the answer
Answer: A
A's port faces east, so the touching edge of B must face the opposite way, west, and that edge must carry U. B's U starts on its top (north) edge, and moving it north to east to south to west takes three clockwise quarter turns, so B must turn 270 degrees clockwise (the same as one quarter turn counterclockwise). Only that picture puts U on B's joining edge, against A's U.
A (correct): A 270 degree clockwise turn carries U from B's north edge to its west edge, right against A's U port.
B: Turning B 180 degrees clockwise puts the letter A on the joining west edge and leaves U facing south, so the U connectors do not meet.
C: Leaving B unturned puts the letter R on the joining west edge and leaves U facing north, so the U connectors do not meet.
D: Turning B 90 degrees clockwise puts the letter W on the joining west edge and leaves U facing east, so the U connectors do not meet.
Question 34 of 40 · hard
In this assembly, plate A does not move and its port Y sits on the west edge. Plate B carries P on the top, C on the right, Y on the bottom, and G on the left. Using only 90 degree turns and no flips, which picture brings B's Y edge flush against A's port?
Show the answer
Answer: D
A's port faces west, so the touching edge of B must face the opposite way, east, and that edge must carry Y. B's Y starts on its bottom (south) edge, and moving it south to west to north to east takes three clockwise quarter turns, so B must turn 270 degrees clockwise (the same as one quarter turn counterclockwise). Only that picture puts Y on B's joining edge, against A's Y.
A: Turning B 90 degrees clockwise puts the letter P on the joining east edge and leaves Y facing west, so the Y connectors do not meet.
B: Leaving B unturned puts the letter C on the joining east edge and leaves Y facing south, so the Y connectors do not meet.
C: Turning B 180 degrees clockwise puts the letter G on the joining east edge and leaves Y facing north, so the Y connectors do not meet.
D (correct): A 270 degree clockwise turn carries Y from B's south edge to its east edge, right against A's Y port.
Question 35 of 40 · hard
A tile labeled Q on top, V on the right, T on the bottom, and J on the left is plate B. It must connect to fixed plate A, whose port T lies on its north edge. B can be rotated in steps of 90 degrees but must stay face-up. Which picture shows the T contacts meeting?
Show the answer
Answer: B
A's port faces north, so the touching edge of B must face the opposite way, south, and that edge must carry T. B's T is already on its bottom (south) edge, so B needs no turn at all; it slides straight into place. Only that picture puts T on B's joining edge, against A's T.
A: Turning B 270 degrees clockwise puts the letter J on the joining south edge and leaves T facing east, so the T connectors do not meet.
B (correct): Left unturned, B already has T on its south edge, so it meets A's T port directly.
C: Turning B 90 degrees clockwise puts the letter V on the joining south edge and leaves T facing west, so the T connectors do not meet.
D: Turning B 180 degrees clockwise puts the letter Q on the joining south edge and leaves T facing north, so the T connectors do not meet.
Question 36 of 40 · hard
Fixed plate A: port N on the south edge. Plate B, face-up: N top, R right, S bottom, M left. B may turn only in 90 degree steps and may not be flipped. Which picture shows B turned so its N touches A's N?
Show the answer
Answer: A
A's port faces south, so the touching edge of B must face the opposite way, north, and that edge must carry N. B's N is already on its top (north) edge, so B needs no turn at all; it slides straight into place. Only that picture puts N on B's joining edge, against A's N.
A (correct): Left unturned, B already has N on its north edge, so it meets A's N port directly.
B: Turning B 270 degrees clockwise puts the letter R on the joining north edge and leaves N facing west, so the N connectors do not meet.
C: Turning B 180 degrees clockwise puts the letter S on the joining north edge and leaves N facing south, so the N connectors do not meet.
D: Turning B 90 degrees clockwise puts the letter M on the joining north edge and leaves N facing east, so the N connectors do not meet.
Question 37 of 40 · hard
Plate A is anchored, and the only port on it, L, is on its east edge. Plate B starts out with P on the top edge, L on the right edge, C on the bottom edge, and H on the left edge. Keeping B face-up and rotating it only by quarter turns, which picture makes the L connection?
Show the answer
Answer: D
A's port faces east, so the touching edge of B must face the opposite way, west, and that edge must carry L. B's L starts on its right (east) edge, and moving it east to south to west takes two clockwise quarter turns, so B must turn 180 degrees clockwise. Only that picture puts L on B's joining edge, against A's L.
A: Turning B 90 degrees clockwise puts the letter C on the joining west edge and leaves L facing south, so the L connectors do not meet.
B: Leaving B unturned puts the letter H on the joining west edge and leaves L facing east, so the L connectors do not meet.
C: Turning B 270 degrees clockwise puts the letter P on the joining west edge and leaves L facing north, so the L connectors do not meet.
D (correct): A 180 degree clockwise turn carries L from B's east edge to its west edge, right against A's L port.
Question 38 of 40 · hard
Before it is turned, plate B has W across its top, S down its right side, E across its bottom, and K down its left side. It must be joined to fixed plate A at A's port W, found on A's west edge. B may not be flipped, and it turns only in 90 degree steps. Which picture shows the matching connectors joined?
Show the answer
Answer: B
A's port faces west, so the touching edge of B must face the opposite way, east, and that edge must carry W. B's W starts on its top (north) edge, and moving it north to east takes one clockwise quarter turn, so B must turn 90 degrees clockwise. Only that picture puts W on B's joining edge, against A's W.
A: Turning B 270 degrees clockwise puts the letter E on the joining east edge and leaves W facing west, so the W connectors do not meet.
B (correct): A 90 degree clockwise turn carries W from B's north edge to its east edge, right against A's W port.
C: Leaving B unturned puts the letter S on the joining east edge and leaves W facing north, so the W connectors do not meet.
D: Turning B 180 degrees clockwise puts the letter K on the joining east edge and leaves W facing south, so the W connectors do not meet.
Question 39 of 40 · hard
A technician holds plate A still; its port C is on the north edge. Plate B, printed side up, shows R on top, C on its right, H on its bottom, and S on its left. The technician can turn B by 90, 180, or 270 degrees, or not at all, but cannot flip it. Which picture joins the two C connectors?
Show the answer
Answer: C
A's port faces north, so the touching edge of B must face the opposite way, south, and that edge must carry C. B's C starts on its right (east) edge, and moving it east to south takes one clockwise quarter turn, so B must turn 90 degrees clockwise. Only that picture puts C on B's joining edge, against A's C.
A: Turning B 270 degrees clockwise puts the letter S on the joining south edge and leaves C facing north, so the C connectors do not meet.
B: Turning B 180 degrees clockwise puts the letter R on the joining south edge and leaves C facing west, so the C connectors do not meet.
C (correct): A 90 degree clockwise turn carries C from B's east edge to its south edge, right against A's C port.
D: Leaving B unturned puts the letter H on the joining south edge and leaves C facing east, so the C connectors do not meet.
Question 40 of 40 · hard
To complete the joint, port M on the south edge of fixed plate A must touch the M on plate B. B, lying face-up, has F on top, M on the right, N on the bottom, and L on the left. Only quarter-turn rotations of B are allowed. Which picture shows the joint made correctly?
Show the answer
Answer: A
A's port faces south, so the touching edge of B must face the opposite way, north, and that edge must carry M. B's M starts on its right (east) edge, and moving it east to south to west to north takes three clockwise quarter turns, so B must turn 270 degrees clockwise (the same as one quarter turn counterclockwise). Only that picture puts M on B's joining edge, against A's M.
A (correct): A 270 degree clockwise turn carries M from B's east edge to its north edge, right against A's M port.
B: Leaving B unturned puts the letter F on the joining north edge and leaves M facing east, so the M connectors do not meet.
C: Turning B 180 degrees clockwise puts the letter N on the joining north edge and leaves M facing west, so the M connectors do not meet.
D: Turning B 90 degrees clockwise puts the letter L on the joining north edge and leaves M facing south, so the M connectors do not meet.
The left box shows two shapes, each with a lettered point, and a line with the same two letters on its ends. Which figure shows how the shapes connect when each end of the line is attached to the point with the same letter?
Show the answer
Answer: D
Check one letter at a time. Point R is at the middle of a long side of the rectangle, and point S is at a corner of the long side of the trapezoid. Cross out any figure where either end of the line lands somewhere else or where a shape has changed. The shapes may be turned, so find each point by its place on the shape (corner, middle of a side, center), not by up, down, left or right.
A: The line ends in the wrong place: it meets the trapezoid at the middle of a slanted side, but point S is at a corner of the long side.
B: The line ends in the wrong place: it meets the rectangle at a corner, but point R is at the middle of a long side.
C: The line ends in the wrong place: it meets the rectangle at the center, but point R is at the middle of a long side and it meets the trapezoid at the middle of a slanted side, but point S is at a corner of the long side.
D (correct): The line joins the middle of a long side of the rectangle to a corner of the long side of the trapezoid, the same spots as points R and S in the left box; turning a shape does not move a point on it.
Practice 2 of 80 · hard
The left box shows two shapes, each with a lettered point, and a line with the same two letters on its ends. Which figure shows how the shapes connect when each end of the line is attached to the point with the same letter?
Show the answer
Answer: D
Check one letter at a time. Point E is at the middle of a long side of the rectangle, and point F is at the middle of a wall of the house shape. Cross out any figure where either end of the line lands somewhere else or where a shape has changed. The shapes may be turned, so find each point by its place on the shape (corner, middle of a side, center), not by up, down, left or right.
A: The line ends in the wrong place: it meets the rectangle at a corner, but point E is at the middle of a long side.
B: The line ends in the wrong place: it meets the rectangle at the middle of a short side, but point E is at the middle of a long side.
C: One of the shapes here is a parallelogram, but the left box has a rectangle. Joining parts never changes a shape.
D (correct): The line joins the middle of a long side of the rectangle to the middle of a wall of the house shape, the same spots as points E and F in the left box; turning a shape does not move a point on it.
Practice 3 of 80 · hard
The left box shows two shapes, each with a lettered point, and a line with the same two letters on its ends. Which figure shows how the shapes connect when each end of the line is attached to the point with the same letter?
Show the answer
Answer: C
Check one letter at a time. Point T is at the middle of a slanted side of the trapezoid, and point U is at the middle of a side of the triangle. Cross out any figure where either end of the line lands somewhere else or where a shape has changed. The shapes may be turned, so find each point by its place on the shape (corner, middle of a side, center), not by up, down, left or right.
A: The line ends in the wrong place: it meets the trapezoid at a corner of the long side, but point T is at the middle of a slanted side and it meets the triangle at a corner, but point U is at the middle of a side.
B: The line ends in the wrong place: it meets the trapezoid at the middle of the short side, but point T is at the middle of a slanted side.
C (correct): The line joins the middle of a slanted side of the trapezoid to the middle of a side of the triangle, the same spots as points T and U in the left box; turning a shape does not move a point on it.
D: The line ends in the wrong place: it meets the triangle at the center, but point U is at the middle of a side.
Practice 4 of 80 · medium
The left box shows two shapes, each with a lettered point, and a line with the same two letters on its ends. Which figure shows how the shapes connect when each end of the line is attached to the point with the same letter?
Show the answer
Answer: A
Check one letter at a time. Point M is at the sharpest corner of the right triangle, and point N is at a corner of the flat side of the half-circle. Cross out any figure where either end of the line lands somewhere else or where a shape has changed. The shapes may be turned, so find each point by its place on the shape (corner, middle of a side, center), not by up, down, left or right.
A (correct): The line joins the sharpest corner of the right triangle to a corner of the flat side of the half-circle, the same spots as points M and N in the left box; turning a shape does not move a point on it.
B: The line ends in the wrong place: it meets the half-circle at the top of the curved side, but point N is at a corner of the flat side.
C: The line ends in the wrong place: it meets the right triangle at the middle of the longer leg, but point M is at the sharpest corner.
D: The line ends in the wrong place: it meets the right triangle at the middle of the shorter leg, but point M is at the sharpest corner.
Practice 5 of 80 · medium
The left box shows two shapes, each with a lettered point, and a line with the same two letters on its ends. Which figure shows how the shapes connect when each end of the line is attached to the point with the same letter?
Show the answer
Answer: B
Check one letter at a time. Point G is at a corner of the triangle, and point H is at a sharp corner of the parallelogram. Cross out any figure where either end of the line lands somewhere else or where a shape has changed. The shapes may be turned, so find each point by its place on the shape (corner, middle of a side, center), not by up, down, left or right.
A: The line ends in the wrong place: it meets the triangle at the middle of a side, but point G is at a corner and it meets the parallelogram at the middle of a short side, but point H is at a sharp corner.
B (correct): The line joins a corner of the triangle to a sharp corner of the parallelogram, the same spots as points G and H in the left box; turning a shape does not move a point on it.
C: The line ends in the wrong place: it meets the parallelogram at the middle of a long side, but point H is at a sharp corner.
D: The line ends in the wrong place: it meets the parallelogram at the middle of a short side, but point H is at a sharp corner.
Practice 6 of 80 · medium
The left box shows two shapes, each with a lettered point, and a line with the same two letters on its ends. Which figure shows how the shapes connect when each end of the line is attached to the point with the same letter?
Show the answer
Answer: D
Check one letter at a time. Point M is at the middle of the slanted side of the right triangle, and point N is at the middle of a slanted side of the trapezoid. Cross out any figure where either end of the line lands somewhere else or where a shape has changed. The shapes may be turned, so find each point by its place on the shape (corner, middle of a side, center), not by up, down, left or right.
A: The line ends in the wrong place: it meets the trapezoid at the middle of the long side, but point N is at the middle of a slanted side.
B: The line ends in the wrong place: it meets the right triangle at the middle of the longer leg, but point M is at the middle of the slanted side and it meets the trapezoid at a corner of the long side, but point N is at the middle of a slanted side.
C: The line ends in the wrong place: it meets the trapezoid at a corner of the long side, but point N is at the middle of a slanted side.
D (correct): The line joins the middle of the slanted side of the right triangle to the middle of a slanted side of the trapezoid, the same spots as points M and N in the left box; turning a shape does not move a point on it.
Practice 7 of 80 · easy
The left box shows two shapes, each with a lettered point, and a line with the same two letters on its ends. Which figure shows how the shapes connect when each end of the line is attached to the point with the same letter?
Show the answer
Answer: D
Check one letter at a time. Point G is at the top of the curved side of the half-circle, and point H is at a corner of the hexagon. Cross out any figure where either end of the line lands somewhere else or where a shape has changed. The shapes may be turned, so find each point by its place on the shape (corner, middle of a side, center), not by up, down, left or right.
A: The line ends in the wrong place: it meets the hexagon at the middle of a side, but point H is at a corner.
B: The line ends in the wrong place: it meets the half-circle at a corner of the flat side, but point G is at the top of the curved side.
C: The line ends in the wrong place: it meets the half-circle at a corner of the flat side, but point G is at the top of the curved side and it meets the hexagon at the middle of a side, but point H is at a corner.
D (correct): The line joins the top of the curved side of the half-circle to a corner of the hexagon, the same spots as points G and H in the left box; turning a shape does not move a point on it.
Practice 8 of 80 · medium
The left box shows two shapes, each with a lettered point, and a line with the same two letters on its ends. Which figure shows how the shapes connect when each end of the line is attached to the point with the same letter?
Show the answer
Answer: C
Check one letter at a time. Point P is at the center of the rectangle, and point Q is at the middle of the longer leg of the right triangle. Cross out any figure where either end of the line lands somewhere else or where a shape has changed. The shapes may be turned, so find each point by its place on the shape (corner, middle of a side, center), not by up, down, left or right.
A: The line ends in the wrong place: it meets the right triangle at the sharpest corner, but point Q is at the middle of the longer leg.
B: One of the shapes here is a parallelogram, but the left box has a rectangle. Joining parts never changes a shape.
C (correct): The line joins the center of the rectangle to the middle of the longer leg of the right triangle, the same spots as points P and Q in the left box; turning a shape does not move a point on it.
D: The line ends in the wrong place: it meets the right triangle at the middle of the slanted side, but point Q is at the middle of the longer leg.
Practice 9 of 80 · easy
The left box shows two shapes, each with a lettered point, and a line with the same two letters on its ends. Which figure shows how the shapes connect when each end of the line is attached to the point with the same letter?
Show the answer
Answer: A
Check one letter at a time. Point X is at the center of the triangle, and point Y is at the middle of a long side of the rectangle. Cross out any figure where either end of the line lands somewhere else or where a shape has changed. The shapes may be turned, so find each point by its place on the shape (corner, middle of a side, center), not by up, down, left or right.
A (correct): The line joins the center of the triangle to the middle of a long side of the rectangle, the same spots as points X and Y in the left box; turning a shape does not move a point on it.
B: The line ends in the wrong place: it meets the triangle at the middle of a side, but point X is at the center.
C: The line ends in the wrong place: it meets the triangle at the middle of a side, but point X is at the center and it meets the rectangle at the middle of a short side, but point Y is at the middle of a long side.
D: The line ends in the wrong place: it meets the rectangle at the center, but point Y is at the middle of a long side.
Practice 10 of 80 · hard
The left box shows two shapes, each with a lettered point, and a line with the same two letters on its ends. Which figure shows how the shapes connect when each end of the line is attached to the point with the same letter?
Show the answer
Answer: C
Check one letter at a time. Point V is at a corner where the roof meets a wall of the house shape, and point W is at the sharpest corner of the right triangle. Cross out any figure where either end of the line lands somewhere else or where a shape has changed. The shapes may be turned, so find each point by its place on the shape (corner, middle of a side, center), not by up, down, left or right.
A: The line ends in the wrong place: it meets the right triangle at the middle of the slanted side, but point W is at the sharpest corner.
B: The line ends in the wrong place: it meets the house shape at the middle of a wall, but point V is at a corner where the roof meets a wall.
C (correct): The line joins a corner where the roof meets a wall of the house shape to the sharpest corner of the right triangle, the same spots as points V and W in the left box; turning a shape does not move a point on it.
D: The line ends in the wrong place: it meets the house shape at the middle of the bottom side, but point V is at a corner where the roof meets a wall and it meets the right triangle at the middle of the slanted side, but point W is at the sharpest corner.
Practice 11 of 80 · medium
The left box shows two shapes, each with a lettered point, and a line with the same two letters on its ends. Which figure shows how the shapes connect when each end of the line is attached to the point with the same letter?
Show the answer
Answer: A
Check one letter at a time. Point R is at a corner of the short side of the trapezoid, and point S is at the center of the rectangle. Cross out any figure where either end of the line lands somewhere else or where a shape has changed. The shapes may be turned, so find each point by its place on the shape (corner, middle of a side, center), not by up, down, left or right.
A (correct): The line joins a corner of the short side of the trapezoid to the center of the rectangle, the same spots as points R and S in the left box; turning a shape does not move a point on it.
B: The line ends in the wrong place: it meets the trapezoid at a corner of the long side, but point R is at a corner of the short side.
C: One of the shapes here is a square, but the left box has a rectangle. Joining parts never changes a shape.
D: The line ends in the wrong place: it meets the rectangle at a corner, but point S is at the center.
Practice 12 of 80 · hard
The left box shows two shapes, each with a lettered point, and a line with the same two letters on its ends. Which figure shows how the shapes connect when each end of the line is attached to the point with the same letter?
Show the answer
Answer: B
Check one letter at a time. Point J is at the middle of a side of the diamond, and point K is at the middle of a side of the square. Cross out any figure where either end of the line lands somewhere else or where a shape has changed. The shapes may be turned, so find each point by its place on the shape (corner, middle of a side, center), not by up, down, left or right.
A: The line ends in the wrong place: it meets the diamond at a wide corner, but point J is at the middle of a side and it meets the square at a corner, but point K is at the middle of a side.
B (correct): The line joins the middle of a side of the diamond to the middle of a side of the square, the same spots as points J and K in the left box; turning a shape does not move a point on it.
C: The line ends in the wrong place: it meets the diamond at a wide corner, but point J is at the middle of a side.
D: The line ends in the wrong place: it meets the square at the center, but point K is at the middle of a side.
Practice 13 of 80 · easy
The left box shows two shapes, each with a lettered point, and a line with the same two letters on its ends. Which figure shows how the shapes connect when each end of the line is attached to the point with the same letter?
Show the answer
Answer: B
Check one letter at a time. Point V is at a corner of the pentagon, and point W is at a corner of the long side of the trapezoid. Cross out any figure where either end of the line lands somewhere else or where a shape has changed. The shapes may be turned, so find each point by its place on the shape (corner, middle of a side, center), not by up, down, left or right.
A: The line ends in the wrong place: it meets the pentagon at the middle of a side, but point V is at a corner and it meets the trapezoid at the middle of the long side, but point W is at a corner of the long side.
B (correct): The line joins a corner of the pentagon to a corner of the long side of the trapezoid, the same spots as points V and W in the left box; turning a shape does not move a point on it.
C: The line ends in the wrong place: it meets the trapezoid at the middle of a slanted side, but point W is at a corner of the long side.
D: The line ends in the wrong place: it meets the pentagon at the center, but point V is at a corner.
Practice 14 of 80 · easy
The left box shows two shapes, each with a lettered point, and a line with the same two letters on its ends. Which figure shows how the shapes connect when each end of the line is attached to the point with the same letter?
Show the answer
Answer: C
Check one letter at a time. Point J is at the top of the curved side of the half-circle, and point K is at a corner of the short side of the trapezoid. Cross out any figure where either end of the line lands somewhere else or where a shape has changed. The shapes may be turned, so find each point by its place on the shape (corner, middle of a side, center), not by up, down, left or right.
A: The line ends in the wrong place: it meets the half-circle at a corner of the flat side, but point J is at the top of the curved side and it meets the trapezoid at the middle of the short side, but point K is at a corner of the short side.
B: The line ends in the wrong place: it meets the trapezoid at a corner of the long side, but point K is at a corner of the short side.
C (correct): The line joins the top of the curved side of the half-circle to a corner of the short side of the trapezoid, the same spots as points J and K in the left box; turning a shape does not move a point on it.
D: The line ends in the wrong place: it meets the half-circle at the middle of the flat side, but point J is at the top of the curved side.
Practice 15 of 80 · hard
The left box shows two shapes, each with a lettered point, and a line with the same two letters on its ends. Which figure shows how the shapes connect when each end of the line is attached to the point with the same letter?
Show the answer
Answer: B
Check one letter at a time. Point M is at the center of the pentagon, and point N is at the middle of a long side of the parallelogram. Cross out any figure where either end of the line lands somewhere else or where a shape has changed. The shapes may be turned, so find each point by its place on the shape (corner, middle of a side, center), not by up, down, left or right.
A: One of the shapes here is a rectangle, but the left box has a parallelogram. Joining parts never changes a shape.
B (correct): The line joins the center of the pentagon to the middle of a long side of the parallelogram, the same spots as points M and N in the left box; turning a shape does not move a point on it.
C: The line ends in the wrong place: it meets the parallelogram at the center, but point N is at the middle of a long side.
D: The line ends in the wrong place: it meets the parallelogram at a wide corner, but point N is at the middle of a long side.
Practice 16 of 80 · medium
The left box shows two shapes, each with a lettered point, and a line with the same two letters on its ends. Which figure shows how the shapes connect when each end of the line is attached to the point with the same letter?
Show the answer
Answer: D
Check one letter at a time. Point E is at the middle of a short side of the rectangle, and point F is at a corner of the hexagon. Cross out any figure where either end of the line lands somewhere else or where a shape has changed. The shapes may be turned, so find each point by its place on the shape (corner, middle of a side, center), not by up, down, left or right.
A: The line ends in the wrong place: it meets the hexagon at the middle of a side, but point F is at a corner.
B: The line ends in the wrong place: it meets the rectangle at the middle of a long side, but point E is at the middle of a short side.
C: One of the shapes here is a parallelogram, but the left box has a rectangle. Joining parts never changes a shape.
D (correct): The line joins the middle of a short side of the rectangle to a corner of the hexagon, the same spots as points E and F in the left box; turning a shape does not move a point on it.
Practice 17 of 80 · easy
The left box shows two shapes, each with a lettered point, and a line with the same two letters on its ends. Which figure shows how the shapes connect when each end of the line is attached to the point with the same letter?
Show the answer
Answer: C
Check one letter at a time. Point M is at the middle of the bottom side of the house shape, and point N is at the center of the pentagon. Cross out any figure where either end of the line lands somewhere else or where a shape has changed. The shapes may be turned, so find each point by its place on the shape (corner, middle of a side, center), not by up, down, left or right.
A: The line ends in the wrong place: it meets the house shape at the peak of the roof, but point M is at the middle of the bottom side.
B: The line ends in the wrong place: it meets the house shape at a corner where the roof meets a wall, but point M is at the middle of the bottom side and it meets the pentagon at a corner, but point N is at the center.
C (correct): The line joins the middle of the bottom side of the house shape to the center of the pentagon, the same spots as points M and N in the left box; turning a shape does not move a point on it.
D: The line ends in the wrong place: it meets the pentagon at the middle of a side, but point N is at the center.
Practice 18 of 80 · medium
The left box shows two shapes, each with a lettered point, and a line with the same two letters on its ends. Which figure shows how the shapes connect when each end of the line is attached to the point with the same letter?
Show the answer
Answer: B
Check one letter at a time. Point V is at the center of the triangle, and point W is at a sharp corner of the parallelogram. Cross out any figure where either end of the line lands somewhere else or where a shape has changed. The shapes may be turned, so find each point by its place on the shape (corner, middle of a side, center), not by up, down, left or right.
A: The line ends in the wrong place: it meets the parallelogram at the middle of a long side, but point W is at a sharp corner.
B (correct): The line joins the center of the triangle to a sharp corner of the parallelogram, the same spots as points V and W in the left box; turning a shape does not move a point on it.
C: The line ends in the wrong place: it meets the triangle at a corner, but point V is at the center and it meets the parallelogram at the center, but point W is at a sharp corner.
D: The line ends in the wrong place: it meets the parallelogram at the center, but point W is at a sharp corner.
Practice 19 of 80 · hard
The left box shows two shapes, each with a lettered point, and a line with the same two letters on its ends. Which figure shows how the shapes connect when each end of the line is attached to the point with the same letter?
Show the answer
Answer: C
Check one letter at a time. Point E is at a corner of the flat side of the half-circle, and point F is at the middle of the shorter leg of the right triangle. Cross out any figure where either end of the line lands somewhere else or where a shape has changed. The shapes may be turned, so find each point by its place on the shape (corner, middle of a side, center), not by up, down, left or right.
A: The line ends in the wrong place: it meets the half-circle at the top of the curved side, but point E is at a corner of the flat side.
B: The line ends in the wrong place: it meets the right triangle at the middle of the longer leg, but point F is at the middle of the shorter leg.
C (correct): The line joins a corner of the flat side of the half-circle to the middle of the shorter leg of the right triangle, the same spots as points E and F in the left box; turning a shape does not move a point on it.
D: The line ends in the wrong place: it meets the half-circle at the middle of the flat side, but point E is at a corner of the flat side and it meets the right triangle at the middle of the slanted side, but point F is at the middle of the shorter leg.
Practice 20 of 80 · medium
The left box shows two shapes, each with a lettered point, and a line with the same two letters on its ends. Which figure shows how the shapes connect when each end of the line is attached to the point with the same letter?
Show the answer
Answer: C
Check one letter at a time. Point E is at a corner of the pentagon, and point F is at a corner of the rectangle. Cross out any figure where either end of the line lands somewhere else or where a shape has changed. The shapes may be turned, so find each point by its place on the shape (corner, middle of a side, center), not by up, down, left or right.
A: The line ends in the wrong place: it meets the rectangle at the middle of a short side, but point F is at a corner.
B: One of the shapes here is a square, but the left box has a rectangle. Joining parts never changes a shape.
C (correct): The line joins a corner of the pentagon to a corner of the rectangle, the same spots as points E and F in the left box; turning a shape does not move a point on it.
D: The line ends in the wrong place: it meets the pentagon at the center, but point E is at a corner.
Practice 21 of 80 · medium
The left box shows two shapes, each with a lettered point, and a line with the same two letters on its ends. Which figure shows how the shapes connect when each end of the line is attached to the point with the same letter?
Show the answer
Answer: A
Check one letter at a time. Point G is at the middle of a side of the triangle, and point H is at the middle of a long side of the rectangle. Cross out any figure where either end of the line lands somewhere else or where a shape has changed. The shapes may be turned, so find each point by its place on the shape (corner, middle of a side, center), not by up, down, left or right.
A (correct): The line joins the middle of a side of the triangle to the middle of a long side of the rectangle, the same spots as points G and H in the left box; turning a shape does not move a point on it.
B: The line ends in the wrong place: it meets the triangle at the center, but point G is at the middle of a side.
C: One of the shapes here is a parallelogram, but the left box has a rectangle. Joining parts never changes a shape.
D: The line ends in the wrong place: it meets the rectangle at the center, but point H is at the middle of a long side.
Practice 22 of 80 · medium
The left box shows two shapes, each with a lettered point, and a line with the same two letters on its ends. Which figure shows how the shapes connect when each end of the line is attached to the point with the same letter?
Show the answer
Answer: B
Check one letter at a time. Point V is at the middle of a side of the pentagon, and point W is at the middle of the long side of the trapezoid. Cross out any figure where either end of the line lands somewhere else or where a shape has changed. The shapes may be turned, so find each point by its place on the shape (corner, middle of a side, center), not by up, down, left or right.
A: One of the shapes here is a hexagon, but the left box has a pentagon. Joining parts never changes a shape.
B (correct): The line joins the middle of a side of the pentagon to the middle of the long side of the trapezoid, the same spots as points V and W in the left box; turning a shape does not move a point on it.
C: The line ends in the wrong place: it meets the trapezoid at the middle of a slanted side, but point W is at the middle of the long side.
D: The line ends in the wrong place: it meets the trapezoid at a corner of the short side, but point W is at the middle of the long side.
Practice 23 of 80 · hard
The left box shows two shapes, each with a lettered point, and a line with the same two letters on its ends. Which figure shows how the shapes connect when each end of the line is attached to the point with the same letter?
Show the answer
Answer: A
Check one letter at a time. Point T is at a corner of the triangle, and point U is at the center of the square. Cross out any figure where either end of the line lands somewhere else or where a shape has changed. The shapes may be turned, so find each point by its place on the shape (corner, middle of a side, center), not by up, down, left or right.
A (correct): The line joins a corner of the triangle to the center of the square, the same spots as points T and U in the left box; turning a shape does not move a point on it.
B: The line ends in the wrong place: it meets the square at the middle of a side, but point U is at the center.
C: The line ends in the wrong place: it meets the triangle at the middle of a side, but point T is at a corner.
D: One of the shapes here is a rectangle, but the left box has a square. Joining parts never changes a shape.
Practice 24 of 80 · medium
The left box shows two shapes, each with a lettered point, and a line with the same two letters on its ends. Which figure shows how the shapes connect when each end of the line is attached to the point with the same letter?
Show the answer
Answer: C
Check one letter at a time. Point J is at a sharp corner of the parallelogram, and point K is at the middle of a short side of the rectangle. Cross out any figure where either end of the line lands somewhere else or where a shape has changed. The shapes may be turned, so find each point by its place on the shape (corner, middle of a side, center), not by up, down, left or right.
A: The line ends in the wrong place: it meets the parallelogram at the middle of a short side, but point J is at a sharp corner.
B: The line ends in the wrong place: it meets the parallelogram at the middle of a long side, but point J is at a sharp corner and it meets the rectangle at the middle of a long side, but point K is at the middle of a short side.
C (correct): The line joins a sharp corner of the parallelogram to the middle of a short side of the rectangle, the same spots as points J and K in the left box; turning a shape does not move a point on it.
D: The line ends in the wrong place: it meets the parallelogram at a wide corner, but point J is at a sharp corner.
Practice 25 of 80 · medium
The left box shows two shapes, each with a lettered point, and a line with the same two letters on its ends. Which figure shows how the shapes connect when each end of the line is attached to the point with the same letter?
Show the answer
Answer: A
Check one letter at a time. Point T is at a sharp corner of the diamond, and point U is at a corner of the short side of the trapezoid. Cross out any figure where either end of the line lands somewhere else or where a shape has changed. The shapes may be turned, so find each point by its place on the shape (corner, middle of a side, center), not by up, down, left or right.
A (correct): The line joins a sharp corner of the diamond to a corner of the short side of the trapezoid, the same spots as points T and U in the left box; turning a shape does not move a point on it.
B: The line ends in the wrong place: it meets the trapezoid at the middle of the short side, but point U is at a corner of the short side.
C: The line ends in the wrong place: it meets the diamond at the middle of a side, but point T is at a sharp corner.
D: The line ends in the wrong place: it meets the diamond at a wide corner, but point T is at a sharp corner and it meets the trapezoid at the middle of the long side, but point U is at a corner of the short side.
Practice 26 of 80 · medium
The left box shows two shapes, each with a lettered point, and a line with the same two letters on its ends. Which figure shows how the shapes connect when each end of the line is attached to the point with the same letter?
Show the answer
Answer: C
Check one letter at a time. Point J is at the middle of a side of the hexagon, and point K is at the middle of a short side of the parallelogram. Cross out any figure where either end of the line lands somewhere else or where a shape has changed. The shapes may be turned, so find each point by its place on the shape (corner, middle of a side, center), not by up, down, left or right.
A: The line ends in the wrong place: it meets the hexagon at a corner, but point J is at the middle of a side.
B: The line ends in the wrong place: it meets the parallelogram at a sharp corner, but point K is at the middle of a short side.
C (correct): The line joins the middle of a side of the hexagon to the middle of a short side of the parallelogram, the same spots as points J and K in the left box; turning a shape does not move a point on it.
D: One of the shapes here is a pentagon, but the left box has a hexagon. Joining parts never changes a shape.
Practice 27 of 80 · hard
The left box shows two shapes, each with a lettered point, and a line with the same two letters on its ends. Which figure shows how the shapes connect when each end of the line is attached to the point with the same letter?
Show the answer
Answer: A
Check one letter at a time. Point K is at the center of the pentagon, and point L is at a corner where the roof meets a wall of the house shape. Cross out any figure where either end of the line lands somewhere else or where a shape has changed. The shapes may be turned, so find each point by its place on the shape (corner, middle of a side, center), not by up, down, left or right.
A (correct): The line joins the center of the pentagon to a corner where the roof meets a wall of the house shape, the same spots as points K and L in the left box; turning a shape does not move a point on it.
B: The line ends in the wrong place: it meets the house shape at the peak of the roof, but point L is at a corner where the roof meets a wall.
C: The line ends in the wrong place: it meets the pentagon at a corner, but point K is at the center.
D: One of the shapes here is a hexagon, but the left box has a pentagon. Joining parts never changes a shape.
Practice 28 of 80 · hard
The left box shows two shapes, each with a lettered point, and a line with the same two letters on its ends. Which figure shows how the shapes connect when each end of the line is attached to the point with the same letter?
Show the answer
Answer: B
Check one letter at a time. Point E is at a corner of the pentagon, and point F is at a corner of the hexagon. Cross out any figure where either end of the line lands somewhere else or where a shape has changed. The shapes may be turned, so find each point by its place on the shape (corner, middle of a side, center), not by up, down, left or right.
A: The line ends in the wrong place: it meets the pentagon at the center, but point E is at a corner and it meets the hexagon at the middle of a side, but point F is at a corner.
B (correct): The line joins a corner of the pentagon to a corner of the hexagon, the same spots as points E and F in the left box; turning a shape does not move a point on it.
C: The line ends in the wrong place: it meets the pentagon at the center, but point E is at a corner.
D: The line ends in the wrong place: it meets the pentagon at the middle of a side, but point E is at a corner.
Practice 29 of 80 · hard
The left box shows two shapes, each with a lettered point, and a line with the same two letters on its ends. Which figure shows how the shapes connect when each end of the line is attached to the point with the same letter?
Show the answer
Answer: C
Check one letter at a time. Point E is at the center of the rectangle, and point F is at the middle of a side of the triangle. Cross out any figure where either end of the line lands somewhere else or where a shape has changed. The shapes may be turned, so find each point by its place on the shape (corner, middle of a side, center), not by up, down, left or right.
A: The line ends in the wrong place: it meets the rectangle at the middle of a short side, but point E is at the center.
B: One of the shapes here is a square, but the left box has a rectangle. Joining parts never changes a shape.
C (correct): The line joins the center of the rectangle to the middle of a side of the triangle, the same spots as points E and F in the left box; turning a shape does not move a point on it.
D: The line ends in the wrong place: it meets the triangle at a corner, but point F is at the middle of a side.
Practice 30 of 80 · medium
The left box shows two shapes, each with a lettered point, and a line with the same two letters on its ends. Which figure shows how the shapes connect when each end of the line is attached to the point with the same letter?
Show the answer
Answer: B
Check one letter at a time. Point V is at a corner where the roof meets a wall of the house shape, and point W is at the middle of a side of the square. Cross out any figure where either end of the line lands somewhere else or where a shape has changed. The shapes may be turned, so find each point by its place on the shape (corner, middle of a side, center), not by up, down, left or right.
A: The line ends in the wrong place: it meets the house shape at the peak of the roof, but point V is at a corner where the roof meets a wall.
B (correct): The line joins a corner where the roof meets a wall of the house shape to the middle of a side of the square, the same spots as points V and W in the left box; turning a shape does not move a point on it.
C: One of the shapes here is a diamond, but the left box has a square. Joining parts never changes a shape.
D: The line ends in the wrong place: it meets the house shape at the middle of a wall, but point V is at a corner where the roof meets a wall.
Practice 31 of 80 · hard
The left box shows two shapes, each with a lettered point, and a line with the same two letters on its ends. Which figure shows how the shapes connect when each end of the line is attached to the point with the same letter?
Show the answer
Answer: B
Check one letter at a time. Point J is at the middle of a side of the triangle, and point K is at the center of the parallelogram. Cross out any figure where either end of the line lands somewhere else or where a shape has changed. The shapes may be turned, so find each point by its place on the shape (corner, middle of a side, center), not by up, down, left or right.
A: The line ends in the wrong place: it meets the parallelogram at a sharp corner, but point K is at the center.
B (correct): The line joins the middle of a side of the triangle to the center of the parallelogram, the same spots as points J and K in the left box; turning a shape does not move a point on it.
C: The line ends in the wrong place: it meets the parallelogram at the middle of a short side, but point K is at the center.
D: One of the shapes here is a rectangle, but the left box has a parallelogram. Joining parts never changes a shape.
Practice 32 of 80 · medium
The left box shows two shapes, each with a lettered point, and a line with the same two letters on its ends. Which figure shows how the shapes connect when each end of the line is attached to the point with the same letter?
Show the answer
Answer: D
Check one letter at a time. Point T is at the center of the square, and point U is at a corner of the rectangle. Cross out any figure where either end of the line lands somewhere else or where a shape has changed. The shapes may be turned, so find each point by its place on the shape (corner, middle of a side, center), not by up, down, left or right.
A: One of the shapes here is a diamond, but the left box has a square. Joining parts never changes a shape.
B: The line ends in the wrong place: it meets the rectangle at the center, but point U is at a corner.
C: The line ends in the wrong place: it meets the square at a corner, but point T is at the center.
D (correct): The line joins the center of the square to a corner of the rectangle, the same spots as points T and U in the left box; turning a shape does not move a point on it.
Practice 33 of 80 · medium
The left box shows two shapes, each with a lettered point, and a line with the same two letters on its ends. Which figure shows how the shapes connect when each end of the line is attached to the point with the same letter?
Show the answer
Answer: C
Check one letter at a time. Point E is at the middle of the shorter leg of the right triangle, and point F is at the middle of a short side of the parallelogram. Cross out any figure where either end of the line lands somewhere else or where a shape has changed. The shapes may be turned, so find each point by its place on the shape (corner, middle of a side, center), not by up, down, left or right.
A: The line ends in the wrong place: it meets the right triangle at the sharpest corner, but point E is at the middle of the shorter leg.
B: The line ends in the wrong place: it meets the parallelogram at the middle of a long side, but point F is at the middle of a short side.
C (correct): The line joins the middle of the shorter leg of the right triangle to the middle of a short side of the parallelogram, the same spots as points E and F in the left box; turning a shape does not move a point on it.
D: One of the shapes here is a rectangle, but the left box has a parallelogram. Joining parts never changes a shape.
Practice 34 of 80 · medium
The left box shows two shapes, each with a lettered point, and a line with the same two letters on its ends. Which figure shows how the shapes connect when each end of the line is attached to the point with the same letter?
Show the answer
Answer: C
Check one letter at a time. Point J is at a corner of the rectangle, and point K is at the middle of the slanted side of the right triangle. Cross out any figure where either end of the line lands somewhere else or where a shape has changed. The shapes may be turned, so find each point by its place on the shape (corner, middle of a side, center), not by up, down, left or right.
A: The line ends in the wrong place: it meets the right triangle at the middle of the longer leg, but point K is at the middle of the slanted side.
B: One of the shapes here is a square, but the left box has a rectangle. Joining parts never changes a shape.
C (correct): The line joins a corner of the rectangle to the middle of the slanted side of the right triangle, the same spots as points J and K in the left box; turning a shape does not move a point on it.
D: The line ends in the wrong place: it meets the right triangle at the middle of the shorter leg, but point K is at the middle of the slanted side.
Practice 35 of 80 · medium
The left box shows two shapes, each with a lettered point, and a line with the same two letters on its ends. Which figure shows how the shapes connect when each end of the line is attached to the point with the same letter?
Show the answer
Answer: A
Check one letter at a time. Point M is at the center of the triangle, and point N is at the top of the curved side of the half-circle. Cross out any figure where either end of the line lands somewhere else or where a shape has changed. The shapes may be turned, so find each point by its place on the shape (corner, middle of a side, center), not by up, down, left or right.
A (correct): The line joins the center of the triangle to the top of the curved side of the half-circle, the same spots as points M and N in the left box; turning a shape does not move a point on it.
B: The line ends in the wrong place: it meets the triangle at the middle of a side, but point M is at the center.
C: The line ends in the wrong place: it meets the half-circle at a corner of the flat side, but point N is at the top of the curved side.
D: The line ends in the wrong place: it meets the triangle at the middle of a side, but point M is at the center and it meets the half-circle at a corner of the flat side, but point N is at the top of the curved side.
Practice 36 of 80 · medium
The left box shows two shapes, each with a lettered point, and a line with the same two letters on its ends. Which figure shows how the shapes connect when each end of the line is attached to the point with the same letter?
Show the answer
Answer: D
Check one letter at a time. Point G is at a corner of the pentagon, and point H is at the center of the rectangle. Cross out any figure where either end of the line lands somewhere else or where a shape has changed. The shapes may be turned, so find each point by its place on the shape (corner, middle of a side, center), not by up, down, left or right.
A: The line ends in the wrong place: it meets the pentagon at the center, but point G is at a corner.
B: The line ends in the wrong place: it meets the rectangle at the middle of a long side, but point H is at the center.
C: One of the shapes here is a parallelogram, but the left box has a rectangle. Joining parts never changes a shape.
D (correct): The line joins a corner of the pentagon to the center of the rectangle, the same spots as points G and H in the left box; turning a shape does not move a point on it.
Practice 37 of 80 · easy
The left box shows two shapes, each with a lettered point, and a line with the same two letters on its ends. Which figure shows how the shapes connect when each end of the line is attached to the point with the same letter?
Show the answer
Answer: B
Check one letter at a time. Point X is at a corner of the rectangle, and point Y is at a corner of the flat side of the half-circle. Cross out any figure where either end of the line lands somewhere else or where a shape has changed. The shapes may be turned, so find each point by its place on the shape (corner, middle of a side, center), not by up, down, left or right.
A: The line ends in the wrong place: it meets the rectangle at the center, but point X is at a corner.
B (correct): The line joins a corner of the rectangle to a corner of the flat side of the half-circle, the same spots as points X and Y in the left box; turning a shape does not move a point on it.
C: The line ends in the wrong place: it meets the rectangle at the middle of a long side, but point X is at a corner.
D: The line ends in the wrong place: it meets the rectangle at the center, but point X is at a corner and it meets the half-circle at the top of the curved side, but point Y is at a corner of the flat side.
Practice 38 of 80 · hard
The left box shows two shapes, each with a lettered point, and a line with the same two letters on its ends. Which figure shows how the shapes connect when each end of the line is attached to the point with the same letter?
Show the answer
Answer: C
Check one letter at a time. Point K is at a bottom corner of the house shape, and point L is at the center of the triangle. Cross out any figure where either end of the line lands somewhere else or where a shape has changed. The shapes may be turned, so find each point by its place on the shape (corner, middle of a side, center), not by up, down, left or right.
A: The line ends in the wrong place: it meets the house shape at a corner where the roof meets a wall, but point K is at a bottom corner.
B: The line ends in the wrong place: it meets the house shape at the middle of a wall, but point K is at a bottom corner.
C (correct): The line joins a bottom corner of the house shape to the center of the triangle, the same spots as points K and L in the left box; turning a shape does not move a point on it.
D: The line ends in the wrong place: it meets the house shape at the middle of a wall, but point K is at a bottom corner and it meets the triangle at the middle of a side, but point L is at the center.
Practice 39 of 80 · hard
The left box shows two shapes, each with a lettered point, and a line with the same two letters on its ends. Which figure shows how the shapes connect when each end of the line is attached to the point with the same letter?
Show the answer
Answer: C
Check one letter at a time. Point M is at the peak of the roof of the house shape, and point N is at the center of the hexagon. Cross out any figure where either end of the line lands somewhere else or where a shape has changed. The shapes may be turned, so find each point by its place on the shape (corner, middle of a side, center), not by up, down, left or right.
A: The line ends in the wrong place: it meets the house shape at the middle of a wall, but point M is at the peak of the roof.
B: The line ends in the wrong place: it meets the house shape at a corner where the roof meets a wall, but point M is at the peak of the roof.
C (correct): The line joins the peak of the roof of the house shape to the center of the hexagon, the same spots as points M and N in the left box; turning a shape does not move a point on it.
D: One of the shapes here is a pentagon, but the left box has a hexagon. Joining parts never changes a shape.
Practice 40 of 80 · easy
The left box shows two shapes, each with a lettered point, and a line with the same two letters on its ends. Which figure shows how the shapes connect when each end of the line is attached to the point with the same letter?
Show the answer
Answer: D
Check one letter at a time. Point V is at the center of the rectangle, and point W is at the middle of a wall of the house shape. Cross out any figure where either end of the line lands somewhere else or where a shape has changed. The shapes may be turned, so find each point by its place on the shape (corner, middle of a side, center), not by up, down, left or right.
A: The line ends in the wrong place: it meets the rectangle at the middle of a long side, but point V is at the center.
B: The line ends in the wrong place: it meets the house shape at a corner where the roof meets a wall, but point W is at the middle of a wall.
C: The line ends in the wrong place: it meets the rectangle at a corner, but point V is at the center and it meets the house shape at the peak of the roof, but point W is at the middle of a wall.
D (correct): The line joins the center of the rectangle to the middle of a wall of the house shape, the same spots as points V and W in the left box; turning a shape does not move a point on it.
Practice 41 of 80 · medium
The left box shows two shapes, each with a lettered point, and a line with the same two letters on its ends. Which figure shows how the shapes connect when each end of the line is attached to the point with the same letter?
Show the answer
Answer: C
Check one letter at a time. Point V is at a corner of the hexagon, and point W is at the middle of a side of the triangle. Cross out any figure where either end of the line lands somewhere else or where a shape has changed. The shapes may be turned, so find each point by its place on the shape (corner, middle of a side, center), not by up, down, left or right.
A: The line ends in the wrong place: it meets the hexagon at the center, but point V is at a corner.
B: One of the shapes here is a pentagon, but the left box has a hexagon. Joining parts never changes a shape.
C (correct): The line joins a corner of the hexagon to the middle of a side of the triangle, the same spots as points V and W in the left box; turning a shape does not move a point on it.
D: The line ends in the wrong place: it meets the hexagon at the middle of a side, but point V is at a corner.
Practice 42 of 80 · medium
The left box shows two shapes, each with a lettered point, and a line with the same two letters on its ends. Which figure shows how the shapes connect when each end of the line is attached to the point with the same letter?
Show the answer
Answer: B
Check one letter at a time. Point X is at a wide corner of the diamond, and point Y is at a corner of the long side of the trapezoid. Cross out any figure where either end of the line lands somewhere else or where a shape has changed. The shapes may be turned, so find each point by its place on the shape (corner, middle of a side, center), not by up, down, left or right.
A: The line ends in the wrong place: it meets the diamond at the middle of a side, but point X is at a wide corner and it meets the trapezoid at the middle of the long side, but point Y is at a corner of the long side.
B (correct): The line joins a wide corner of the diamond to a corner of the long side of the trapezoid, the same spots as points X and Y in the left box; turning a shape does not move a point on it.
C: The line ends in the wrong place: it meets the diamond at the center, but point X is at a wide corner.
D: The line ends in the wrong place: it meets the trapezoid at the middle of the short side, but point Y is at a corner of the long side.
Practice 43 of 80 · medium
The left box shows two shapes, each with a lettered point, and a line with the same two letters on its ends. Which figure shows how the shapes connect when each end of the line is attached to the point with the same letter?
Show the answer
Answer: C
Check one letter at a time. Point J is at the middle of the bottom side of the house shape, and point K is at a wide corner of the parallelogram. Cross out any figure where either end of the line lands somewhere else or where a shape has changed. The shapes may be turned, so find each point by its place on the shape (corner, middle of a side, center), not by up, down, left or right.
A: The line ends in the wrong place: it meets the parallelogram at the middle of a short side, but point K is at a wide corner.
B: The line ends in the wrong place: it meets the house shape at a corner where the roof meets a wall, but point J is at the middle of the bottom side.
C (correct): The line joins the middle of the bottom side of the house shape to a wide corner of the parallelogram, the same spots as points J and K in the left box; turning a shape does not move a point on it.
D: The line ends in the wrong place: it meets the house shape at the peak of the roof, but point J is at the middle of the bottom side.
Practice 44 of 80 · hard
The left box shows two shapes, each with a lettered point, and a line with the same two letters on its ends. Which figure shows how the shapes connect when each end of the line is attached to the point with the same letter?
Show the answer
Answer: A
Check one letter at a time. Point E is at the middle of a side of the diamond, and point F is at the middle of a long side of the parallelogram. Cross out any figure where either end of the line lands somewhere else or where a shape has changed. The shapes may be turned, so find each point by its place on the shape (corner, middle of a side, center), not by up, down, left or right.
A (correct): The line joins the middle of a side of the diamond to the middle of a long side of the parallelogram, the same spots as points E and F in the left box; turning a shape does not move a point on it.
B: One of the shapes here is a rectangle, but the left box has a parallelogram. Joining parts never changes a shape.
C: The line ends in the wrong place: it meets the parallelogram at a sharp corner, but point F is at the middle of a long side.
D: The line ends in the wrong place: it meets the parallelogram at a wide corner, but point F is at the middle of a long side.
Practice 45 of 80 · medium
The left box shows two shapes, each with a lettered point, and a line with the same two letters on its ends. Which figure shows how the shapes connect when each end of the line is attached to the point with the same letter?
Show the answer
Answer: B
Check one letter at a time. Point M is at the middle of the flat side of the half-circle, and point N is at the middle of a side of the hexagon. Cross out any figure where either end of the line lands somewhere else or where a shape has changed. The shapes may be turned, so find each point by its place on the shape (corner, middle of a side, center), not by up, down, left or right.
A: One of the shapes here is a pentagon, but the left box has a hexagon. Joining parts never changes a shape.
B (correct): The line joins the middle of the flat side of the half-circle to the middle of a side of the hexagon, the same spots as points M and N in the left box; turning a shape does not move a point on it.
C: The line ends in the wrong place: it meets the half-circle at the top of the curved side, but point M is at the middle of the flat side.
D: The line ends in the wrong place: it meets the half-circle at a corner of the flat side, but point M is at the middle of the flat side.
Practice 46 of 80 · medium
The left box shows two shapes, each with a lettered point, and a line with the same two letters on its ends. Which figure shows how the shapes connect when each end of the line is attached to the point with the same letter?
Show the answer
Answer: C
Check one letter at a time. Point J is at the middle of a slanted side of the trapezoid, and point K is at a sharp corner of the parallelogram. Cross out any figure where either end of the line lands somewhere else or where a shape has changed. The shapes may be turned, so find each point by its place on the shape (corner, middle of a side, center), not by up, down, left or right.
A: The line ends in the wrong place: it meets the trapezoid at a corner of the short side, but point J is at the middle of a slanted side.
B: The line ends in the wrong place: it meets the trapezoid at a corner of the long side, but point J is at the middle of a slanted side and it meets the parallelogram at the center, but point K is at a sharp corner.
C (correct): The line joins the middle of a slanted side of the trapezoid to a sharp corner of the parallelogram, the same spots as points J and K in the left box; turning a shape does not move a point on it.
D: The line ends in the wrong place: it meets the parallelogram at the middle of a short side, but point K is at a sharp corner.
Practice 47 of 80 · medium
The left box shows two shapes, each with a lettered point, and a line with the same two letters on its ends. Which figure shows how the shapes connect when each end of the line is attached to the point with the same letter?
Show the answer
Answer: B
Check one letter at a time. Point X is at a wide corner of the diamond, and point Y is at the middle of a side of the pentagon. Cross out any figure where either end of the line lands somewhere else or where a shape has changed. The shapes may be turned, so find each point by its place on the shape (corner, middle of a side, center), not by up, down, left or right.
A: The line ends in the wrong place: it meets the diamond at the middle of a side, but point X is at a wide corner.
B (correct): The line joins a wide corner of the diamond to the middle of a side of the pentagon, the same spots as points X and Y in the left box; turning a shape does not move a point on it.
C: One of the shapes here is a hexagon, but the left box has a pentagon. Joining parts never changes a shape.
D: The line ends in the wrong place: it meets the pentagon at a corner, but point Y is at the middle of a side.
Practice 48 of 80 · medium
The left box shows two shapes, each with a lettered point, and a line with the same two letters on its ends. Which figure shows how the shapes connect when each end of the line is attached to the point with the same letter?
Show the answer
Answer: D
Check one letter at a time. Point M is at a sharp corner of the diamond, and point N is at the center of the hexagon. Cross out any figure where either end of the line lands somewhere else or where a shape has changed. The shapes may be turned, so find each point by its place on the shape (corner, middle of a side, center), not by up, down, left or right.
A: The line ends in the wrong place: it meets the diamond at the middle of a side, but point M is at a sharp corner.
B: One of the shapes here is a pentagon, but the left box has a hexagon. Joining parts never changes a shape.
C: The line ends in the wrong place: it meets the hexagon at a corner, but point N is at the center.
D (correct): The line joins a sharp corner of the diamond to the center of the hexagon, the same spots as points M and N in the left box; turning a shape does not move a point on it.
Practice 49 of 80 · hard
The left box shows two shapes, each with a lettered point, and a line with the same two letters on its ends. Which figure shows how the shapes connect when each end of the line is attached to the point with the same letter?
Show the answer
Answer: B
Check one letter at a time. Point V is at the middle of the shorter leg of the right triangle, and point W is at the center of the rectangle. Cross out any figure where either end of the line lands somewhere else or where a shape has changed. The shapes may be turned, so find each point by its place on the shape (corner, middle of a side, center), not by up, down, left or right.
A: The line ends in the wrong place: it meets the right triangle at the sharpest corner, but point V is at the middle of the shorter leg.
B (correct): The line joins the middle of the shorter leg of the right triangle to the center of the rectangle, the same spots as points V and W in the left box; turning a shape does not move a point on it.
C: One of the shapes here is a square, but the left box has a rectangle. Joining parts never changes a shape.
D: The line ends in the wrong place: it meets the right triangle at the middle of the longer leg, but point V is at the middle of the shorter leg.
Practice 50 of 80 · medium
The left box shows two shapes, each with a lettered point, and a line with the same two letters on its ends. Which figure shows how the shapes connect when each end of the line is attached to the point with the same letter?
Show the answer
Answer: D
Check one letter at a time. Point J is at a corner of the triangle, and point K is at the middle of a slanted side of the trapezoid. Cross out any figure where either end of the line lands somewhere else or where a shape has changed. The shapes may be turned, so find each point by its place on the shape (corner, middle of a side, center), not by up, down, left or right.
A: The line ends in the wrong place: it meets the triangle at the center, but point J is at a corner and it meets the trapezoid at the middle of the short side, but point K is at the middle of a slanted side.
B: The line ends in the wrong place: it meets the trapezoid at the middle of the long side, but point K is at the middle of a slanted side.
C: The line ends in the wrong place: it meets the triangle at the middle of a side, but point J is at a corner.
D (correct): The line joins a corner of the triangle to the middle of a slanted side of the trapezoid, the same spots as points J and K in the left box; turning a shape does not move a point on it.
Practice 51 of 80 · medium
The left box shows two shapes, each with a lettered point, and a line with the same two letters on its ends. Which figure shows how the shapes connect when each end of the line is attached to the point with the same letter?
Show the answer
Answer: D
Check one letter at a time. Point J is at the middle of a side of the hexagon, and point K is at a corner of the flat side of the half-circle. Cross out any figure where either end of the line lands somewhere else or where a shape has changed. The shapes may be turned, so find each point by its place on the shape (corner, middle of a side, center), not by up, down, left or right.
A: The line ends in the wrong place: it meets the half-circle at the middle of the flat side, but point K is at a corner of the flat side.
B: One of the shapes here is a pentagon, but the left box has a hexagon. Joining parts never changes a shape.
C: The line ends in the wrong place: it meets the hexagon at the center, but point J is at the middle of a side.
D (correct): The line joins the middle of a side of the hexagon to a corner of the flat side of the half-circle, the same spots as points J and K in the left box; turning a shape does not move a point on it.
Practice 52 of 80 · easy
The left box shows two shapes, each with a lettered point, and a line with the same two letters on its ends. Which figure shows how the shapes connect when each end of the line is attached to the point with the same letter?
Show the answer
Answer: C
Check one letter at a time. Point T is at the middle of a side of the triangle, and point U is at the peak of the roof of the house shape. Cross out any figure where either end of the line lands somewhere else or where a shape has changed. The shapes may be turned, so find each point by its place on the shape (corner, middle of a side, center), not by up, down, left or right.
A: The line ends in the wrong place: it meets the house shape at the middle of the bottom side, but point U is at the peak of the roof.
B: The line ends in the wrong place: it meets the triangle at a corner, but point T is at the middle of a side and it meets the house shape at the middle of a wall, but point U is at the peak of the roof.
C (correct): The line joins the middle of a side of the triangle to the peak of the roof of the house shape, the same spots as points T and U in the left box; turning a shape does not move a point on it.
D: The line ends in the wrong place: it meets the house shape at a bottom corner, but point U is at the peak of the roof.
Practice 53 of 80 · medium
The left box shows two shapes, each with a lettered point, and a line with the same two letters on its ends. Which figure shows how the shapes connect when each end of the line is attached to the point with the same letter?
Show the answer
Answer: D
Check one letter at a time. Point P is at a corner of the square, and point Q is at the middle of the longer leg of the right triangle. Cross out any figure where either end of the line lands somewhere else or where a shape has changed. The shapes may be turned, so find each point by its place on the shape (corner, middle of a side, center), not by up, down, left or right.
A: The line ends in the wrong place: it meets the square at the center, but point P is at a corner.
B: One of the shapes here is a rectangle, but the left box has a square. Joining parts never changes a shape.
C: The line ends in the wrong place: it meets the right triangle at the right-angle corner, but point Q is at the middle of the longer leg.
D (correct): The line joins a corner of the square to the middle of the longer leg of the right triangle, the same spots as points P and Q in the left box; turning a shape does not move a point on it.
Practice 54 of 80 · easy
The left box shows two shapes, each with a lettered point, and a line with the same two letters on its ends. Which figure shows how the shapes connect when each end of the line is attached to the point with the same letter?
Show the answer
Answer: D
Check one letter at a time. Point G is at the peak of the roof of the house shape, and point H is at the middle of a short side of the parallelogram. Cross out any figure where either end of the line lands somewhere else or where a shape has changed. The shapes may be turned, so find each point by its place on the shape (corner, middle of a side, center), not by up, down, left or right.
A: The line ends in the wrong place: it meets the house shape at the middle of a wall, but point G is at the peak of the roof and it meets the parallelogram at a sharp corner, but point H is at the middle of a short side.
B: The line ends in the wrong place: it meets the house shape at a bottom corner, but point G is at the peak of the roof.
C: The line ends in the wrong place: it meets the house shape at the middle of the bottom side, but point G is at the peak of the roof.
D (correct): The line joins the peak of the roof of the house shape to the middle of a short side of the parallelogram, the same spots as points G and H in the left box; turning a shape does not move a point on it.
Practice 55 of 80 · easy
The left box shows two shapes, each with a lettered point, and a line with the same two letters on its ends. Which figure shows how the shapes connect when each end of the line is attached to the point with the same letter?
Show the answer
Answer: B
Check one letter at a time. Point P is at a corner of the flat side of the half-circle, and point Q is at a bottom corner of the house shape. Cross out any figure where either end of the line lands somewhere else or where a shape has changed. The shapes may be turned, so find each point by its place on the shape (corner, middle of a side, center), not by up, down, left or right.
A: The line ends in the wrong place: it meets the half-circle at the middle of the flat side, but point P is at a corner of the flat side.
B (correct): The line joins a corner of the flat side of the half-circle to a bottom corner of the house shape, the same spots as points P and Q in the left box; turning a shape does not move a point on it.
C: The line ends in the wrong place: it meets the half-circle at the top of the curved side, but point P is at a corner of the flat side and it meets the house shape at the middle of the bottom side, but point Q is at a bottom corner.
D: The line ends in the wrong place: it meets the house shape at a corner where the roof meets a wall, but point Q is at a bottom corner.
Practice 56 of 80 · easy
The left box shows two shapes, each with a lettered point, and a line with the same two letters on its ends. Which figure shows how the shapes connect when each end of the line is attached to the point with the same letter?
Show the answer
Answer: C
Check one letter at a time. Point G is at a corner of the long side of the trapezoid, and point H is at the center of the triangle. Cross out any figure where either end of the line lands somewhere else or where a shape has changed. The shapes may be turned, so find each point by its place on the shape (corner, middle of a side, center), not by up, down, left or right.
A: The line ends in the wrong place: it meets the trapezoid at a corner of the short side, but point G is at a corner of the long side and it meets the triangle at the middle of a side, but point H is at the center.
B: The line ends in the wrong place: it meets the trapezoid at a corner of the short side, but point G is at a corner of the long side.
C (correct): The line joins a corner of the long side of the trapezoid to the center of the triangle, the same spots as points G and H in the left box; turning a shape does not move a point on it.
D: The line ends in the wrong place: it meets the triangle at the middle of a side, but point H is at the center.
Practice 57 of 80 · easy
The left box shows two shapes, each with a lettered point, and a line with the same two letters on its ends. Which figure shows how the shapes connect when each end of the line is attached to the point with the same letter?
Show the answer
Answer: C
Check one letter at a time. Point G is at the middle of the longer leg of the right triangle, and point H is at the middle of a side of the diamond. Cross out any figure where either end of the line lands somewhere else or where a shape has changed. The shapes may be turned, so find each point by its place on the shape (corner, middle of a side, center), not by up, down, left or right.
A: The line ends in the wrong place: it meets the diamond at a wide corner, but point H is at the middle of a side.
B: The line ends in the wrong place: it meets the diamond at a sharp corner, but point H is at the middle of a side.
C (correct): The line joins the middle of the longer leg of the right triangle to the middle of a side of the diamond, the same spots as points G and H in the left box; turning a shape does not move a point on it.
D: The line ends in the wrong place: it meets the right triangle at the sharpest corner, but point G is at the middle of the longer leg and it meets the diamond at a sharp corner, but point H is at the middle of a side.
Practice 58 of 80 · easy
The left box shows two shapes, each with a lettered point, and a line with the same two letters on its ends. Which figure shows how the shapes connect when each end of the line is attached to the point with the same letter?
Show the answer
Answer: D
Check one letter at a time. Point G is at the center of the diamond, and point H is at a corner of the hexagon. Cross out any figure where either end of the line lands somewhere else or where a shape has changed. The shapes may be turned, so find each point by its place on the shape (corner, middle of a side, center), not by up, down, left or right.
A: The line ends in the wrong place: it meets the diamond at the middle of a side, but point G is at the center.
B: The line ends in the wrong place: it meets the diamond at a wide corner, but point G is at the center.
C: The line ends in the wrong place: it meets the diamond at a sharp corner, but point G is at the center and it meets the hexagon at the center, but point H is at a corner.
D (correct): The line joins the center of the diamond to a corner of the hexagon, the same spots as points G and H in the left box; turning a shape does not move a point on it.
Practice 59 of 80 · easy
The left box shows two shapes, each with a lettered point, and a line with the same two letters on its ends. Which figure shows how the shapes connect when each end of the line is attached to the point with the same letter?
Show the answer
Answer: D
Check one letter at a time. Point V is at a corner of the flat side of the half-circle, and point W is at the middle of the short side of the trapezoid. Cross out any figure where either end of the line lands somewhere else or where a shape has changed. The shapes may be turned, so find each point by its place on the shape (corner, middle of a side, center), not by up, down, left or right.
A: The line ends in the wrong place: it meets the trapezoid at the middle of the long side, but point W is at the middle of the short side.
B: The line ends in the wrong place: it meets the half-circle at the middle of the flat side, but point V is at a corner of the flat side and it meets the trapezoid at a corner of the short side, but point W is at the middle of the short side.
C: The line ends in the wrong place: it meets the trapezoid at a corner of the long side, but point W is at the middle of the short side.
D (correct): The line joins a corner of the flat side of the half-circle to the middle of the short side of the trapezoid, the same spots as points V and W in the left box; turning a shape does not move a point on it.
Practice 60 of 80 · hard
The left box shows two shapes, each with a lettered point, and a line with the same two letters on its ends. Which figure shows how the shapes connect when each end of the line is attached to the point with the same letter?
Show the answer
Answer: A
Check one letter at a time. Point R is at the center of the diamond, and point S is at a corner of the long side of the trapezoid. Cross out any figure where either end of the line lands somewhere else or where a shape has changed. The shapes may be turned, so find each point by its place on the shape (corner, middle of a side, center), not by up, down, left or right.
A (correct): The line joins the center of the diamond to a corner of the long side of the trapezoid, the same spots as points R and S in the left box; turning a shape does not move a point on it.
B: One of the shapes here is a square, but the left box has a diamond. Joining parts never changes a shape.
C: The line ends in the wrong place: it meets the diamond at a sharp corner, but point R is at the center.
D: The line ends in the wrong place: it meets the diamond at the middle of a side, but point R is at the center.
Practice 61 of 80 · medium
The left box shows two shapes, each with a lettered point, and a line with the same two letters on its ends. Which figure shows how the shapes connect when each end of the line is attached to the point with the same letter?
Show the answer
Answer: A
Check one letter at a time. Point M is at the middle of a short side of the rectangle, and point N is at the middle of a side of the triangle. Cross out any figure where either end of the line lands somewhere else or where a shape has changed. The shapes may be turned, so find each point by its place on the shape (corner, middle of a side, center), not by up, down, left or right.
A (correct): The line joins the middle of a short side of the rectangle to the middle of a side of the triangle, the same spots as points M and N in the left box; turning a shape does not move a point on it.
B: One of the shapes here is a parallelogram, but the left box has a rectangle. Joining parts never changes a shape.
C: The line ends in the wrong place: it meets the rectangle at a corner, but point M is at the middle of a short side.
D: The line ends in the wrong place: it meets the rectangle at the middle of a long side, but point M is at the middle of a short side.
Practice 62 of 80 · medium
The left box shows two shapes, each with a lettered point, and a line with the same two letters on its ends. Which figure shows how the shapes connect when each end of the line is attached to the point with the same letter?
Show the answer
Answer: D
Check one letter at a time. Point P is at the center of the parallelogram, and point Q is at a corner of the square. Cross out any figure where either end of the line lands somewhere else or where a shape has changed. The shapes may be turned, so find each point by its place on the shape (corner, middle of a side, center), not by up, down, left or right.
A: The line ends in the wrong place: it meets the parallelogram at the middle of a short side, but point P is at the center.
B: One of the shapes here is a rectangle, but the left box has a square. Joining parts never changes a shape.
C: The line ends in the wrong place: it meets the parallelogram at the middle of a long side, but point P is at the center.
D (correct): The line joins the center of the parallelogram to a corner of the square, the same spots as points P and Q in the left box; turning a shape does not move a point on it.
Practice 63 of 80 · hard
The left box shows two shapes, each with a lettered point, and a line with the same two letters on its ends. Which figure shows how the shapes connect when each end of the line is attached to the point with the same letter?
Show the answer
Answer: A
Check one letter at a time. Point R is at a corner of the square, and point S is at a sharp corner of the parallelogram. Cross out any figure where either end of the line lands somewhere else or where a shape has changed. The shapes may be turned, so find each point by its place on the shape (corner, middle of a side, center), not by up, down, left or right.
A (correct): The line joins a corner of the square to a sharp corner of the parallelogram, the same spots as points R and S in the left box; turning a shape does not move a point on it.
B: The line ends in the wrong place: it meets the parallelogram at the center, but point S is at a sharp corner.
C: One of the shapes here is a rectangle, but the left box has a square. Joining parts never changes a shape.
D: The line ends in the wrong place: it meets the square at the center, but point R is at a corner.
Practice 64 of 80 · medium
The left box shows two shapes, each with a lettered point, and a line with the same two letters on its ends. Which figure shows how the shapes connect when each end of the line is attached to the point with the same letter?
Show the answer
Answer: D
Check one letter at a time. Point E is at a corner of the flat side of the half-circle, and point F is at the right-angle corner of the right triangle. Cross out any figure where either end of the line lands somewhere else or where a shape has changed. The shapes may be turned, so find each point by its place on the shape (corner, middle of a side, center), not by up, down, left or right.
A: The line ends in the wrong place: it meets the right triangle at the middle of the slanted side, but point F is at the right-angle corner.
B: The line ends in the wrong place: it meets the right triangle at the middle of the shorter leg, but point F is at the right-angle corner.
C: The line ends in the wrong place: it meets the half-circle at the top of the curved side, but point E is at a corner of the flat side.
D (correct): The line joins a corner of the flat side of the half-circle to the right-angle corner of the right triangle, the same spots as points E and F in the left box; turning a shape does not move a point on it.
Practice 65 of 80 · medium
The left box shows two shapes, each with a lettered point, and a line with the same two letters on its ends. Which figure shows how the shapes connect when each end of the line is attached to the point with the same letter?
Show the answer
Answer: A
Check one letter at a time. Point J is at the center of the triangle, and point K is at a sharp corner of the parallelogram. Cross out any figure where either end of the line lands somewhere else or where a shape has changed. The shapes may be turned, so find each point by its place on the shape (corner, middle of a side, center), not by up, down, left or right.
A (correct): The line joins the center of the triangle to a sharp corner of the parallelogram, the same spots as points J and K in the left box; turning a shape does not move a point on it.
B: The line ends in the wrong place: it meets the triangle at a corner, but point J is at the center and it meets the parallelogram at a wide corner, but point K is at a sharp corner.
C: The line ends in the wrong place: it meets the parallelogram at the middle of a long side, but point K is at a sharp corner.
D: The line ends in the wrong place: it meets the parallelogram at a wide corner, but point K is at a sharp corner.
Practice 66 of 80 · easy
The left box shows two shapes, each with a lettered point, and a line with the same two letters on its ends. Which figure shows how the shapes connect when each end of the line is attached to the point with the same letter?
Show the answer
Answer: A
Check one letter at a time. Point R is at the center of the hexagon, and point S is at the middle of the long side of the trapezoid. Cross out any figure where either end of the line lands somewhere else or where a shape has changed. The shapes may be turned, so find each point by its place on the shape (corner, middle of a side, center), not by up, down, left or right.
A (correct): The line joins the center of the hexagon to the middle of the long side of the trapezoid, the same spots as points R and S in the left box; turning a shape does not move a point on it.
B: The line ends in the wrong place: it meets the hexagon at a corner, but point R is at the center and it meets the trapezoid at the middle of a slanted side, but point S is at the middle of the long side.
C: The line ends in the wrong place: it meets the trapezoid at a corner of the long side, but point S is at the middle of the long side.
D: The line ends in the wrong place: it meets the hexagon at the middle of a side, but point R is at the center.
Practice 67 of 80 · hard
The left box shows two shapes, each with a lettered point, and a line with the same two letters on its ends. Which figure shows how the shapes connect when each end of the line is attached to the point with the same letter?
Show the answer
Answer: D
Check one letter at a time. Point V is at a corner of the triangle, and point W is at a corner of the rectangle. Cross out any figure where either end of the line lands somewhere else or where a shape has changed. The shapes may be turned, so find each point by its place on the shape (corner, middle of a side, center), not by up, down, left or right.
A: The line ends in the wrong place: it meets the triangle at the middle of a side, but point V is at a corner.
B: The line ends in the wrong place: it meets the rectangle at the middle of a short side, but point W is at a corner.
C: One of the shapes here is a square, but the left box has a rectangle. Joining parts never changes a shape.
D (correct): The line joins a corner of the triangle to a corner of the rectangle, the same spots as points V and W in the left box; turning a shape does not move a point on it.
Practice 68 of 80 · medium
The left box shows two shapes, each with a lettered point, and a line with the same two letters on its ends. Which figure shows how the shapes connect when each end of the line is attached to the point with the same letter?
Show the answer
Answer: B
Check one letter at a time. Point G is at a sharp corner of the diamond, and point H is at the middle of a wall of the house shape. Cross out any figure where either end of the line lands somewhere else or where a shape has changed. The shapes may be turned, so find each point by its place on the shape (corner, middle of a side, center), not by up, down, left or right.
A: The line ends in the wrong place: it meets the diamond at the center, but point G is at a sharp corner and it meets the house shape at the peak of the roof, but point H is at the middle of a wall.
B (correct): The line joins a sharp corner of the diamond to the middle of a wall of the house shape, the same spots as points G and H in the left box; turning a shape does not move a point on it.
C: The line ends in the wrong place: it meets the diamond at a wide corner, but point G is at a sharp corner.
D: The line ends in the wrong place: it meets the house shape at a bottom corner, but point H is at the middle of a wall.
Practice 69 of 80 · hard
The left box shows two shapes, each with a lettered point, and a line with the same two letters on its ends. Which figure shows how the shapes connect when each end of the line is attached to the point with the same letter?
Show the answer
Answer: A
Check one letter at a time. Point M is at the center of the square, and point N is at the middle of a short side of the parallelogram. Cross out any figure where either end of the line lands somewhere else or where a shape has changed. The shapes may be turned, so find each point by its place on the shape (corner, middle of a side, center), not by up, down, left or right.
A (correct): The line joins the center of the square to the middle of a short side of the parallelogram, the same spots as points M and N in the left box; turning a shape does not move a point on it.
B: The line ends in the wrong place: it meets the square at a corner, but point M is at the center.
C: One of the shapes here is a diamond, but the left box has a square. Joining parts never changes a shape.
D: The line ends in the wrong place: it meets the parallelogram at a sharp corner, but point N is at the middle of a short side.
Practice 70 of 80 · medium
The left box shows two shapes, each with a lettered point, and a line with the same two letters on its ends. Which figure shows how the shapes connect when each end of the line is attached to the point with the same letter?
Show the answer
Answer: D
Check one letter at a time. Point K is at a corner of the hexagon, and point L is at a corner of the short side of the trapezoid. Cross out any figure where either end of the line lands somewhere else or where a shape has changed. The shapes may be turned, so find each point by its place on the shape (corner, middle of a side, center), not by up, down, left or right.
A: The line ends in the wrong place: it meets the trapezoid at the middle of the short side, but point L is at a corner of the short side.
B: The line ends in the wrong place: it meets the hexagon at the middle of a side, but point K is at a corner.
C: One of the shapes here is a pentagon, but the left box has a hexagon. Joining parts never changes a shape.
D (correct): The line joins a corner of the hexagon to a corner of the short side of the trapezoid, the same spots as points K and L in the left box; turning a shape does not move a point on it.
Practice 71 of 80 · medium
The left box shows two shapes, each with a lettered point, and a line with the same two letters on its ends. Which figure shows how the shapes connect when each end of the line is attached to the point with the same letter?
Show the answer
Answer: A
Check one letter at a time. Point P is at a corner of the flat side of the half-circle, and point Q is at the center of the rectangle. Cross out any figure where either end of the line lands somewhere else or where a shape has changed. The shapes may be turned, so find each point by its place on the shape (corner, middle of a side, center), not by up, down, left or right.
A (correct): The line joins a corner of the flat side of the half-circle to the center of the rectangle, the same spots as points P and Q in the left box; turning a shape does not move a point on it.
B: The line ends in the wrong place: it meets the rectangle at the middle of a long side, but point Q is at the center.
C: One of the shapes here is a square, but the left box has a rectangle. Joining parts never changes a shape.
D: The line ends in the wrong place: it meets the half-circle at the top of the curved side, but point P is at a corner of the flat side.
Practice 72 of 80 · medium
The left box shows two shapes, each with a lettered point, and a line with the same two letters on its ends. Which figure shows how the shapes connect when each end of the line is attached to the point with the same letter?
Show the answer
Answer: B
Check one letter at a time. Point G is at the center of the parallelogram, and point H is at a corner of the flat side of the half-circle. Cross out any figure where either end of the line lands somewhere else or where a shape has changed. The shapes may be turned, so find each point by its place on the shape (corner, middle of a side, center), not by up, down, left or right.
A: One of the shapes here is a rectangle, but the left box has a parallelogram. Joining parts never changes a shape.
B (correct): The line joins the center of the parallelogram to a corner of the flat side of the half-circle, the same spots as points G and H in the left box; turning a shape does not move a point on it.
C: The line ends in the wrong place: it meets the parallelogram at the middle of a long side, but point G is at the center.
D: The line ends in the wrong place: it meets the half-circle at the top of the curved side, but point H is at a corner of the flat side.
Practice 73 of 80 · easy
The left box shows two shapes, each with a lettered point, and a line with the same two letters on its ends. Which figure shows how the shapes connect when each end of the line is attached to the point with the same letter?
Show the answer
Answer: A
Check one letter at a time. Point V is at the middle of a side of the diamond, and point W is at the right-angle corner of the right triangle. Cross out any figure where either end of the line lands somewhere else or where a shape has changed. The shapes may be turned, so find each point by its place on the shape (corner, middle of a side, center), not by up, down, left or right.
A (correct): The line joins the middle of a side of the diamond to the right-angle corner of the right triangle, the same spots as points V and W in the left box; turning a shape does not move a point on it.
B: The line ends in the wrong place: it meets the right triangle at the middle of the longer leg, but point W is at the right-angle corner.
C: The line ends in the wrong place: it meets the diamond at a wide corner, but point V is at the middle of a side.
D: The line ends in the wrong place: it meets the diamond at a sharp corner, but point V is at the middle of a side and it meets the right triangle at the middle of the shorter leg, but point W is at the right-angle corner.
Practice 74 of 80 · medium
The left box shows two shapes, each with a lettered point, and a line with the same two letters on its ends. Which figure shows how the shapes connect when each end of the line is attached to the point with the same letter?
Show the answer
Answer: B
Check one letter at a time. Point R is at the middle of the flat side of the half-circle, and point S is at the middle of a side of the pentagon. Cross out any figure where either end of the line lands somewhere else or where a shape has changed. The shapes may be turned, so find each point by its place on the shape (corner, middle of a side, center), not by up, down, left or right.
A: The line ends in the wrong place: it meets the pentagon at the center, but point S is at the middle of a side.
B (correct): The line joins the middle of the flat side of the half-circle to the middle of a side of the pentagon, the same spots as points R and S in the left box; turning a shape does not move a point on it.
C: The line ends in the wrong place: it meets the half-circle at the top of the curved side, but point R is at the middle of the flat side.
D: One of the shapes here is a hexagon, but the left box has a pentagon. Joining parts never changes a shape.
Practice 75 of 80 · medium
The left box shows two shapes, each with a lettered point, and a line with the same two letters on its ends. Which figure shows how the shapes connect when each end of the line is attached to the point with the same letter?
Show the answer
Answer: A
Check one letter at a time. Point P is at the middle of a side of the square, and point Q is at the top of the curved side of the half-circle. Cross out any figure where either end of the line lands somewhere else or where a shape has changed. The shapes may be turned, so find each point by its place on the shape (corner, middle of a side, center), not by up, down, left or right.
A (correct): The line joins the middle of a side of the square to the top of the curved side of the half-circle, the same spots as points P and Q in the left box; turning a shape does not move a point on it.
B: The line ends in the wrong place: it meets the half-circle at a corner of the flat side, but point Q is at the top of the curved side.
C: The line ends in the wrong place: it meets the square at a corner, but point P is at the middle of a side.
D: One of the shapes here is a diamond, but the left box has a square. Joining parts never changes a shape.
Practice 76 of 80 · hard
The left box shows two shapes, each with a lettered point, and a line with the same two letters on its ends. Which figure shows how the shapes connect when each end of the line is attached to the point with the same letter?
Show the answer
Answer: B
Check one letter at a time. Point K is at a corner of the triangle, and point L is at a corner of the pentagon. Cross out any figure where either end of the line lands somewhere else or where a shape has changed. The shapes may be turned, so find each point by its place on the shape (corner, middle of a side, center), not by up, down, left or right.
A: The line ends in the wrong place: it meets the pentagon at the center, but point L is at a corner.
B (correct): The line joins a corner of the triangle to a corner of the pentagon, the same spots as points K and L in the left box; turning a shape does not move a point on it.
C: The line ends in the wrong place: it meets the triangle at the middle of a side, but point K is at a corner.
D: One of the shapes here is a hexagon, but the left box has a pentagon. Joining parts never changes a shape.
Practice 77 of 80 · easy
The left box shows two shapes, each with a lettered point, and a line with the same two letters on its ends. Which figure shows how the shapes connect when each end of the line is attached to the point with the same letter?
Show the answer
Answer: B
Check one letter at a time. Point E is at a corner of the long side of the trapezoid, and point F is at a wide corner of the diamond. Cross out any figure where either end of the line lands somewhere else or where a shape has changed. The shapes may be turned, so find each point by its place on the shape (corner, middle of a side, center), not by up, down, left or right.
A: The line ends in the wrong place: it meets the trapezoid at the middle of a slanted side, but point E is at a corner of the long side and it meets the diamond at a sharp corner, but point F is at a wide corner.
B (correct): The line joins a corner of the long side of the trapezoid to a wide corner of the diamond, the same spots as points E and F in the left box; turning a shape does not move a point on it.
C: The line ends in the wrong place: it meets the diamond at the center, but point F is at a wide corner.
D: The line ends in the wrong place: it meets the diamond at the middle of a side, but point F is at a wide corner.
Practice 78 of 80 · easy
The left box shows two shapes, each with a lettered point, and a line with the same two letters on its ends. Which figure shows how the shapes connect when each end of the line is attached to the point with the same letter?
Show the answer
Answer: A
Check one letter at a time. Point K is at a corner of the rectangle, and point L is at a sharp corner of the diamond. Cross out any figure where either end of the line lands somewhere else or where a shape has changed. The shapes may be turned, so find each point by its place on the shape (corner, middle of a side, center), not by up, down, left or right.
A (correct): The line joins a corner of the rectangle to a sharp corner of the diamond, the same spots as points K and L in the left box; turning a shape does not move a point on it.
B: The line ends in the wrong place: it meets the rectangle at the middle of a short side, but point K is at a corner and it meets the diamond at a wide corner, but point L is at a sharp corner.
C: The line ends in the wrong place: it meets the rectangle at the middle of a short side, but point K is at a corner.
D: The line ends in the wrong place: it meets the diamond at the middle of a side, but point L is at a sharp corner.
Practice 79 of 80 · easy
The left box shows two shapes, each with a lettered point, and a line with the same two letters on its ends. Which figure shows how the shapes connect when each end of the line is attached to the point with the same letter?
Show the answer
Answer: D
Check one letter at a time. Point J is at the right-angle corner of the right triangle, and point K is at the peak of the roof of the house shape. Cross out any figure where either end of the line lands somewhere else or where a shape has changed. The shapes may be turned, so find each point by its place on the shape (corner, middle of a side, center), not by up, down, left or right.
A: The line ends in the wrong place: it meets the house shape at the middle of a wall, but point K is at the peak of the roof.
B: The line ends in the wrong place: it meets the right triangle at the middle of the longer leg, but point J is at the right-angle corner and it meets the house shape at a bottom corner, but point K is at the peak of the roof.
C: The line ends in the wrong place: it meets the house shape at the middle of the bottom side, but point K is at the peak of the roof.
D (correct): The line joins the right-angle corner of the right triangle to the peak of the roof of the house shape, the same spots as points J and K in the left box; turning a shape does not move a point on it.
Practice 80 of 80 · medium
The left box shows two shapes, each with a lettered point, and a line with the same two letters on its ends. Which figure shows how the shapes connect when each end of the line is attached to the point with the same letter?
Show the answer
Answer: A
Check one letter at a time. Point E is at the middle of the short side of the trapezoid, and point F is at the top of the curved side of the half-circle. Cross out any figure where either end of the line lands somewhere else or where a shape has changed. The shapes may be turned, so find each point by its place on the shape (corner, middle of a side, center), not by up, down, left or right.
A (correct): The line joins the middle of the short side of the trapezoid to the top of the curved side of the half-circle, the same spots as points E and F in the left box; turning a shape does not move a point on it.
B: The line ends in the wrong place: it meets the trapezoid at a corner of the long side, but point E is at the middle of the short side and it meets the half-circle at the middle of the flat side, but point F is at the top of the curved side.
C: The line ends in the wrong place: it meets the half-circle at a corner of the flat side, but point F is at the top of the curved side.
D: The line ends in the wrong place: it meets the trapezoid at a corner of the long side, but point E is at the middle of the short side.
About this test
An explanation appears after each answer and identifies the constraint that rules a choice in or out. Use that to target your review. Missed mirror decoys point to the reflection and mirror trap sections; missed overlaps lead to the hidden-overlap and negative-space sections; slow or uncertain solving suggests practicing the one-symbol and two-symbol methods and the timed routine.
Your percentage here reflects practice accuracy on this lesson, not an official score of any kind. Review the sections behind your misses and retake the test once the method feels automatic.
The same 124 lessons, 6,516 questions and 82 timed practice tests on your phone, plus flashcards with spaced review and progress tracking. Free to download, and it works offline.
 ASVAB Camp
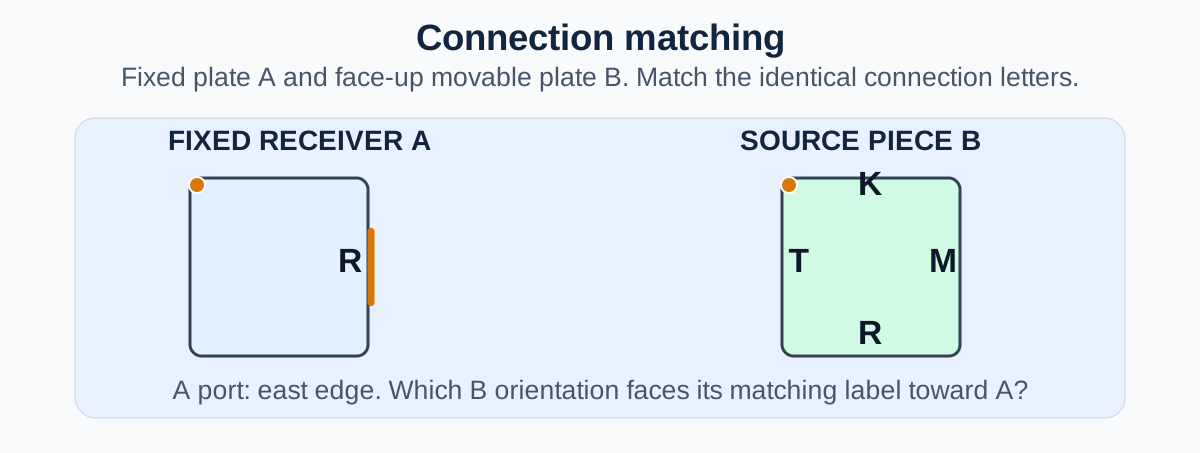
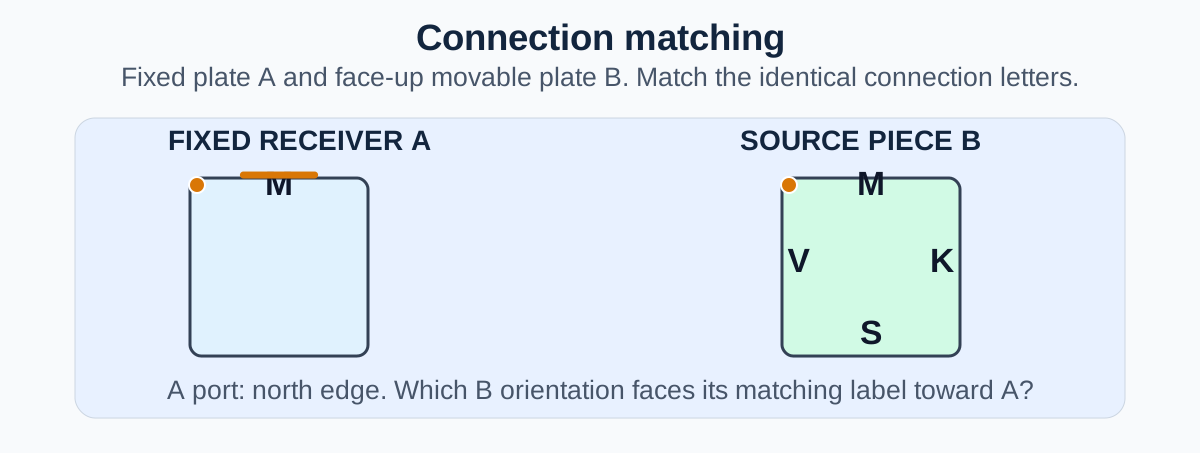
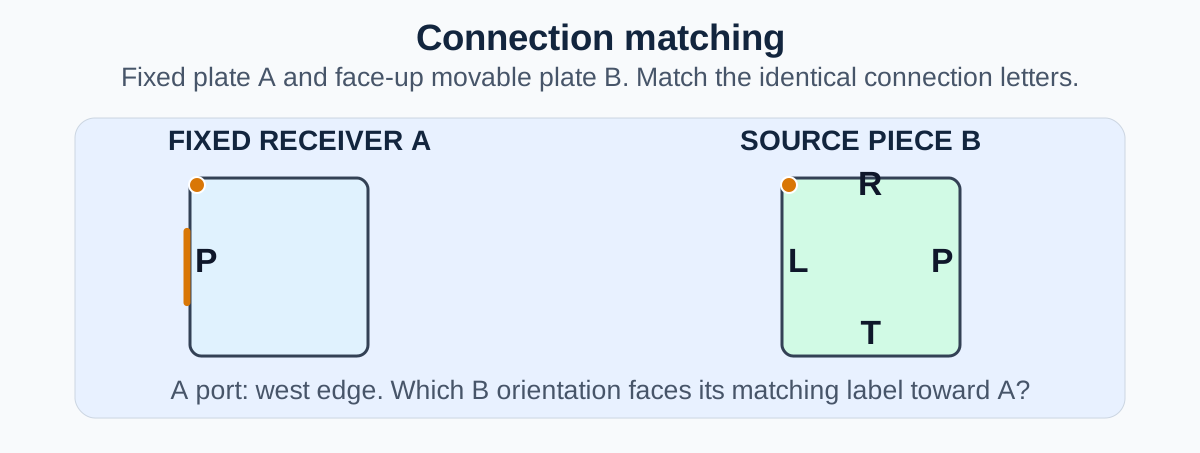
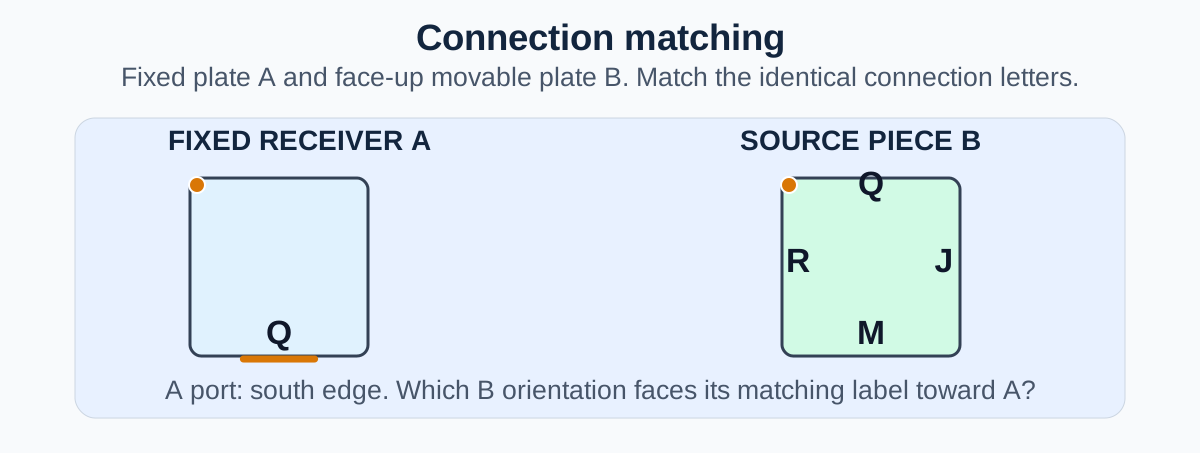
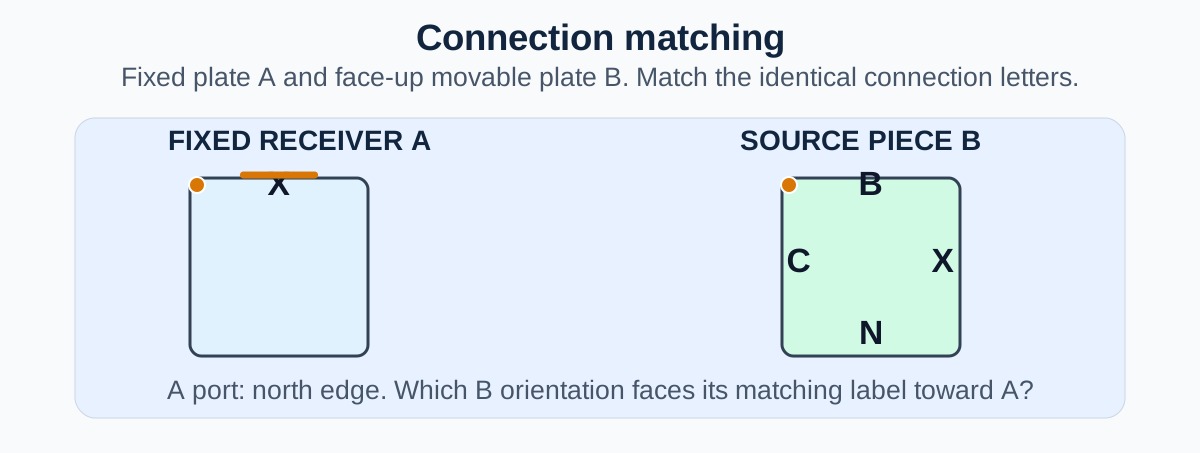
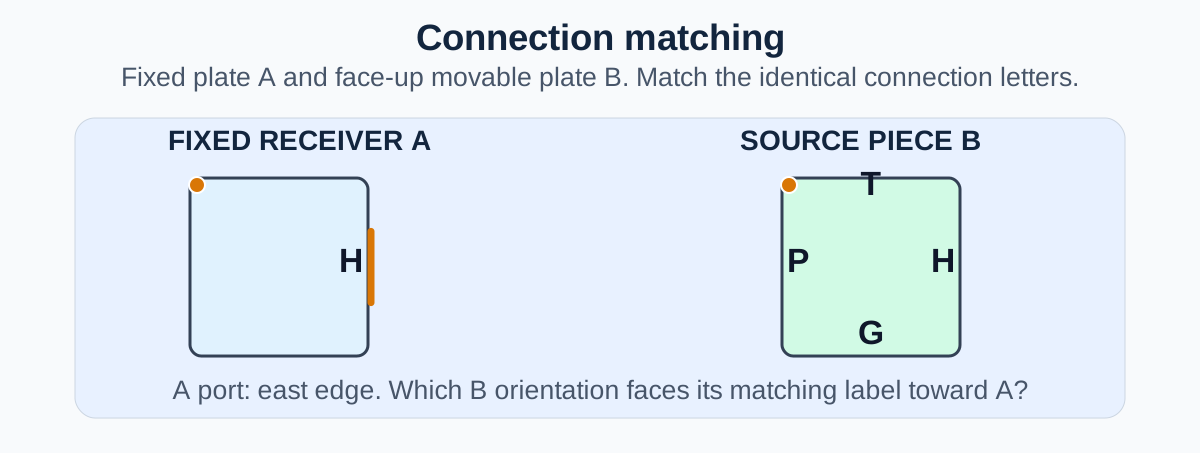
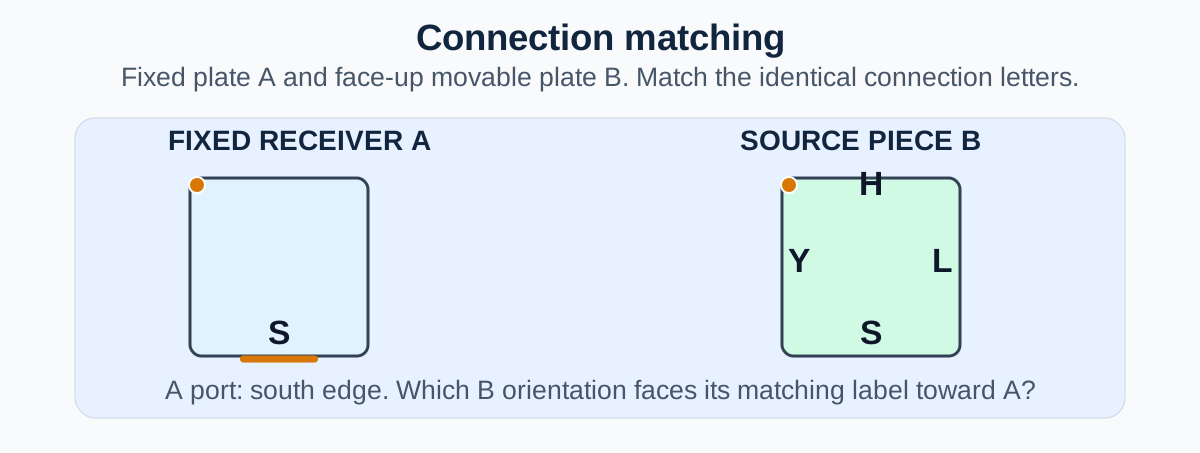
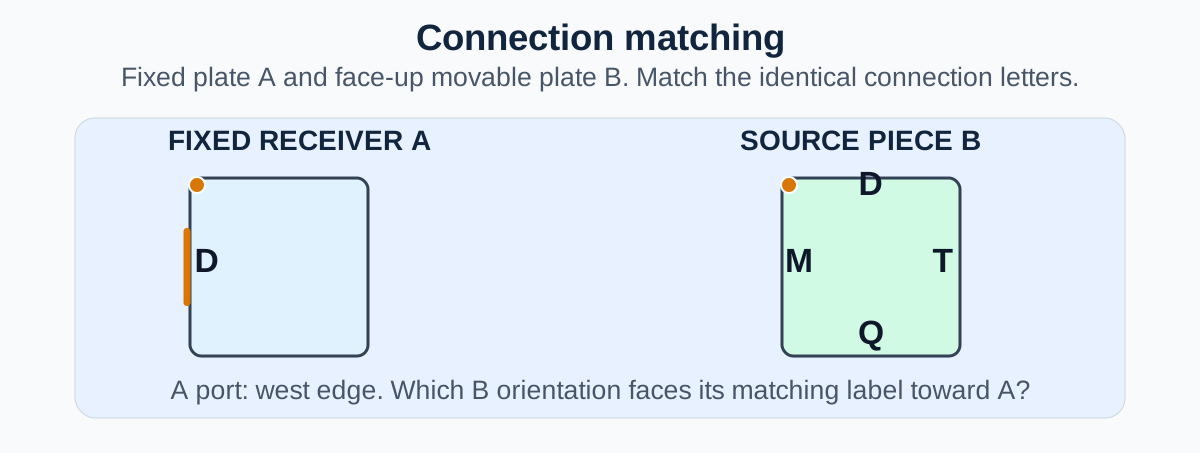
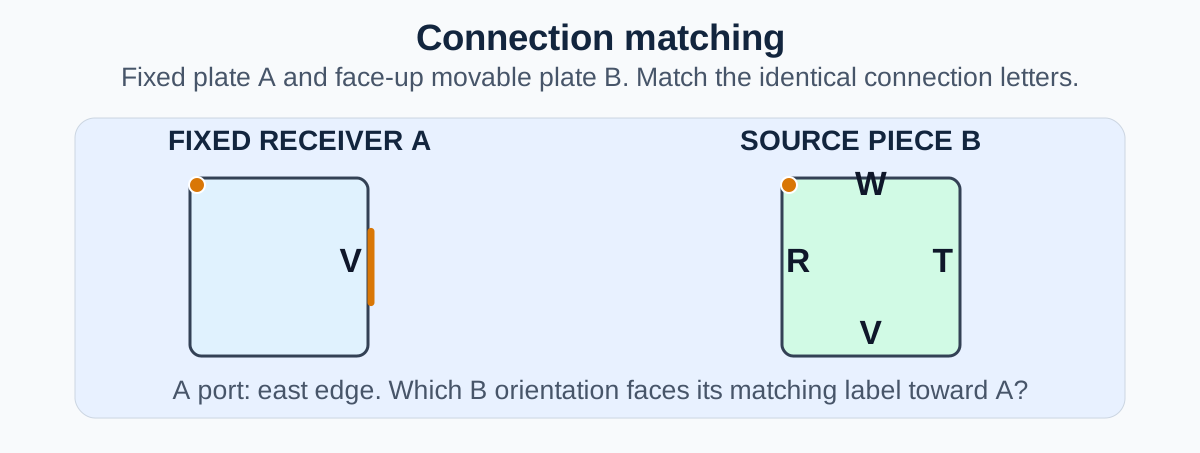
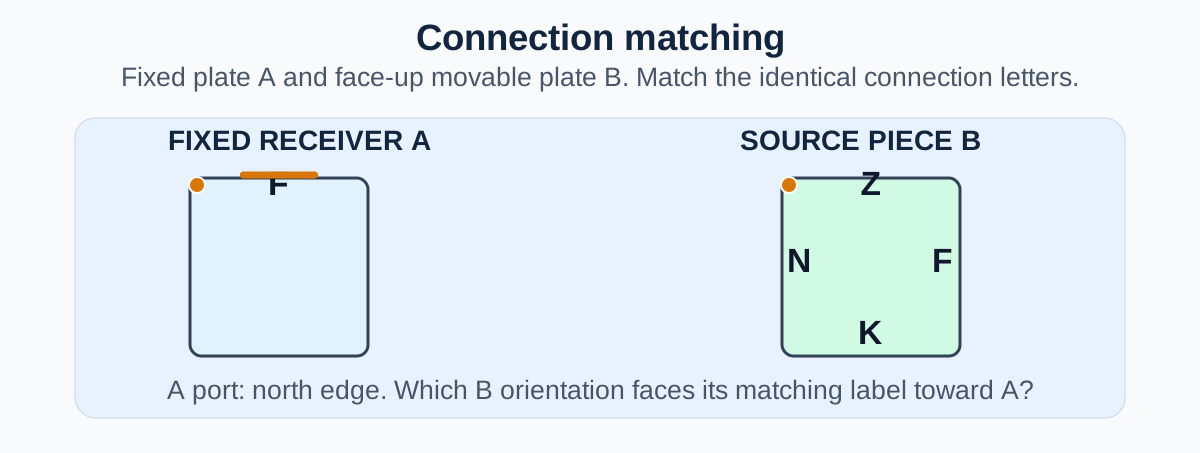
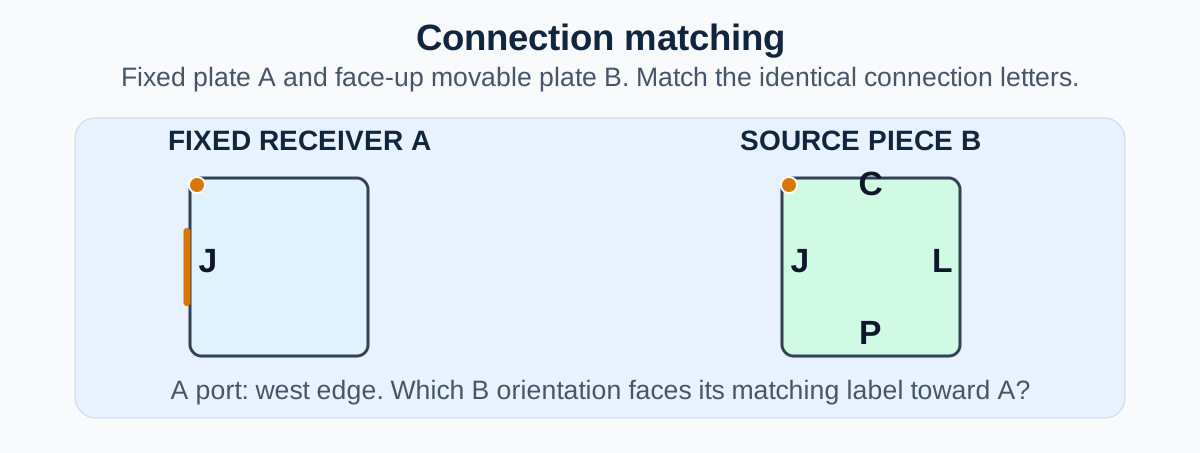
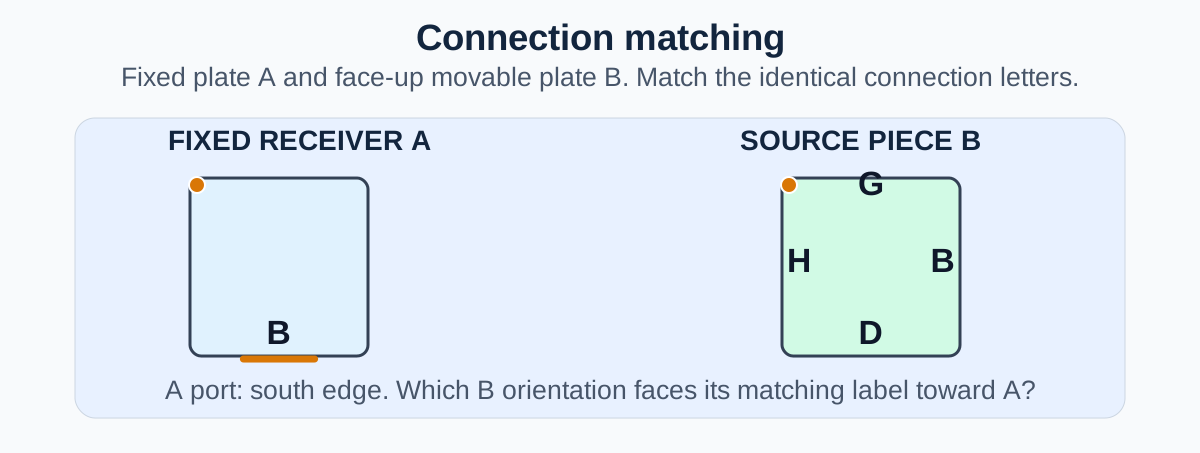
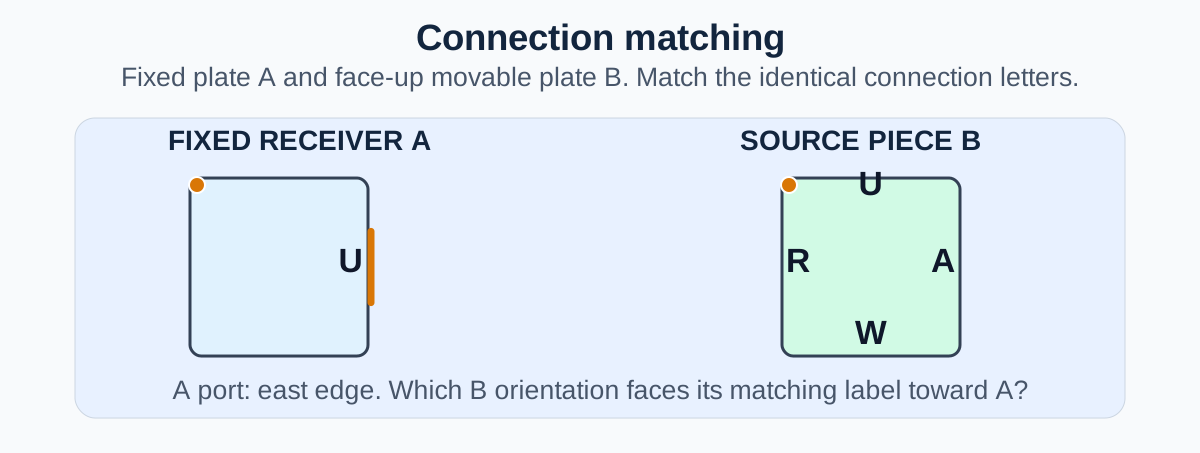
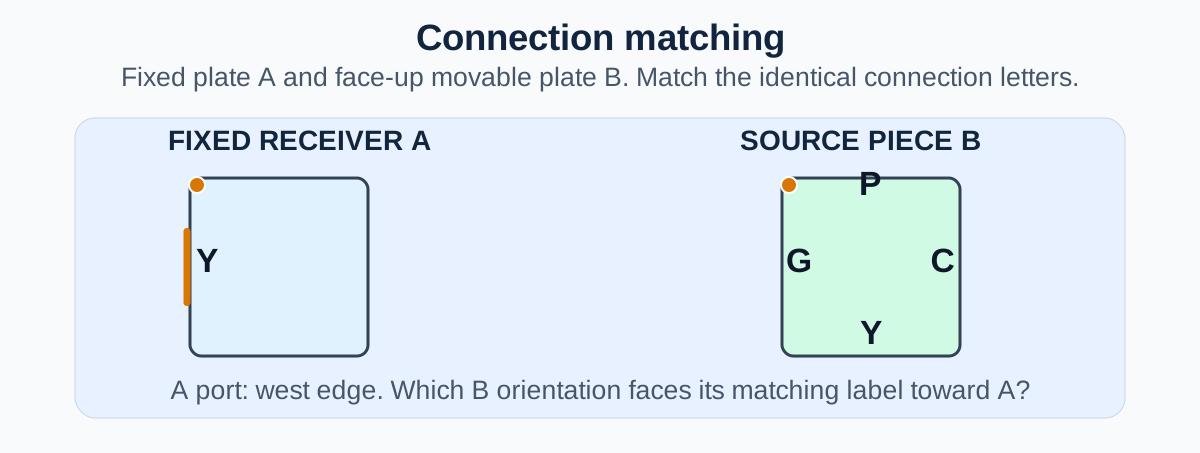
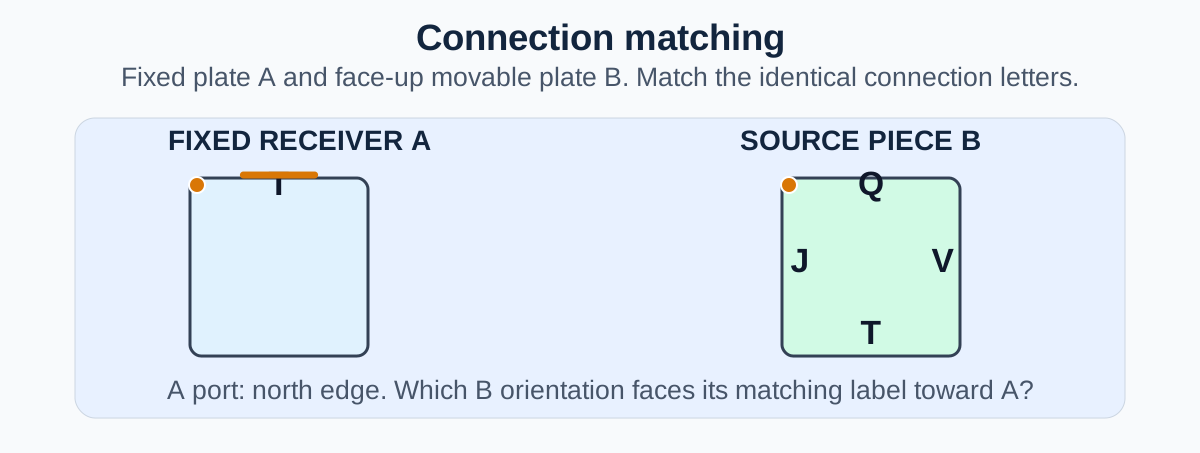
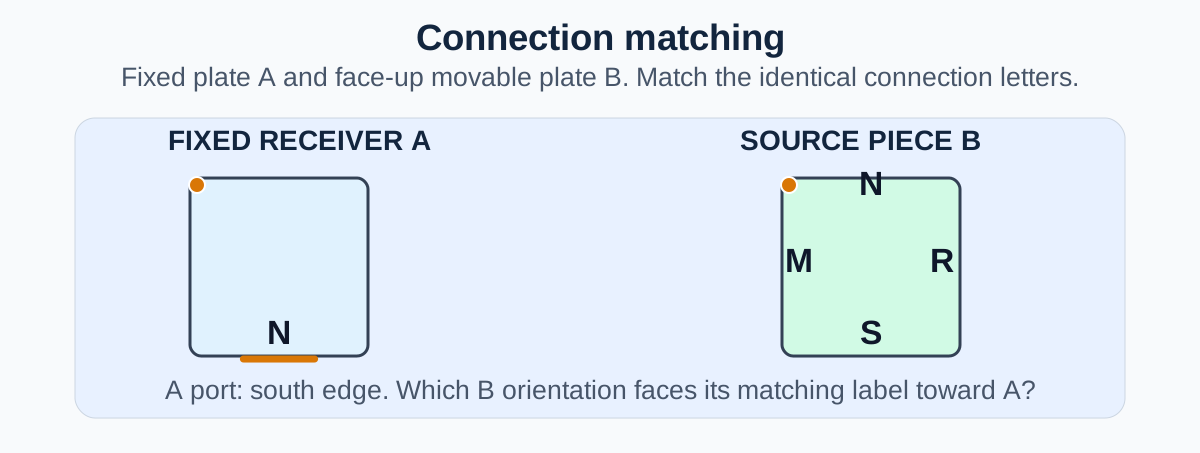
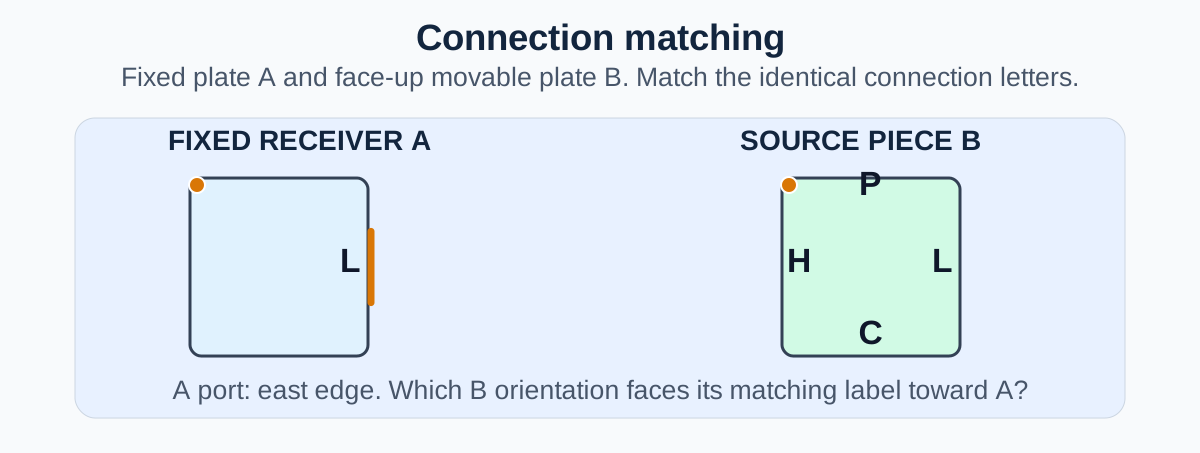
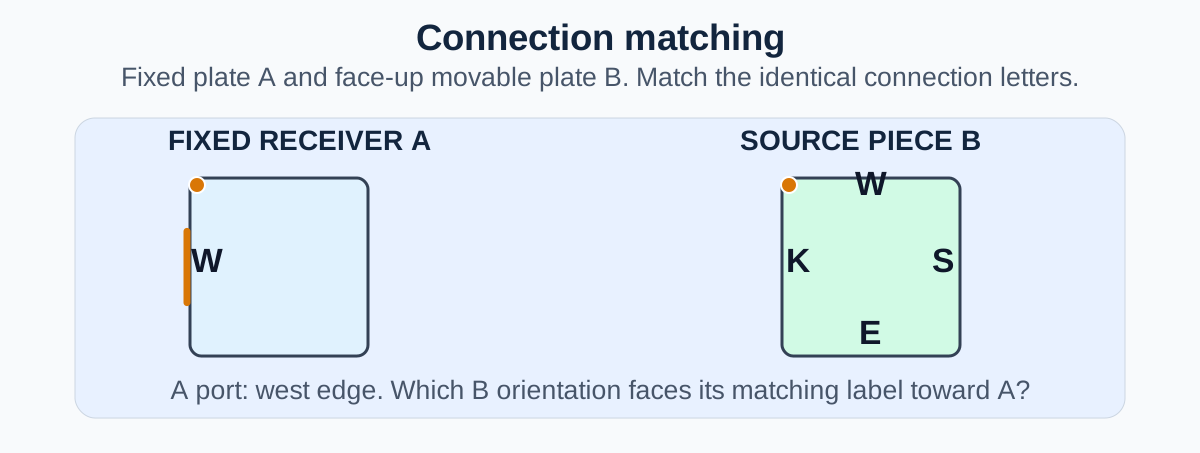
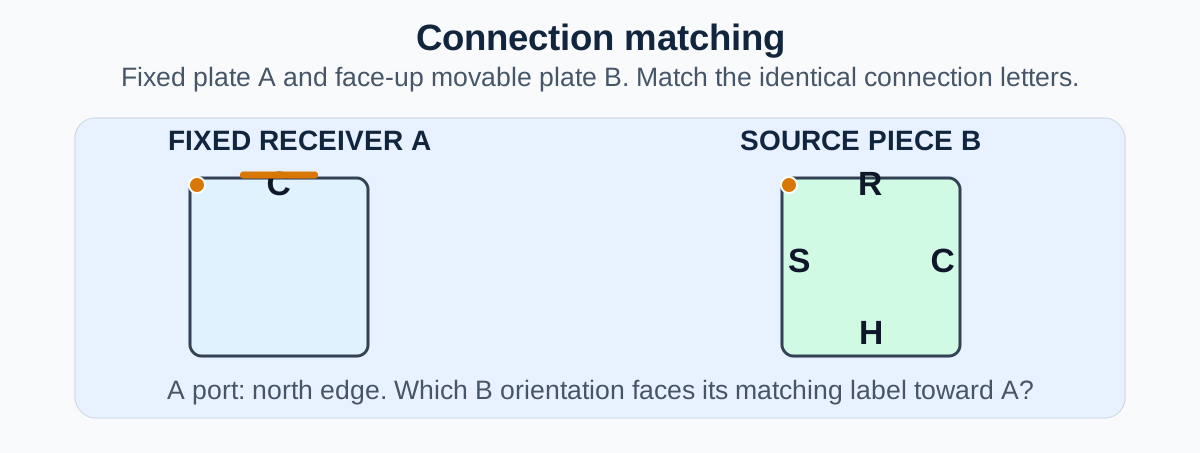
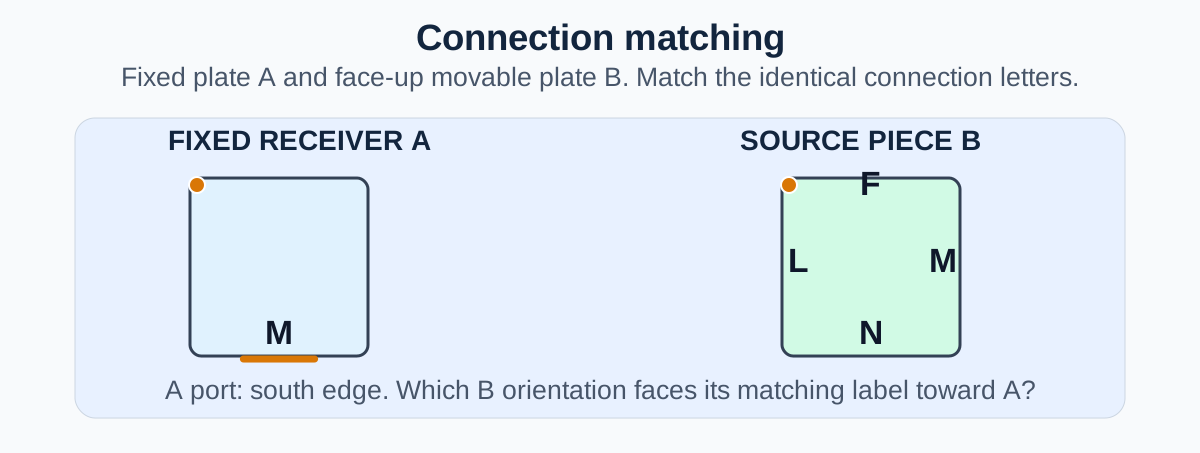
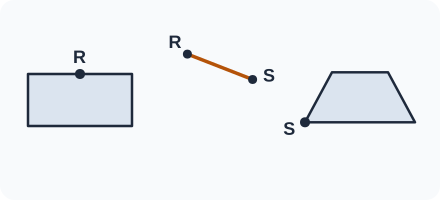
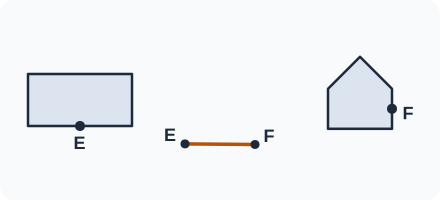
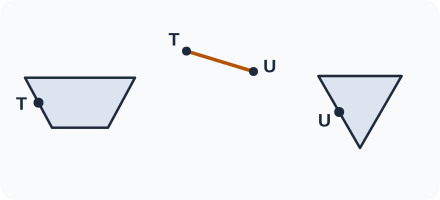
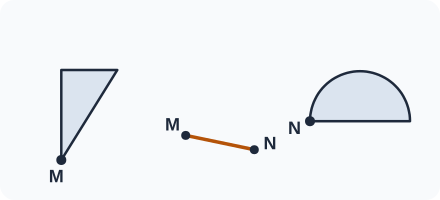
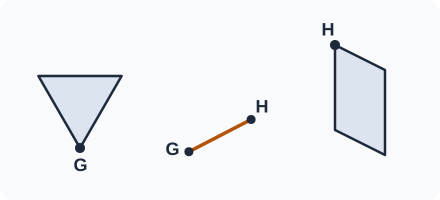
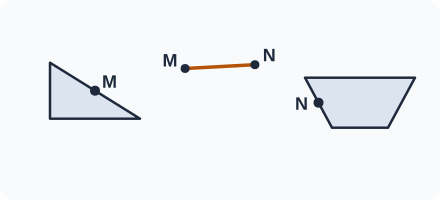
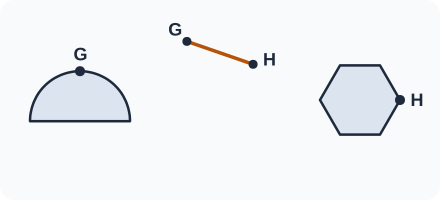
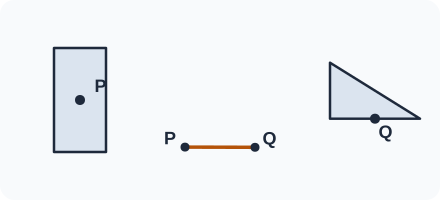
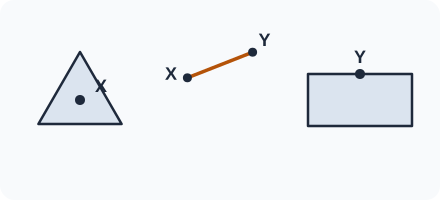
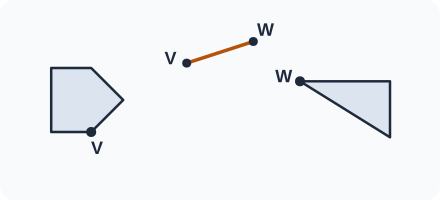
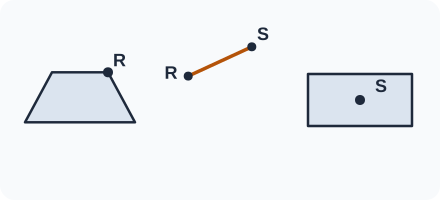
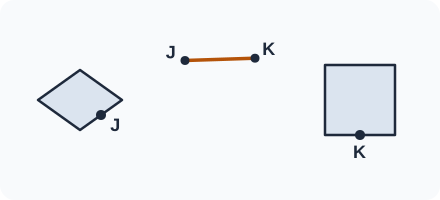
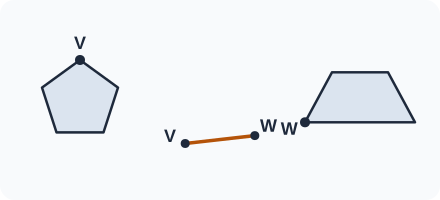
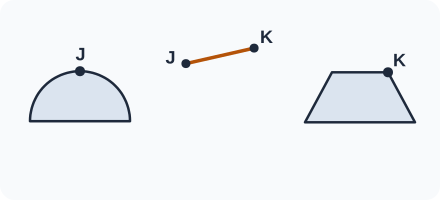
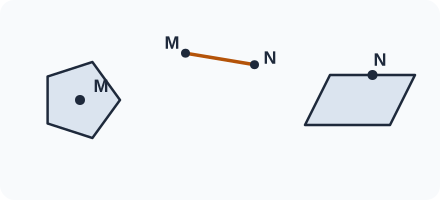
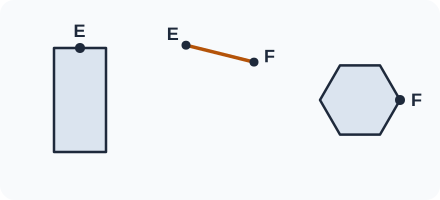
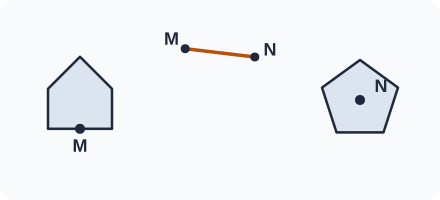
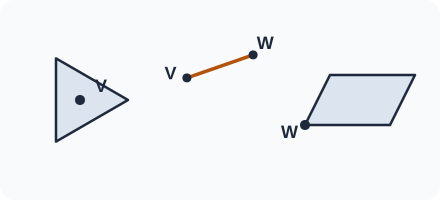
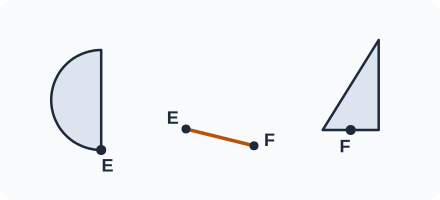
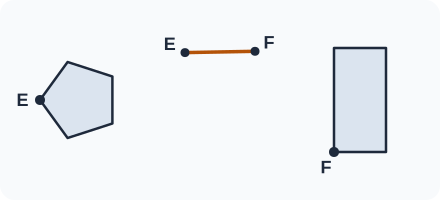
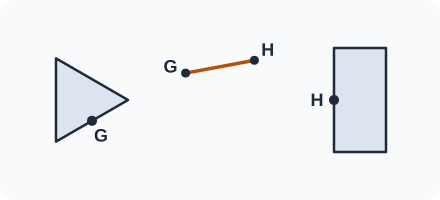
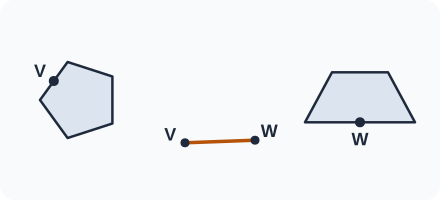
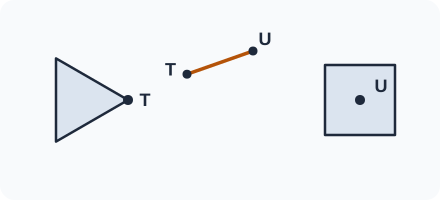
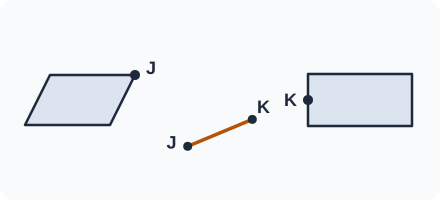
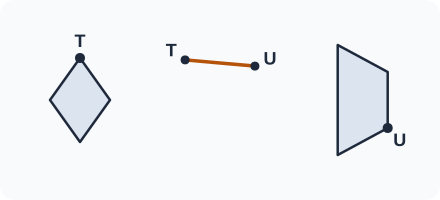
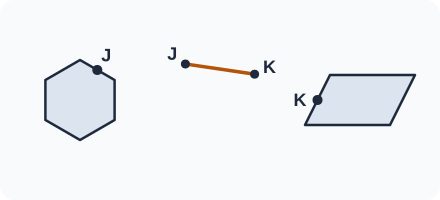
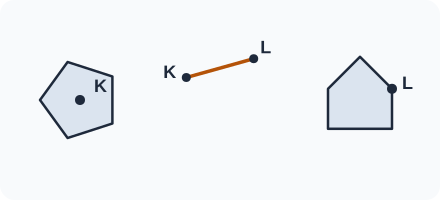
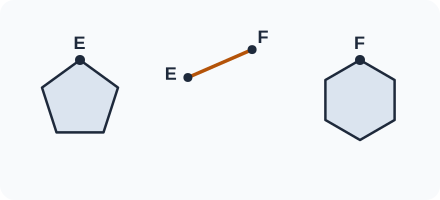
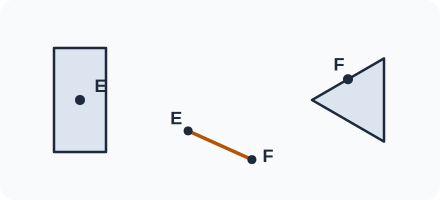
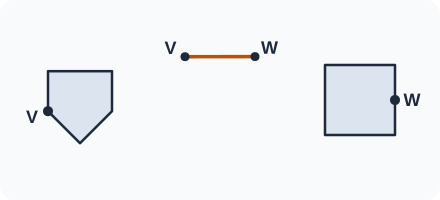
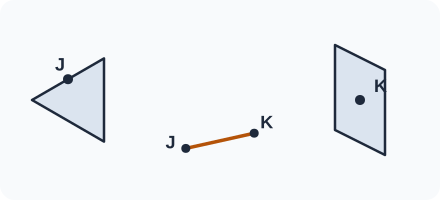
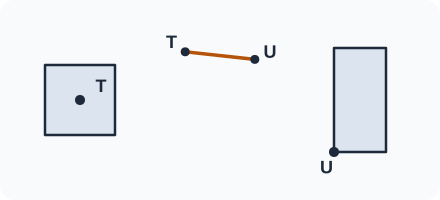
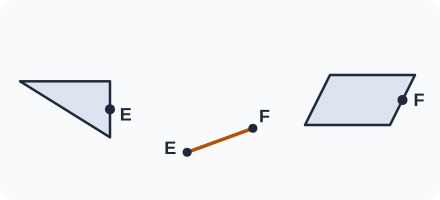
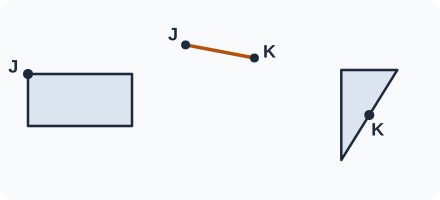
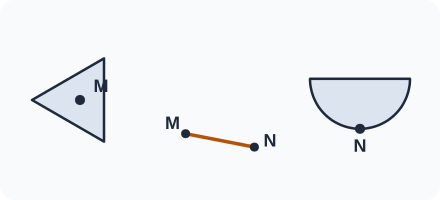
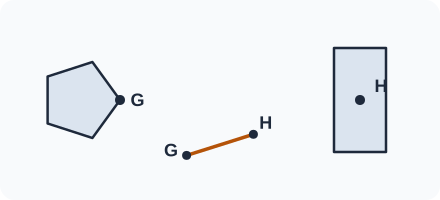
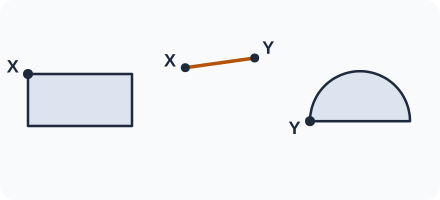
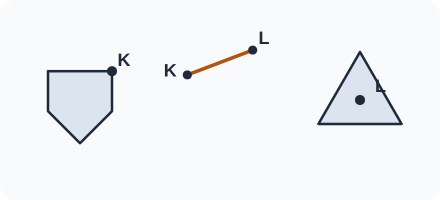
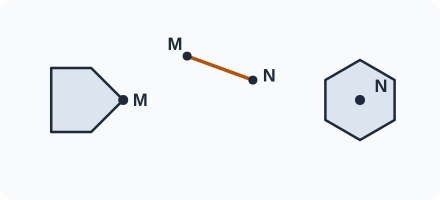
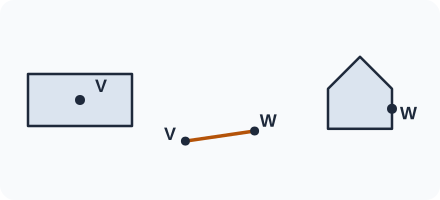
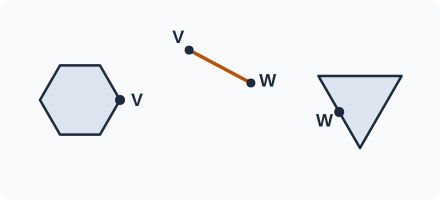
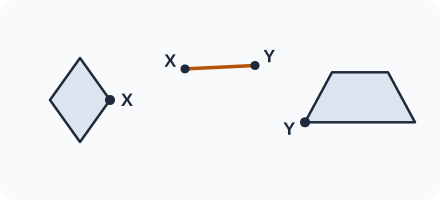
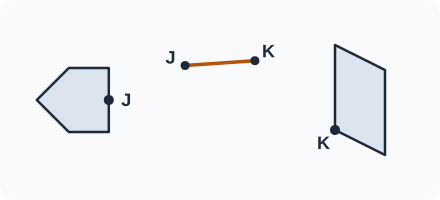
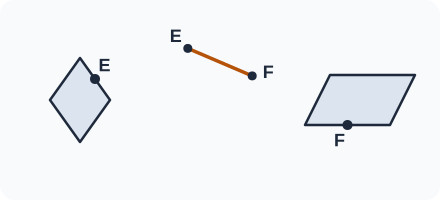
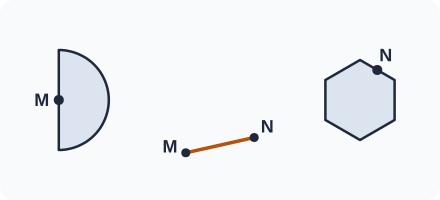
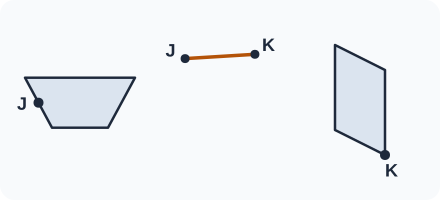
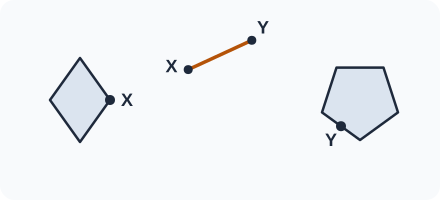
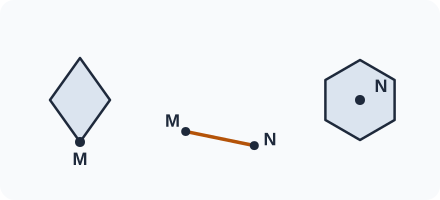
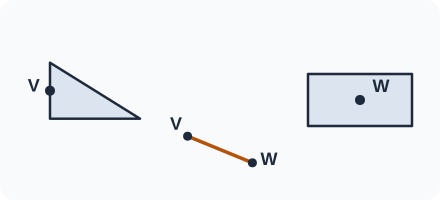
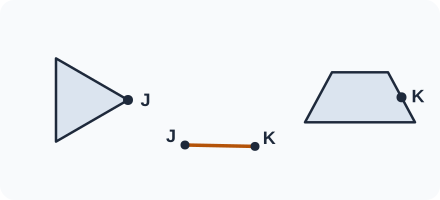
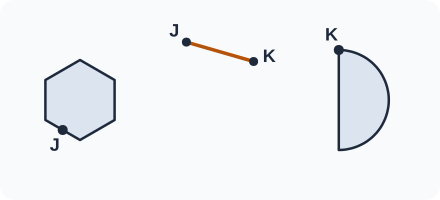
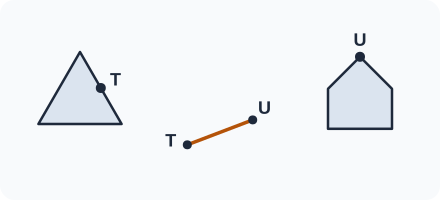
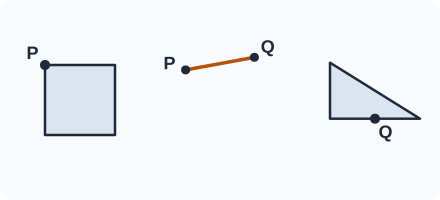
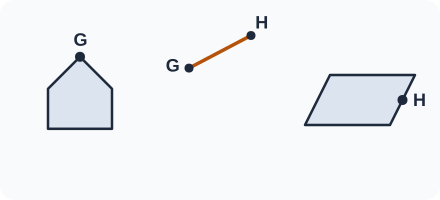
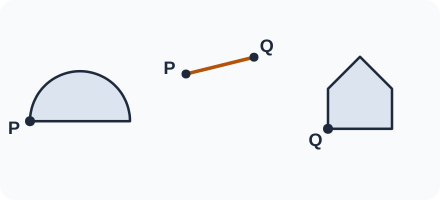
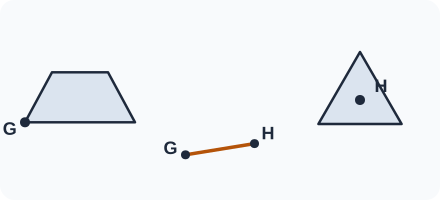
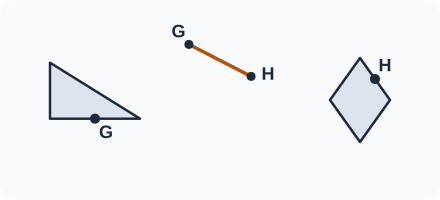
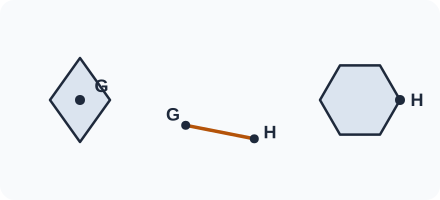
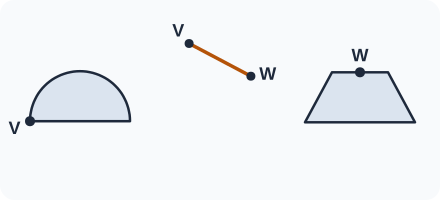
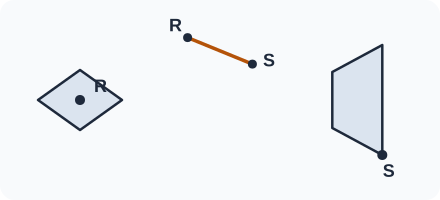
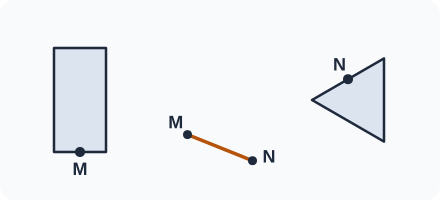
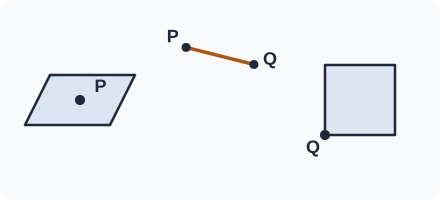
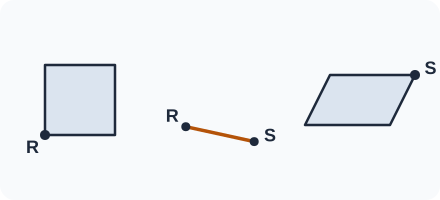
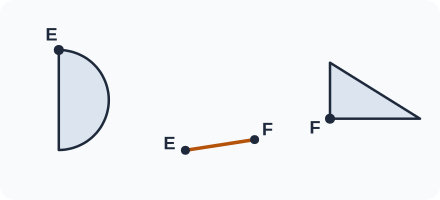
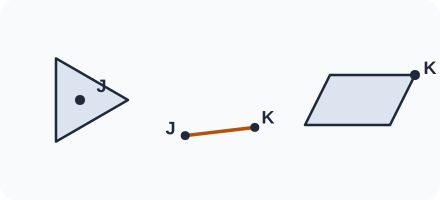
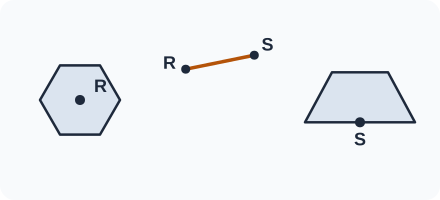
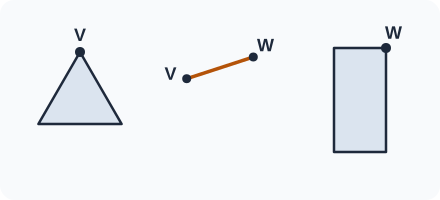
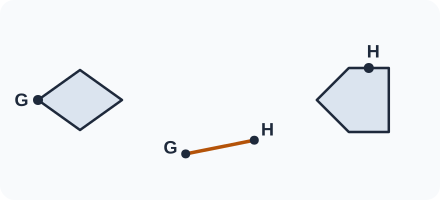
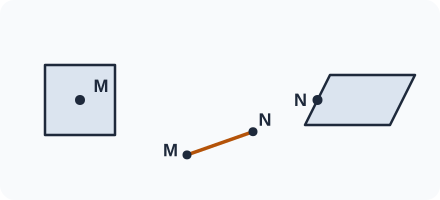
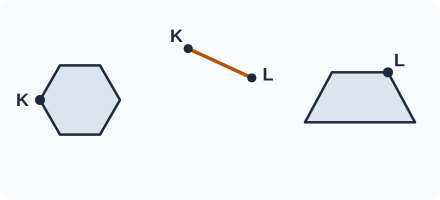
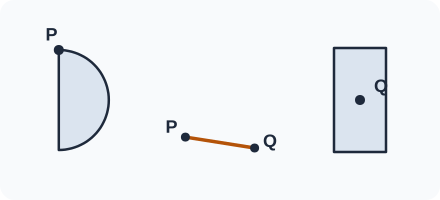
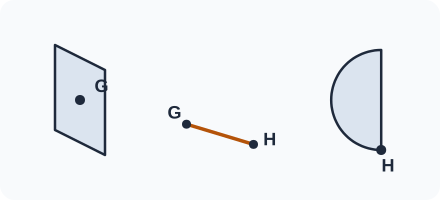
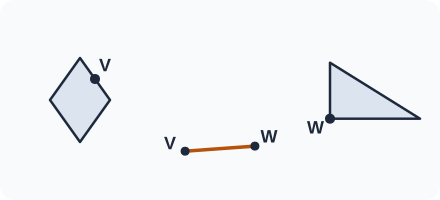
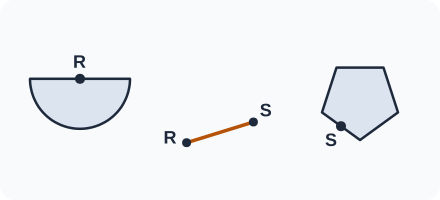
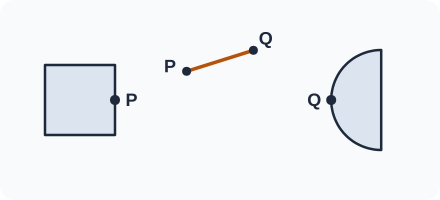
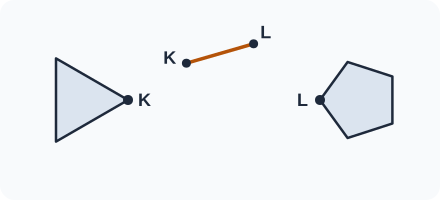
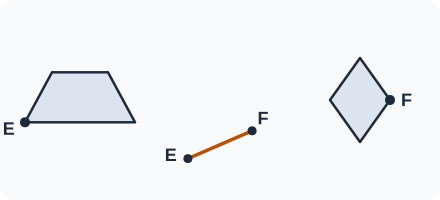
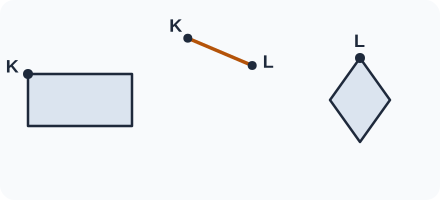
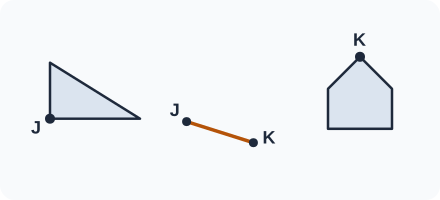
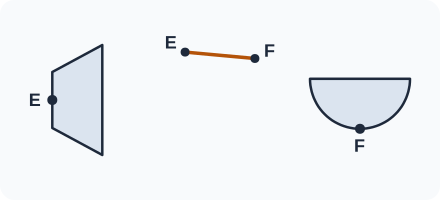
 English ▾