 ASVAB Camp
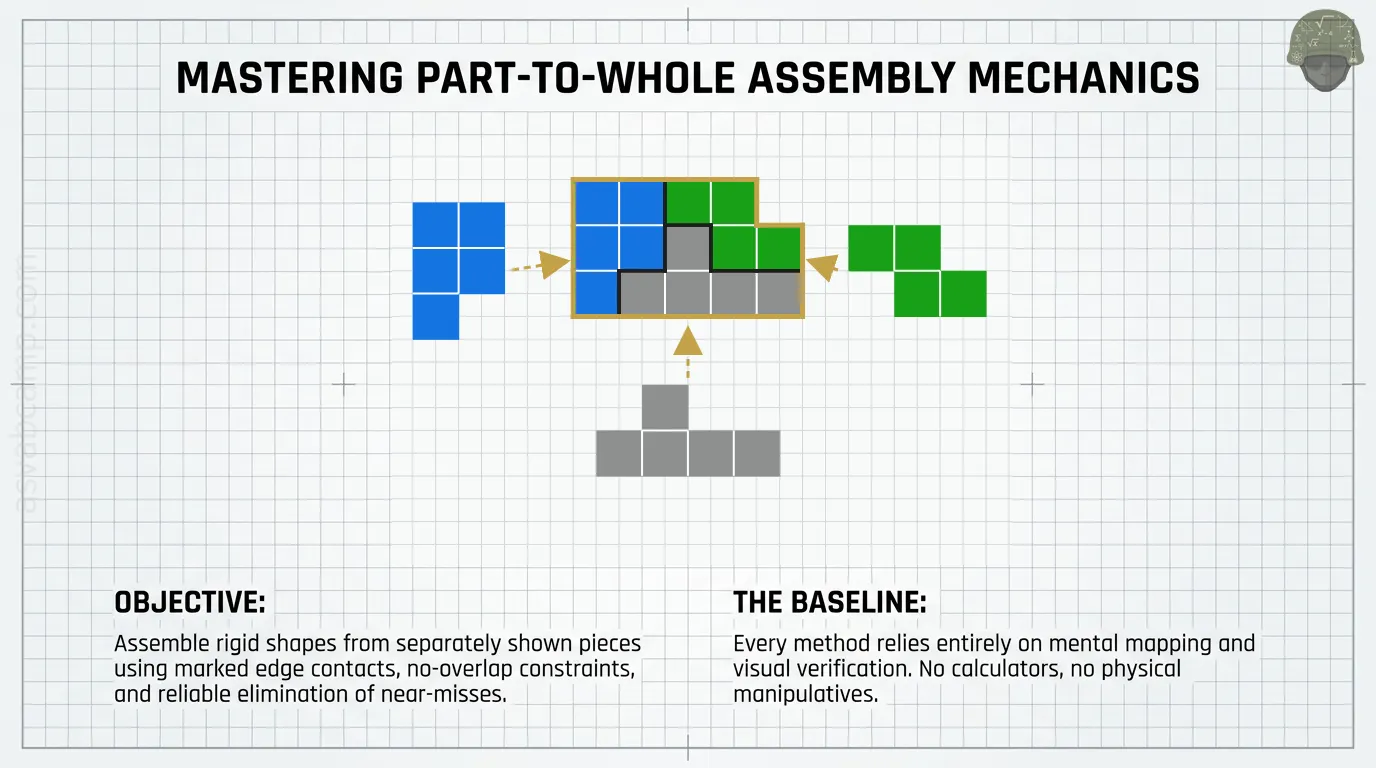
The whole must explain every part
By the end of this lesson you should be able to take two or three separately drawn flat pieces, picture how they fit together, and pick the one assembled drawing that is truly possible.
A correct assembly accounts for every supplied piece, keeps each piece's exact shape, joins the marked edges exactly where the marks say, and adds no extra material. If any part of the finished drawing cannot be traced back to a supplied piece, the drawing fails.
ASVAB relevance and question integrity
The Assembling Objects subtest measures how well you can mentally combine separate parts into a whole. This lesson builds that skill with original practice items written for this course; none of them are copied from the real test. The teaching examples in this lesson use a simple grid and colored edge markers so that every step can be checked cell by cell. The extra practice questions use the two question styles of the real subtest, connectors and puzzles, so the habits you build here, such as matching marked points, protecting each piece's shape, and rejecting near misses, carry straight over.
Puzzle questions on the test
The puzzle kind of Assembling Objects question shows several separate flat pieces in a box. You choose the figure that shows the pieces fitted together into one shape; thin lines in each answer figure show where the pieces meet. Pieces may be turned and slid, but never flipped, resized or reshaped, and every piece must be used exactly once.
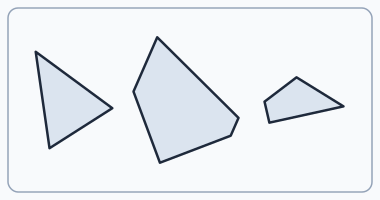
These pieces fit together into the shape below. Each piece appears once, only turned and moved.
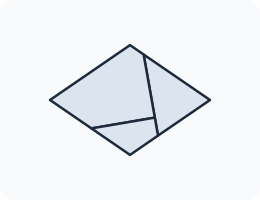
A fast routine: first count the pieces and cross out any figure with a different number. Then pick the most distinctive piece, such as the largest one or one with a curved edge or a very sharp point, and find it in each remaining figure. Finally compare the sizes of the other pieces. In a wrong figure a cut is usually in a slightly different place, which makes one piece too big and its neighbor too small.
What counts as a part?
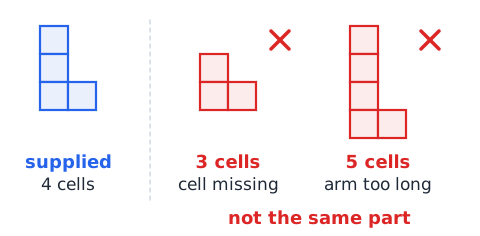
A part is one rigid, flat shape shown on its own in the problem. Rigid means it cannot bend, stretch, shrink, or lose a branch. Whatever you do to it, its cells, notches, and arms stay in the same relationship to one another.
For example, an L-shaped piece made of four cells is still four cells in an L after any slide or turn. If an answer shows that piece with three cells, or with a longer arm, that drawing does not contain the supplied part.
Inventory before attempting a join
Before you try any mental fitting, take a quick inventory. Count the pieces, note the color or label of each, count roughly how many cells each one has, and find the marked connectors.
Suppose a problem shows a five-cell blue piece and a three-cell red piece. You now know any correct answer must contain exactly one blue region of five cells and one red region of three cells. Answers that break that count can be dropped before you think about rotation.
Separate translation from rotation
Two different motions are allowed for a rigid piece. A translation slides it to a new place without turning it; every cell moves the same distance in the same direction. A rotation turns it about a point, changing which way its features face.
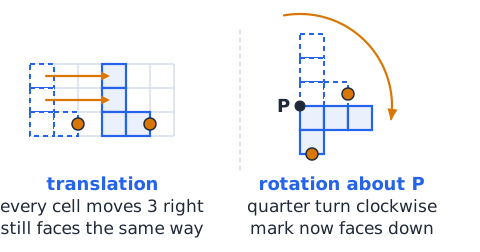
Handle them one at a time. First decide how far the piece has turned by checking which way a distinctive feature points. Then decide where it sits. Mixing the two questions is a common source of confusion.
A mirror is not an ordinary turn
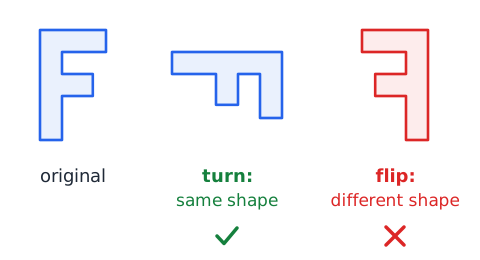
A reflection flips a piece over, like viewing it in a mirror. No amount of turning within the flat page can produce that result, because a flip reverses the piece's handedness: features that ran clockwise around the edge now run counterclockwise.
Think of the letter F. Rotate it any amount and it still reads as F turned. Flip it and you get a backward F, a different shape for our purposes. When flipping is not allowed, a mirrored piece is wrong.
The connector pair is an anchor
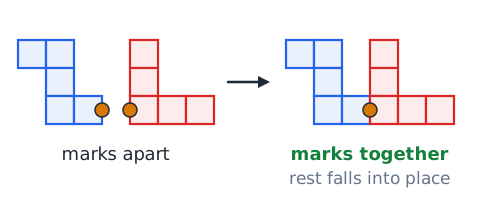
The matching marks on two pieces tell you exactly which point of one must touch which point of the other. Treat that pair as an anchor: once the marked spots are together, the rest of each piece has very little freedom.
Place the marked edge of the first piece, bring the marked edge of the second piece directly against it, and then let the remaining cells fall where the rigid shapes force them.
Edge contact differs from corner contact
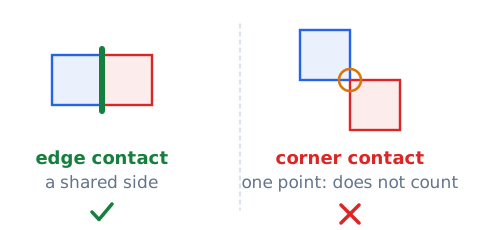
Edge contact means two pieces share a full side of at least one cell, so a line segment is common to both. Corner contact means they touch at only a single point, the way two squares on a checkerboard meet diagonally.
When a problem says marked edges must meet, a corner touch does not qualify. The two marked sides must lie flush against each other along their length.
No-overlap rule for flat solid pieces
Treat each piece as a flat tile cut from solid material. Two tiles cannot occupy the same spot on the table, so no cell may belong to two pieces at once.
If an answer drawing shows a blue cell sitting where a red cell should also be, that region would have to be stacked or squeezed, which is not allowed. An overlap quietly removes material from the footprint, so the assembled shape no longer matches the parts.
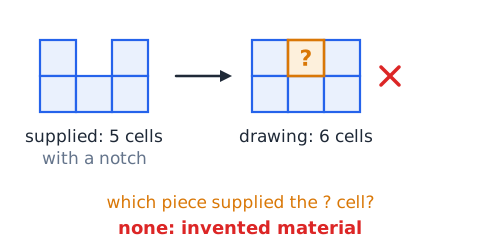
Do not accidentally invent material
The opposite error is adding material. A drawing may fill a notch, close a gap, or extend an arm so the outline looks neat. Any cell that does not come from a supplied piece is invented.
Check suspicious areas, especially tidy rectangles and filled corners, by asking which piece that cell belongs to. If no piece can supply it, the drawing contains extra material and must be rejected.
Area conservation in a grid puzzle
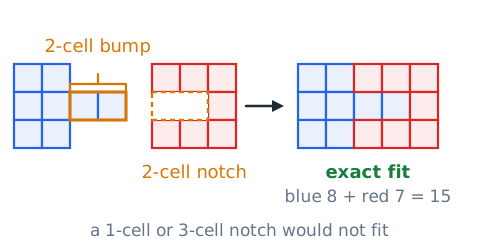
On a grid, every cell is the same size, so area is just a count. When pieces join without overlap, the total number of filled cells in the assembly equals the sum of the pieces' cell counts.
A seven-cell piece joined to a five-cell piece must produce exactly twelve filled cells. Eleven means something overlapped or was lost; thirteen means material was invented. This count is a fast first filter.
Every internal seam has two sides
Where two pieces meet, the seam between them is a line with one piece on each side. Every point along that seam should belong to the edge of one piece and the edge of the other.
When you check a seam, look at both sides. If one side shows a cell from the right piece but the other side shows empty space or the wrong piece, the seam is not where the marks say it should be.
Complementary projections and recesses
Some pieces fit like a key in a lock: a bump on one piece slides into a notch of the same size on the other. The bump and the notch are complementary.
When you see a projection two cells long and one cell wide, look for a recess on the partner that is exactly two cells long and one cell wide. A one-cell recess cannot hold it, and a three-cell recess leaves a hole.
Align the marked boundary, not the page
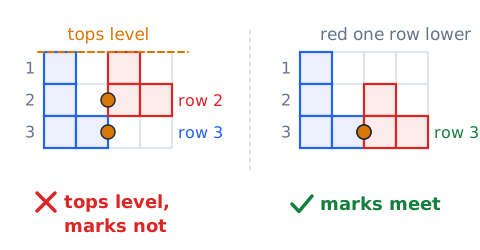
Do not assume pieces line up with the top or bottom of the drawing area. The only alignment that matters is between the marked boundaries.
A red piece might need to sit one row lower than the blue piece so its marked side lands beside the blue mark. If the two pieces' top rows are level but the marks are not, the join is wrong even though it looks orderly.
The silhouette is useful but incomplete
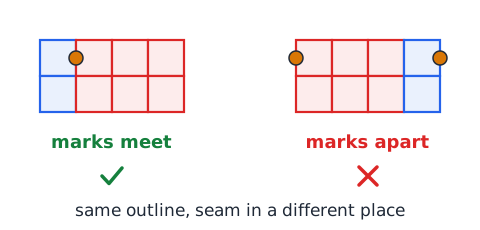
The silhouette is the outer outline of the finished assembly. Checking it can eliminate answers quickly, because a wrong outline means a wrong assembly.
A correct outline is not proof, though. Two different arrangements of the same pieces can produce the same outer boundary while their internal seams sit in different places. After the outline passes, still check the seams and marks.
Track a marker through the turn
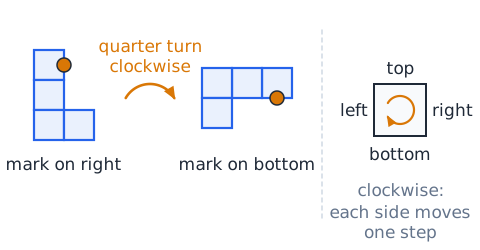
When a piece turns, its connector mark turns with it. If a mark sits on the right side of a piece and the piece turns a quarter turn clockwise, the mark ends up on the bottom side.
Follow the mark, not the overall shape. Asking where the marked side faces after the turn quickly tells you where the partner piece must be.
Use one stable asymmetric landmark
Pick one feature on each piece that appears only once, such as a single notch, the long arm of an L, or a lone branch. That feature is your landmark.
Because it is unique, it tells you the piece's orientation without ambiguity. In each answer drawing, find the same landmark and confirm that it points the way the allowed rotation predicts, and that other features keep the same order around it.
Look for the exact joining side
A connector mark sits on one specific side of one specific cell. Joining the right pieces along the wrong side, or along the right side but one cell off, is still a wrong join.
Name the marked spot precisely, for example the right side of the bottom cell in the tall column. Then confirm the answer drawing uses that exact side, not a neighbor.
A right angle changes side labels
A quarter turn shifts every side label by one step. Turning clockwise, the top side becomes the right side, the right becomes the bottom, the bottom becomes the left, and the left becomes the top. Counterclockwise runs the other way.
So a mark on a piece's top edge, after a quarter turn clockwise, belongs on its right edge. Updating the labels keeps you from searching the wrong side.
Half-turn and three-quarter-turn
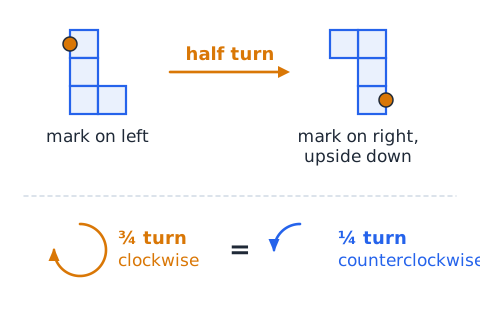
A half turn is two quarter turns. It swaps top with bottom and left with right, so a mark on the left side ends up on the right side and the piece appears upside down.
A three-quarter turn clockwise is the same as one quarter turn counterclockwise. Recognizing that shortcut saves time: instead of stepping three times, step once the other way. Every one of these turns preserves handedness.
Keep pieces in their own colors mentally
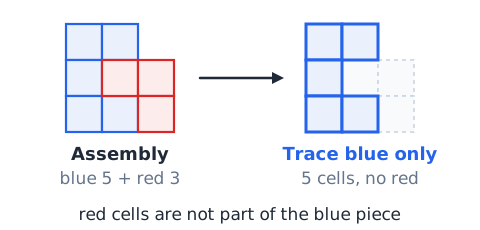
In an assembled drawing, the pieces may sit right next to each other. Keep each piece's identity separate in your mind, as if each were painted a distinct color.
This prevents a subtle mistake: counting a cell from the red piece as part of the blue piece's shape. When you trace the blue piece in an answer, trace only blue cells, and confirm that region alone matches the supplied blue shape.
Assemble around a fixed base piece
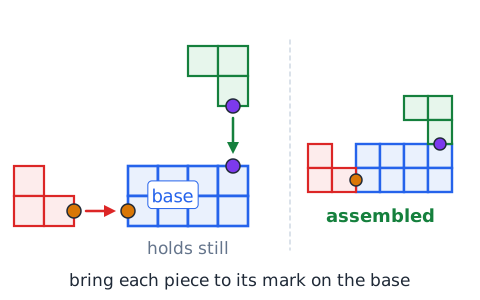
Choose one piece, usually the largest or the one with the most connectors, and hold it still in your mind. This base defines the frame of reference.
Then bring each other piece to the base by its marked edge. Because the base never moves, you only have to solve one piece's orientation and position at a time, which is far easier than juggling all of them.
Three-piece chains require two checks
In a chain of three pieces, one piece sits in the middle and joins the other two. There are two separate joints, and both must be correct.
Check the first joint fully, then check the second joint fully. A drawing that gets the first joint perfect but leaves the third piece one cell away from the middle piece is still wrong, because one of the required connections is missing.
Branching shapes need an interface map
When a piece has several arms, or more than one connector, write a quick mental map: which arm touches which piece, and at which marked side.
For example: the top arm of the gray piece meets the green piece; the right arm meets the orange piece. With that map you can check each interface in turn instead of trying to absorb the whole picture at once.
Negative space is evidence
Empty space inside or around an assembly carries information. A notch in a piece should remain a notch unless the partner fills it exactly.
If an answer shows a solid area where the supplied piece had a gap, ask which piece filled it. If no piece did, material was invented. If an answer shows a gap where two pieces should meet flush, the pieces are separated.
External boundary and interior marks
Two kinds of evidence appear in an assembly drawing. The external boundary is the outline around everything. Interior marks are the seams between pieces and the connector dots.
Use both. The boundary tests overall shape; the interior marks test how the pieces were placed. Answers designed as traps often get the boundary right but put a seam or a marker in the wrong place.
Grid coordinates as a checking aid
When pieces lie on a grid, you can name each cell by row and column, counting rows from the top and columns from the left. Row 2, column 5 is one exact square.
Coordinates make checks objective. A connector on the right side of row 3, column 4 can only touch the left side of row 3, column 5. If the partner's mark sits on row 4, column 5, the two marks are a row apart and cannot meet.
Preserve neighbors and corner patterns
Inside a rigid piece, every cell keeps the same neighbors after any slide or turn. If a cell touched two others in the original piece, it touches the same two in every valid copy.
Corners also keep their pattern. An outside corner stays an outside corner, and an inside corner stays an inside corner. A drawing where a neighbor relation or corner type has changed shows a different shape.
Beware of global rotation invariance
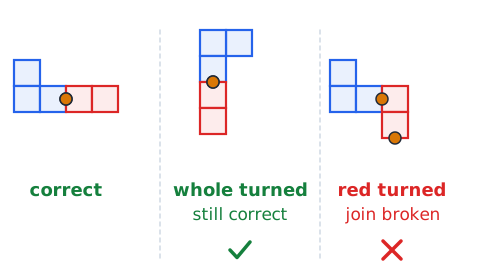
Turning the entire assembly, every piece together, does not change whether it is correct. So an answer drawn sideways can still be right.
The trap is the reverse idea: thinking you may turn one piece by itself and call it the same assembly. Rotating only one piece changes its relationship to the others and usually breaks the join. Compare relationships between pieces, not the angle of the whole picture.
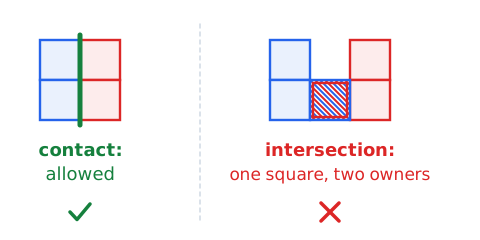
Distinguish contact from intersection
Contact means two pieces touch along a boundary with no shared interior. Intersection means part of one piece lies inside the other.
On a grid, contact shows up as two cells of different pieces sharing a side. Intersection shows up as one square claimed by both pieces. Only contact is allowed. If you are unsure, try naming the owner of each cell; any square with two owners is an intersection.
Control the amount of rotation
Count turns in quarter-turn steps: none, one quarter, half, or three quarters. Decide the amount from a landmark, then apply exactly that amount to everything else on the piece.
A frequent slip is turning the landmark correctly but rotating the connector mark by a different amount. Keep the whole piece turning as one block, and recheck the mark after you settle the angle.
Triage wrong choices systematically
Sort out wrong answers in a fixed order, from fastest check to slowest. First, are all pieces present and is the cell count right? Second, does each piece keep its shape with no flip? Third, do the marked connectors touch exactly?
Most wrong drawings fail at one of these steps. Applying the steps in order means you rarely need to study a drawing in fine detail.
Do not trust an almost-correct seam
Near-miss answers are built to look right at a glance. The seam is in the right general area but shifted by one cell, or the pieces are close but separated by a thin strip of space.
Almost correct is wrong. Locate both connector marks and check that they sit on the same grid line and face each other directly. A one-cell offset is enough to reject the drawing.
Separate unknown orientation from unknown position
When a piece appears in an answer, two things might differ from the original: which way it faces, and where it sits. Treat them as separate unknowns.
Solve orientation first by matching a landmark. Then solve position by checking where the connector mark lands relative to its partner. A piece can have the correct orientation and still be in the wrong position.
Work backward from the answer option
Sometimes it is easier to start from a proposed assembly and take it apart. Mentally lift out each colored region and compare it with the matching supplied piece.
If every region matches a supplied piece after some slide or turn, and the marks meet, the drawing is valid. If any region has the wrong shape, an extra cell, or a flipped orientation, the drawing fails.
A complete assembly uses each piece once
Every supplied piece must appear in the finished assembly exactly one time. A missing piece leaves the whole incomplete, and a duplicate adds material that was never provided.
An answer can have a pleasing outline and still be wrong because it omits a small piece or repeats one. Count pieces by color or label before anything else.
When two choices seem identical
Occasionally two answer drawings look the same at first. Do not guess between them. Look for the difference the test maker built in.
Common differences include a seam moved by one cell, a connector mark on the wrong row, or one piece mirrored. Compare the two drawings feature by feature, starting with the marked connectors, until you find the detail that separates them.
Worked example: a single marked seam
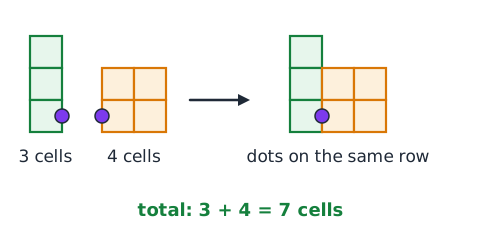
A green piece is a straight bar of three cells standing upright, with a dot on the right side of its bottom cell. An orange piece is a two-by-two square with a dot on the left side of its lower-left cell.
Step one: the green dot faces right, so the orange dot must face left, which it already does. Step two: place the two dots side by side on the same row. Step three: the orange square now sits to the right of the green bar, with its bottom row level with the bar's bottom cell. Result: seven filled cells in total.
Worked example: counting solid material
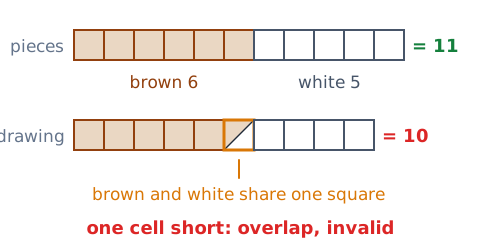
A brown piece has six cells and a white piece has five. A proposed assembly shows ten filled cells.
Step one: the correct total is 6 plus 5, which is 11 cells. Step two: the drawing shows 10, one short. Step three: conclude that one cell was lost, most likely through an overlap where a brown cell and a white cell occupy the same square. Answer: the drawing is invalid, without any need to study rotation.
Worked example: reflection trap
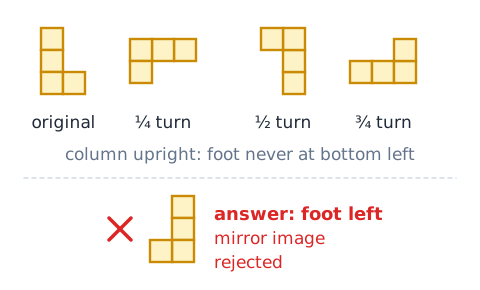
A yellow piece looks like the letter L: a column of three cells with one extra cell sticking out to the right at the bottom. An answer shows the column with its extra cell sticking out to the left at the bottom.
Step one: try a half turn of the original. The foot would then be at the top, pointing left. Step two: try quarter turns; the foot never sits at the bottom pointing left while the column stays upright. Answer: that drawing is a mirror image, so it is rejected when flipping is not allowed.
Worked example: two different joins
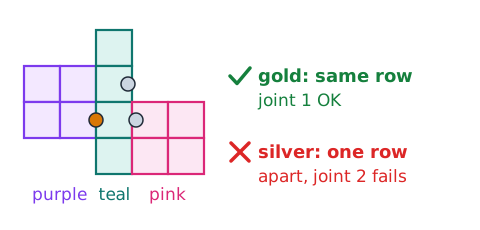
A purple piece must join a teal piece at gold marks, and the teal piece must join a pink piece at silver marks. A proposed drawing shows the gold marks side by side on the same row, but the silver mark on the pink piece sits one row below the silver mark on the teal piece.
Step one: the gold joint passes. Step two: the silver joint fails because the marks are a row apart. Answer: reject the drawing; one good joint does not rescue a bad one.
Worked example: checking a candidate backward
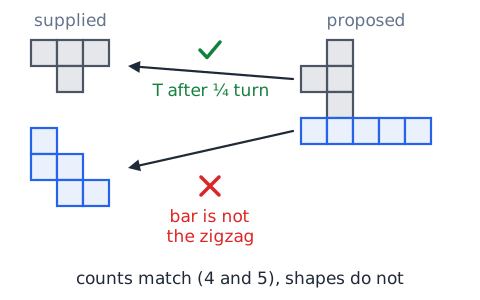
A proposed assembly shows a gray region of four cells in a T shape and a blue region of five cells. The supplied pieces are a four-cell T and a five-cell zigzag.
Step one: lift out the gray region; it is a T, matching after a quarter turn. Step two: lift out the blue region; it is a straight bar of five cells, not a zigzag. Answer: the drawing fails because one region does not match its supplied piece, even though the cell counts are correct.
A repeatable fifteen-second scan
Use the same short routine on every item. In the first few seconds, count pieces and note each one's landmark and connector. Next, scan each answer for missing or extra pieces and wrong cell counts. Then check each surviving answer for flipped pieces. Finally, check that each pair of marks touches on the same grid line with no gap.
Most items resolve before the final step. Having a fixed routine keeps you calm and consistent when the clock is running.
Manage time without inventing a rule
Under time pressure, people sometimes create shortcuts that are not real rules, such as assuming the most symmetrical drawing is right, or that the answer with the neatest rectangle must be correct. Those habits lead to errors.
Save time by applying genuine rules quickly: piece count, shape match, no flip, no overlap, marks touching. If an item still feels unclear, make your best choice from what remains and move on rather than freezing on one question.
Mobile-friendly diagram reading
On a small screen, pieces and marks can look cramped. Zoom in on the connector area before you judge a seam, and count grid squares rather than estimating distances by eye.
Read the pieces one at a time from left to right, and return to the supplied pieces whenever you need to confirm a shape. Rotating your device or tilting your head does not change the problem; reason about the pieces instead.
Independent verification of a solution
After choosing an answer, verify it with a different method than the one you used to find it. If you found it by matching marks, verify by counting cells and lifting out each region to compare shapes.
When two independent checks agree, you can be confident. If they disagree, one of them uncovered a mistake, and it is worth a few more seconds to find out which.
A piece with two connectors is highly constrained
A middle piece in a chain carries two connector marks, one for each neighbor. Each mark pins one side of the piece to a partner, so the middle piece has almost no freedom once both neighbors are placed.
Use this. If you know where the first neighbor sits, the first mark fixes the middle piece's position and turn. The second mark then tells you exactly where the third piece must go. If the second mark points somewhere the third piece cannot reach, the drawing is wrong.
The same shape can fit in several places
A piece of the correct shape and orientation may appear in an answer in several positions: one cell higher, one cell lower, or one column further away. All of those copies look right as shapes.
Only one position puts its connector exactly against the partner's connector. That is why shape matching alone cannot finish the job. After confirming shape, confirm position by checking that the two marks share a grid line and face each other.
Why one-cell displacement is deceptive
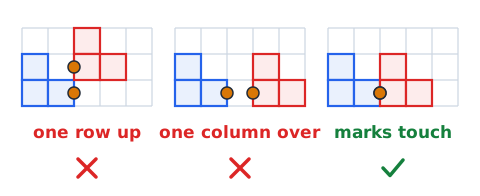
A shift of a single cell barely changes the overall picture, so the eye accepts it. Yet it moves the connector mark a full cell away from where it belongs.
A horizontal shift leaves a one-cell gap between the marks, so the pieces do not touch at the required spot. A vertical shift puts the marks on different rows, so they slide past each other. Both produce a drawing that looks almost right and is completely wrong.
Two colored seams are two separate promises
When a problem uses, say, gold marks for one joint and purple marks for another, each color is its own requirement. Gold must meet gold, and purple must meet purple.
Satisfying one color says nothing about the other. Do not let a perfect gold joint make you relax; check the purple joint with the same care. A gold mark touching a purple mark does not count as either joint.
How to detect an illegal interior intersection
An intersection hides inside the drawing, so the outline may give no hint. To catch it, count the cells in each colored region and compare with the supplied pieces.
If the blue region in the answer has one fewer cell than the supplied blue piece, a red cell may be covering it. Another clue is a seam line that cuts through the middle of a cell rather than running along grid lines. In either case, two pieces are claiming the same space, and the drawing must be rejected.
Conserving feature order along a winding path
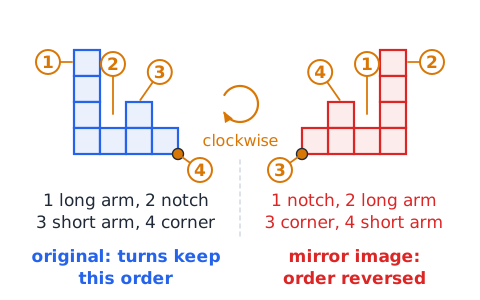
Trace a piece's edge with your finger, going clockwise, and list its features: long arm, notch, short arm, corner. A turn of the piece keeps that clockwise order the same; it only changes where you begin.
A mirror image reverses the order. If tracing the answer clockwise gives notch, long arm, corner, short arm, the sequence is backward, and the piece has been flipped. Feature order is one of the most reliable tests for handedness.
One-piece-at-a-time visual loading
Working memory holds only a few details at once. Trying to picture two or three moving pieces together overloads it and leads to mistakes.
Load one piece at a time. Study the first piece's shape and connector, find it in the answer, and confirm it. Then clear your mind and do the same for the next piece. The final step checks how the confirmed pieces meet at their marks.
Use a local check before a global check
A local check looks at one small area, such as the two connector marks and the cells right next to them. A global check studies the whole assembly.
Start local. If the marks are a row apart or a column apart, you can reject the drawing in seconds without examining every piece. Only drawings that pass the local check need the slower global check of shape, count, and orientation.
Classify a miss to improve the next attempt
When you get a practice item wrong, name the kind of mistake. Did you miss a flipped piece? Accept a one-cell shift? Overlook a missing piece? Accept corner contact as an edge join?
Keeping a short tally of mistake types shows your weak spot. If shifts keep fooling you, slow down at the connector step. If flips fool you, practice tracing feature order. Targeted review improves scores faster than repeating random items.
Worked example: the tempting vertical shift
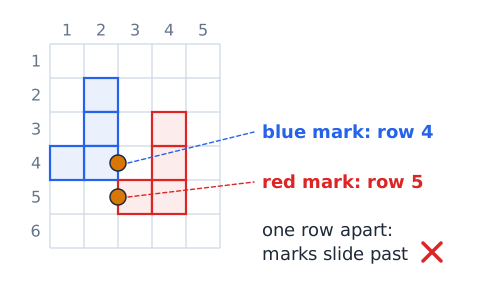
A blue piece has a mark on the right side of its cell in row 4, column 2. A proposed answer places a red piece whose mark sits on the left side of row 5, column 3. Both pieces have the right shapes and turns.
Step one: the columns are neighbors, so horizontally the marks could touch. Step two: compare rows; row 4 and row 5 differ by one. Answer: the marks slide past each other instead of meeting, so the drawing is rejected despite its correct shapes.
Worked example: a middle-piece shift
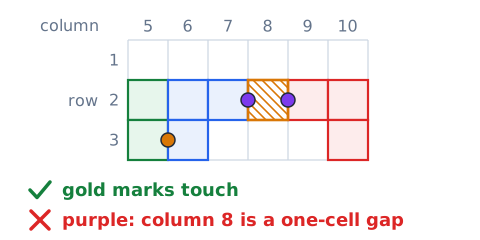
In a three-piece chain, the gold marks between the first two pieces sit on the same row in neighboring columns, which is correct. The middle piece's purple mark is on the right side of row 2, column 7, while the third piece's purple mark is on the left side of row 2, column 9.
Step one: the gold joint passes. Step two: the purple marks share a row, but column 8 lies between them, a one-cell gap. Answer: reject the drawing.
Material accounting does not solve orientation
Cell counting tells you whether material was lost or added, but it says nothing about which way a piece faces or where it sits. A flipped piece has the same number of cells as the original, and so does a shifted one.
So a drawing with the correct total can still be wrong. Treat the count as a necessary first test, then move on to the shape, orientation, and connector checks that counting cannot do.
What a strong verbal explanation contains
Explaining your choice in words helps confirm it. A solid explanation names each piece and how it was moved, for example: the red bar turned a quarter turn clockwise and slid so its mark rests against the blue mark on row 3.
It also states the checks you made: all pieces used once, cell total correct, no flip, no overlap, and every pair of marks touching along a shared side. If you cannot state one of those checks, go back and do it.
The boundary-dot convention used in this lesson
In this lesson's grid items, a connector is drawn as a colored dot on one side of one cell, and rows are counted from the top while columns are counted from the left.
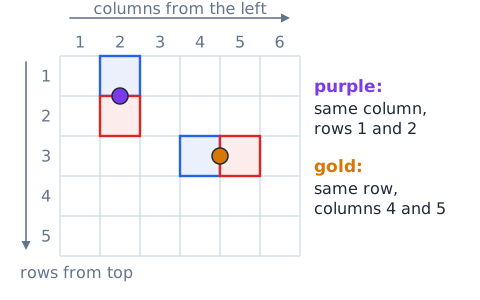
A correct side-by-side joint pairs a dot on the right side of a cell with a dot on the left side of the cell directly to its right. That means the two dots share a row, and their columns differ by exactly one. A top-to-bottom joint works the same way: the dots share a column, and their rows differ by exactly one. Same-color dots on different rows, or two columns apart, do not form a joint.
Assembly checklist you can reuse
Use this checklist on every Assembling Objects item. Count the supplied pieces and confirm each appears exactly once. Confirm the total number of filled cells equals the sum of the pieces. Lift out each region and confirm its shape matches after a slide or turn, with no mirror flip. Confirm no cell belongs to two pieces and no extra cells were added. Finally, confirm that each pair of matching marks touches along a full shared side, on the same row, with no gap.
What success looks like
You have mastered this lesson when you can glance at a set of pieces, name each one's landmark and connector, and predict where its partner must sit. You reject flipped pieces, one-cell shifts, gaps, overlaps, and corner-only contact without hesitation.
Just as important, you can explain why the correct answer works: every piece is present and unchanged, the material adds up, and every marked joint meets exactly.
 English ▾