This 40-question lesson test puts your assembly method to work. Each item shows separate pieces and asks which diagram joins them correctly, so you must match marked contacts, apply the right rotation, keep every piece and avoid overlaps or invented material. The questions are original and written in the ASVAB style for the Assembling Objects subtest.
A green piece covers 7 grid cells and an orange piece covers 4 grid cells. If the two pieces are joined correctly, with no overlap and no added material, how many filled cells should the finished assembly show?
Show the answer
Answer: A
Correct answer: 11 cells. On a grid every cell has the same area, so the assembly holds the sum of the pieces:
7 + 4 = 11
filled cells. Any other total means material was lost to an overlap or invented.
A (correct): Joined pieces simply add their areas: 7 + 4 = 11 filled cells.
B: Ten cells would mean one cell was lost, which happens only if the pieces overlap.
C: This multiplies the cell counts, but areas of joined pieces add rather than multiply.
D: Twelve cells would mean one extra cell was invented that neither piece supplies.
Question 2 of 40 · easy
A supplied piece is shaped like the letter F. One answer drawing shows that piece as a backward F. If flipping is not allowed, what should you conclude about that drawing?
Show the answer
Answer: B
Correct answer: It must be rejected, because no turn in the plane can turn an F into a backward F. A reflection reverses a piece's handedness, and no amount of turning within the page can undo that. When flipping is forbidden, a drawing that shows a mirrored piece is wrong even if its size and cell count match.
A: Moving a piece to a new spot is allowed; the problem is the change in handedness, not the change in position.
B (correct): A backward F is a mirror image; rotation keeps handedness, so only a forbidden flip could produce it.
C: A mirrored piece has the same cell count as the original, so counting cannot excuse a flip.
D: A half turn of an F gives an upside-down F, not a backward one, so this test never rescues a mirrored piece.
Question 3 of 40 · easy
Two square cells from different pieces touch only where their corners meet, like diagonal squares on a checkerboard. The problem requires the marked edges of the pieces to meet. Does this contact satisfy the requirement?
Show the answer
Answer: B
Correct answer: No, because an edge join needs a full shared side, not a single point. Edge contact means a full side of a cell is common to both pieces. Diagonal squares meet at only one point, which is corner contact, so the marked edges have not met.
A: Touching at a corner is not an overlap; no square is claimed by both pieces, so this misnames the problem.
B (correct): Edge contact means the two cells share a whole side; a corner touch shares only one point.
C: Sharing a single point is corner contact, which the lesson says does not count as an edge join.
D: Avoiding overlap is necessary, but it does not turn a corner touch into the required edge contact.
Question 4 of 40 · easy
A connector dot sits on the top side of a piece. The piece is then turned a quarter turn clockwise. On which side of the piece is the dot now?
Show the answer
Answer: C
Correct answer: The right side. Turning clockwise shifts each side label one step: top becomes right, right becomes bottom, bottom becomes left, and left becomes top. The dot that started on top therefore ends up on the right side.
A: Top moves to the left only with a counterclockwise quarter turn.
B: The dot turns with the piece, so it cannot stay on top after a quarter turn.
C (correct): A clockwise quarter turn moves top to right, so the dot faces right.
D: Top reaches the bottom only after a half turn, which is two quarter turns.
Question 5 of 40 · easy
In an answer drawing, one grid square appears to belong to both the blue piece and the red piece at the same time. What does this show?
Show the answer
Answer: C
Correct answer: An illegal intersection, so the drawing is rejected. Each piece is a solid tile, so no square may belong to two pieces. A square with two owners is an intersection (overlap), and any drawing that contains one is invalid.
A: Edge contact means two different squares share a side, not one square shared by two pieces.
B: An overlap removes a cell from the total footprint; it makes the count too small, not too large.
C (correct): A square with two owners means one piece lies inside the other, which solid flat pieces cannot do.
D: Even at the marked spot, the pieces must touch along a side; they still may not cover the same square.
Question 6 of 40 · easy
A supplied piece is an L made of four cells: a column of three with one cell beside the bottom. Which answer-drawing version of that piece could still be the same rigid piece?
Show the answer
Answer: A
Correct answer: An L of four cells lying on its side, its long arm three cells. A rigid piece keeps its cells and their arrangement after any shift or turn. Only the four-cell L with a three-cell long arm, simply turned, matches the supplied piece.
A (correct): A turned copy keeps all four cells and the same arm lengths, so it is still the supplied piece.
B: The cells are the right count, but the foot has moved into line, so the shape and neighbor pattern changed.
C: This drawing has lost a cell; a rigid piece cannot shrink.
D: This drawing stretches the long arm, adding a cell the piece does not have.
Question 7 of 40 · easy
A piece has a connector dot on its left side. The piece is given a half turn. Where is the dot after the turn?
Show the answer
Answer: D
Correct answer: On the right side. A half turn is two quarter turns. It swaps top with bottom and left with right, so a dot that started on the left side ends on the right side.
A: Left moves to the top after a quarter turn clockwise, not after a half turn.
B: Only a full turn, or no turn, returns the dot to the left side.
C: Left moves to the bottom after a quarter turn counterclockwise, not after a half turn.
D (correct): A half turn swaps left with right, so the dot ends up on the right side.
Question 8 of 40 · easy
Using the convention that rows are counted from the top and columns from the left, a gold dot is on the right side of the cell at row 5, column 2. Where must the matching gold dot be for the two dots to form a joint?
Show the answer
Answer: A
Correct answer: On the left side of row 5, column 3. A right-side dot can only meet a left-side dot on the cell directly to its right. That cell shares row 5 and is one column over, so it is row 5, column 3.
A (correct): This cell is directly to the right on the same row, and its left side lies against the first dot.
B: A right-side dot on the next cell faces away from the first dot, so the dots never touch.
C: This dot is one row lower, so the two dots pass each other instead of meeting.
D: Column 4 is two columns away, leaving column 3 as a gap between the dots.
Question 9 of 40 · medium
A problem supplies three pieces with 6, 4 and 3 cells. One answer drawing shows all three colors but only 12 filled cells. What is the best conclusion?
Show the answer
Answer: C
Correct answer: The drawing is invalid; a cell is missing, most likely lost to an overlap. Add the pieces:
6 + 4 + 3 = 13
cells. The drawing shows 12, one fewer, so material was lost, most likely through an overlap. The drawing is rejected without checking rotation at all.
A: Invented material would raise the total above 13, but this drawing falls short of it.
B: Area must be exact on a grid; even one missing cell means the assembly does not match the pieces.
C (correct): The correct total is 6 + 4 + 3 = 13; a total of 12 means one cell vanished, typically where two pieces overlap.
D: Showing every color only confirms each piece is present; the area count still has to match.
Question 10 of 40 · medium
A dot sits on the bottom side of a piece. The piece is turned three quarter turns clockwise. Which single move gives the same result, and where does the dot end up?
Show the answer
Answer: A
Correct answer: A quarter turn counterclockwise; the dot ends on the right side. Three quarter turns clockwise equal one quarter turn counterclockwise. Counterclockwise, the side labels shift bottom to right, right to top, top to left and left to bottom, so the dot ends on the right side. Stepping clockwise three times (bottom to left, to top, to right) gives the same answer.
A (correct): Three clockwise quarter turns equal one counterclockwise quarter turn, which carries bottom to right.
B: One clockwise quarter turn is a different amount of rotation from three clockwise quarter turns.
C: The shortcut is right, but a counterclockwise quarter turn moves bottom to the right side, not the top.
D: A half turn is only two quarter turns, so it is not equivalent to three.
Question 11 of 40 · medium
An answer drawing has exactly the same outer outline as the correct assembly. Why is that not enough to accept it?
Show the answer
Answer: B
The silhouette can eliminate wrong answers, but two placements of the same pieces can give the same boundary. After the outline passes, still check that each seam is where the marks require and that the dots meet.
A: The outline says nothing about where the interior seams and dots are, so it cannot prove the joint is correct.
B (correct): The outline tests only overall shape; the interior seams and marks show how the pieces were actually placed.
C: Outline checks are a useful quick filter; they are just not proof on their own.
D: A matching outline is not evidence of a flip; flips must be checked separately by feature order.
Question 12 of 40 · medium
In a three-piece chain, the gold dots between the first two pieces meet correctly. The middle piece has a purple dot on the right side of row 5, column 4, and the third piece has its purple dot on the left side of row 6, column 5. What is wrong with this drawing?
Show the answer
Answer: B
Correct answer: The purple dots are on different rows, so they never meet. A joint needs the right-side dot and the left-side dot on the same row in neighboring columns. Here the columns (4 and 5) are fine, but the rows (5 and 6) differ, so the purple joint fails and the drawing is rejected even though the gold joint passes.
A: Each joint is a separate requirement; a good gold joint does not make up for a bad purple joint.
B (correct): Row 5 and row 6 differ by one, so the dots pass each other even though the columns are adjacent.
C: Nothing in the dot positions shows a flip; the problem is a one-row offset.
D: Columns 4 and 5 are neighbors, so there is no column between the dots.
Question 13 of 40 · easy
The blue Z-shaped piece and the red corner-shaped piece below are drawn separately. As supplied, the blue piece has a gold dot on its right edge and the red piece has one on its left edge. You may move and rotate the pieces in the plane, but you may not flip any piece over. Same-colored dots must meet across one shared edge, with no gap at the joint and no overlap anywhere.
Which drawing shows the pieces assembled correctly?
Show the answer
Answer: D
Hold the blue piece fixed as drawn. The red piece needs no turn, and its gold dot stays on the left edge. In the correct drawing the gold dots meet on row 3, blue in column 3 and red in column 4. All 10 cells are accounted for with no overlap. All four drawings show correctly shaped, correctly turned pieces, so the deciding test is whether each dot pair shares a row in neighboring columns.
A: The shapes and turns are right, but the position is not. At the gold joint the blue dot is on row 3 but the red dot is on row 4; this one-row shift means the marked edges never face each other. The pieces touch elsewhere, but not at the marked edges.
B: The shapes and turns are right, but the position is not. The gold dots are a row apart (blue on row 4, red on row 3), so they pass each other instead of meeting; the blue piece sits one row lower than the joint requires.
C: The shapes and turns are right, but the position is not. There is a one-column gap at the gold joint: the blue dot faces right from row 3, column 3 while the red dot faces left from row 3, column 5, with column 4 empty between them. The blue and red pieces do not touch at all.
D (correct): Every marked joint closes: the gold dots face each other on row 3, columns 3 and 4, with the red piece unturned and no gap or overlap.
Question 14 of 40 · easy
Two separate parts are shown: a blue Z-shaped piece and a red U-shaped piece. As supplied, the blue piece has a gold dot on its right edge and the red piece has one on its top edge. You may move and rotate the pieces in the plane, but you may not flip any piece over. Each pair of matching dots has to touch along a common side, and no two pieces may cover the same square.
Which drawing follows every rule?
Show the answer
Answer: A
Hold the blue piece fixed as drawn. Turn the red piece a quarter turn counterclockwise, which moves its gold dot from the top edge to the left edge. In the correct drawing the gold dots meet on row 3, blue in column 3 and red in column 4. All 10 cells are accounted for with no overlap. All four drawings show correctly shaped, correctly turned pieces, so the deciding test is whether each dot pair shares a row in neighboring columns.
A (correct): Every marked joint closes: the gold dots face each other on row 3, columns 3 and 4, with the red piece turned a quarter turn counterclockwise and no gap or overlap.
B: The shapes and turns are right, but the position is not. At the gold joint the blue dot is on row 3 but the red dot is on row 2; this one-row shift means the marked edges never face each other. The pieces touch elsewhere, but not at the marked edges.
C: The shapes and turns are right, but the position is not. At the gold joint the blue dot is on row 3 but the red dot is on row 4; this one-row shift means the marked edges never face each other.
D: The shapes and turns are right, but the position is not. The red piece sits one column too far right: the blue gold dot is on the right edge of row 3, column 3, but the red gold dot is on the left edge of row 3, column 5, so an empty column separates them. The blue and red pieces do not touch at all.
Question 15 of 40 · medium
Look at the two loose pieces, one blue and P-shaped, one red and staircase. As supplied, the blue piece has a gold dot on its right edge and the red piece has one on its left edge. Turning and shifting are allowed; mirroring a piece is not. Matching dots must face each other on a shared edge; overlaps and gaps at a marked joint are not allowed.
Which assembled drawing is possible?
Show the answer
Answer: B
Hold the blue piece fixed as drawn. The red piece needs no turn, and its gold dot stays on the left edge. In the correct drawing the gold dots meet on row 2, blue in column 3 and red in column 4. All 10 cells are accounted for with no overlap. All four drawings show correctly shaped, correctly turned pieces, so the deciding test is whether each dot pair shares a row in neighboring columns.
A: The shapes and turns are right, but the position is not. The red piece sits one column too far right: the blue gold dot is on the right edge of row 2, column 3, but the red gold dot is on the left edge of row 2, column 5, so an empty column separates them. The blue and red pieces do not touch at all.
B (correct): Every marked joint closes: the gold dots face each other on row 2, columns 3 and 4, with the red piece unturned and no gap or overlap.
C: The shapes and turns are right, but the position is not. At the gold joint the blue dot is on row 2 but the red dot is on row 3; this one-row shift means the marked edges never face each other. The pieces touch elsewhere, but not at the marked edges.
D: The shapes and turns are right, but the position is not. The gold dots are a row apart (blue on row 3, red on row 2), so they pass each other instead of meeting; the blue piece sits one row lower than the joint requires. The pieces touch elsewhere, but not at the marked edges.
Question 16 of 40 · medium
A blue piece (S-shaped) and a red piece (branching) must be joined into one assembly. As supplied, the blue piece has a gold dot on its right edge and the red piece has one on its left edge. Turning and shifting are allowed; mirroring a piece is not. Every dot must sit flush against the dot of the same color, and no cell may belong to two pieces.
Which answer drawing joins the pieces correctly?
Show the answer
Answer: D
Hold the blue piece fixed as drawn. The red piece needs no turn, and its gold dot stays on the left edge. In the correct drawing the gold dots meet on row 2, blue in column 3 and red in column 4. All 10 cells are accounted for with no overlap. All four drawings show correctly shaped, correctly turned pieces, so the deciding test is whether each dot pair shares a row in neighboring columns.
A: The shapes and turns are right, but the position is not. The gold dots are a row apart (blue on row 2, red on row 3), so they pass each other instead of meeting; the red piece sits one row lower than the joint requires. The pieces touch elsewhere, but not at the marked edges.
B: The shapes and turns are right, but the position is not. At the gold joint the blue dot is on row 3 but the red dot is on row 2; this one-row shift means the marked edges never face each other.
C: The shapes and turns are right, but the position is not. The red piece sits one column too far right: the blue gold dot is on the right edge of row 2, column 3, but the red gold dot is on the left edge of row 2, column 5, so an empty column separates them. The blue and red pieces do not touch at all.
D (correct): Every marked joint closes: the gold dots face each other on row 2, columns 3 and 4, with the red piece unturned and no gap or overlap.
Question 17 of 40 · medium
You are given a branching blue part and a U-shaped red part. As supplied, the blue piece has a gold dot on its right edge and the red piece has one on its top edge. Each piece may be shifted or turned in quarter turns, but never flipped. Each pair of matching dots has to touch along a common side, and no two pieces may cover the same square.
Which picture is the only valid assembly?
Show the answer
Answer: D
Hold the blue piece fixed as drawn. Turn the red piece a quarter turn counterclockwise, which moves its gold dot from the top edge to the left edge. In the correct drawing the gold dots meet on row 2, blue in column 3 and red in column 4. All 10 cells are accounted for with no overlap. All four drawings show correctly shaped, correctly turned pieces, so the deciding test is whether each dot pair shares a row in neighboring columns.
A: The shapes and turns are right, but the position is not. There is a one-column gap at the gold joint: the blue dot faces right from row 2, column 3 while the red dot faces left from row 2, column 5, with column 4 empty between them. The blue and red pieces do not touch at all.
B: The shapes and turns are right, but the position is not. The gold dots are a row apart (blue on row 2, red on row 3), so they pass each other instead of meeting; the red piece sits one row lower than the joint requires.
C: The shapes and turns are right, but the position is not. The gold dots are a row apart (blue on row 2, red on row 1), so they pass each other instead of meeting; the blue piece sits one row lower than the joint requires. The pieces touch elsewhere, but not at the marked edges.
D (correct): Every marked joint closes: the gold dots face each other on row 2, columns 3 and 4, with the red piece turned a quarter turn counterclockwise and no gap or overlap.
Question 18 of 40 · medium
The problem supplies two flat tiles: blue (branching) and red (P-shaped). As supplied, the blue piece has a gold dot on its right edge and the red piece has one on its right edge. Each piece may be shifted or turned in quarter turns, but never flipped. Matching dots must face each other on a shared edge; overlaps and gaps at a marked joint are not allowed.
Which drawing shows the pieces assembled correctly?
Show the answer
Answer: A
Hold the blue piece fixed as drawn. Turn the red piece a half turn, which moves its gold dot from the right edge to the left edge. In the correct drawing the gold dots meet on row 3, blue in column 3 and red in column 4. All 10 cells are accounted for with no overlap. All four drawings show correctly shaped, correctly turned pieces, so the deciding test is whether each dot pair shares a row in neighboring columns.
A (correct): Every marked joint closes: the gold dots face each other on row 3, columns 3 and 4, with the red piece turned a half turn and no gap or overlap.
B: The shapes and turns are right, but the position is not. The gold dots are a row apart (blue on row 3, red on row 2), so they pass each other instead of meeting; the blue piece sits one row lower than the joint requires. The pieces touch elsewhere, but not at the marked edges.
C: The shapes and turns are right, but the position is not. There is a one-column gap at the gold joint: the blue dot faces right from row 3, column 3 while the red dot faces left from row 3, column 5, with column 4 empty between them. The blue and red pieces do not touch at all.
D: The shapes and turns are right, but the position is not. At the gold joint the blue dot is on row 3 but the red dot is on row 4; this one-row shift means the marked edges never face each other.
Question 19 of 40 · medium
Picture fitting a branching blue tile to a staircase red tile. As supplied, the blue piece has a gold dot on its right edge and the red piece has one on its right edge. The pieces keep their exact shapes and colors and may be rotated but not reflected. Every dot must sit flush against the dot of the same color, and no cell may belong to two pieces.
Which drawing follows every rule?
Show the answer
Answer: C
Hold the blue piece fixed as drawn. Turn the red piece a half turn, which moves its gold dot from the right edge to the left edge. In the correct drawing the gold dots meet on row 3, blue in column 3 and red in column 4. All 10 cells are accounted for with no overlap. All four drawings show correctly shaped, correctly turned pieces, so the deciding test is whether each dot pair shares a row in neighboring columns.
A: The shapes and turns are right, but the position is not. The red piece sits one column too far right: the blue gold dot is on the right edge of row 3, column 3, but the red gold dot is on the left edge of row 3, column 5, so an empty column separates them. The blue and red pieces do not touch at all.
B: The shapes and turns are right, but the position is not. The gold dots are a row apart (blue on row 3, red on row 2), so they pass each other instead of meeting; the blue piece sits one row lower than the joint requires. The pieces touch elsewhere, but not at the marked edges.
C (correct): Every marked joint closes: the gold dots face each other on row 3, columns 3 and 4, with the red piece turned a half turn and no gap or overlap.
D: The shapes and turns are right, but the position is not. At the gold joint the blue dot is on row 3 but the red dot is on row 4; this one-row shift means the marked edges never face each other.
Question 20 of 40 · medium
The blue backward-P piece and the red U-shaped piece below are drawn separately. As supplied, the blue piece has a gold dot on its right edge and the red piece has one on its bottom edge. The pieces keep their exact shapes and colors and may be rotated but not reflected. Same-colored dots must meet across one shared edge, with no gap at the joint and no overlap anywhere.
Which assembled drawing is possible?
Show the answer
Answer: C
Hold the blue piece fixed as drawn. Turn the red piece a quarter turn clockwise, which moves its gold dot from the bottom edge to the left edge. In the correct drawing the gold dots meet on row 2, blue in column 3 and red in column 4. All 10 cells are accounted for with no overlap. All four drawings show correctly shaped, correctly turned pieces, so the deciding test is whether each dot pair shares a row in neighboring columns.
A: The shapes and turns are right, but the position is not. There is a one-column gap at the gold joint: the blue dot faces right from row 2, column 3 while the red dot faces left from row 2, column 5, with column 4 empty between them. The blue and red pieces do not touch at all.
B: The shapes and turns are right, but the position is not. The gold dots are a row apart (blue on row 1, red on row 2), so they pass each other instead of meeting; the red piece sits one row lower than the joint requires. The pieces touch elsewhere, but not at the marked edges.
C (correct): Every marked joint closes: the gold dots face each other on row 2, columns 3 and 4, with the red piece turned a quarter turn clockwise and no gap or overlap.
D: The shapes and turns are right, but the position is not. The gold dots are a row apart (blue on row 3, red on row 2), so they pass each other instead of meeting; the blue piece sits one row lower than the joint requires.
Question 21 of 40 · medium
Two separate parts are shown: a blue Z-shaped piece and a red corner-shaped piece. As supplied, the blue piece has a gold dot on its right edge and the red piece has one on its top edge. You may move and rotate the pieces in the plane, but you may not flip any piece over. Matching dots must face each other on a shared edge; overlaps and gaps at a marked joint are not allowed.
Which answer drawing joins the pieces correctly?
Show the answer
Answer: A
Hold the blue piece fixed as drawn. Turn the red piece a quarter turn counterclockwise, which moves its gold dot from the top edge to the left edge. In the correct drawing the gold dots meet on row 3, blue in column 3 and red in column 4. All 10 cells are accounted for with no overlap. All four drawings show correctly shaped, correctly turned pieces, so the deciding test is whether each dot pair shares a row in neighboring columns.
A (correct): Every marked joint closes: the gold dots face each other on row 3, columns 3 and 4, with the red piece turned a quarter turn counterclockwise and no gap or overlap.
B: The shapes and turns are right, but the position is not. The gold dots are a row apart (blue on row 3, red on row 2), so they pass each other instead of meeting; the blue piece sits one row lower than the joint requires. The pieces touch elsewhere, but not at the marked edges.
C: The shapes and turns are right, but the position is not. The gold dots are a row apart (blue on row 3, red on row 4), so they pass each other instead of meeting; the red piece sits one row lower than the joint requires.
D: The shapes and turns are right, but the position is not. There is a one-column gap at the gold joint: the blue dot faces right from row 3, column 3 while the red dot faces left from row 3, column 5, with column 4 empty between them. The blue and red pieces do not touch at all.
Question 22 of 40 · medium
Look at the two loose pieces, one blue and branching, one red and branching. As supplied, the blue piece has a gold dot on its right edge and the red piece has one on its top edge. You may move and rotate the pieces in the plane, but you may not flip any piece over. Every dot must sit flush against the dot of the same color, and no cell may belong to two pieces.
Which picture is the only valid assembly?
Show the answer
Answer: D
Hold the blue piece fixed as drawn. Turn the red piece a quarter turn counterclockwise, which moves its gold dot from the top edge to the left edge. In the correct drawing the gold dots meet on row 2, blue in column 3 and red in column 4. All 10 cells are accounted for with no overlap. All four drawings show correctly shaped, correctly turned pieces, so the deciding test is whether each dot pair shares a row in neighboring columns.
A: The shapes and turns are right, but the position is not. The gold dots are a row apart (blue on row 3, red on row 2), so they pass each other instead of meeting; the blue piece sits one row lower than the joint requires.
B: The shapes and turns are right, but the position is not. There is a one-column gap at the gold joint: the blue dot faces right from row 2, column 3 while the red dot faces left from row 2, column 5, with column 4 empty between them. The blue and red pieces do not touch at all.
C: The shapes and turns are right, but the position is not. At the gold joint the blue dot is on row 2 but the red dot is on row 3; this one-row shift means the marked edges never face each other. The pieces touch elsewhere, but not at the marked edges.
D (correct): Every marked joint closes: the gold dots face each other on row 2, columns 3 and 4, with the red piece turned a quarter turn counterclockwise and no gap or overlap.
Question 23 of 40 · medium
A blue piece (S-shaped) and a red piece (U-shaped) must be joined into one assembly. As supplied, the blue piece has a gold dot on its right edge and the red piece has one on its right edge. Turning and shifting are allowed; mirroring a piece is not. Same-colored dots must meet across one shared edge, with no gap at the joint and no overlap anywhere.
Which drawing shows the pieces assembled correctly?
Show the answer
Answer: C
Hold the blue piece fixed as drawn. Turn the red piece a half turn, which moves its gold dot from the right edge to the left edge. In the correct drawing the gold dots meet on row 3, blue in column 3 and red in column 4. All 10 cells are accounted for with no overlap. All four drawings show correctly shaped, correctly turned pieces, so the deciding test is whether each dot pair shares a row in neighboring columns.
A: The shapes and turns are right, but the position is not. At the gold joint the blue dot is on row 3 but the red dot is on row 4; this one-row shift means the marked edges never face each other. The pieces touch elsewhere, but not at the marked edges.
B: The shapes and turns are right, but the position is not. At the gold joint the blue dot is on row 3 but the red dot is on row 2; this one-row shift means the marked edges never face each other. The pieces touch elsewhere, but not at the marked edges.
C (correct): Every marked joint closes: the gold dots face each other on row 3, columns 3 and 4, with the red piece turned a half turn and no gap or overlap.
D: The shapes and turns are right, but the position is not. The red piece sits one column too far right: the blue gold dot is on the right edge of row 3, column 3, but the red gold dot is on the left edge of row 3, column 5, so an empty column separates them. The blue and red pieces do not touch at all.
Question 24 of 40 · medium
You are given a staircase blue part and a branching red part. As supplied, the blue piece has a gold dot on its right edge and the red piece has one on its bottom edge. Turning and shifting are allowed; mirroring a piece is not. Each pair of matching dots has to touch along a common side, and no two pieces may cover the same square.
Which drawing follows every rule?
Show the answer
Answer: D
Hold the blue piece fixed as drawn. Turn the red piece a quarter turn clockwise, which moves its gold dot from the bottom edge to the left edge. In the correct drawing the gold dots meet on row 2, blue in column 3 and red in column 4. All 10 cells are accounted for with no overlap. All four drawings show correctly shaped, correctly turned pieces, so the deciding test is whether each dot pair shares a row in neighboring columns.
A: The shapes and turns are right, but the position is not. There is a one-column gap at the gold joint: the blue dot faces right from row 2, column 3 while the red dot faces left from row 2, column 5, with column 4 empty between them. The blue and red pieces do not touch at all.
B: The shapes and turns are right, but the position is not. At the gold joint the blue dot is on row 2 but the red dot is on row 3; this one-row shift means the marked edges never face each other. The pieces touch elsewhere, but not at the marked edges.
C: The shapes and turns are right, but the position is not. The gold dots are a row apart (blue on row 3, red on row 2), so they pass each other instead of meeting; the blue piece sits one row lower than the joint requires.
D (correct): Every marked joint closes: the gold dots face each other on row 2, columns 3 and 4, with the red piece turned a quarter turn clockwise and no gap or overlap.
Question 25 of 40 · medium
The problem supplies two flat tiles: blue (P-shaped) and red (branching). As supplied, the blue piece has a gold dot on its right edge and the red piece has one on its left edge. Each piece may be shifted or turned in quarter turns, but never flipped. Every dot must sit flush against the dot of the same color, and no cell may belong to two pieces.
Which assembled drawing is possible?
Show the answer
Answer: B
Hold the blue piece fixed as drawn. The red piece needs no turn, and its gold dot stays on the left edge. In the correct drawing the gold dots meet on row 2, blue in column 3 and red in column 4. All 10 cells are accounted for with no overlap. All four drawings show correctly shaped, correctly turned pieces, so the deciding test is whether each dot pair shares a row in neighboring columns.
A: The shapes and turns are right, but the position is not. There is a one-column gap at the gold joint: the blue dot faces right from row 2, column 3 while the red dot faces left from row 2, column 5, with column 4 empty between them. The blue and red pieces do not touch at all.
B (correct): Every marked joint closes: the gold dots face each other on row 2, columns 3 and 4, with the red piece unturned and no gap or overlap.
C: The shapes and turns are right, but the position is not. The gold dots are a row apart (blue on row 3, red on row 2), so they pass each other instead of meeting; the blue piece sits one row lower than the joint requires.
D: The shapes and turns are right, but the position is not. The gold dots are a row apart (blue on row 1, red on row 2), so they pass each other instead of meeting; the red piece sits one row lower than the joint requires. The pieces touch elsewhere, but not at the marked edges.
Question 26 of 40 · medium
Picture fitting a branching blue tile to a branching red tile. As supplied, the blue piece has a gold dot on its right edge and the red piece has one on its right edge. Each piece may be shifted or turned in quarter turns, but never flipped. Same-colored dots must meet across one shared edge, with no gap at the joint and no overlap anywhere.
Which answer drawing joins the pieces correctly?
Show the answer
Answer: D
Hold the blue piece fixed as drawn. Turn the red piece a half turn, which moves its gold dot from the right edge to the left edge. In the correct drawing the gold dots meet on row 2, blue in column 3 and red in column 4. All 10 cells are accounted for with no overlap. All four drawings show correctly shaped, correctly turned pieces, so the deciding test is whether each dot pair shares a row in neighboring columns.
A: The shapes and turns are right, but the position is not. The gold dots are a row apart (blue on row 3, red on row 2), so they pass each other instead of meeting; the blue piece sits one row lower than the joint requires.
B: The shapes and turns are right, but the position is not. There is a one-column gap at the gold joint: the blue dot faces right from row 2, column 3 while the red dot faces left from row 2, column 5, with column 4 empty between them. The blue and red pieces do not touch at all.
C: The shapes and turns are right, but the position is not. At the gold joint the blue dot is on row 2 but the red dot is on row 3; this one-row shift means the marked edges never face each other.
D (correct): Every marked joint closes: the gold dots face each other on row 2, columns 3 and 4, with the red piece turned a half turn and no gap or overlap.
Question 27 of 40 · medium
The blue branching piece and the red corner-shaped piece below are drawn separately. As supplied, the blue piece has a gold dot on its right edge and the red piece has one on its bottom edge. The pieces keep their exact shapes and colors and may be rotated but not reflected. Each pair of matching dots has to touch along a common side, and no two pieces may cover the same square.
Which picture is the only valid assembly?
Show the answer
Answer: D
Hold the blue piece fixed as drawn. Turn the red piece a quarter turn clockwise, which moves its gold dot from the bottom edge to the left edge. In the correct drawing the gold dots meet on row 2, blue in column 3 and red in column 4. All 10 cells are accounted for with no overlap. All four drawings show correctly shaped, correctly turned pieces, so the deciding test is whether each dot pair shares a row in neighboring columns.
A: The shapes and turns are right, but the position is not. At the gold joint the blue dot is on row 2 but the red dot is on row 1; this one-row shift means the marked edges never face each other. The pieces touch elsewhere, but not at the marked edges.
B: The shapes and turns are right, but the position is not. The red piece sits one column too far right: the blue gold dot is on the right edge of row 2, column 3, but the red gold dot is on the left edge of row 2, column 5, so an empty column separates them. The blue and red pieces do not touch at all.
C: The shapes and turns are right, but the position is not. The gold dots are a row apart (blue on row 2, red on row 3), so they pass each other instead of meeting; the red piece sits one row lower than the joint requires. The pieces touch elsewhere, but not at the marked edges.
D (correct): Every marked joint closes: the gold dots face each other on row 2, columns 3 and 4, with the red piece turned a quarter turn clockwise and no gap or overlap.
Question 28 of 40 · medium
Two separate parts are shown: a blue staircase piece and a red P-shaped piece. As supplied, the blue piece has a gold dot on its right edge and the red piece has one on its top edge. The pieces keep their exact shapes and colors and may be rotated but not reflected. Matching dots must face each other on a shared edge; overlaps and gaps at a marked joint are not allowed.
Which drawing shows the pieces assembled correctly?
Show the answer
Answer: C
Hold the blue piece fixed as drawn. Turn the red piece a quarter turn counterclockwise, which moves its gold dot from the top edge to the left edge. In the correct drawing the gold dots meet on row 3, blue in column 3 and red in column 4. All 10 cells are accounted for with no overlap. All four drawings show correctly shaped, correctly turned pieces, so the deciding test is whether each dot pair shares a row in neighboring columns.
A: The shapes and turns are right, but the position is not. At the gold joint the blue dot is on row 3 but the red dot is on row 4; this one-row shift means the marked edges never face each other.
B: The shapes and turns are right, but the position is not. The gold dots are a row apart (blue on row 3, red on row 2), so they pass each other instead of meeting; the blue piece sits one row lower than the joint requires. The pieces touch elsewhere, but not at the marked edges.
C (correct): Every marked joint closes: the gold dots face each other on row 3, columns 3 and 4, with the red piece turned a quarter turn counterclockwise and no gap or overlap.
D: The shapes and turns are right, but the position is not. There is a one-column gap at the gold joint: the blue dot faces right from row 3, column 3 while the red dot faces left from row 3, column 5, with column 4 empty between them. The blue and red pieces do not touch at all.
Question 29 of 40 · medium
Look at the two loose pieces, one blue and branching, one red and P-shaped. As supplied, the blue piece has a gold dot on its right edge and the red piece has one on its top edge. You may move and rotate the pieces in the plane, but you may not flip any piece over. Same-colored dots must meet across one shared edge, with no gap at the joint and no overlap anywhere.
Which drawing follows every rule?
Show the answer
Answer: A
Hold the blue piece fixed as drawn. Turn the red piece a quarter turn counterclockwise, which moves its gold dot from the top edge to the left edge. In the correct drawing the gold dots meet on row 2, blue in column 3 and red in column 4. All 10 cells are accounted for with no overlap. All four drawings show correctly shaped, correctly turned pieces, so the deciding test is whether each dot pair shares a row in neighboring columns.
A (correct): Every marked joint closes: the gold dots face each other on row 2, columns 3 and 4, with the red piece turned a quarter turn counterclockwise and no gap or overlap.
B: The shapes and turns are right, but the position is not. The gold dots are a row apart (blue on row 2, red on row 1), so they pass each other instead of meeting; the blue piece sits one row lower than the joint requires. The pieces touch elsewhere, but not at the marked edges.
C: The shapes and turns are right, but the position is not. The gold dots are a row apart (blue on row 2, red on row 3), so they pass each other instead of meeting; the red piece sits one row lower than the joint requires.
D: The shapes and turns are right, but the position is not. There is a one-column gap at the gold joint: the blue dot faces right from row 2, column 3 while the red dot faces left from row 2, column 5, with column 4 empty between them. The blue and red pieces do not touch at all.
Question 30 of 40 · medium
A blue piece (branching) and a red piece (corner-shaped) must be joined into one assembly. As supplied, the blue piece has a gold dot on its right edge and the red piece has one on its top edge. You may move and rotate the pieces in the plane, but you may not flip any piece over. Each pair of matching dots has to touch along a common side, and no two pieces may cover the same square.
Which assembled drawing is possible?
Show the answer
Answer: D
Hold the blue piece fixed as drawn. Turn the red piece a quarter turn counterclockwise, which moves its gold dot from the top edge to the left edge. In the correct drawing the gold dots meet on row 2, blue in column 3 and red in column 4. All 10 cells are accounted for with no overlap. All four drawings show correctly shaped, correctly turned pieces, so the deciding test is whether each dot pair shares a row in neighboring columns.
A: The shapes and turns are right, but the position is not. There is a one-column gap at the gold joint: the blue dot faces right from row 2, column 3 while the red dot faces left from row 2, column 5, with column 4 empty between them. The blue and red pieces do not touch at all.
B: The shapes and turns are right, but the position is not. The gold dots are a row apart (blue on row 2, red on row 3), so they pass each other instead of meeting; the red piece sits one row lower than the joint requires. The pieces touch elsewhere, but not at the marked edges.
C: The shapes and turns are right, but the position is not. At the gold joint the blue dot is on row 3 but the red dot is on row 2; this one-row shift means the marked edges never face each other. The pieces touch elsewhere, but not at the marked edges.
D (correct): Every marked joint closes: the gold dots face each other on row 2, columns 3 and 4, with the red piece turned a quarter turn counterclockwise and no gap or overlap.
Question 31 of 40 · hard
You are given a staircase blue part, a corner-shaped red part and a staircase teal part. As supplied, the blue piece has a gold dot on its right edge and the red piece has one on its left edge; the red piece has a purple dot on its right edge and the teal piece has one on its left edge. Turning and shifting are allowed; mirroring a piece is not. Matching dots must face each other on a shared edge; overlaps and gaps at a marked joint are not allowed.
Which answer drawing joins the pieces correctly?
Show the answer
Answer: B
Hold the blue piece fixed as drawn. The red piece needs no turn, and its gold dot stays on the left edge. The teal piece needs no turn, and its purple dot stays on the left edge. In the correct drawing the gold dots meet on row 3, blue in column 3 and red in column 4; the purple dots meet on row 3, red in column 6 and teal in column 7. All 15 cells are accounted for with no overlap. All four drawings show correctly shaped, correctly turned pieces, so the deciding test is whether each dot pair shares a row in neighboring columns.
A: The gold joint is fine, but this drawing fails elsewhere. There is a one-column gap at the purple joint: the red dot faces right from row 3, column 6 while the teal dot faces left from row 3, column 8, with column 7 empty between them. The red and teal pieces do not touch at all.
B (correct): Every marked joint closes: the gold dots face each other on row 3, columns 3 and 4 and the purple dots face each other on row 3, columns 6 and 7, with the red piece unturned, the teal piece unturned and no gap or overlap.
C: At the gold joint the blue dot is on row 4 but the red dot is on row 3; this one-row shift means the marked edges never face each other. At the purple joint the red dot is on row 3 but the teal dot is on row 4; this one-row shift means the marked edges never face each other.
D: The gold joint is fine, but this drawing fails elsewhere. The purple dots are a row apart (red on row 3, teal on row 4), so they pass each other instead of meeting; the teal piece sits one row lower than the joint requires. The pieces touch elsewhere, but not at the marked edges.
Question 32 of 40 · hard
Picture building one assembly from a blue branching tile, a red branching tile and a teal staircase tile. As supplied, the blue piece has a gold dot on its right edge and the red piece has one on its left edge; the red piece has a purple dot on its right edge and the teal piece has one on its bottom edge. Turning and shifting are allowed; mirroring a piece is not. Every dot must sit flush against the dot of the same color, and no cell may belong to two pieces.
Which picture is the only valid assembly?
Show the answer
Answer: A
Hold the blue piece fixed as drawn. The red piece needs no turn, and its gold dot stays on the left edge. Turn the teal piece a quarter turn clockwise, which moves its purple dot from the bottom edge to the left edge. In the correct drawing the gold dots meet on row 3, blue in column 3 and red in column 4; the purple dots meet on row 4, red in column 6 and teal in column 7. All 15 cells are accounted for with no overlap. All four drawings show correctly shaped, correctly turned pieces, so the deciding test is whether each dot pair shares a row in neighboring columns.
A (correct): Every marked joint closes: the gold dots face each other on row 3, columns 3 and 4 and the purple dots face each other on row 4, columns 6 and 7, with the red piece unturned, the teal piece turned a quarter turn clockwise and no gap or overlap.
B: The gold joint is fine, but this drawing fails elsewhere. The purple dots are a row apart (red on row 4, teal on row 5), so they pass each other instead of meeting; the teal piece sits one row lower than the joint requires.
C: The gold joint is fine, but this drawing fails elsewhere. The teal piece sits one column too far right: the red purple dot is on the right edge of row 4, column 6, but the teal purple dot is on the left edge of row 4, column 8, so an empty column separates them. The red and teal pieces do not touch at all.
D: At the gold joint the blue dot is on row 3 but the red dot is on row 2; this one-row shift means the marked edges never face each other. At the purple joint the red dot is on row 3 but the teal dot is on row 4; this one-row shift means the marked edges never face each other.
Question 33 of 40 · hard
Three separate parts are shown: a blue branching piece, a red U-shaped piece and a teal T-shaped piece. As supplied, the blue piece has a gold dot on its right edge and the red piece has one on its top edge; the red piece has a purple dot on its bottom edge and the teal piece has one on its right edge. Each piece may be shifted or turned in quarter turns, but never flipped. Each pair of matching dots has to touch along a common side, and no two pieces may cover the same square.
Which drawing shows the pieces assembled correctly?
Show the answer
Answer: A
Hold the blue piece fixed as drawn. Turn the red piece a quarter turn counterclockwise, which moves its gold dot from the top edge to the left edge and its purple dot from the bottom edge to the right edge. Turn the teal piece a half turn, which moves its purple dot from the right edge to the left edge. In the correct drawing the gold dots meet on row 2, blue in column 3 and red in column 4; the purple dots meet on row 2, red in column 6 and teal in column 7. All 15 cells are accounted for with no overlap. All four drawings show correctly shaped, correctly turned pieces, so the deciding test is whether each dot pair shares a row in neighboring columns.
A (correct): Every marked joint closes: the gold dots face each other on row 2, columns 3 and 4 and the purple dots face each other on row 2, columns 6 and 7, with the red piece turned a quarter turn counterclockwise, the teal piece turned a half turn and no gap or overlap.
B: At the gold joint the blue dot is on row 3 but the red dot is on row 2; this one-row shift means the marked edges never face each other. At the purple joint the red dot is on row 2 but the teal dot is on row 3; this one-row shift means the marked edges never face each other.
C: The gold joint is fine, but this drawing fails elsewhere. The purple dots are a row apart (red on row 2, teal on row 3), so they pass each other instead of meeting; the teal piece sits one row lower than the joint requires.
D: The gold joint is fine, but this drawing fails elsewhere. The teal piece sits one column too far right: the red purple dot is on the right edge of row 2, column 6, but the teal purple dot is on the left edge of row 2, column 8, so an empty column separates them. The red and teal pieces do not touch at all.
Question 34 of 40 · hard
The blue (Z-shaped), red (branching) and teal (corner-shaped) pieces must be joined into a single chain. As supplied, the blue piece has a gold dot on its right edge and the red piece has one on its right edge; the red piece has a purple dot on its left edge and the teal piece has one on its top edge. Each piece may be shifted or turned in quarter turns, but never flipped. Matching dots must face each other on a shared edge; overlaps and gaps at a marked joint are not allowed.
Which drawing follows every rule?
Show the answer
Answer: B
Hold the blue piece fixed as drawn. Turn the red piece a half turn, which moves its gold dot from the right edge to the left edge and its purple dot from the left edge to the right edge. Turn the teal piece a quarter turn counterclockwise, which moves its purple dot from the top edge to the left edge. In the correct drawing the gold dots meet on row 3, blue in column 3 and red in column 4; the purple dots meet on row 4, red in column 6 and teal in column 7. All 15 cells are accounted for with no overlap. All four drawings show correctly shaped, correctly turned pieces, so the deciding test is whether each dot pair shares a row in neighboring columns.
A: The gold joint is fine, but this drawing fails elsewhere. At the purple joint the red dot is on row 4 but the teal dot is on row 5; this one-row shift means the marked edges never face each other. The pieces touch elsewhere, but not at the marked edges.
B (correct): Every marked joint closes: the gold dots face each other on row 3, columns 3 and 4 and the purple dots face each other on row 4, columns 6 and 7, with the red piece turned a half turn, the teal piece turned a quarter turn counterclockwise and no gap or overlap.
C: The gold dots are a row apart (blue on row 3, red on row 2), so they pass each other instead of meeting; the blue piece sits one row lower than the joint requires. The purple dots are a row apart (red on row 3, teal on row 4), so they pass each other instead of meeting; the teal piece sits one row lower than the joint requires.
D: The gold joint is fine, but this drawing fails elsewhere. There is a one-column gap at the purple joint: the red dot faces right from row 4, column 6 while the teal dot faces left from row 4, column 8, with column 7 empty between them. The red and teal pieces do not touch at all.
Question 35 of 40 · hard
Look at the three loose tiles: branching blue, branching red and P-shaped teal. As supplied, the blue piece has a gold dot on its right edge and the red piece has one on its bottom edge; the red piece has a purple dot on its top edge and the teal piece has one on its left edge. The pieces keep their exact shapes and colors and may be rotated but not reflected. Every dot must sit flush against the dot of the same color, and no cell may belong to two pieces.
Which assembled drawing is possible?
Show the answer
Answer: C
Hold the blue piece fixed as drawn. Turn the red piece a quarter turn clockwise, which moves its gold dot from the bottom edge to the left edge and its purple dot from the top edge to the right edge. The teal piece needs no turn, and its purple dot stays on the left edge. In the correct drawing the gold dots meet on row 2, blue in column 3 and red in column 4; the purple dots meet on row 3, red in column 6 and teal in column 7. All 15 cells are accounted for with no overlap. All four drawings show correctly shaped, correctly turned pieces, so the deciding test is whether each dot pair shares a row in neighboring columns.
A: The gold joint is fine, but this drawing fails elsewhere. There is a one-column gap at the purple joint: the red dot faces right from row 3, column 6 while the teal dot faces left from row 3, column 8, with column 7 empty between them. The red and teal pieces do not touch at all.
B: The gold joint is fine, but this drawing fails elsewhere. The purple dots are a row apart (red on row 3, teal on row 4), so they pass each other instead of meeting; the teal piece sits one row lower than the joint requires. The pieces touch elsewhere, but not at the marked edges.
C (correct): Every marked joint closes: the gold dots face each other on row 2, columns 3 and 4 and the purple dots face each other on row 3, columns 6 and 7, with the red piece turned a quarter turn clockwise, the teal piece unturned and no gap or overlap.
D: The gold dots are a row apart (blue on row 3, red on row 2), so they pass each other instead of meeting; the blue piece sits one row lower than the joint requires. The purple dots are a row apart (red on row 3, teal on row 4), so they pass each other instead of meeting; the teal piece sits one row lower than the joint requires.
Question 36 of 40 · hard
You are given an S-shaped blue part, a P-shaped red part and a staircase teal part. As supplied, the blue piece has a gold dot on its right edge and the red piece has one on its left edge; the red piece has a purple dot on its right edge and the teal piece has one on its bottom edge. The pieces keep their exact shapes and colors and may be rotated but not reflected. Same-colored dots must meet across one shared edge, with no gap at the joint and no overlap anywhere.
Which answer drawing joins the pieces correctly?
Show the answer
Answer: C
Hold the blue piece fixed as drawn. The red piece needs no turn, and its gold dot stays on the left edge. Turn the teal piece a quarter turn clockwise, which moves its purple dot from the bottom edge to the left edge. In the correct drawing the gold dots meet on row 3, blue in column 3 and red in column 4; the purple dots meet on row 4, red in column 6 and teal in column 7. All 15 cells are accounted for with no overlap. All four drawings show correctly shaped, correctly turned pieces, so the deciding test is whether each dot pair shares a row in neighboring columns.
A: The gold joint is fine, but this drawing fails elsewhere. There is a one-column gap at the purple joint: the red dot faces right from row 4, column 6 while the teal dot faces left from row 4, column 8, with column 7 empty between them. The red and teal pieces do not touch at all.
B: The gold joint is fine, but this drawing fails elsewhere. At the purple joint the red dot is on row 4 but the teal dot is on row 5; this one-row shift means the marked edges never face each other.
C (correct): Every marked joint closes: the gold dots face each other on row 3, columns 3 and 4 and the purple dots face each other on row 4, columns 6 and 7, with the red piece unturned, the teal piece turned a quarter turn clockwise and no gap or overlap.
D: The gold dots are a row apart (blue on row 3, red on row 2), so they pass each other instead of meeting; the blue piece sits one row lower than the joint requires. The purple dots are a row apart (red on row 3, teal on row 4), so they pass each other instead of meeting; the teal piece sits one row lower than the joint requires.
Question 37 of 40 · hard
Picture building one assembly from a blue P-shaped tile, a red U-shaped tile and a teal P-shaped tile. As supplied, the blue piece has a gold dot on its right edge and the red piece has one on its top edge; the red piece has a purple dot on its bottom edge and the teal piece has one on its right edge. You may move and rotate the pieces in the plane, but you may not flip any piece over. Matching dots must face each other on a shared edge; overlaps and gaps at a marked joint are not allowed.
Which picture is the only valid assembly?
Show the answer
Answer: B
Hold the blue piece fixed as drawn. Turn the red piece a quarter turn counterclockwise, which moves its gold dot from the top edge to the left edge and its purple dot from the bottom edge to the right edge. Turn the teal piece a half turn, which moves its purple dot from the right edge to the left edge. In the correct drawing the gold dots meet on row 2, blue in column 3 and red in column 4; the purple dots meet on row 2, red in column 6 and teal in column 7. All 15 cells are accounted for with no overlap. All four drawings show correctly shaped, correctly turned pieces, so the deciding test is whether each dot pair shares a row in neighboring columns.
A: The gold joint is fine, but this drawing fails elsewhere. The purple dots are a row apart (red on row 1, teal on row 2), so they pass each other instead of meeting; the teal piece sits one row lower than the joint requires. The pieces touch elsewhere, but not at the marked edges.
B (correct): Every marked joint closes: the gold dots face each other on row 2, columns 3 and 4 and the purple dots face each other on row 2, columns 6 and 7, with the red piece turned a quarter turn counterclockwise, the teal piece turned a half turn and no gap or overlap.
C: The gold dots are a row apart (blue on row 2, red on row 1), so they pass each other instead of meeting; the blue piece sits one row lower than the joint requires. The purple dots are a row apart (red on row 1, teal on row 2), so they pass each other instead of meeting; the teal piece sits one row lower than the joint requires.
D: The gold joint is fine, but this drawing fails elsewhere. There is a one-column gap at the purple joint: the red dot faces right from row 2, column 6 while the teal dot faces left from row 2, column 8, with column 7 empty between them. The red and teal pieces do not touch at all.
Question 38 of 40 · hard
Three separate parts are shown: a blue branching piece, a red corner-shaped piece and a teal branching piece. As supplied, the blue piece has a gold dot on its right edge and the red piece has one on its left edge; the red piece has a purple dot on its right edge and the teal piece has one on its top edge. You may move and rotate the pieces in the plane, but you may not flip any piece over. Every dot must sit flush against the dot of the same color, and no cell may belong to two pieces.
Which drawing shows the pieces assembled correctly?
Show the answer
Answer: B
Hold the blue piece fixed as drawn. The red piece needs no turn, and its gold dot stays on the left edge. Turn the teal piece a quarter turn counterclockwise, which moves its purple dot from the top edge to the left edge. In the correct drawing the gold dots meet on row 2, blue in column 3 and red in column 4; the purple dots meet on row 3, red in column 6 and teal in column 7. All 15 cells are accounted for with no overlap. All four drawings show correctly shaped, correctly turned pieces, so the deciding test is whether each dot pair shares a row in neighboring columns.
A: At the gold joint the blue dot is on row 3 but the red dot is on row 2; this one-row shift means the marked edges never face each other. At the purple joint the red dot is on row 3 but the teal dot is on row 4; this one-row shift means the marked edges never face each other.
B (correct): Every marked joint closes: the gold dots face each other on row 2, columns 3 and 4 and the purple dots face each other on row 3, columns 6 and 7, with the red piece unturned, the teal piece turned a quarter turn counterclockwise and no gap or overlap.
C: The gold joint is fine, but this drawing fails elsewhere. The teal piece sits one column too far right: the red purple dot is on the right edge of row 3, column 6, but the teal purple dot is on the left edge of row 3, column 8, so an empty column separates them. The red and teal pieces do not touch at all.
D: The gold joint is fine, but this drawing fails elsewhere. The purple dots are a row apart (red on row 3, teal on row 4), so they pass each other instead of meeting; the teal piece sits one row lower than the joint requires.
Question 39 of 40 · hard
The blue (backward-P), red (branching) and teal (T-shaped) pieces must be joined into a single chain. As supplied, the blue piece has a gold dot on its right edge and the red piece has one on its right edge; the red piece has a purple dot on its left edge and the teal piece has one on its left edge. Turning and shifting are allowed; mirroring a piece is not. Same-colored dots must meet across one shared edge, with no gap at the joint and no overlap anywhere.
Which drawing follows every rule?
Show the answer
Answer: D
Hold the blue piece fixed as drawn. Turn the red piece a half turn, which moves its gold dot from the right edge to the left edge and its purple dot from the left edge to the right edge. The teal piece needs no turn, and its purple dot stays on the left edge. In the correct drawing the gold dots meet on row 2, blue in column 3 and red in column 4; the purple dots meet on row 3, red in column 6 and teal in column 7. All 15 cells are accounted for with no overlap. All four drawings show correctly shaped, correctly turned pieces, so the deciding test is whether each dot pair shares a row in neighboring columns.
A: The gold joint is fine, but this drawing fails elsewhere. There is a one-column gap at the purple joint: the red dot faces right from row 3, column 6 while the teal dot faces left from row 3, column 8, with column 7 empty between them. The red and teal pieces do not touch at all.
B: The gold joint is fine, but this drawing fails elsewhere. The purple dots are a row apart (red on row 3, teal on row 4), so they pass each other instead of meeting; the teal piece sits one row lower than the joint requires.
C: At the gold joint the blue dot is on row 3 but the red dot is on row 2; this one-row shift means the marked edges never face each other. At the purple joint the red dot is on row 3 but the teal dot is on row 4; this one-row shift means the marked edges never face each other.
D (correct): Every marked joint closes: the gold dots face each other on row 2, columns 3 and 4 and the purple dots face each other on row 3, columns 6 and 7, with the red piece turned a half turn, the teal piece unturned and no gap or overlap.
Question 40 of 40 · hard
Look at the three loose tiles: staircase blue, corner-shaped red and staircase teal. As supplied, the blue piece has a gold dot on its right edge and the red piece has one on its top edge; the red piece has a purple dot on its bottom edge and the teal piece has one on its bottom edge. Turning and shifting are allowed; mirroring a piece is not. Each pair of matching dots has to touch along a common side, and no two pieces may cover the same square.
Which assembled drawing is possible?
Show the answer
Answer: C
Hold the blue piece fixed as drawn. Turn the red piece a quarter turn counterclockwise, which moves its gold dot from the top edge to the left edge and its purple dot from the bottom edge to the right edge. Turn the teal piece a quarter turn clockwise, which moves its purple dot from the bottom edge to the left edge. In the correct drawing the gold dots meet on row 3, blue in column 3 and red in column 4; the purple dots meet on row 3, red in column 6 and teal in column 7. All 15 cells are accounted for with no overlap. All four drawings show correctly shaped, correctly turned pieces, so the deciding test is whether each dot pair shares a row in neighboring columns.
A: At the gold joint the blue dot is on row 4 but the red dot is on row 3; this one-row shift means the marked edges never face each other. At the purple joint the red dot is on row 3 but the teal dot is on row 4; this one-row shift means the marked edges never face each other.
B: The gold joint is fine, but this drawing fails elsewhere. The purple dots are a row apart (red on row 3, teal on row 4), so they pass each other instead of meeting; the teal piece sits one row lower than the joint requires.
C (correct): Every marked joint closes: the gold dots face each other on row 3, columns 3 and 4 and the purple dots face each other on row 3, columns 6 and 7, with the red piece turned a quarter turn counterclockwise, the teal piece turned a quarter turn clockwise and no gap or overlap.
D: The gold joint is fine, but this drawing fails elsewhere. There is a one-column gap at the purple joint: the red dot faces right from row 3, column 6 while the teal dot faces left from row 3, column 8, with column 7 empty between them. The red and teal pieces do not touch at all.
The left box shows separate flat pieces. Which figure shows how the pieces look when they are fitted together?
Show the answer
Answer: C
Count the pieces first: every figure must use each piece exactly once, with nothing added. Then pick one distinctive piece, such as the largest one or one with a curved or sharply pointed edge, and look for it in each figure; pieces may be turned but never flipped over. A figure whose cut lines are in different places has pieces of different sizes and can be crossed out. Here the pieces fit together into a triangle.
A: A cut is in a different place, so the pieces do not match: one piece here covers about 20% of the shape, but the matching piece in the left box covers about 13%.
B: This figure has 4 pieces, but the left box has 3. Every piece must be used once, and nothing may be added.
C (correct): This triangle is made of exactly the 3 pieces in the left box, each only turned and slid into place.
D: This figure is a right triangle. The pieces in the left box do not have these shapes, so they cannot fill this outline without gaps or overlaps.
Practice 2 of 80 · medium
The left box shows separate flat pieces. Which figure shows how the pieces look when they are fitted together?
Show the answer
Answer: A
Count the pieces first: every figure must use each piece exactly once, with nothing added. Then pick one distinctive piece, such as the largest one or one with a curved or sharply pointed edge, and look for it in each figure; pieces may be turned but never flipped over. A figure whose cut lines are in different places has pieces of different sizes and can be crossed out. Here the pieces fit together into a half-circle.
A (correct): This half-circle is made of exactly the 3 pieces in the left box, each only turned and slid into place.
B: This figure has 4 pieces, but the left box has 3. Every piece must be used once, and nothing may be added.
C: This figure is a trapezoid. The pieces in the left box do not have these shapes, so they cannot fill this outline without gaps or overlaps.
D: A cut is in a different place, so the pieces do not match: one piece here covers about 59% of the shape, but the matching piece in the left box covers about 50%.
Practice 3 of 80 · medium
The left box shows separate flat pieces. Which figure shows how the pieces look when they are fitted together?
Show the answer
Answer: C
Count the pieces first: every figure must use each piece exactly once, with nothing added. Then pick one distinctive piece, such as the largest one or one with a curved or sharply pointed edge, and look for it in each figure; pieces may be turned but never flipped over. A figure whose cut lines are in different places has pieces of different sizes and can be crossed out. Here the pieces fit together into a pentagon.
A: This figure has 4 pieces, but the left box has 3. Every piece must be used once, and nothing may be added.
B: This figure is a hexagon. The pieces in the left box do not have these shapes, so they cannot fill this outline without gaps or overlaps.
C (correct): This pentagon is made of exactly the 3 pieces in the left box, each only turned and slid into place.
D: A cut is in a different place, so the pieces do not match: one piece here covers about 50% of the shape, but the matching piece in the left box covers about 42%.
Practice 4 of 80 · hard
The left box shows separate flat pieces. Which figure shows how the pieces look when they are fitted together?
Show the answer
Answer: B
Count the pieces first: every figure must use each piece exactly once, with nothing added. Then pick one distinctive piece, such as the largest one or one with a curved or sharply pointed edge, and look for it in each figure; pieces may be turned but never flipped over. A figure whose cut lines are in different places has pieces of different sizes and can be crossed out. Here the pieces fit together into a rectangle.
A: A cut is in a different place, so the pieces do not match: one piece here covers about 60% of the shape, but the matching piece in the left box covers about 40%.
B (correct): This rectangle is made of exactly the 4 pieces in the left box, each only turned and slid into place.
C: A cut is in a different place, so the pieces do not match: one piece here covers about 32% of the shape, but the matching piece in the left box covers about 40%.
D: This figure is a square. The pieces in the left box do not have these shapes, so they cannot fill this outline without gaps or overlaps.
Practice 5 of 80 · medium
The left box shows separate flat pieces. Which figure shows how the pieces look when they are fitted together?
Show the answer
Answer: D
Count the pieces first: every figure must use each piece exactly once, with nothing added. Then pick one distinctive piece, such as the largest one or one with a curved or sharply pointed edge, and look for it in each figure; pieces may be turned but never flipped over. A figure whose cut lines are in different places has pieces of different sizes and can be crossed out. Here the pieces fit together into a trapezoid.
A: A cut is in a different place, so the pieces do not match: one piece here covers about 33% of the shape, but the matching piece in the left box covers about 24%.
B: This figure is a parallelogram. The pieces in the left box do not have these shapes, so they cannot fill this outline without gaps or overlaps.
C: This figure has 4 pieces, but the left box has 3. Every piece must be used once, and nothing may be added.
D (correct): This trapezoid is made of exactly the 3 pieces in the left box, each only turned and slid into place.
Practice 6 of 80 · hard
The left box shows separate flat pieces. Which figure shows how the pieces look when they are fitted together?
Show the answer
Answer: B
Count the pieces first: every figure must use each piece exactly once, with nothing added. Then pick one distinctive piece, such as the largest one or one with a curved or sharply pointed edge, and look for it in each figure; pieces may be turned but never flipped over. A figure whose cut lines are in different places has pieces of different sizes and can be crossed out. Here the pieces fit together into a right triangle.
A: A cut is in a different place, so the pieces do not match: one piece here covers about 45% of the shape, but the matching piece in the left box covers about 59%.
B (correct): This right triangle is made of exactly the 4 pieces in the left box, each only turned and slid into place.
C: This figure is a triangle. The pieces in the left box do not have these shapes, so they cannot fill this outline without gaps or overlaps.
D: A cut is in a different place, so the pieces do not match: one piece here covers about 37% of the shape, but the matching piece in the left box covers about 59%.
Practice 7 of 80 · hard
The left box shows separate flat pieces. Which figure shows how the pieces look when they are fitted together?
Show the answer
Answer: C
Count the pieces first: every figure must use each piece exactly once, with nothing added. Then pick one distinctive piece, such as the largest one or one with a curved or sharply pointed edge, and look for it in each figure; pieces may be turned but never flipped over. A figure whose cut lines are in different places has pieces of different sizes and can be crossed out. Here the pieces fit together into a diamond.
A: A cut is in a different place, so the pieces do not match: one piece here covers about 14% of the shape, but the matching piece in the left box covers about 24%.
B: A cut is in a different place, so the pieces do not match: one piece here covers about 41% of the shape, but the matching piece in the left box covers about 31%.
C (correct): This diamond is made of exactly the 4 pieces in the left box, each only turned and slid into place.
D: This figure is a square. The pieces in the left box do not have these shapes, so they cannot fill this outline without gaps or overlaps.
Practice 8 of 80 · easy
The left box shows separate flat pieces. Which figure shows how the pieces look when they are fitted together?
Show the answer
Answer: D
Count the pieces first: every figure must use each piece exactly once, with nothing added. Then pick one distinctive piece, such as the largest one or one with a curved or sharply pointed edge, and look for it in each figure; pieces may be turned but never flipped over. A figure whose cut lines are in different places has pieces of different sizes and can be crossed out. Here the pieces fit together into a parallelogram.
A: This figure has 4 pieces, but the left box has 3. Every piece must be used once, and nothing may be added.
B: A cut is in a different place, so the pieces do not match: one piece here covers about 42% of the shape, but the matching piece in the left box covers about 27%.
C: This figure is a rectangle. The pieces in the left box do not have these shapes, so they cannot fill this outline without gaps or overlaps.
D (correct): This parallelogram is made of exactly the 3 pieces in the left box, each only turned and slid into place.
Practice 9 of 80 · medium
The left box shows separate flat pieces. Which figure shows how the pieces look when they are fitted together?
Show the answer
Answer: C
Count the pieces first: every figure must use each piece exactly once, with nothing added. Then pick one distinctive piece, such as the largest one or one with a curved or sharply pointed edge, and look for it in each figure; pieces may be turned but never flipped over. A figure whose cut lines are in different places has pieces of different sizes and can be crossed out. Here the pieces fit together into a trapezoid.
A: This figure has 4 pieces, but the left box has 3. Every piece must be used once, and nothing may be added.
B: A cut is in a different place, so the pieces do not match: one piece here covers about 35% of the shape, but the matching piece in the left box covers about 43%.
C (correct): This trapezoid is made of exactly the 3 pieces in the left box, each only turned and slid into place.
D: A cut is in a different place, so the pieces do not match: one piece here covers about 13% of the shape, but the matching piece in the left box covers about 26%.
Practice 10 of 80 · medium
The left box shows separate flat pieces. Which figure shows how the pieces look when they are fitted together?
Show the answer
Answer: A
Count the pieces first: every figure must use each piece exactly once, with nothing added. Then pick one distinctive piece, such as the largest one or one with a curved or sharply pointed edge, and look for it in each figure; pieces may be turned but never flipped over. A figure whose cut lines are in different places has pieces of different sizes and can be crossed out. Here the pieces fit together into a square.
A (correct): This square is made of exactly the 3 pieces in the left box, each only turned and slid into place.
B: A cut is in a different place, so the pieces do not match: one piece here covers about 51% of the shape, but the matching piece in the left box covers about 34%.
C: This figure has 4 pieces, but the left box has 3. Every piece must be used once, and nothing may be added.
D: This figure is a diamond. The pieces in the left box do not have these shapes, so they cannot fill this outline without gaps or overlaps.
Practice 11 of 80 · easy
The left box shows separate flat pieces. Which figure shows how the pieces look when they are fitted together?
Show the answer
Answer: D
Count the pieces first: every figure must use each piece exactly once, with nothing added. Then pick one distinctive piece, such as the largest one or one with a curved or sharply pointed edge, and look for it in each figure; pieces may be turned but never flipped over. A figure whose cut lines are in different places has pieces of different sizes and can be crossed out. Here the pieces fit together into a trapezoid.
A: A cut is in a different place, so the pieces do not match: one piece here covers about 38% of the shape, but the matching piece in the left box covers about 29%.
B: A cut is in a different place, so the pieces do not match: one piece here covers about 87% of the shape, but the matching piece in the left box covers about 71%.
C: This figure has 3 pieces, but the left box has 2. Every piece must be used once, and nothing may be added.
D (correct): This trapezoid is made of exactly the 2 pieces in the left box, each only turned and slid into place.
Practice 12 of 80 · hard
The left box shows separate flat pieces. Which figure shows how the pieces look when they are fitted together?
Show the answer
Answer: D
Count the pieces first: every figure must use each piece exactly once, with nothing added. Then pick one distinctive piece, such as the largest one or one with a curved or sharply pointed edge, and look for it in each figure; pieces may be turned but never flipped over. A figure whose cut lines are in different places has pieces of different sizes and can be crossed out. Here the pieces fit together into a parallelogram.
A: A cut is in a different place, so the pieces do not match: one piece here covers about 32% of the shape, but the matching piece in the left box covers about 22%.
B: A cut is in a different place, so the pieces do not match: one piece here covers about 35% of the shape, but the matching piece in the left box covers about 43%.
C: This figure is a rectangle. The pieces in the left box do not have these shapes, so they cannot fill this outline without gaps or overlaps.
D (correct): This parallelogram is made of exactly the 4 pieces in the left box, each only turned and slid into place.
Practice 13 of 80 · medium
The left box shows separate flat pieces. Which figure shows how the pieces look when they are fitted together?
Show the answer
Answer: A
Count the pieces first: every figure must use each piece exactly once, with nothing added. Then pick one distinctive piece, such as the largest one or one with a curved or sharply pointed edge, and look for it in each figure; pieces may be turned but never flipped over. A figure whose cut lines are in different places has pieces of different sizes and can be crossed out. Here the pieces fit together into a triangle.
A (correct): This triangle is made of exactly the 3 pieces in the left box, each only turned and slid into place.
B: A cut is in a different place, so the pieces do not match: one piece here covers about 50% of the shape, but the matching piece in the left box covers about 41%.
C: This figure has 4 pieces, but the left box has 3. Every piece must be used once, and nothing may be added.
D: This figure is a right triangle. The pieces in the left box do not have these shapes, so they cannot fill this outline without gaps or overlaps.
Practice 14 of 80 · easy
The left box shows separate flat pieces. Which figure shows how the pieces look when they are fitted together?
Show the answer
Answer: A
Count the pieces first: every figure must use each piece exactly once, with nothing added. Then pick one distinctive piece, such as the largest one or one with a curved or sharply pointed edge, and look for it in each figure; pieces may be turned but never flipped over. A figure whose cut lines are in different places has pieces of different sizes and can be crossed out. Here the pieces fit together into a triangle.
A (correct): This triangle is made of exactly the 2 pieces in the left box, each only turned and slid into place.
B: A cut is in a different place, so the pieces do not match: one piece here covers about 80% of the shape, but the matching piece in the left box covers about 59%.
C: A cut is in a different place, so the pieces do not match: one piece here covers about 29% of the shape, but the matching piece in the left box covers about 41%.
D: This figure has 3 pieces, but the left box has 2. Every piece must be used once, and nothing may be added.
Practice 15 of 80 · hard
The left box shows separate flat pieces. Which figure shows how the pieces look when they are fitted together?
Show the answer
Answer: D
Count the pieces first: every figure must use each piece exactly once, with nothing added. Then pick one distinctive piece, such as the largest one or one with a curved or sharply pointed edge, and look for it in each figure; pieces may be turned but never flipped over. A figure whose cut lines are in different places has pieces of different sizes and can be crossed out. Here the pieces fit together into a trapezoid.
A: A cut is in a different place, so the pieces do not match: one piece here covers about 23% of the shape, but the matching piece in the left box covers about 32%.
B: A cut is in a different place, so the pieces do not match: one piece here covers about 25% of the shape, but the matching piece in the left box covers about 15%.
C: This figure is a parallelogram. The pieces in the left box do not have these shapes, so they cannot fill this outline without gaps or overlaps.
D (correct): This trapezoid is made of exactly the 4 pieces in the left box, each only turned and slid into place.
Practice 16 of 80 · medium
The left box shows separate flat pieces. Which figure shows how the pieces look when they are fitted together?
Show the answer
Answer: D
Count the pieces first: every figure must use each piece exactly once, with nothing added. Then pick one distinctive piece, such as the largest one or one with a curved or sharply pointed edge, and look for it in each figure; pieces may be turned but never flipped over. A figure whose cut lines are in different places has pieces of different sizes and can be crossed out. Here the pieces fit together into a hexagon.
A: A cut is in a different place, so the pieces do not match: one piece here covers about 24% of the shape, but the matching piece in the left box covers about 38%.
B: This figure has 4 pieces, but the left box has 3. Every piece must be used once, and nothing may be added.
C: This figure is a circle. The pieces in the left box do not have these shapes, so they cannot fill this outline without gaps or overlaps.
D (correct): This hexagon is made of exactly the 3 pieces in the left box, each only turned and slid into place.
Practice 17 of 80 · easy
The left box shows separate flat pieces. Which figure shows how the pieces look when they are fitted together?
Show the answer
Answer: C
Count the pieces first: every figure must use each piece exactly once, with nothing added. Then pick one distinctive piece, such as the largest one or one with a curved or sharply pointed edge, and look for it in each figure; pieces may be turned but never flipped over. A figure whose cut lines are in different places has pieces of different sizes and can be crossed out. Here the pieces fit together into a rectangle.
A: This figure is a square. The pieces in the left box do not have these shapes, so they cannot fill this outline without gaps or overlaps.
B: A cut is in a different place, so the pieces do not match: one piece here covers about 46% of the shape, but the matching piece in the left box covers about 26%.
C (correct): This rectangle is made of exactly the 2 pieces in the left box, each only turned and slid into place.
D: This figure has 3 pieces, but the left box has 2. Every piece must be used once, and nothing may be added.
Practice 18 of 80 · hard
The left box shows separate flat pieces. Which figure shows how the pieces look when they are fitted together?
Show the answer
Answer: D
Count the pieces first: every figure must use each piece exactly once, with nothing added. Then pick one distinctive piece, such as the largest one or one with a curved or sharply pointed edge, and look for it in each figure; pieces may be turned but never flipped over. A figure whose cut lines are in different places has pieces of different sizes and can be crossed out. Here the pieces fit together into a trapezoid.
A: A cut is in a different place, so the pieces do not match: one piece here covers about 28% of the shape, but the matching piece in the left box covers about 36%.
B: A cut is in a different place, so the pieces do not match: one piece here covers about 36% of the shape, but the matching piece in the left box covers about 28%.
C: This figure is a parallelogram. The pieces in the left box do not have these shapes, so they cannot fill this outline without gaps or overlaps.
D (correct): This trapezoid is made of exactly the 4 pieces in the left box, each only turned and slid into place.
Practice 19 of 80 · hard
The left box shows separate flat pieces. Which figure shows how the pieces look when they are fitted together?
Show the answer
Answer: B
Count the pieces first: every figure must use each piece exactly once, with nothing added. Then pick one distinctive piece, such as the largest one or one with a curved or sharply pointed edge, and look for it in each figure; pieces may be turned but never flipped over. A figure whose cut lines are in different places has pieces of different sizes and can be crossed out. Here the pieces fit together into a circle.
A: A cut is in a different place, so the pieces do not match: one piece here covers about 20% of the shape, but the matching piece in the left box covers about 29%.
B (correct): This circle is made of exactly the 4 pieces in the left box, each only turned and slid into place.
C: A cut is in a different place, so the pieces do not match: one piece here covers about 52% of the shape, but the matching piece in the left box covers about 36%.
D: This figure is a hexagon. The pieces in the left box do not have these shapes, so they cannot fill this outline without gaps or overlaps.
Practice 20 of 80 · hard
The left box shows separate flat pieces. Which figure shows how the pieces look when they are fitted together?
Show the answer
Answer: B
Count the pieces first: every figure must use each piece exactly once, with nothing added. Then pick one distinctive piece, such as the largest one or one with a curved or sharply pointed edge, and look for it in each figure; pieces may be turned but never flipped over. A figure whose cut lines are in different places has pieces of different sizes and can be crossed out. Here the pieces fit together into a square.
A: A cut is in a different place, so the pieces do not match: one piece here covers about 51% of the shape, but the matching piece in the left box covers about 35%.
B (correct): This square is made of exactly the 4 pieces in the left box, each only turned and slid into place.
C: This figure is a rectangle. The pieces in the left box do not have these shapes, so they cannot fill this outline without gaps or overlaps.
D: A cut is in a different place, so the pieces do not match: one piece here covers about 43% of the shape, but the matching piece in the left box covers about 35%.
Practice 21 of 80 · medium
The left box shows separate flat pieces. Which figure shows how the pieces look when they are fitted together?
Show the answer
Answer: C
Count the pieces first: every figure must use each piece exactly once, with nothing added. Then pick one distinctive piece, such as the largest one or one with a curved or sharply pointed edge, and look for it in each figure; pieces may be turned but never flipped over. A figure whose cut lines are in different places has pieces of different sizes and can be crossed out. Here the pieces fit together into a rectangle.
A: A cut is in a different place, so the pieces do not match: one piece here covers about 48% of the shape, but the matching piece in the left box covers about 58%.
B: This figure has 4 pieces, but the left box has 3. Every piece must be used once, and nothing may be added.
C (correct): This rectangle is made of exactly the 3 pieces in the left box, each only turned and slid into place.
D: This figure is a square. The pieces in the left box do not have these shapes, so they cannot fill this outline without gaps or overlaps.
Practice 22 of 80 · medium
The left box shows separate flat pieces. Which figure shows how the pieces look when they are fitted together?
Show the answer
Answer: D
Count the pieces first: every figure must use each piece exactly once, with nothing added. Then pick one distinctive piece, such as the largest one or one with a curved or sharply pointed edge, and look for it in each figure; pieces may be turned but never flipped over. A figure whose cut lines are in different places has pieces of different sizes and can be crossed out. Here the pieces fit together into a right triangle.
A: A cut is in a different place, so the pieces do not match: one piece here covers about 61% of the shape, but the matching piece in the left box covers about 47%.
B: This figure has 4 pieces, but the left box has 3. Every piece must be used once, and nothing may be added.
C: A cut is in a different place, so the pieces do not match: one piece here covers about 30% of the shape, but the matching piece in the left box covers about 16%.
D (correct): This right triangle is made of exactly the 3 pieces in the left box, each only turned and slid into place.
Practice 23 of 80 · easy
The left box shows separate flat pieces. Which figure shows how the pieces look when they are fitted together?
Show the answer
Answer: C
Count the pieces first: every figure must use each piece exactly once, with nothing added. Then pick one distinctive piece, such as the largest one or one with a curved or sharply pointed edge, and look for it in each figure; pieces may be turned but never flipped over. A figure whose cut lines are in different places has pieces of different sizes and can be crossed out. Here the pieces fit together into a circle.
A: A cut is in a different place, so the pieces do not match: one piece here covers about 29% of the shape, but the matching piece in the left box covers about 18%.
B: A cut is in a different place, so the pieces do not match: one piece here covers about 40% of the shape, but the matching piece in the left box covers about 18%.
C (correct): This circle is made of exactly the 2 pieces in the left box, each only turned and slid into place.
D: This figure has 3 pieces, but the left box has 2. Every piece must be used once, and nothing may be added.
Practice 24 of 80 · medium
The left box shows separate flat pieces. Which figure shows how the pieces look when they are fitted together?
Show the answer
Answer: D
Count the pieces first: every figure must use each piece exactly once, with nothing added. Then pick one distinctive piece, such as the largest one or one with a curved or sharply pointed edge, and look for it in each figure; pieces may be turned but never flipped over. A figure whose cut lines are in different places has pieces of different sizes and can be crossed out. Here the pieces fit together into a triangle.
A: This figure is a right triangle. The pieces in the left box do not have these shapes, so they cannot fill this outline without gaps or overlaps.
B: A cut is in a different place, so the pieces do not match: one piece here covers about 28% of the shape, but the matching piece in the left box covers about 21%.
C: This figure has 4 pieces, but the left box has 3. Every piece must be used once, and nothing may be added.
D (correct): This triangle is made of exactly the 3 pieces in the left box, each only turned and slid into place.
Practice 25 of 80 · hard
The left box shows separate flat pieces. Which figure shows how the pieces look when they are fitted together?
Show the answer
Answer: B
Count the pieces first: every figure must use each piece exactly once, with nothing added. Then pick one distinctive piece, such as the largest one or one with a curved or sharply pointed edge, and look for it in each figure; pieces may be turned but never flipped over. A figure whose cut lines are in different places has pieces of different sizes and can be crossed out. Here the pieces fit together into a hexagon.
A: A cut is in a different place, so the pieces do not match: one piece here covers about 52% of the shape, but the matching piece in the left box covers about 39%.
B (correct): This hexagon is made of exactly the 4 pieces in the left box, each only turned and slid into place.
C: A cut is in a different place, so the pieces do not match: one piece here covers about 31% of the shape, but the matching piece in the left box covers about 39%.
D: This figure is a circle. The pieces in the left box do not have these shapes, so they cannot fill this outline without gaps or overlaps.
Practice 26 of 80 · medium
The left box shows separate flat pieces. Which figure shows how the pieces look when they are fitted together?
Show the answer
Answer: B
Count the pieces first: every figure must use each piece exactly once, with nothing added. Then pick one distinctive piece, such as the largest one or one with a curved or sharply pointed edge, and look for it in each figure; pieces may be turned but never flipped over. A figure whose cut lines are in different places has pieces of different sizes and can be crossed out. Here the pieces fit together into a pentagon.
A: This figure is a hexagon. The pieces in the left box do not have these shapes, so they cannot fill this outline without gaps or overlaps.
B (correct): This pentagon is made of exactly the 3 pieces in the left box, each only turned and slid into place.
C: A cut is in a different place, so the pieces do not match: one piece here covers about 68% of the shape, but the matching piece in the left box covers about 46%.
D: This figure has 4 pieces, but the left box has 3. Every piece must be used once, and nothing may be added.
Practice 27 of 80 · medium
The left box shows separate flat pieces. Which figure shows how the pieces look when they are fitted together?
Show the answer
Answer: D
Count the pieces first: every figure must use each piece exactly once, with nothing added. Then pick one distinctive piece, such as the largest one or one with a curved or sharply pointed edge, and look for it in each figure; pieces may be turned but never flipped over. A figure whose cut lines are in different places has pieces of different sizes and can be crossed out. Here the pieces fit together into a triangle.
A: This figure has 4 pieces, but the left box has 3. Every piece must be used once, and nothing may be added.
B: A cut is in a different place, so the pieces do not match: one piece here covers about 14% of the shape, but the matching piece in the left box covers about 28%.
C: This figure is a right triangle. The pieces in the left box do not have these shapes, so they cannot fill this outline without gaps or overlaps.
D (correct): This triangle is made of exactly the 3 pieces in the left box, each only turned and slid into place.
Practice 28 of 80 · easy
The left box shows separate flat pieces. Which figure shows how the pieces look when they are fitted together?
Show the answer
Answer: B
Count the pieces first: every figure must use each piece exactly once, with nothing added. Then pick one distinctive piece, such as the largest one or one with a curved or sharply pointed edge, and look for it in each figure; pieces may be turned but never flipped over. A figure whose cut lines are in different places has pieces of different sizes and can be crossed out. Here the pieces fit together into a diamond.
A: A cut is in a different place, so the pieces do not match: one piece here covers about 86% of the shape, but the matching piece in the left box covers about 64%.
B (correct): This diamond is made of exactly the 2 pieces in the left box, each only turned and slid into place.
C: This figure has 3 pieces, but the left box has 2. Every piece must be used once, and nothing may be added.
D: This figure is a square. The pieces in the left box do not have these shapes, so they cannot fill this outline without gaps or overlaps.
Practice 29 of 80 · medium
The left box shows separate flat pieces. Which figure shows how the pieces look when they are fitted together?
Show the answer
Answer: B
Count the pieces first: every figure must use each piece exactly once, with nothing added. Then pick one distinctive piece, such as the largest one or one with a curved or sharply pointed edge, and look for it in each figure; pieces may be turned but never flipped over. A figure whose cut lines are in different places has pieces of different sizes and can be crossed out. Here the pieces fit together into a rectangle.
A: This figure has 4 pieces, but the left box has 3. Every piece must be used once, and nothing may be added.
B (correct): This rectangle is made of exactly the 3 pieces in the left box, each only turned and slid into place.
C: A cut is in a different place, so the pieces do not match: one piece here covers about 42% of the shape, but the matching piece in the left box covers about 57%.
D: This figure is a square. The pieces in the left box do not have these shapes, so they cannot fill this outline without gaps or overlaps.
Practice 30 of 80 · medium
The left box shows separate flat pieces. Which figure shows how the pieces look when they are fitted together?
Show the answer
Answer: A
Count the pieces first: every figure must use each piece exactly once, with nothing added. Then pick one distinctive piece, such as the largest one or one with a curved or sharply pointed edge, and look for it in each figure; pieces may be turned but never flipped over. A figure whose cut lines are in different places has pieces of different sizes and can be crossed out. Here the pieces fit together into a pentagon.
A (correct): This pentagon is made of exactly the 3 pieces in the left box, each only turned and slid into place.
B: This figure is a hexagon. The pieces in the left box do not have these shapes, so they cannot fill this outline without gaps or overlaps.
C: This figure has 4 pieces, but the left box has 3. Every piece must be used once, and nothing may be added.
D: A cut is in a different place, so the pieces do not match: one piece here covers about 55% of the shape, but the matching piece in the left box covers about 46%.
Practice 31 of 80 · hard
The left box shows separate flat pieces. Which figure shows how the pieces look when they are fitted together?
Show the answer
Answer: B
Count the pieces first: every figure must use each piece exactly once, with nothing added. Then pick one distinctive piece, such as the largest one or one with a curved or sharply pointed edge, and look for it in each figure; pieces may be turned but never flipped over. A figure whose cut lines are in different places has pieces of different sizes and can be crossed out. Here the pieces fit together into a rectangle.
A: A cut is in a different place, so the pieces do not match: one piece here covers about 27% of the shape, but the matching piece in the left box covers about 36%.
B (correct): This rectangle is made of exactly the 4 pieces in the left box, each only turned and slid into place.
C: A cut is in a different place, so the pieces do not match: one piece here covers about 35% of the shape, but the matching piece in the left box covers about 27%.
D: This figure is a square. The pieces in the left box do not have these shapes, so they cannot fill this outline without gaps or overlaps.
Practice 32 of 80 · easy
The left box shows separate flat pieces. Which figure shows how the pieces look when they are fitted together?
Show the answer
Answer: A
Count the pieces first: every figure must use each piece exactly once, with nothing added. Then pick one distinctive piece, such as the largest one or one with a curved or sharply pointed edge, and look for it in each figure; pieces may be turned but never flipped over. A figure whose cut lines are in different places has pieces of different sizes and can be crossed out. Here the pieces fit together into a triangle.
A (correct): This triangle is made of exactly the 2 pieces in the left box, each only turned and slid into place.
B: This figure has 3 pieces, but the left box has 2. Every piece must be used once, and nothing may be added.
C: A cut is in a different place, so the pieces do not match: one piece here covers about 69% of the shape, but the matching piece in the left box covers about 53%.
D: This figure is a right triangle. The pieces in the left box do not have these shapes, so they cannot fill this outline without gaps or overlaps.
Practice 33 of 80 · medium
The left box shows separate flat pieces. Which figure shows how the pieces look when they are fitted together?
Show the answer
Answer: C
Count the pieces first: every figure must use each piece exactly once, with nothing added. Then pick one distinctive piece, such as the largest one or one with a curved or sharply pointed edge, and look for it in each figure; pieces may be turned but never flipped over. A figure whose cut lines are in different places has pieces of different sizes and can be crossed out. Here the pieces fit together into a pentagon.
A: A cut is in a different place, so the pieces do not match: one piece here covers about 38% of the shape, but the matching piece in the left box covers about 47%.
B: This figure has 4 pieces, but the left box has 3. Every piece must be used once, and nothing may be added.
C (correct): This pentagon is made of exactly the 3 pieces in the left box, each only turned and slid into place.
D: This figure is a hexagon. The pieces in the left box do not have these shapes, so they cannot fill this outline without gaps or overlaps.
Practice 34 of 80 · medium
The left box shows separate flat pieces. Which figure shows how the pieces look when they are fitted together?
Show the answer
Answer: A
Count the pieces first: every figure must use each piece exactly once, with nothing added. Then pick one distinctive piece, such as the largest one or one with a curved or sharply pointed edge, and look for it in each figure; pieces may be turned but never flipped over. A figure whose cut lines are in different places has pieces of different sizes and can be crossed out. Here the pieces fit together into a rectangle.
A (correct): This rectangle is made of exactly the 3 pieces in the left box, each only turned and slid into place.
B: A cut is in a different place, so the pieces do not match: one piece here covers about 24% of the shape, but the matching piece in the left box covers about 12%.
C: This figure has 4 pieces, but the left box has 3. Every piece must be used once, and nothing may be added.
D: This figure is a parallelogram. The pieces in the left box do not have these shapes, so they cannot fill this outline without gaps or overlaps.
Practice 35 of 80 · easy
The left box shows separate flat pieces. Which figure shows how the pieces look when they are fitted together?
Show the answer
Answer: A
Count the pieces first: every figure must use each piece exactly once, with nothing added. Then pick one distinctive piece, such as the largest one or one with a curved or sharply pointed edge, and look for it in each figure; pieces may be turned but never flipped over. A figure whose cut lines are in different places has pieces of different sizes and can be crossed out. Here the pieces fit together into a circle.
A (correct): This circle is made of exactly the 2 pieces in the left box, each only turned and slid into place.
B: A cut is in a different place, so the pieces do not match: one piece here covers about 43% of the shape, but the matching piece in the left box covers about 27%.
C: A cut is in a different place, so the pieces do not match: one piece here covers about 85% of the shape, but the matching piece in the left box covers about 73%.
D: This figure has 3 pieces, but the left box has 2. Every piece must be used once, and nothing may be added.
Practice 36 of 80 · medium
The left box shows separate flat pieces. Which figure shows how the pieces look when they are fitted together?
Show the answer
Answer: D
Count the pieces first: every figure must use each piece exactly once, with nothing added. Then pick one distinctive piece, such as the largest one or one with a curved or sharply pointed edge, and look for it in each figure; pieces may be turned but never flipped over. A figure whose cut lines are in different places has pieces of different sizes and can be crossed out. Here the pieces fit together into a half-circle.
A: This figure is a trapezoid. The pieces in the left box do not have these shapes, so they cannot fill this outline without gaps or overlaps.
B: This figure has 4 pieces, but the left box has 3. Every piece must be used once, and nothing may be added.
C: A cut is in a different place, so the pieces do not match: one piece here covers about 14% of the shape, but the matching piece in the left box covers about 27%.
D (correct): This half-circle is made of exactly the 3 pieces in the left box, each only turned and slid into place.
Practice 37 of 80 · medium
The left box shows separate flat pieces. Which figure shows how the pieces look when they are fitted together?
Show the answer
Answer: C
Count the pieces first: every figure must use each piece exactly once, with nothing added. Then pick one distinctive piece, such as the largest one or one with a curved or sharply pointed edge, and look for it in each figure; pieces may be turned but never flipped over. A figure whose cut lines are in different places has pieces of different sizes and can be crossed out. Here the pieces fit together into a triangle.
A: A cut is in a different place, so the pieces do not match: one piece here covers about 31% of the shape, but the matching piece in the left box covers about 14%.
B: A cut is in a different place, so the pieces do not match: one piece here covers about 22% of the shape, but the matching piece in the left box covers about 14%.
C (correct): This triangle is made of exactly the 3 pieces in the left box, each only turned and slid into place.
D: This figure has 4 pieces, but the left box has 3. Every piece must be used once, and nothing may be added.
Practice 38 of 80 · easy
The left box shows separate flat pieces. Which figure shows how the pieces look when they are fitted together?
Show the answer
Answer: A
Count the pieces first: every figure must use each piece exactly once, with nothing added. Then pick one distinctive piece, such as the largest one or one with a curved or sharply pointed edge, and look for it in each figure; pieces may be turned but never flipped over. A figure whose cut lines are in different places has pieces of different sizes and can be crossed out. Here the pieces fit together into a parallelogram.
A (correct): This parallelogram is made of exactly the 2 pieces in the left box, each only turned and slid into place.
B: A cut is in a different place, so the pieces do not match: one piece here covers about 19% of the shape, but the matching piece in the left box covers about 34%.
C: This figure is a trapezoid. The pieces in the left box do not have these shapes, so they cannot fill this outline without gaps or overlaps.
D: This figure has 3 pieces, but the left box has 2. Every piece must be used once, and nothing may be added.
Practice 39 of 80 · medium
The left box shows separate flat pieces. Which figure shows how the pieces look when they are fitted together?
Show the answer
Answer: C
Count the pieces first: every figure must use each piece exactly once, with nothing added. Then pick one distinctive piece, such as the largest one or one with a curved or sharply pointed edge, and look for it in each figure; pieces may be turned but never flipped over. A figure whose cut lines are in different places has pieces of different sizes and can be crossed out. Here the pieces fit together into a diamond.
A: A cut is in a different place, so the pieces do not match: one piece here covers about 63% of the shape, but the matching piece in the left box covers about 50%.
B: This figure has 4 pieces, but the left box has 3. Every piece must be used once, and nothing may be added.
C (correct): This diamond is made of exactly the 3 pieces in the left box, each only turned and slid into place.
D: This figure is a square. The pieces in the left box do not have these shapes, so they cannot fill this outline without gaps or overlaps.
Practice 40 of 80 · hard
The left box shows separate flat pieces. Which figure shows how the pieces look when they are fitted together?
Show the answer
Answer: B
Count the pieces first: every figure must use each piece exactly once, with nothing added. Then pick one distinctive piece, such as the largest one or one with a curved or sharply pointed edge, and look for it in each figure; pieces may be turned but never flipped over. A figure whose cut lines are in different places has pieces of different sizes and can be crossed out. Here the pieces fit together into a circle.
A: A cut is in a different place, so the pieces do not match: one piece here covers about 49% of the shape, but the matching piece in the left box covers about 39%.
B (correct): This circle is made of exactly the 4 pieces in the left box, each only turned and slid into place.
C: A cut is in a different place, so the pieces do not match: one piece here covers about 30% of the shape, but the matching piece in the left box covers about 39%.
D: This figure is a hexagon. The pieces in the left box do not have these shapes, so they cannot fill this outline without gaps or overlaps.
Practice 41 of 80 · medium
The left box shows separate flat pieces. Which figure shows how the pieces look when they are fitted together?
Show the answer
Answer: C
Count the pieces first: every figure must use each piece exactly once, with nothing added. Then pick one distinctive piece, such as the largest one or one with a curved or sharply pointed edge, and look for it in each figure; pieces may be turned but never flipped over. A figure whose cut lines are in different places has pieces of different sizes and can be crossed out. Here the pieces fit together into a rectangle.
A: A cut is in a different place, so the pieces do not match: one piece here covers about 26% of the shape, but the matching piece in the left box covers about 18%.
B: This figure has 4 pieces, but the left box has 3. Every piece must be used once, and nothing may be added.
C (correct): This rectangle is made of exactly the 3 pieces in the left box, each only turned and slid into place.
D: This figure is a square. The pieces in the left box do not have these shapes, so they cannot fill this outline without gaps or overlaps.
Practice 42 of 80 · medium
The left box shows separate flat pieces. Which figure shows how the pieces look when they are fitted together?
Show the answer
Answer: B
Count the pieces first: every figure must use each piece exactly once, with nothing added. Then pick one distinctive piece, such as the largest one or one with a curved or sharply pointed edge, and look for it in each figure; pieces may be turned but never flipped over. A figure whose cut lines are in different places has pieces of different sizes and can be crossed out. Here the pieces fit together into a circle.
A: A cut is in a different place, so the pieces do not match: one piece here covers about 39% of the shape, but the matching piece in the left box covers about 46%.
B (correct): This circle is made of exactly the 3 pieces in the left box, each only turned and slid into place.
C: This figure has 4 pieces, but the left box has 3. Every piece must be used once, and nothing may be added.
D: A cut is in a different place, so the pieces do not match: one piece here covers about 63% of the shape, but the matching piece in the left box covers about 46%.
Practice 43 of 80 · easy
The left box shows separate flat pieces. Which figure shows how the pieces look when they are fitted together?
Show the answer
Answer: D
Count the pieces first: every figure must use each piece exactly once, with nothing added. Then pick one distinctive piece, such as the largest one or one with a curved or sharply pointed edge, and look for it in each figure; pieces may be turned but never flipped over. A figure whose cut lines are in different places has pieces of different sizes and can be crossed out. Here the pieces fit together into a square.
A: A cut is in a different place, so the pieces do not match: one piece here covers about 68% of the shape, but the matching piece in the left box covers about 82%.
B: This figure is a rectangle. The pieces in the left box do not have these shapes, so they cannot fill this outline without gaps or overlaps.
C: This figure has 3 pieces, but the left box has 2. Every piece must be used once, and nothing may be added.
D (correct): This square is made of exactly the 2 pieces in the left box, each only turned and slid into place.
Practice 44 of 80 · medium
The left box shows separate flat pieces. Which figure shows how the pieces look when they are fitted together?
Show the answer
Answer: D
Count the pieces first: every figure must use each piece exactly once, with nothing added. Then pick one distinctive piece, such as the largest one or one with a curved or sharply pointed edge, and look for it in each figure; pieces may be turned but never flipped over. A figure whose cut lines are in different places has pieces of different sizes and can be crossed out. Here the pieces fit together into a parallelogram.
A: This figure is a rectangle. The pieces in the left box do not have these shapes, so they cannot fill this outline without gaps or overlaps.
B: This figure has 4 pieces, but the left box has 3. Every piece must be used once, and nothing may be added.
C: A cut is in a different place, so the pieces do not match: one piece here covers about 29% of the shape, but the matching piece in the left box covers about 18%.
D (correct): This parallelogram is made of exactly the 3 pieces in the left box, each only turned and slid into place.
Practice 45 of 80 · medium
The left box shows separate flat pieces. Which figure shows how the pieces look when they are fitted together?
Show the answer
Answer: A
Count the pieces first: every figure must use each piece exactly once, with nothing added. Then pick one distinctive piece, such as the largest one or one with a curved or sharply pointed edge, and look for it in each figure; pieces may be turned but never flipped over. A figure whose cut lines are in different places has pieces of different sizes and can be crossed out. Here the pieces fit together into a triangle.
A (correct): This triangle is made of exactly the 3 pieces in the left box, each only turned and slid into place.
B: This figure has 4 pieces, but the left box has 3. Every piece must be used once, and nothing may be added.
C: A cut is in a different place, so the pieces do not match: one piece here covers about 30% of the shape, but the matching piece in the left box covers about 38%.
D: A cut is in a different place, so the pieces do not match: one piece here covers about 40% of the shape, but the matching piece in the left box covers about 48%.
Practice 46 of 80 · medium
The left box shows separate flat pieces. Which figure shows how the pieces look when they are fitted together?
Show the answer
Answer: B
Count the pieces first: every figure must use each piece exactly once, with nothing added. Then pick one distinctive piece, such as the largest one or one with a curved or sharply pointed edge, and look for it in each figure; pieces may be turned but never flipped over. A figure whose cut lines are in different places has pieces of different sizes and can be crossed out. Here the pieces fit together into a parallelogram.
A: This figure is a rectangle. The pieces in the left box do not have these shapes, so they cannot fill this outline without gaps or overlaps.
B (correct): This parallelogram is made of exactly the 3 pieces in the left box, each only turned and slid into place.
C: This figure has 4 pieces, but the left box has 3. Every piece must be used once, and nothing may be added.
D: A cut is in a different place, so the pieces do not match: one piece here covers about 31% of the shape, but the matching piece in the left box covers about 17%.
Practice 47 of 80 · easy
The left box shows separate flat pieces. Which figure shows how the pieces look when they are fitted together?
Show the answer
Answer: B
Count the pieces first: every figure must use each piece exactly once, with nothing added. Then pick one distinctive piece, such as the largest one or one with a curved or sharply pointed edge, and look for it in each figure; pieces may be turned but never flipped over. A figure whose cut lines are in different places has pieces of different sizes and can be crossed out. Here the pieces fit together into a hexagon.
A: This figure has 3 pieces, but the left box has 2. Every piece must be used once, and nothing may be added.
B (correct): This hexagon is made of exactly the 2 pieces in the left box, each only turned and slid into place.
C: A cut is in a different place, so the pieces do not match: one piece here covers about 33% of the shape, but the matching piece in the left box covers about 43%.
D: This figure is a pentagon. The pieces in the left box do not have these shapes, so they cannot fill this outline without gaps or overlaps.
Practice 48 of 80 · hard
The left box shows separate flat pieces. Which figure shows how the pieces look when they are fitted together?
Show the answer
Answer: C
Count the pieces first: every figure must use each piece exactly once, with nothing added. Then pick one distinctive piece, such as the largest one or one with a curved or sharply pointed edge, and look for it in each figure; pieces may be turned but never flipped over. A figure whose cut lines are in different places has pieces of different sizes and can be crossed out. Here the pieces fit together into a trapezoid.
A: This figure is a half-circle. The pieces in the left box do not have these shapes, so they cannot fill this outline without gaps or overlaps.
B: A cut is in a different place, so the pieces do not match: one piece here covers about 46% of the shape, but the matching piece in the left box covers about 29%.
C (correct): This trapezoid is made of exactly the 4 pieces in the left box, each only turned and slid into place.
D: A cut is in a different place, so the pieces do not match: one piece here covers about 38% of the shape, but the matching piece in the left box covers about 29%.
Practice 49 of 80 · easy
The left box shows separate flat pieces. Which figure shows how the pieces look when they are fitted together?
Show the answer
Answer: B
Count the pieces first: every figure must use each piece exactly once, with nothing added. Then pick one distinctive piece, such as the largest one or one with a curved or sharply pointed edge, and look for it in each figure; pieces may be turned but never flipped over. A figure whose cut lines are in different places has pieces of different sizes and can be crossed out. Here the pieces fit together into a trapezoid.
A: This figure is a half-circle. The pieces in the left box do not have these shapes, so they cannot fill this outline without gaps or overlaps.
B (correct): This trapezoid is made of exactly the 2 pieces in the left box, each only turned and slid into place.
C: A cut is in a different place, so the pieces do not match: one piece here covers about 48% of the shape, but the matching piece in the left box covers about 30%.
D: This figure has 3 pieces, but the left box has 2. Every piece must be used once, and nothing may be added.
Practice 50 of 80 · hard
The left box shows separate flat pieces. Which figure shows how the pieces look when they are fitted together?
Show the answer
Answer: C
Count the pieces first: every figure must use each piece exactly once, with nothing added. Then pick one distinctive piece, such as the largest one or one with a curved or sharply pointed edge, and look for it in each figure; pieces may be turned but never flipped over. A figure whose cut lines are in different places has pieces of different sizes and can be crossed out. Here the pieces fit together into a circle.
A: This figure is a hexagon. The pieces in the left box do not have these shapes, so they cannot fill this outline without gaps or overlaps.
B: A cut is in a different place, so the pieces do not match: one piece here covers about 21% of the shape, but the matching piece in the left box covers about 28%.
C (correct): This circle is made of exactly the 4 pieces in the left box, each only turned and slid into place.
D: A cut is in a different place, so the pieces do not match: one piece here covers about 51% of the shape, but the matching piece in the left box covers about 35%.
Practice 51 of 80 · easy
The left box shows separate flat pieces. Which figure shows how the pieces look when they are fitted together?
Show the answer
Answer: C
Count the pieces first: every figure must use each piece exactly once, with nothing added. Then pick one distinctive piece, such as the largest one or one with a curved or sharply pointed edge, and look for it in each figure; pieces may be turned but never flipped over. A figure whose cut lines are in different places has pieces of different sizes and can be crossed out. Here the pieces fit together into a diamond.
A: A cut is in a different place, so the pieces do not match: one piece here covers about 22% of the shape, but the matching piece in the left box covers about 37%.
B: This figure is a square. The pieces in the left box do not have these shapes, so they cannot fill this outline without gaps or overlaps.
C (correct): This diamond is made of exactly the 2 pieces in the left box, each only turned and slid into place.
D: This figure has 3 pieces, but the left box has 2. Every piece must be used once, and nothing may be added.
Practice 52 of 80 · easy
The left box shows separate flat pieces. Which figure shows how the pieces look when they are fitted together?
Show the answer
Answer: A
Count the pieces first: every figure must use each piece exactly once, with nothing added. Then pick one distinctive piece, such as the largest one or one with a curved or sharply pointed edge, and look for it in each figure; pieces may be turned but never flipped over. A figure whose cut lines are in different places has pieces of different sizes and can be crossed out. Here the pieces fit together into a diamond.
A (correct): This diamond is made of exactly the 3 pieces in the left box, each only turned and slid into place.
B: A cut is in a different place, so the pieces do not match: one piece here covers about 28% of the shape, but the matching piece in the left box covers about 20%.
C: A cut is in a different place, so the pieces do not match: one piece here covers about 13% of the shape, but the matching piece in the left box covers about 20%.
D: This figure has 4 pieces, but the left box has 3. Every piece must be used once, and nothing may be added.
Practice 53 of 80 · easy
The left box shows separate flat pieces. Which figure shows how the pieces look when they are fitted together?
Show the answer
Answer: C
Count the pieces first: every figure must use each piece exactly once, with nothing added. Then pick one distinctive piece, such as the largest one or one with a curved or sharply pointed edge, and look for it in each figure; pieces may be turned but never flipped over. A figure whose cut lines are in different places has pieces of different sizes and can be crossed out. Here the pieces fit together into a parallelogram.
A: This figure has 3 pieces, but the left box has 2. Every piece must be used once, and nothing may be added.
B: This figure is a rectangle. The pieces in the left box do not have these shapes, so they cannot fill this outline without gaps or overlaps.
C (correct): This parallelogram is made of exactly the 2 pieces in the left box, each only turned and slid into place.
D: A cut is in a different place, so the pieces do not match: one piece here covers about 22% of the shape, but the matching piece in the left box covers about 44%.
Practice 54 of 80 · easy
The left box shows separate flat pieces. Which figure shows how the pieces look when they are fitted together?
Show the answer
Answer: A
Count the pieces first: every figure must use each piece exactly once, with nothing added. Then pick one distinctive piece, such as the largest one or one with a curved or sharply pointed edge, and look for it in each figure; pieces may be turned but never flipped over. A figure whose cut lines are in different places has pieces of different sizes and can be crossed out. Here the pieces fit together into a pentagon.
A (correct): This pentagon is made of exactly the 2 pieces in the left box, each only turned and slid into place.
B: A cut is in a different place, so the pieces do not match: one piece here covers about 86% of the shape, but the matching piece in the left box covers about 75%.
C: This figure has 3 pieces, but the left box has 2. Every piece must be used once, and nothing may be added.
D: A cut is in a different place, so the pieces do not match: one piece here covers about 49% of the shape, but the matching piece in the left box covers about 25%.
Practice 55 of 80 · hard
The left box shows separate flat pieces. Which figure shows how the pieces look when they are fitted together?
Show the answer
Answer: D
Count the pieces first: every figure must use each piece exactly once, with nothing added. Then pick one distinctive piece, such as the largest one or one with a curved or sharply pointed edge, and look for it in each figure; pieces may be turned but never flipped over. A figure whose cut lines are in different places has pieces of different sizes and can be crossed out. Here the pieces fit together into a diamond.
A: A cut is in a different place, so the pieces do not match: one piece here covers about 50% of the shape, but the matching piece in the left box covers about 40%.
B: This figure is a square. The pieces in the left box do not have these shapes, so they cannot fill this outline without gaps or overlaps.
C: A cut is in a different place, so the pieces do not match: one piece here covers about 32% of the shape, but the matching piece in the left box covers about 40%.
D (correct): This diamond is made of exactly the 4 pieces in the left box, each only turned and slid into place.
Practice 56 of 80 · medium
The left box shows separate flat pieces. Which figure shows how the pieces look when they are fitted together?
Show the answer
Answer: A
Count the pieces first: every figure must use each piece exactly once, with nothing added. Then pick one distinctive piece, such as the largest one or one with a curved or sharply pointed edge, and look for it in each figure; pieces may be turned but never flipped over. A figure whose cut lines are in different places has pieces of different sizes and can be crossed out. Here the pieces fit together into a parallelogram.
A (correct): This parallelogram is made of exactly the 3 pieces in the left box, each only turned and slid into place.
B: This figure is a rectangle. The pieces in the left box do not have these shapes, so they cannot fill this outline without gaps or overlaps.
C: A cut is in a different place, so the pieces do not match: one piece here covers about 62% of the shape, but the matching piece in the left box covers about 40%.
D: This figure has 4 pieces, but the left box has 3. Every piece must be used once, and nothing may be added.
Practice 57 of 80 · hard
The left box shows separate flat pieces. Which figure shows how the pieces look when they are fitted together?
Show the answer
Answer: D
Count the pieces first: every figure must use each piece exactly once, with nothing added. Then pick one distinctive piece, such as the largest one or one with a curved or sharply pointed edge, and look for it in each figure; pieces may be turned but never flipped over. A figure whose cut lines are in different places has pieces of different sizes and can be crossed out. Here the pieces fit together into a triangle.
A: This figure is a right triangle. The pieces in the left box do not have these shapes, so they cannot fill this outline without gaps or overlaps.
B: A cut is in a different place, so the pieces do not match: one piece here covers about 22% of the shape, but the matching piece in the left box covers about 30%.
C: A cut is in a different place, so the pieces do not match: one piece here covers about 49% of the shape, but the matching piece in the left box covers about 31%.
D (correct): This triangle is made of exactly the 4 pieces in the left box, each only turned and slid into place.
Practice 58 of 80 · easy
The left box shows separate flat pieces. Which figure shows how the pieces look when they are fitted together?
Show the answer
Answer: A
Count the pieces first: every figure must use each piece exactly once, with nothing added. Then pick one distinctive piece, such as the largest one or one with a curved or sharply pointed edge, and look for it in each figure; pieces may be turned but never flipped over. A figure whose cut lines are in different places has pieces of different sizes and can be crossed out. Here the pieces fit together into a square.
A (correct): This square is made of exactly the 3 pieces in the left box, each only turned and slid into place.
B: This figure has 4 pieces, but the left box has 3. Every piece must be used once, and nothing may be added.
C: This figure is a rectangle. The pieces in the left box do not have these shapes, so they cannot fill this outline without gaps or overlaps.
D: A cut is in a different place, so the pieces do not match: one piece here covers about 62% of the shape, but the matching piece in the left box covers about 40%.
Practice 59 of 80 · medium
The left box shows separate flat pieces. Which figure shows how the pieces look when they are fitted together?
Show the answer
Answer: B
Count the pieces first: every figure must use each piece exactly once, with nothing added. Then pick one distinctive piece, such as the largest one or one with a curved or sharply pointed edge, and look for it in each figure; pieces may be turned but never flipped over. A figure whose cut lines are in different places has pieces of different sizes and can be crossed out. Here the pieces fit together into a rectangle.
A: This figure has 4 pieces, but the left box has 3. Every piece must be used once, and nothing may be added.
B (correct): This rectangle is made of exactly the 3 pieces in the left box, each only turned and slid into place.
C: A cut is in a different place, so the pieces do not match: one piece here covers about 34% of the shape, but the matching piece in the left box covers about 22%.
D: This figure is a square. The pieces in the left box do not have these shapes, so they cannot fill this outline without gaps or overlaps.
Practice 60 of 80 · medium
The left box shows separate flat pieces. Which figure shows how the pieces look when they are fitted together?
Show the answer
Answer: A
Count the pieces first: every figure must use each piece exactly once, with nothing added. Then pick one distinctive piece, such as the largest one or one with a curved or sharply pointed edge, and look for it in each figure; pieces may be turned but never flipped over. A figure whose cut lines are in different places has pieces of different sizes and can be crossed out. Here the pieces fit together into a trapezoid.
A (correct): This trapezoid is made of exactly the 3 pieces in the left box, each only turned and slid into place.
B: This figure has 4 pieces, but the left box has 3. Every piece must be used once, and nothing may be added.
C: A cut is in a different place, so the pieces do not match: one piece here covers about 48% of the shape, but the matching piece in the left box covers about 41%.
D: A cut is in a different place, so the pieces do not match: one piece here covers about 17% of the shape, but the matching piece in the left box covers about 29%.
Practice 61 of 80 · medium
The left box shows separate flat pieces. Which figure shows how the pieces look when they are fitted together?
Show the answer
Answer: C
Count the pieces first: every figure must use each piece exactly once, with nothing added. Then pick one distinctive piece, such as the largest one or one with a curved or sharply pointed edge, and look for it in each figure; pieces may be turned but never flipped over. A figure whose cut lines are in different places has pieces of different sizes and can be crossed out. Here the pieces fit together into a right triangle.
A: This figure has 4 pieces, but the left box has 3. Every piece must be used once, and nothing may be added.
B: A cut is in a different place, so the pieces do not match: one piece here covers about 43% of the shape, but the matching piece in the left box covers about 53%.
C (correct): This right triangle is made of exactly the 3 pieces in the left box, each only turned and slid into place.
D: This figure is a triangle. The pieces in the left box do not have these shapes, so they cannot fill this outline without gaps or overlaps.
Practice 62 of 80 · medium
The left box shows separate flat pieces. Which figure shows how the pieces look when they are fitted together?
Show the answer
Answer: B
Count the pieces first: every figure must use each piece exactly once, with nothing added. Then pick one distinctive piece, such as the largest one or one with a curved or sharply pointed edge, and look for it in each figure; pieces may be turned but never flipped over. A figure whose cut lines are in different places has pieces of different sizes and can be crossed out. Here the pieces fit together into a square.
A: A cut is in a different place, so the pieces do not match: one piece here covers about 70% of the shape, but the matching piece in the left box covers about 46%.
B (correct): This square is made of exactly the 3 pieces in the left box, each only turned and slid into place.
C: This figure is a rectangle. The pieces in the left box do not have these shapes, so they cannot fill this outline without gaps or overlaps.
D: This figure has 4 pieces, but the left box has 3. Every piece must be used once, and nothing may be added.
Practice 63 of 80 · medium
The left box shows separate flat pieces. Which figure shows how the pieces look when they are fitted together?
Show the answer
Answer: A
Count the pieces first: every figure must use each piece exactly once, with nothing added. Then pick one distinctive piece, such as the largest one or one with a curved or sharply pointed edge, and look for it in each figure; pieces may be turned but never flipped over. A figure whose cut lines are in different places has pieces of different sizes and can be crossed out. Here the pieces fit together into a triangle.
A (correct): This triangle is made of exactly the 3 pieces in the left box, each only turned and slid into place.
B: This figure has 4 pieces, but the left box has 3. Every piece must be used once, and nothing may be added.
C: This figure is a right triangle. The pieces in the left box do not have these shapes, so they cannot fill this outline without gaps or overlaps.
D: A cut is in a different place, so the pieces do not match: one piece here covers about 58% of the shape, but the matching piece in the left box covers about 37%.
Practice 64 of 80 · hard
The left box shows separate flat pieces. Which figure shows how the pieces look when they are fitted together?
Show the answer
Answer: C
Count the pieces first: every figure must use each piece exactly once, with nothing added. Then pick one distinctive piece, such as the largest one or one with a curved or sharply pointed edge, and look for it in each figure; pieces may be turned but never flipped over. A figure whose cut lines are in different places has pieces of different sizes and can be crossed out. Here the pieces fit together into a parallelogram.
A: A cut is in a different place, so the pieces do not match: one piece here covers about 45% of the shape, but the matching piece in the left box covers about 34%.
B: A cut is in a different place, so the pieces do not match: one piece here covers about 17% of the shape, but the matching piece in the left box covers about 24%.
C (correct): This parallelogram is made of exactly the 4 pieces in the left box, each only turned and slid into place.
D: This figure is a rectangle. The pieces in the left box do not have these shapes, so they cannot fill this outline without gaps or overlaps.
Practice 65 of 80 · medium
The left box shows separate flat pieces. Which figure shows how the pieces look when they are fitted together?
Show the answer
Answer: D
Count the pieces first: every figure must use each piece exactly once, with nothing added. Then pick one distinctive piece, such as the largest one or one with a curved or sharply pointed edge, and look for it in each figure; pieces may be turned but never flipped over. A figure whose cut lines are in different places has pieces of different sizes and can be crossed out. Here the pieces fit together into a parallelogram.
A: A cut is in a different place, so the pieces do not match: one piece here covers about 58% of the shape, but the matching piece in the left box covers about 43%.
B: This figure has 4 pieces, but the left box has 3. Every piece must be used once, and nothing may be added.
C: This figure is a trapezoid. The pieces in the left box do not have these shapes, so they cannot fill this outline without gaps or overlaps.
D (correct): This parallelogram is made of exactly the 3 pieces in the left box, each only turned and slid into place.
Practice 66 of 80 · easy
The left box shows separate flat pieces. Which figure shows how the pieces look when they are fitted together?
Show the answer
Answer: C
Count the pieces first: every figure must use each piece exactly once, with nothing added. Then pick one distinctive piece, such as the largest one or one with a curved or sharply pointed edge, and look for it in each figure; pieces may be turned but never flipped over. A figure whose cut lines are in different places has pieces of different sizes and can be crossed out. Here the pieces fit together into a parallelogram.
A: This figure has 3 pieces, but the left box has 2. Every piece must be used once, and nothing may be added.
B: This figure is a rectangle. The pieces in the left box do not have these shapes, so they cannot fill this outline without gaps or overlaps.
C (correct): This parallelogram is made of exactly the 2 pieces in the left box, each only turned and slid into place.
D: A cut is in a different place, so the pieces do not match: one piece here covers about 41% of the shape, but the matching piece in the left box covers about 24%.
Practice 67 of 80 · medium
The left box shows separate flat pieces. Which figure shows how the pieces look when they are fitted together?
Show the answer
Answer: A
Count the pieces first: every figure must use each piece exactly once, with nothing added. Then pick one distinctive piece, such as the largest one or one with a curved or sharply pointed edge, and look for it in each figure; pieces may be turned but never flipped over. A figure whose cut lines are in different places has pieces of different sizes and can be crossed out. Here the pieces fit together into a parallelogram.
A (correct): This parallelogram is made of exactly the 3 pieces in the left box, each only turned and slid into place.
B: This figure has 4 pieces, but the left box has 3. Every piece must be used once, and nothing may be added.
C: This figure is a rectangle. The pieces in the left box do not have these shapes, so they cannot fill this outline without gaps or overlaps.
D: A cut is in a different place, so the pieces do not match: one piece here covers about 36% of the shape, but the matching piece in the left box covers about 24%.
Practice 68 of 80 · medium
The left box shows separate flat pieces. Which figure shows how the pieces look when they are fitted together?
Show the answer
Answer: B
Count the pieces first: every figure must use each piece exactly once, with nothing added. Then pick one distinctive piece, such as the largest one or one with a curved or sharply pointed edge, and look for it in each figure; pieces may be turned but never flipped over. A figure whose cut lines are in different places has pieces of different sizes and can be crossed out. Here the pieces fit together into a hexagon.
A: This figure has 4 pieces, but the left box has 3. Every piece must be used once, and nothing may be added.
B (correct): This hexagon is made of exactly the 3 pieces in the left box, each only turned and slid into place.
C: This figure is a pentagon. The pieces in the left box do not have these shapes, so they cannot fill this outline without gaps or overlaps.
D: A cut is in a different place, so the pieces do not match: one piece here covers about 37% of the shape, but the matching piece in the left box covers about 28%.
Practice 69 of 80 · easy
The left box shows separate flat pieces. Which figure shows how the pieces look when they are fitted together?
Show the answer
Answer: A
Count the pieces first: every figure must use each piece exactly once, with nothing added. Then pick one distinctive piece, such as the largest one or one with a curved or sharply pointed edge, and look for it in each figure; pieces may be turned but never flipped over. A figure whose cut lines are in different places has pieces of different sizes and can be crossed out. Here the pieces fit together into a diamond.
A (correct): This diamond is made of exactly the 3 pieces in the left box, each only turned and slid into place.
B: This figure is a square. The pieces in the left box do not have these shapes, so they cannot fill this outline without gaps or overlaps.
C: This figure has 4 pieces, but the left box has 3. Every piece must be used once, and nothing may be added.
D: A cut is in a different place, so the pieces do not match: one piece here covers about 53% of the shape, but the matching piece in the left box covers about 37%.
Practice 70 of 80 · medium
The left box shows separate flat pieces. Which figure shows how the pieces look when they are fitted together?
Show the answer
Answer: A
Count the pieces first: every figure must use each piece exactly once, with nothing added. Then pick one distinctive piece, such as the largest one or one with a curved or sharply pointed edge, and look for it in each figure; pieces may be turned but never flipped over. A figure whose cut lines are in different places has pieces of different sizes and can be crossed out. Here the pieces fit together into a diamond.
A (correct): This diamond is made of exactly the 3 pieces in the left box, each only turned and slid into place.
B: A cut is in a different place, so the pieces do not match: one piece here covers about 36% of the shape, but the matching piece in the left box covers about 69%.
C: This figure has 4 pieces, but the left box has 3. Every piece must be used once, and nothing may be added.
D: This figure is a square. The pieces in the left box do not have these shapes, so they cannot fill this outline without gaps or overlaps.
Practice 71 of 80 · hard
The left box shows separate flat pieces. Which figure shows how the pieces look when they are fitted together?
Show the answer
Answer: D
Count the pieces first: every figure must use each piece exactly once, with nothing added. Then pick one distinctive piece, such as the largest one or one with a curved or sharply pointed edge, and look for it in each figure; pieces may be turned but never flipped over. A figure whose cut lines are in different places has pieces of different sizes and can be crossed out. Here the pieces fit together into a trapezoid.
A: A cut is in a different place, so the pieces do not match: one piece here covers about 42% of the shape, but the matching piece in the left box covers about 32%.
B: This figure is a half-circle. The pieces in the left box do not have these shapes, so they cannot fill this outline without gaps or overlaps.
C: A cut is in a different place, so the pieces do not match: one piece here covers about 50% of the shape, but the matching piece in the left box covers about 32%.
D (correct): This trapezoid is made of exactly the 4 pieces in the left box, each only turned and slid into place.
Practice 72 of 80 · hard
The left box shows separate flat pieces. Which figure shows how the pieces look when they are fitted together?
Show the answer
Answer: B
Count the pieces first: every figure must use each piece exactly once, with nothing added. Then pick one distinctive piece, such as the largest one or one with a curved or sharply pointed edge, and look for it in each figure; pieces may be turned but never flipped over. A figure whose cut lines are in different places has pieces of different sizes and can be crossed out. Here the pieces fit together into a square.
A: A cut is in a different place, so the pieces do not match: one piece here covers about 51% of the shape, but the matching piece in the left box covers about 39%.
B (correct): This square is made of exactly the 4 pieces in the left box, each only turned and slid into place.
C: A cut is in a different place, so the pieces do not match: one piece here covers about 14% of the shape, but the matching piece in the left box covers about 22%.
D: This figure is a rectangle. The pieces in the left box do not have these shapes, so they cannot fill this outline without gaps or overlaps.
Practice 73 of 80 · hard
The left box shows separate flat pieces. Which figure shows how the pieces look when they are fitted together?
Show the answer
Answer: D
Count the pieces first: every figure must use each piece exactly once, with nothing added. Then pick one distinctive piece, such as the largest one or one with a curved or sharply pointed edge, and look for it in each figure; pieces may be turned but never flipped over. A figure whose cut lines are in different places has pieces of different sizes and can be crossed out. Here the pieces fit together into a hexagon.
A: A cut is in a different place, so the pieces do not match: one piece here covers about 36% of the shape, but the matching piece in the left box covers about 43%.
B: This figure is a circle. The pieces in the left box do not have these shapes, so they cannot fill this outline without gaps or overlaps.
C: A cut is in a different place, so the pieces do not match: one piece here covers about 52% of the shape, but the matching piece in the left box covers about 43%.
D (correct): This hexagon is made of exactly the 4 pieces in the left box, each only turned and slid into place.
Practice 74 of 80 · medium
The left box shows separate flat pieces. Which figure shows how the pieces look when they are fitted together?
Show the answer
Answer: C
Count the pieces first: every figure must use each piece exactly once, with nothing added. Then pick one distinctive piece, such as the largest one or one with a curved or sharply pointed edge, and look for it in each figure; pieces may be turned but never flipped over. A figure whose cut lines are in different places has pieces of different sizes and can be crossed out. Here the pieces fit together into a triangle.
A: A cut is in a different place, so the pieces do not match: one piece here covers about 19% of the shape, but the matching piece in the left box covers about 29%.
B: This figure is a right triangle. The pieces in the left box do not have these shapes, so they cannot fill this outline without gaps or overlaps.
C (correct): This triangle is made of exactly the 3 pieces in the left box, each only turned and slid into place.
D: This figure has 4 pieces, but the left box has 3. Every piece must be used once, and nothing may be added.
Practice 75 of 80 · easy
The left box shows separate flat pieces. Which figure shows how the pieces look when they are fitted together?
Show the answer
Answer: A
Count the pieces first: every figure must use each piece exactly once, with nothing added. Then pick one distinctive piece, such as the largest one or one with a curved or sharply pointed edge, and look for it in each figure; pieces may be turned but never flipped over. A figure whose cut lines are in different places has pieces of different sizes and can be crossed out. Here the pieces fit together into a hexagon.
A (correct): This hexagon is made of exactly the 2 pieces in the left box, each only turned and slid into place.
B: A cut is in a different place, so the pieces do not match: one piece here covers about 18% of the shape, but the matching piece in the left box covers about 49%.
C: This figure has 3 pieces, but the left box has 2. Every piece must be used once, and nothing may be added.
D: This figure is a circle. The pieces in the left box do not have these shapes, so they cannot fill this outline without gaps or overlaps.
Practice 76 of 80 · medium
The left box shows separate flat pieces. Which figure shows how the pieces look when they are fitted together?
Show the answer
Answer: C
Count the pieces first: every figure must use each piece exactly once, with nothing added. Then pick one distinctive piece, such as the largest one or one with a curved or sharply pointed edge, and look for it in each figure; pieces may be turned but never flipped over. A figure whose cut lines are in different places has pieces of different sizes and can be crossed out. Here the pieces fit together into a square.
A: This figure has 4 pieces, but the left box has 3. Every piece must be used once, and nothing may be added.
B: This figure is a rectangle. The pieces in the left box do not have these shapes, so they cannot fill this outline without gaps or overlaps.
C (correct): This square is made of exactly the 3 pieces in the left box, each only turned and slid into place.
D: A cut is in a different place, so the pieces do not match: one piece here covers about 62% of the shape, but the matching piece in the left box covers about 39%.
Practice 77 of 80 · hard
The left box shows separate flat pieces. Which figure shows how the pieces look when they are fitted together?
Show the answer
Answer: B
Count the pieces first: every figure must use each piece exactly once, with nothing added. Then pick one distinctive piece, such as the largest one or one with a curved or sharply pointed edge, and look for it in each figure; pieces may be turned but never flipped over. A figure whose cut lines are in different places has pieces of different sizes and can be crossed out. Here the pieces fit together into a hexagon.
A: A cut is in a different place, so the pieces do not match: one piece here covers about 42% of the shape, but the matching piece in the left box covers about 30%.
B (correct): This hexagon is made of exactly the 4 pieces in the left box, each only turned and slid into place.
C: This figure is a circle. The pieces in the left box do not have these shapes, so they cannot fill this outline without gaps or overlaps.
D: A cut is in a different place, so the pieces do not match: one piece here covers about 40% of the shape, but the matching piece in the left box covers about 30%.
Practice 78 of 80 · medium
The left box shows separate flat pieces. Which figure shows how the pieces look when they are fitted together?
Show the answer
Answer: B
Count the pieces first: every figure must use each piece exactly once, with nothing added. Then pick one distinctive piece, such as the largest one or one with a curved or sharply pointed edge, and look for it in each figure; pieces may be turned but never flipped over. A figure whose cut lines are in different places has pieces of different sizes and can be crossed out. Here the pieces fit together into a hexagon.
A: This figure has 4 pieces, but the left box has 3. Every piece must be used once, and nothing may be added.
B (correct): This hexagon is made of exactly the 3 pieces in the left box, each only turned and slid into place.
C: This figure is a pentagon. The pieces in the left box do not have these shapes, so they cannot fill this outline without gaps or overlaps.
D: A cut is in a different place, so the pieces do not match: one piece here covers about 31% of the shape, but the matching piece in the left box covers about 19%.
Practice 79 of 80 · medium
The left box shows separate flat pieces. Which figure shows how the pieces look when they are fitted together?
Show the answer
Answer: D
Count the pieces first: every figure must use each piece exactly once, with nothing added. Then pick one distinctive piece, such as the largest one or one with a curved or sharply pointed edge, and look for it in each figure; pieces may be turned but never flipped over. A figure whose cut lines are in different places has pieces of different sizes and can be crossed out. Here the pieces fit together into a circle.
A: This figure has 4 pieces, but the left box has 3. Every piece must be used once, and nothing may be added.
B: A cut is in a different place, so the pieces do not match: one piece here covers about 54% of the shape, but the matching piece in the left box covers about 41%.
C: This figure is a hexagon. The pieces in the left box do not have these shapes, so they cannot fill this outline without gaps or overlaps.
D (correct): This circle is made of exactly the 3 pieces in the left box, each only turned and slid into place.
Practice 80 of 80 · medium
The left box shows separate flat pieces. Which figure shows how the pieces look when they are fitted together?
Show the answer
Answer: D
Count the pieces first: every figure must use each piece exactly once, with nothing added. Then pick one distinctive piece, such as the largest one or one with a curved or sharply pointed edge, and look for it in each figure; pieces may be turned but never flipped over. A figure whose cut lines are in different places has pieces of different sizes and can be crossed out. Here the pieces fit together into a triangle.
A: A cut is in a different place, so the pieces do not match: one piece here covers about 57% of the shape, but the matching piece in the left box covers about 48%.
B: This figure has 4 pieces, but the left box has 3. Every piece must be used once, and nothing may be added.
C: A cut is in a different place, so the pieces do not match: one piece here covers about 12% of the shape, but the matching piece in the left box covers about 23%.
D (correct): This triangle is made of exactly the 3 pieces in the left box, each only turned and slid into place.
About this test
After each response you get an explanation of why the correct diagram works and why the near misses fail. That makes the test a diagnostic tool: a pattern of errors on shifted seams points to one problem, while errors on mirrored pieces point to another.
Tally your misses by type once you finish. Reflection mistakes send you back to the section on mirrors versus turns, misplaced joins to the connector anchor and exact joining side, and overlap or gap errors to the no-overlap and area-conservation sections. Review those parts of the lesson, then try again.
The same 124 lessons, 6,516 questions and 82 timed practice tests on your phone, plus flashcards with spaced review and progress tracking. Free to download, and it works offline.
 ASVAB Camp
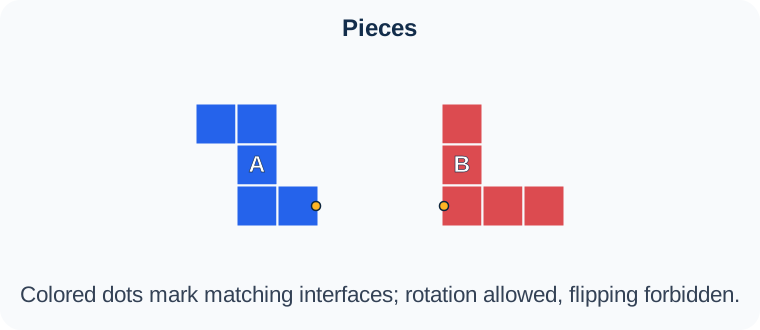
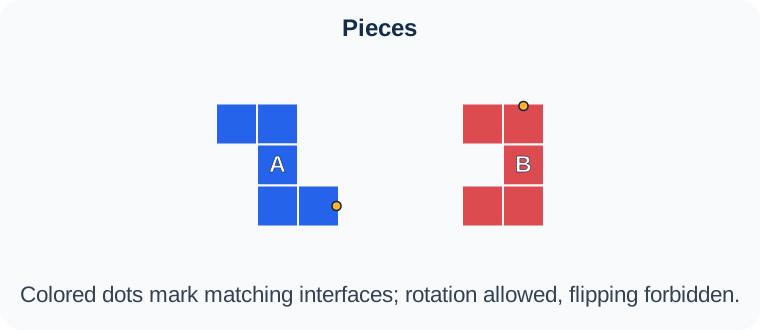
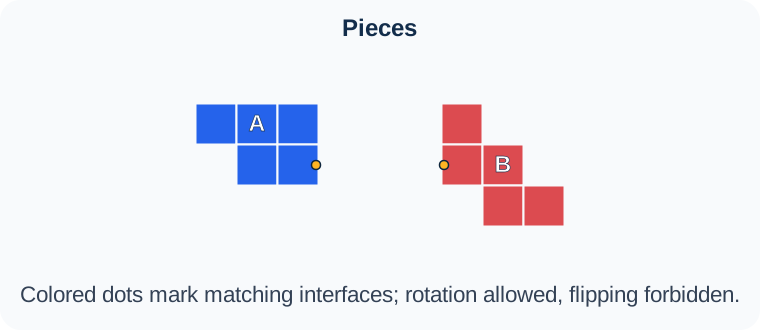
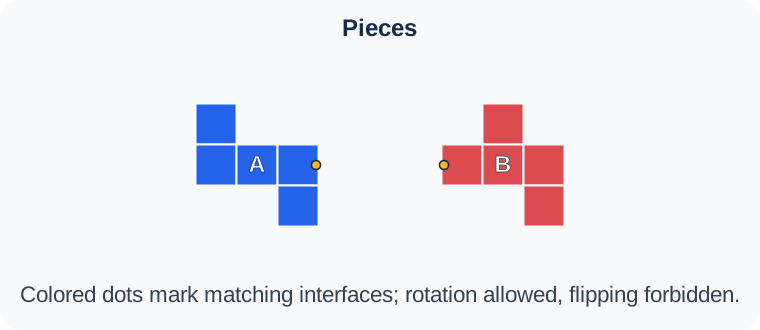
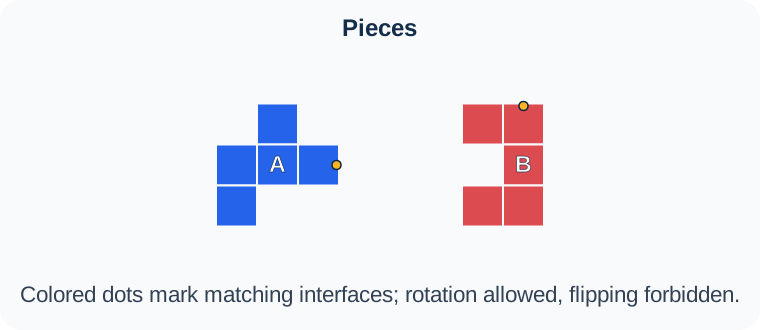
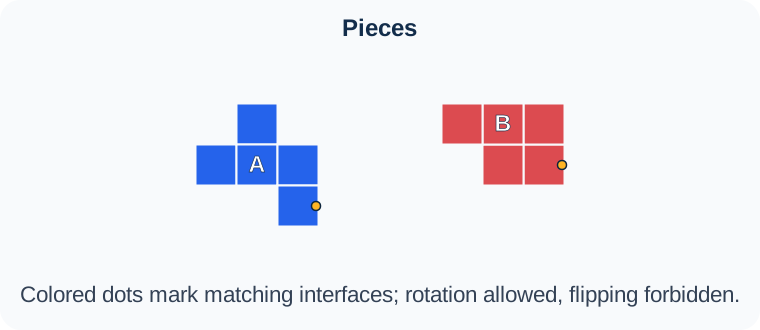
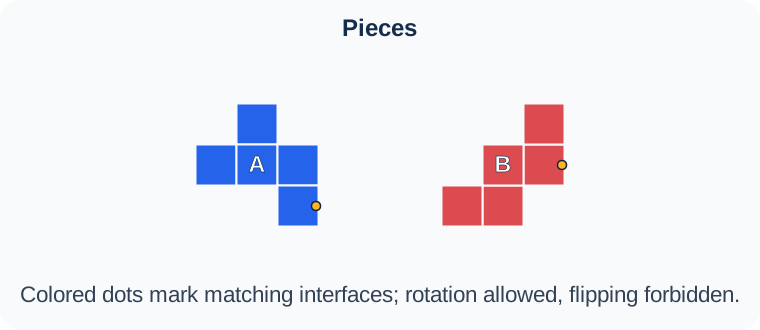
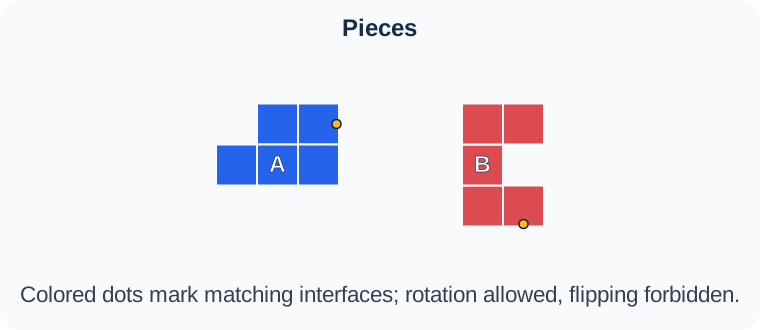
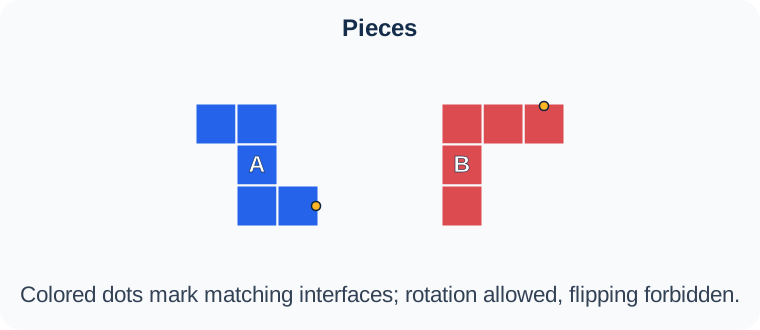
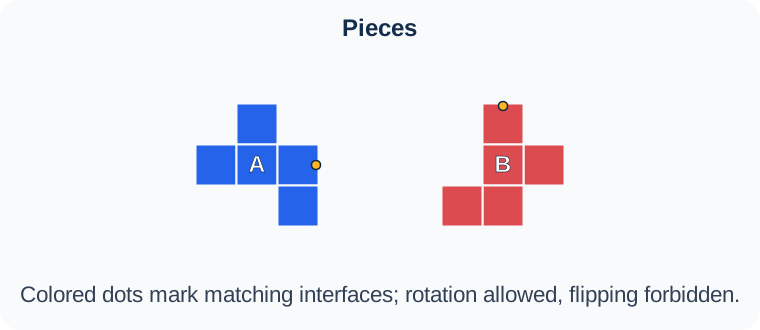
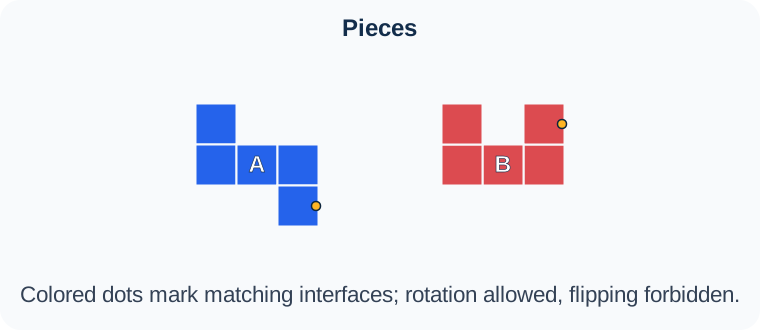
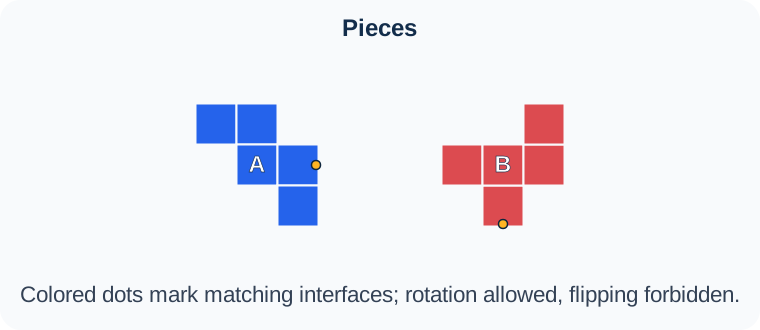
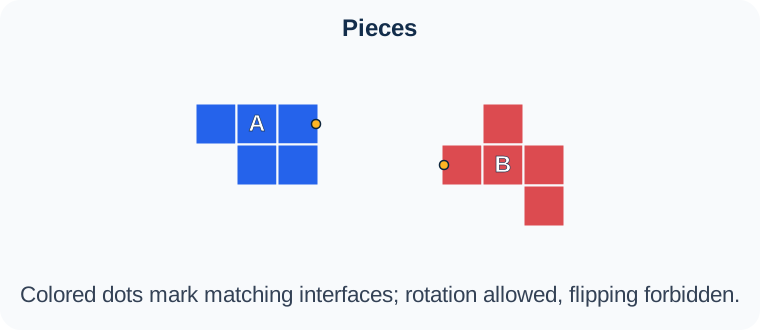
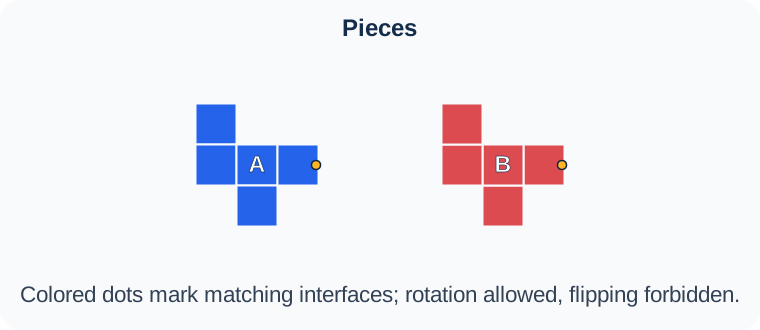
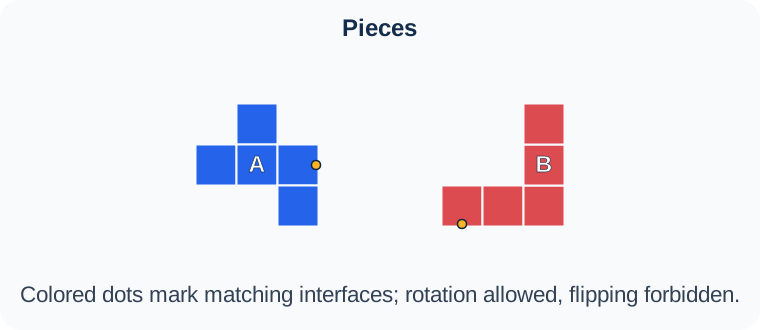
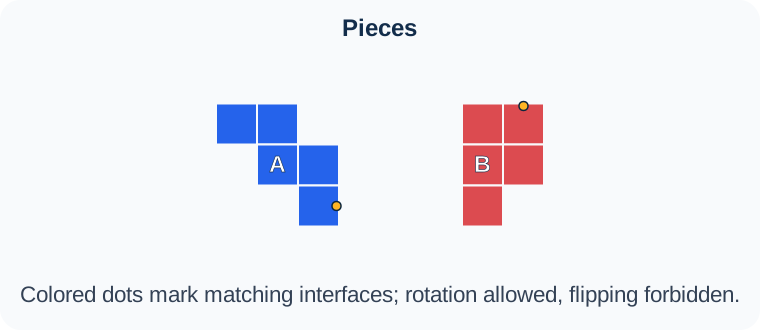
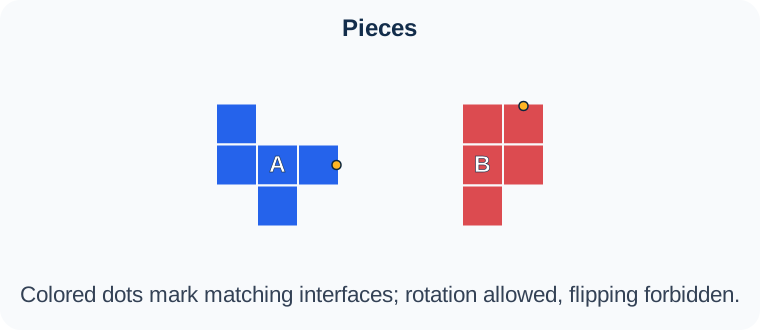
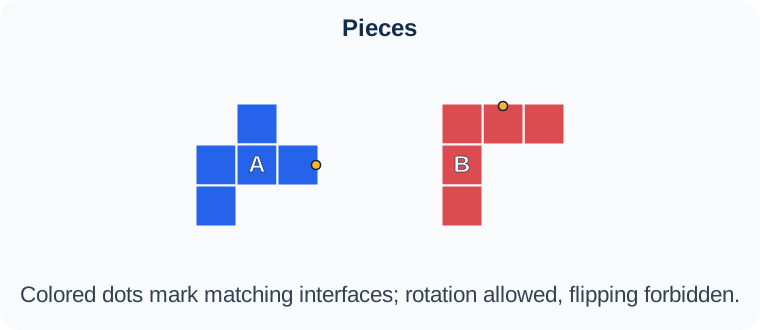
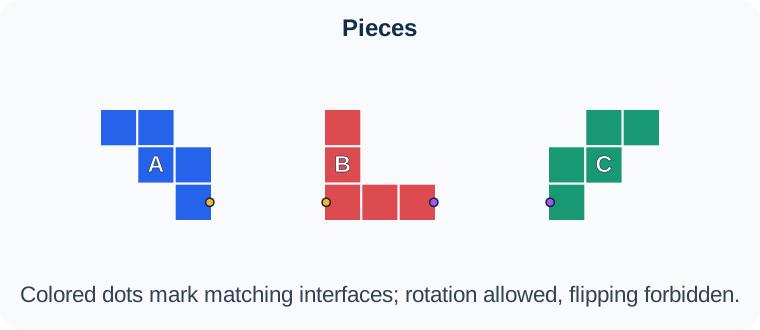
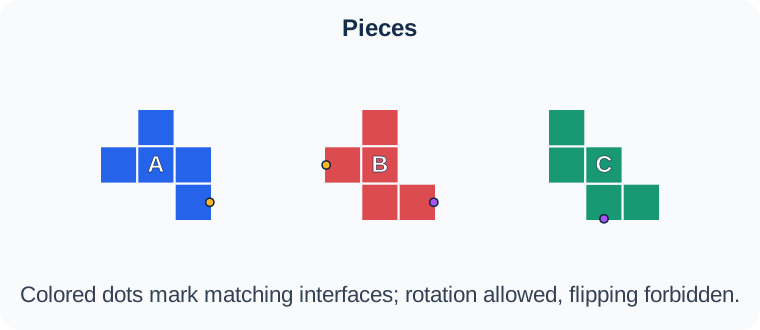
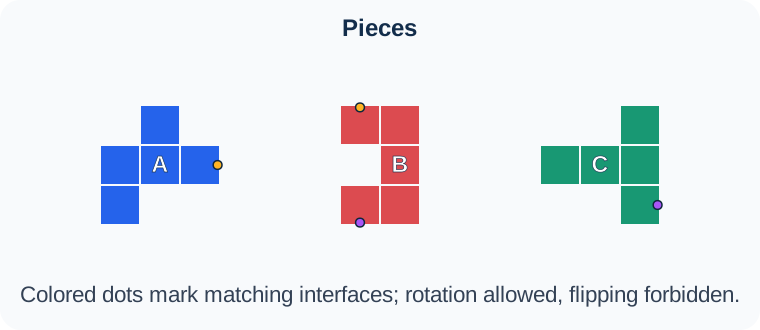
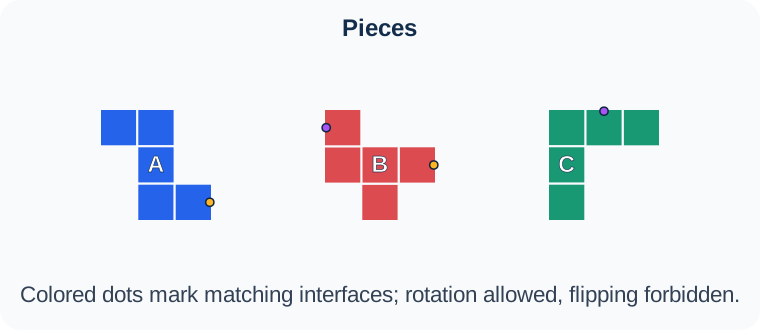
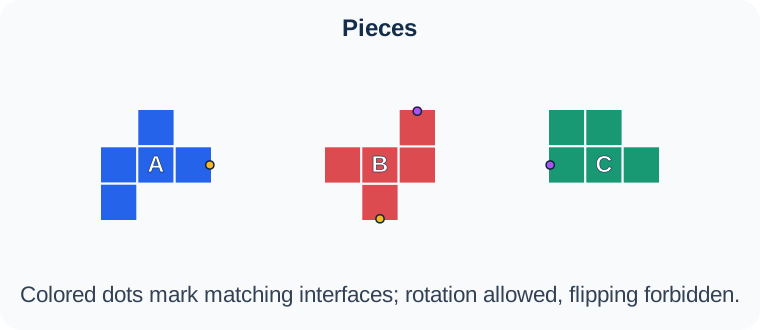
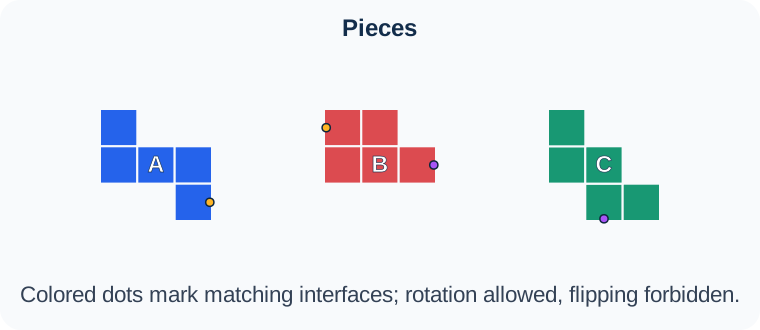
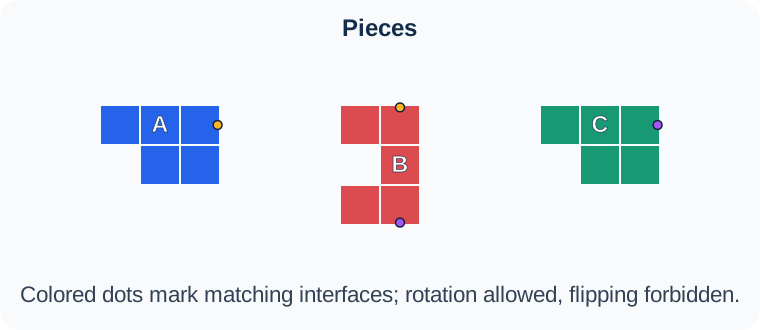
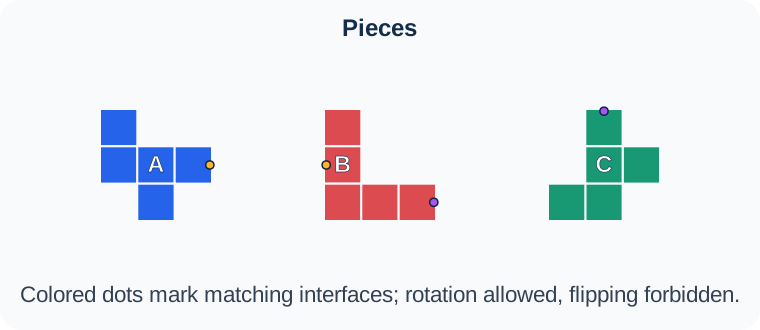
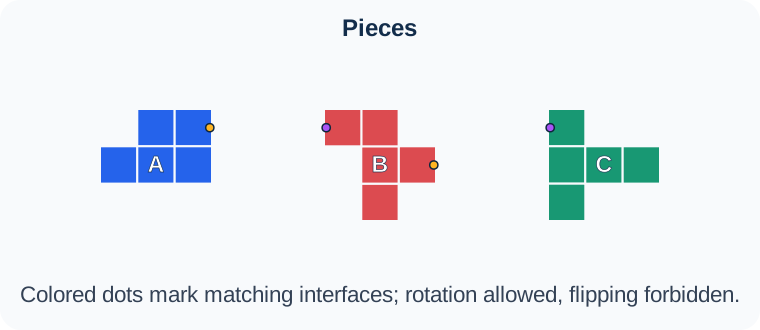
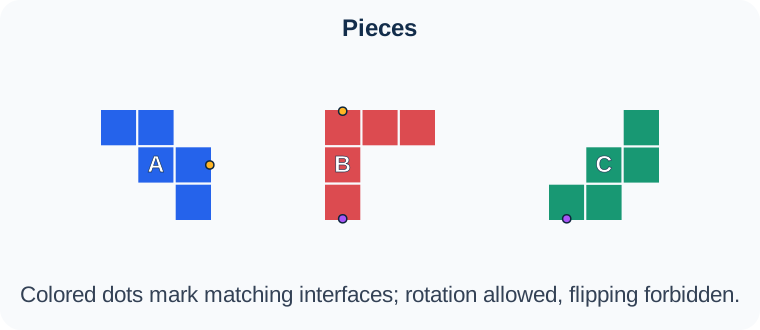
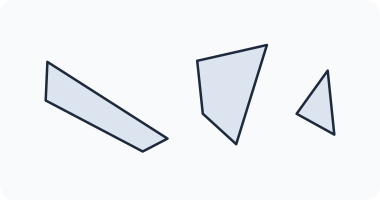
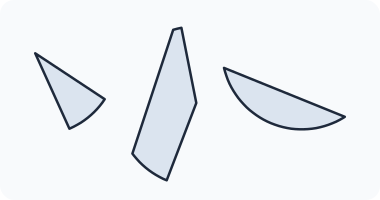
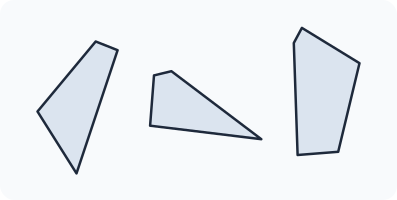
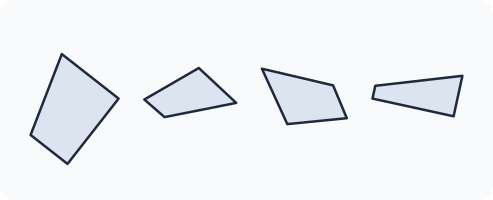
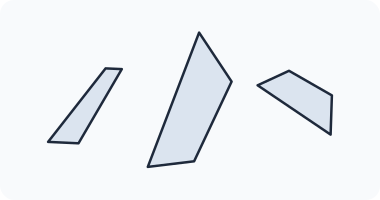
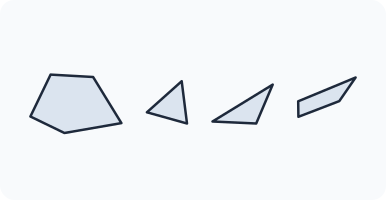
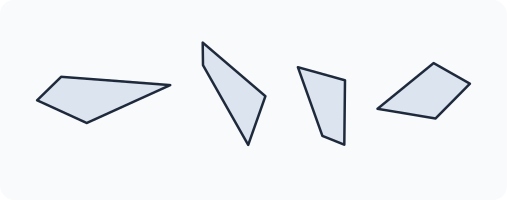
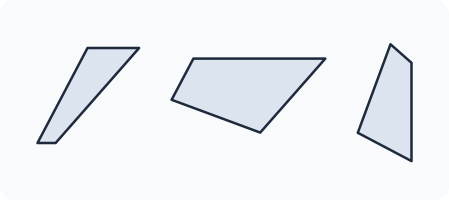
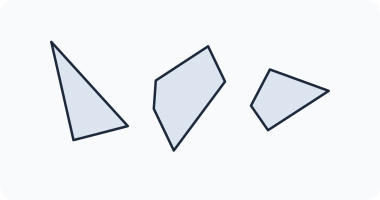
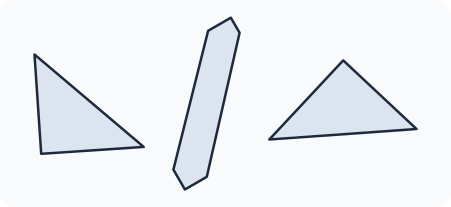
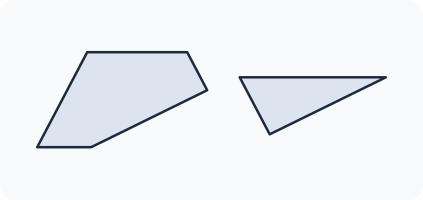
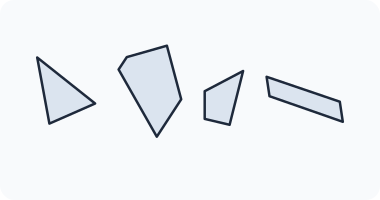
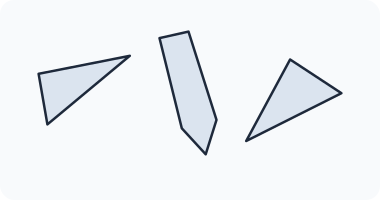
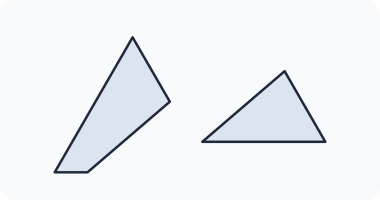
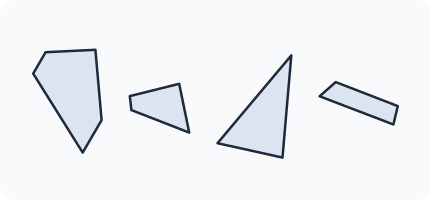
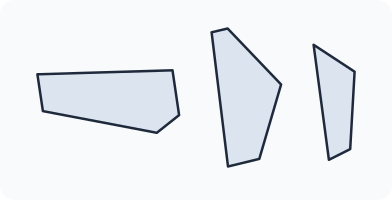
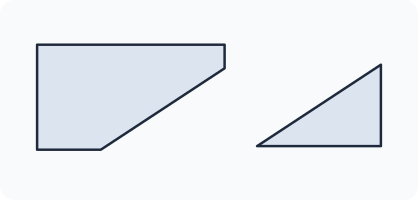
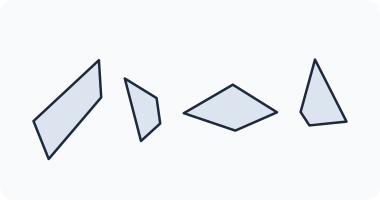
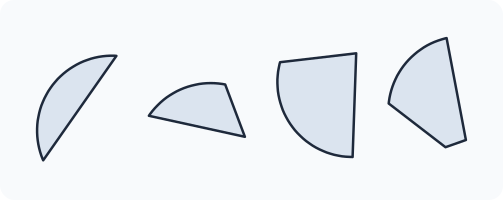
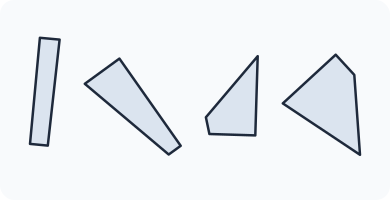
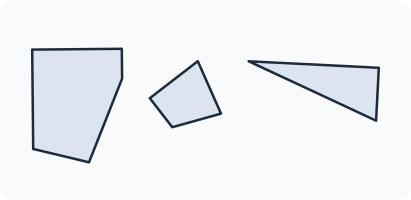
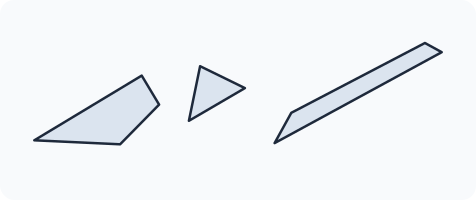
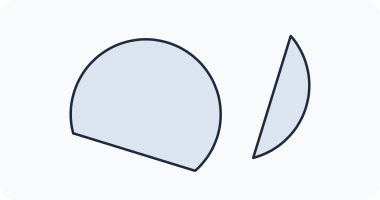
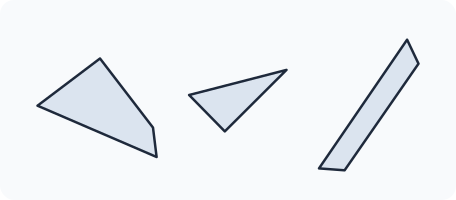
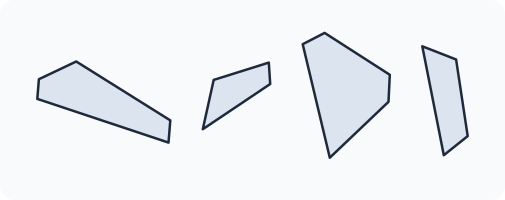
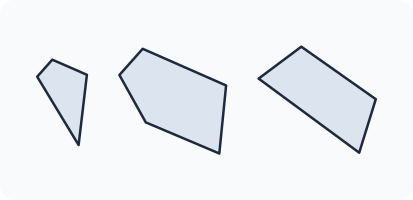
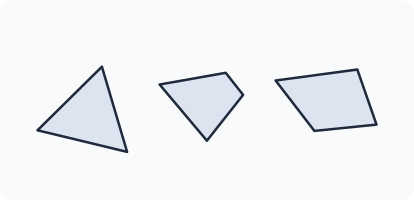
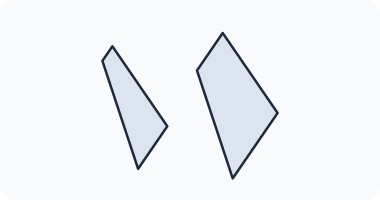
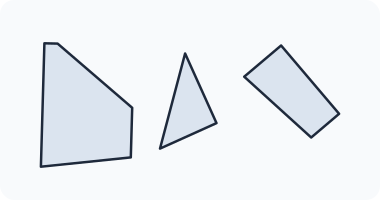
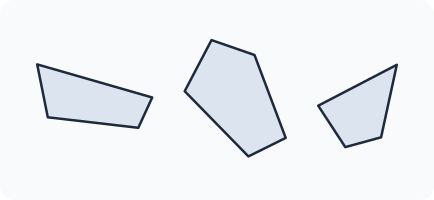
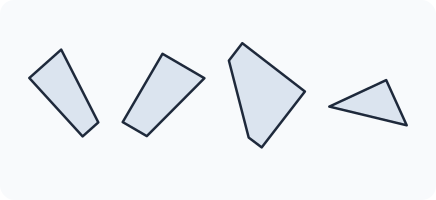
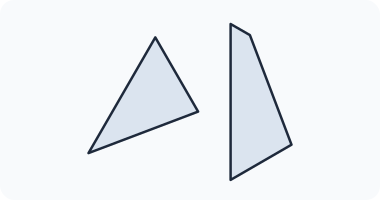
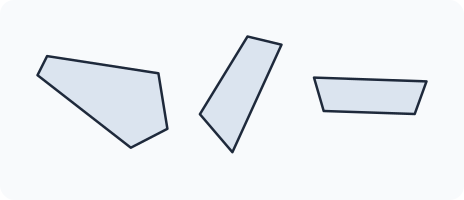
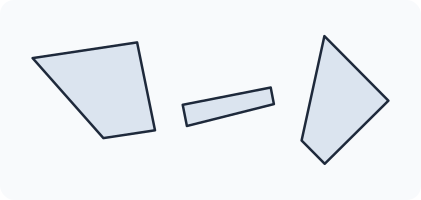
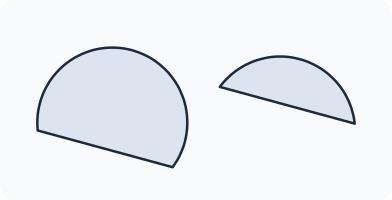
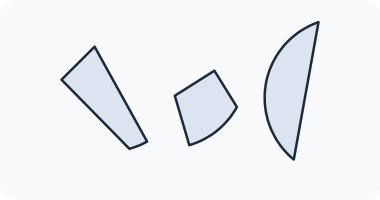
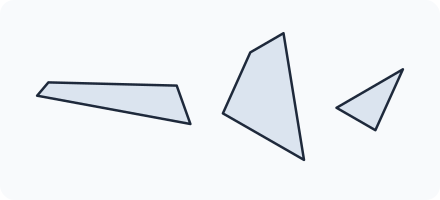
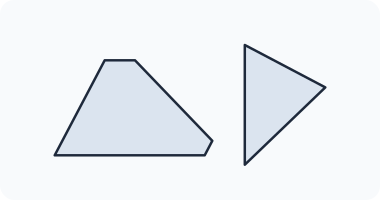
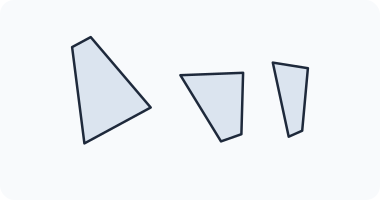
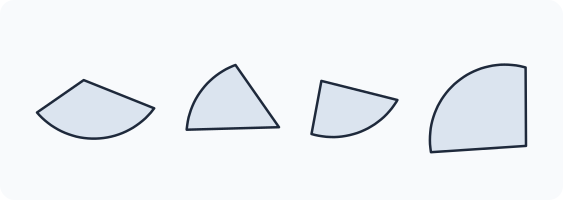
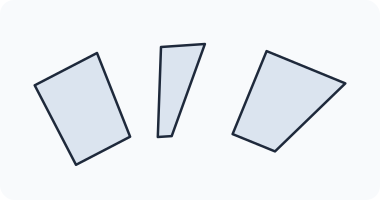
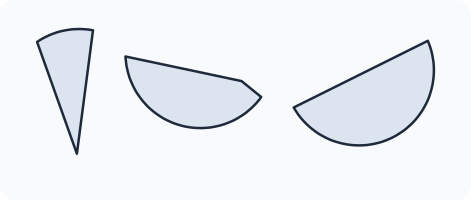
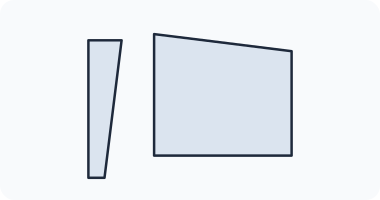
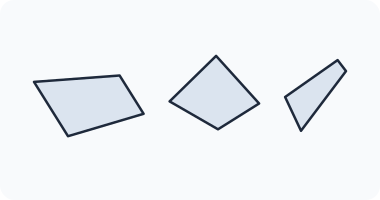
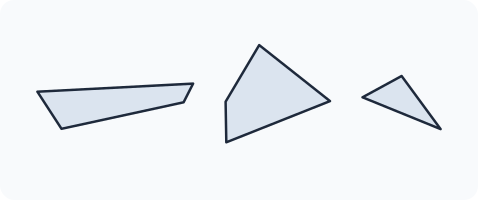
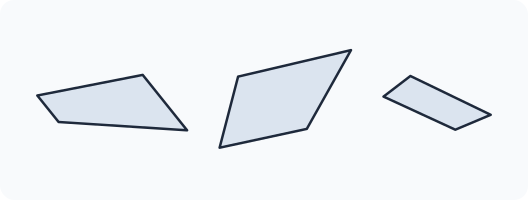
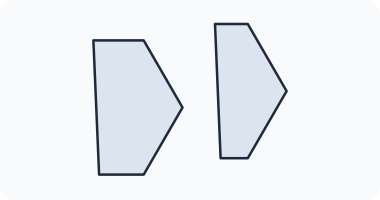
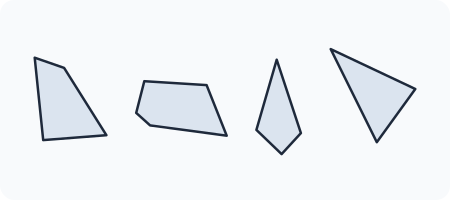
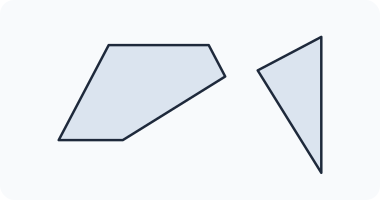
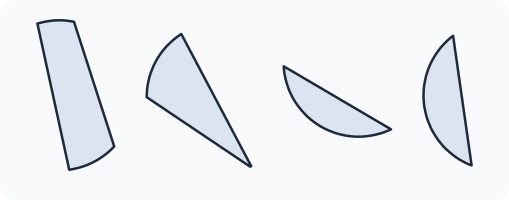
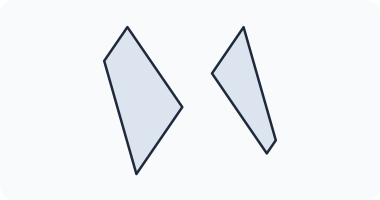
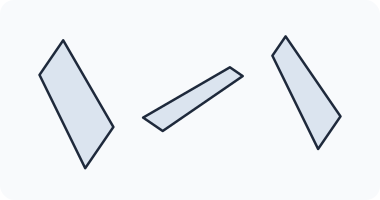
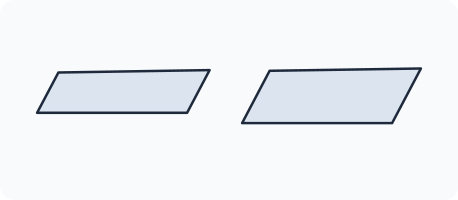
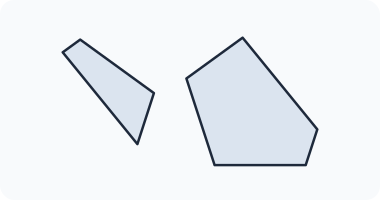
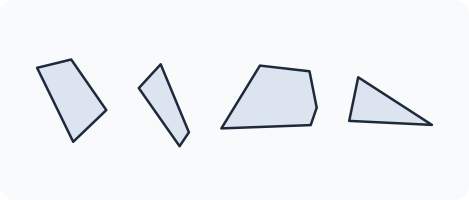
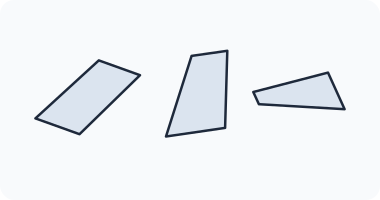
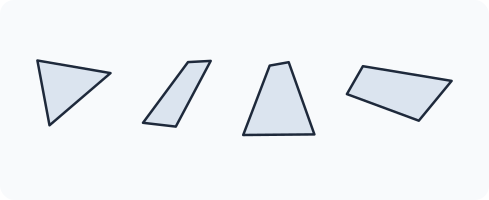
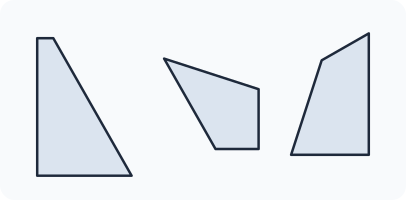
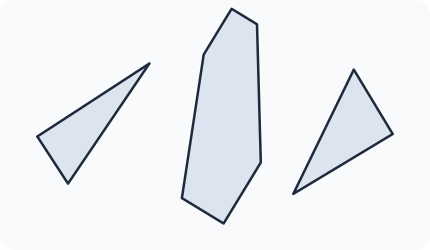
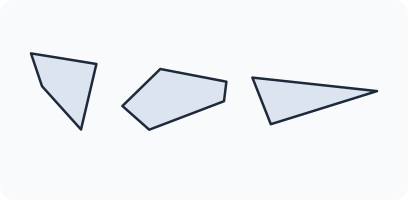
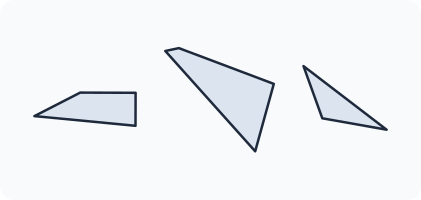
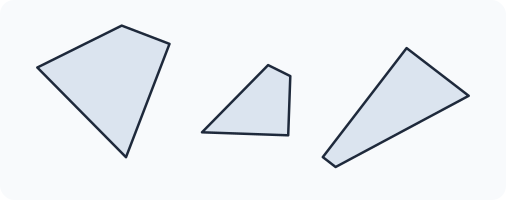
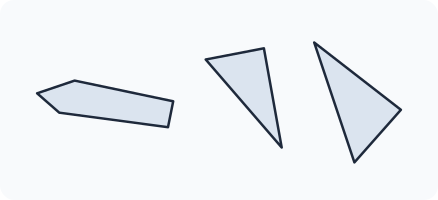
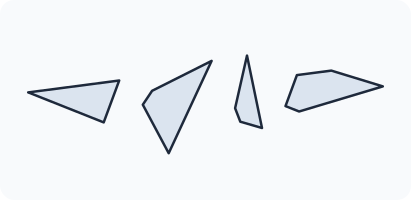
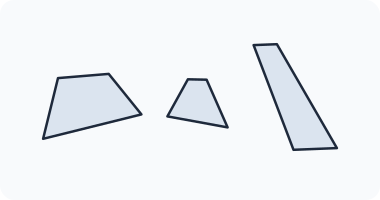
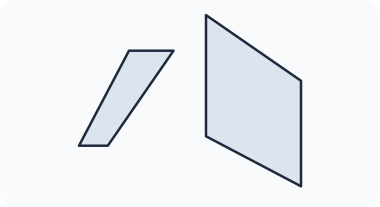
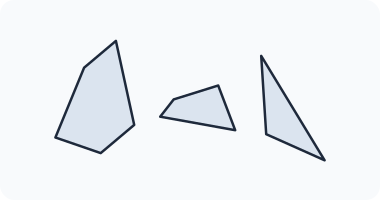
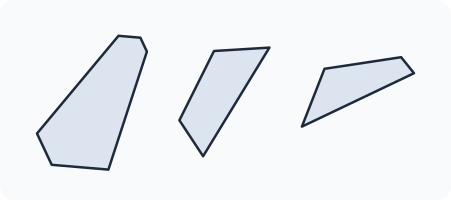
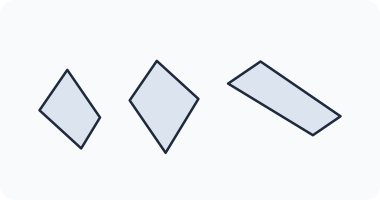
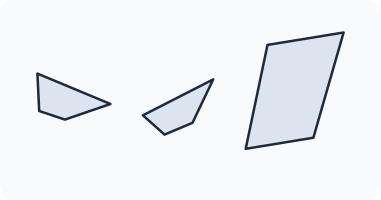
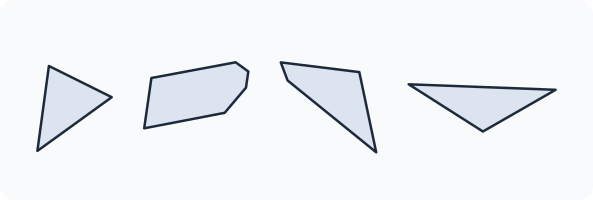
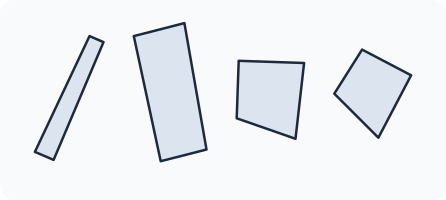
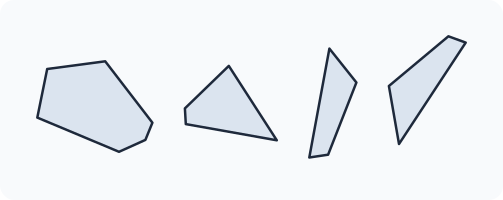
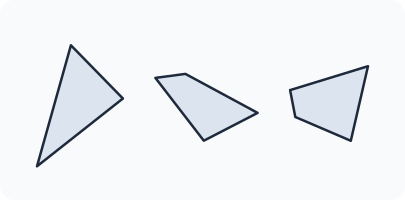
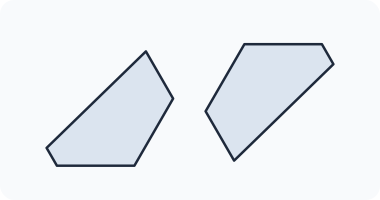
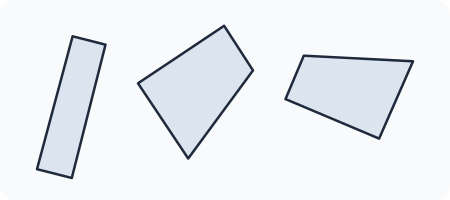
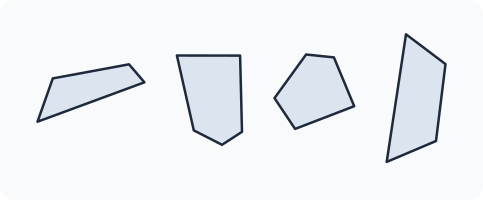
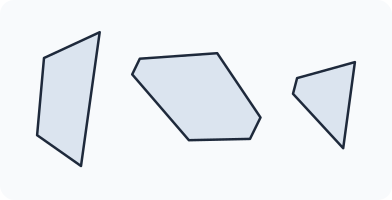
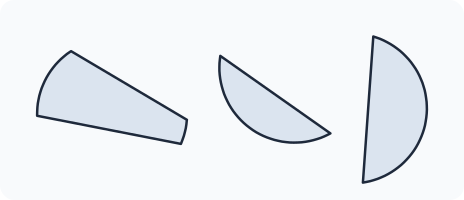
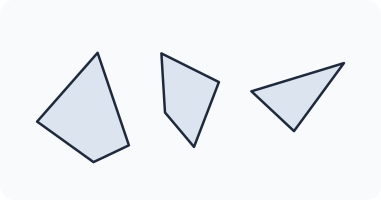
 English ▾