 ASVAB Camp
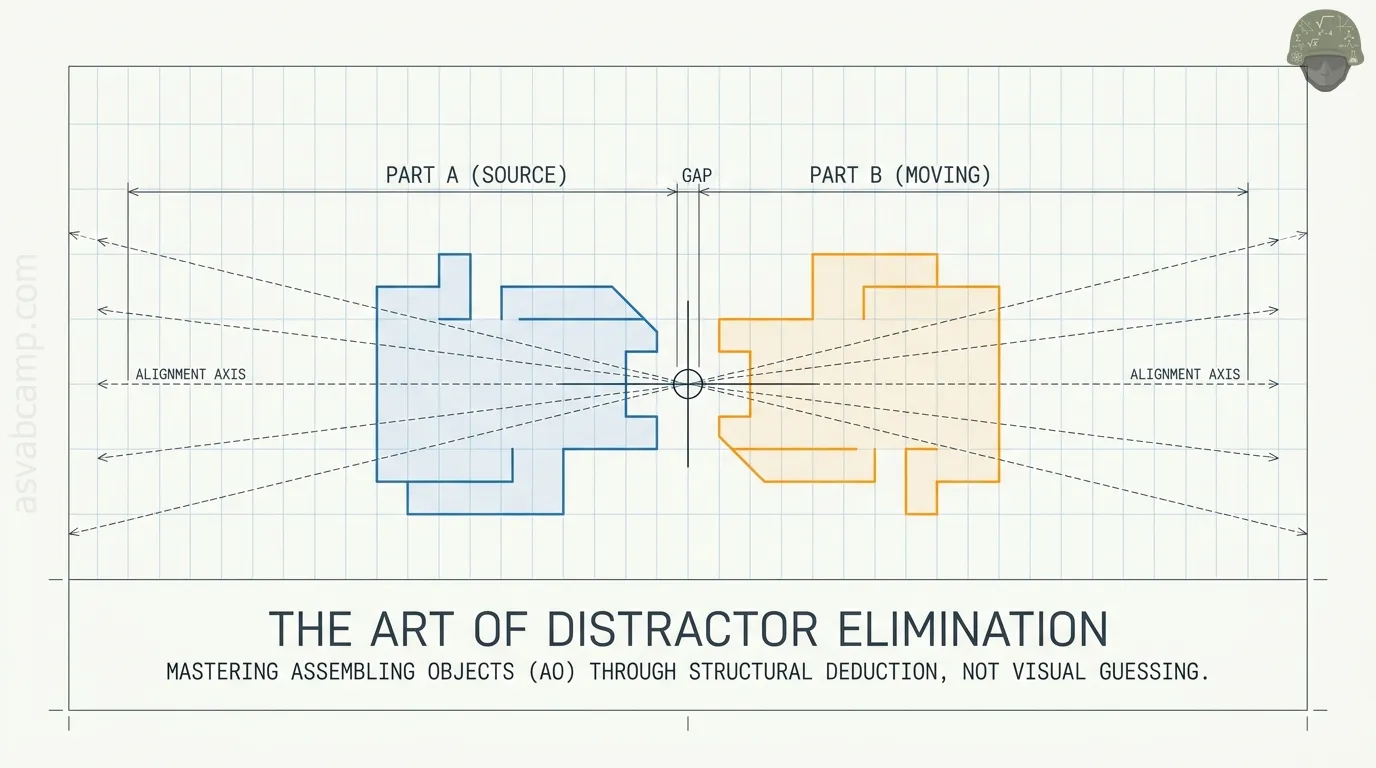
The target skill
In this lesson you learn to reject assemblies that cannot be correct before spending time deciding among the survivors. This is not a magic guessing trick. It is a structured comparison between the exact pieces in the prompt and the candidate whole objects. You will check connector identity, orientation, boundary geometry, relative placement, and missing or extra material. Each rejection must be supported by an observable mismatch.
AO on the official test
The official ASVAB describes Assembling Objects, abbreviated AO, as the ability to determine how an object will look when its parts are put together. The method taught here supports that general spatial skill. Our figures and questions are original instructional examples, not actual or reproduced secure test material. Use each example to practice a transferable reasoning step, not to memorize a particular silhouette.
A reliable order
Read the prompt before looking for a visually attractive answer. Note what can change and what must stay fixed. Check the strongest constraint first: a marked connection, a fixed orientation, or a required contour. Eliminate an option when it violates a stated rule. After reducing the set, use finer details such as protrusion lengths and small notches to select the sole complete match.
Why distractors work
Wrong images are often plausible because the overall silhouette looks familiar while one local feature is false. A mirrored shape can retain the same number of blocks. A one-cell shift can leave the two pieces close together. A rotated part can preserve area and color. Familiarity alone does not certify a valid assembly, so isolate exact differences and be prepared to name them.
Fixed versus movable
First identify whether each part may translate, rotate, flip, overlap, or go behind another part. Translation changes position without changing the shape. Rotation changes direction but preserves internal distances. Reflection reverses handedness. Unless the problem permits a transformation, treat it as forbidden. The source diagram is your reference, not merely a suggestion for how the parts might look.
Mark the connectors
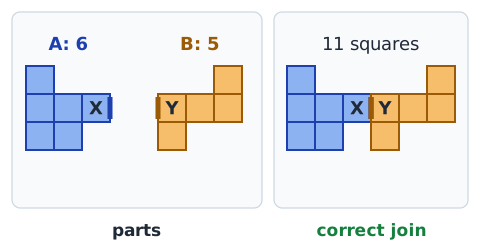
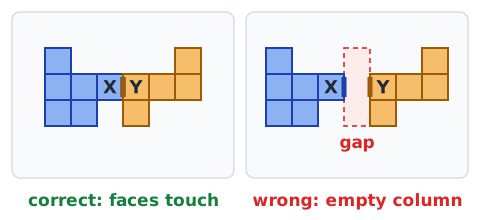
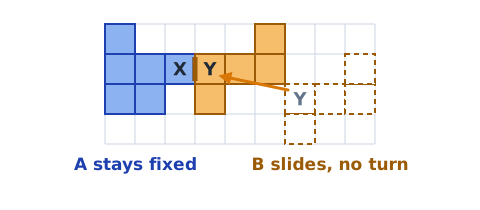
A connection marker is a constraint on a particular boundary location, not just a decoration. If a blue X is on the right face of one square and an orange Y is on the left face of another, those two faces must meet at the same height. Placing the parts nearby does not satisfy the marked connection. The correct candidate has the matching faces directly adjacent, with no cell overlapping and no empty column between them.
Preserve all cells
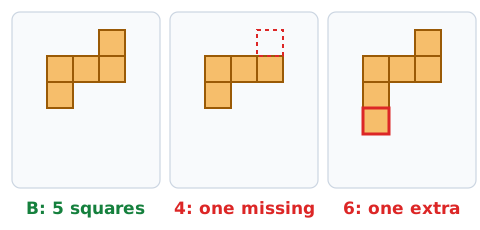
For grid-piece exercises, each occupied square is material. A candidate missing a square cannot be the same source piece. Likewise a bonus square or a reshaped notch is unacceptable. A quick cell count can remove obviously wrong choices, but matching counts are only a necessary condition. Two different configurations can have equal area, so confirm the pattern and the join after counting.
Look for invariants
An invariant is a feature that must remain constant under an allowed operation. If only translation is permitted, the number and relative arrangement of squares, orientation of a protrusion, and marker-to-corner distances are invariant. If rotation is allowed, relative distances still hold, but the direction of a protrusion changes. Use the prompt-defined transformation permissions to decide which invariants are relevant.
Face-to-face contact
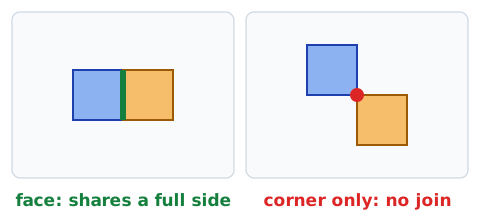
In square-grid drawings, true side contact shares a full unit boundary between cells on opposite pieces. Diagonal corner contact is not the same as sharing a face. If a marked right boundary has no piece immediately to its right, an intended connector is open. If another cell sits on top of the marked cell, that is an overlap rather than a valid face join.
Vertical alignment
Correct horizontal contact also requires the marker cells to have the same row. A candidate with the orange piece shifted one square upward can still look almost connected, yet the specified X and Y faces are no longer opposite. Trace an imaginary horizontal line from X in the source. It must arrive at Y once the pieces are joined.
Multiple possible contacts
A pair of shapes may touch along more than one shared edge when assembled. That does not make the join wrong by itself. What matters is whether the specifically marked pair of edges is among the valid contacts and whether every remaining shape condition holds. Rejecting a solution merely because an additional unmarked edge also touches would add a rule that the prompt did not state.
Why a near miss is wrong
A wrong candidate may satisfy two of three constraints. Perhaps both pieces face upright and have the correct number of squares, yet Y sits above X. Do not award partial credit to a candidate picture. The single target image has to satisfy all explicit conditions simultaneously. Testing the weakest-looking link often reveals which apparently plausible answer should be eliminated.
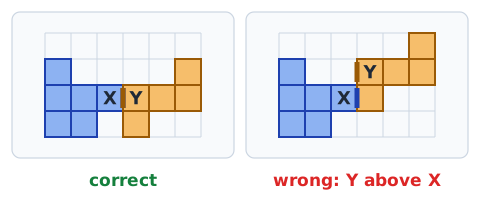
Read orientation exactly
If the instruction says keep both pieces upright, the top of each source shape must remain top in the result. Moving B from right to left does not by itself authorize turning it 180 degrees. Visualize a small letter or asymmetric arm painted on the piece; if that feature points in a new direction, the part has been rotated.
Quarter turns
Under a permitted 90-degree turn, a part changes how its rows and columns align. However, in the fixed-upright questions of this lesson, such a turn is not permitted. An option with a sideways protrusion in place of an upward protrusion fails regardless of whether its total area matches. Do not rotate a source mentally just to rescue an appealing answer.
Half turns
A 180-degree rotation swaps top with bottom and left with right. Shapes with unequal arms or one distinctive corner reveal this change quickly. If the drawing contains a short spur near the top, a half-turned candidate places that spur below. An upright source cannot produce the altered placement unless a turn is explicitly allowed.
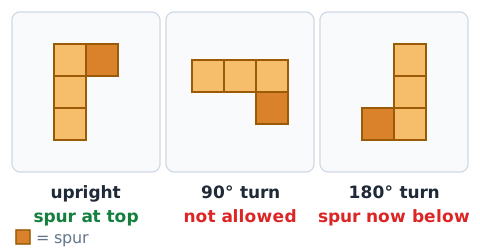
Rotation is not reflection
A rotation can be performed by turning a rigid paper cutout while keeping the same face toward you. A reflection reverses the left-right arrangement as though looking in a mirror or flipping the paper. An asymmetric L-shaped piece is a helpful diagnostic. If its spur appears on the wrong side relative to a fixed corner, examine whether the option has silently reflected it.
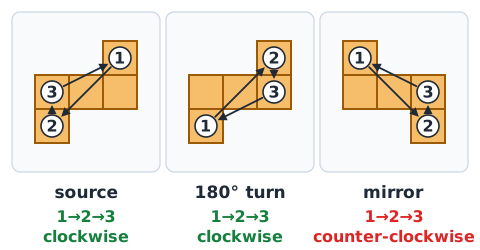
Handedness test
Compare two distinguishable landmarks, such as a top notch and a lower spur. On the original part, perhaps the spur lies left of the notch. A mirrored distractor reverses that ordering even if the overall width and number of cells remain identical. A short mental sweep from the topmost cell to the bottommost cell is often enough to reveal the reversal.
Symmetric traps
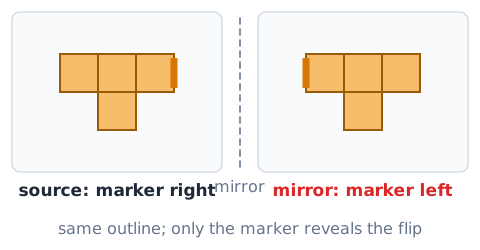
Some shapes are unchanged by a particular reflection. If the source part is symmetrical about that axis, mirroring alone may not distinguish answers. Do not invent a difference that is absent. In our generated practice figures, asymmetric source pieces make mirror changes visible; on a real puzzle, use a different invariant when a shape has symmetry.
Color is a guide, not proof
The blue and orange colors in our images distinguish separate source pieces and make their boundaries easier to inspect. The official AO skill does not depend on this color coding. A choice in which the colored areas look roughly right can still violate the precise outline. Verify the square layout independently of the visual emphasis.
Landmark ordering
Trace a consistent order around a shape: top protrusion, right corner, lower notch, left return. If a candidate reverses that clockwise order, it may be a reflected form. This test is especially valuable when the pieces have been translated and their absolute positions differ substantially. Relative ordering survives translation and ordinary rotation but reverses under reflection.
Area and missing blocks
Counting cells is a fast initial screen. If the source pieces contain six and five unit squares, a valid nonoverlapping assembly must display eleven colored squares. A candidate with ten or twelve cannot preserve both parts intact. This is a useful rejection even before computing the exact connector position, but do not accept an eleven-square candidate without checking its topology.
Gaps and false joins
A blank grid column between X and Y is a gap. The pieces may appear horizontally aligned, yet the marked faces do not touch. At small phone sizes, a one-square gap may be less noticeable than an overall silhouette. Focus on the boundary next to the connector, not on the external edges of the whole drawing.
Overlaps and double occupancy
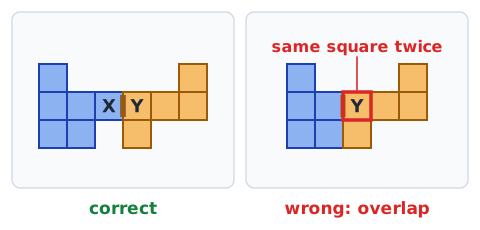
When solid pieces are drawn in the same plane and overlap is forbidden, one cannot cover a square belonging to the other. A composite that paints an orange cell on top of a blue cell has not assembled the original two pieces without conflict. Detect overlapping coordinates explicitly when the diagram is complex or when colors hide the duplicated square.
Extra arms and trimmed corners
An option can preserve approximate placement but attach a new arm to B or shave away one of its lower squares. That violates shape identity. Start by comparing distinctive extremes: highest square, farthest-right protrusion, and bottom edge. If these do not match the source after the permitted motion, discard the choice immediately.
Grid coordinates as a model
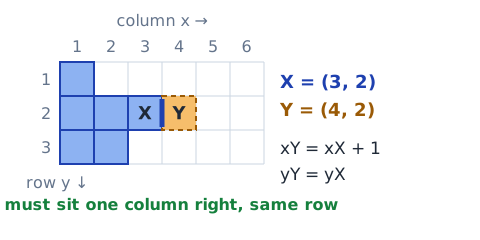
Assign each occupied square a column x and row y, with rows increasing downward. An upright translation adds a constant offset to every square of a piece. This simple mathematical description matches the visual act of sliding a cardboard cutout without twisting or stretching it. You do not need to perform arithmetic on the exam, but the model explains why one-square shifts are definitive errors.
Connector equation
For the horizontal join in our practice figures, suppose X is at square (xX,yX) and Y is at (xY,yY) after positioning the pieces. The right face of X touches the left face of Y precisely when xY = xX + 1 and yY = yX. Both conditions are necessary. An option satisfying only the column rule but not the row rule is a misplaced distractor.
Detecting shifts
If B slides downward one grid square relative to its correct placement, every B square changes row by one. Its internal shape remains intact, which can make the option tempting. Nevertheless the Y marker row becomes yX + 1, so the connector rule fails. A similar upward shift changes the row to yX - 1. Look for that single-unit row mismatch.
Drawing coordinates versus view
The choice drawings may be centered in their own boxes for legibility. Their absolute canvas positions do not matter; the relative B-to-A placement and the pieces' internal coordinates do. Use a distinguishing blue cell as a stable reference point, then read the orange piece relative to it. Do not reject an option merely because the entire assembly is printed further left or right. A useful invariant can be written as
when X faces right and Y faces left. These two relations describe adjacent cells at exactly equal height.
First pass
Scan all four options quickly and look for high-confidence violations. An extra piece, a forbidden reflection, or an open gap can be rejected in seconds. Avoid fully reconstructing every candidate from scratch if two candidates already fail clear invariants. A methodical first pass saves attention for the truly close alternatives.
Second pass
With two candidates left, compare the specific marked squares and the most distinctive protrusion. Identify one blue landmark and one orange landmark. Check exact vertical ordering and face contact. Saying aloud in your mind why a candidate fails helps prevent a guess based only on familiar-looking outer contour.
No outside assumptions
Use only transformations and physical conditions specified by the prompt. If the prompt does not prohibit additional contact along the seam, do not assume it is forbidden. If two pieces are opaque but the question is a top-down planar join, do not introduce a hidden-layer rule from an unrelated task. Stay loyal to the drawing conventions given in that question.
Final selection
After eliminating three options, verify the remaining assembly positively rather than assuming it must be right. Confirm complete pieces, no prohibited transformation, X-to-Y connection, no overlap, and no unwanted gap. This final check catches cases where an early elimination was based on a mistaken interpretation of a small feature.
Worked example: a vertical slip
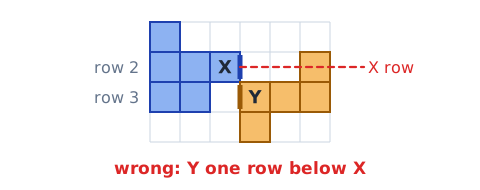
A blue part has its X connector on row two, and an orange part has Y one row below X in the proposed assembly. Both shapes remain upright and intact. This option is still wrong: their specified faces meet only when Y lies on the same row as X. Shifting the orange part upward by one would correct the connector, but you are not allowed to edit an answer choice.
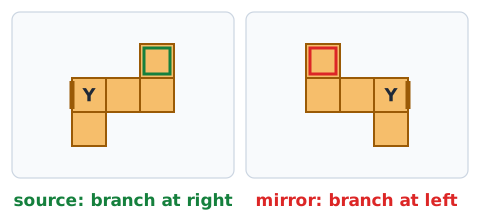
Worked example: a mirror
A source orange piece has a branch reaching upward at its far-right edge. A candidate displays the same number of squares but places that branch at the far-left edge of the orange cluster. Under the instruction to keep the piece upright and unreflected, the candidate is false. Cell count passes, but the relative layout has changed. The mirror test rejects it.
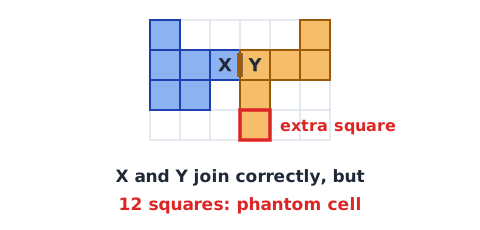
Worked example: a phantom cell
The original blue and orange pieces total eleven squares. A diagram has twelve because an extra orange square extends from the lower arm. The connector may be perfectly aligned, but the orange piece no longer matches its source. Reject the diagram on conservation of material. The lesson is to test more than one constraint; meeting the connector rule is not enough.
Worked example: a one-square gap
Suppose the source marker X is on the right side of a blue square. The orange marked square appears two columns to the right instead of the immediately adjacent column. Its row matches, and B is upright, but a column of empty space lies between the marked faces. The intended joint is absent. Eliminate this distractor before examining small notches.
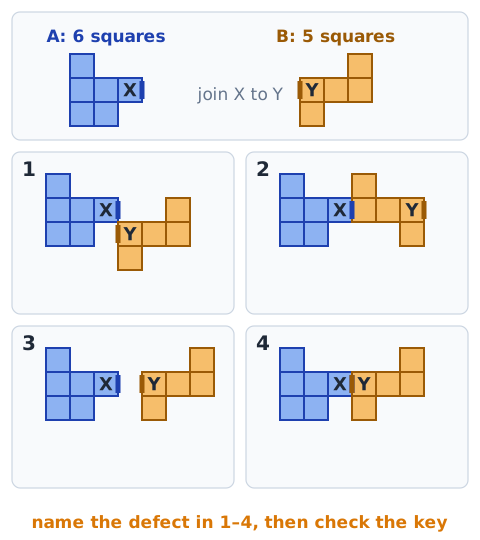
Drill 1: visual vocabulary
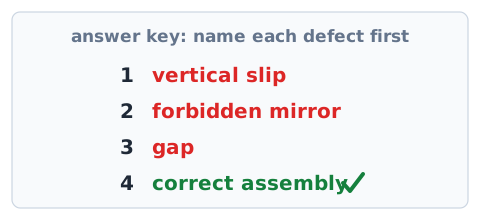
For a set of four diagrams, practice labeling the defect before looking at an answer key: vertical slip, forbidden mirror, gap, extra cell, or correct assembly. Naming the fault is more valuable than memorizing that one location happened to contain the answer. Train yourself to make a one-sentence rejection grounded in an explicit rule.
Drill 2: two landmarks
Choose two distinctive source cells: an upper tip and a lower spur. Compare their relative positions in each candidate. Then check the marked connection. This dual-landmark method is effective when several options retain the same total area but differ by a reflection or local rearrangement.
Drill 3: connector grid
Point to the marked blue cell, move exactly one column toward its outward-facing side, and verify that the marked orange cell occupies that position. If the wrong cell is there, or the marker is in another row, reject the diagram. This procedure takes little time once grid adjacency becomes familiar.
Drill 4: all rules together
Use a full checklist: preserve shape and square count; preserve upright orientation; forbid reflections; align X and Y face-to-face; exclude overlaps and gaps. In a difficult item, systematically apply each line to the remaining options. Most wrong images violate at least one line; the correct picture is the one that survives every stated condition.
Choosing the prettiest silhouette
A balanced, nearly rectangular composite can be visually satisfying even when the specified join cannot produce it. The task is not to find the most regular object. Trust the piece geometry over aesthetics. A jagged but faithful assembly outranks a tidy shape that required bending or reflecting a source part.
Guessing from size alone
Matching total area is not enough. Four different eleven-square composites can have the same square count while using different offsets and orientations. Treat area as a rapid elimination screen, not a proof. After counting, examine landmarks, boundaries, and the exact X-to-Y relationship.
Ignoring small notches
A one-cell notch is easy to overlook when scanning four small diagrams. Yet that notch can determine handedness and distinguish a genuine source shape from a mirrored version. Zoom mentally into the most asymmetric feature. The drawing resolution should not be an excuse to replace the source with a rough impression.
Accidentally moving the wrong part
Our visual puzzles keep blue part A fixed and allow orange B to slide into place. If you imagine moving A and B independently, a false candidate can begin to seem valid. Use A as the reference frame and translate only B. Where a different official sample gives different movement rules, follow the rules printed there instead.
CAT question navigation
The official ASVAB preparation guidance explains that the computer-adaptive ASVAB does not let test-takers return to a question after submitting an answer. Therefore make a complete, efficient decision before finalizing the selection. This is a test-format fact, not an argument to rush or abandon the reasoning process.
Educated elimination
The official preparation page recommends ruling out incorrect choices and using an educated guess from those that remain when the answer is uncertain. Apply that idea to geometry rather than hoping for a pattern in choice letters. A rejected distractor should violate at least one stated constraint that you can point to on the figure.
Do not overfit this lesson
The specific X-right/Y-left colored grid exercises are one pedagogical model. Real spatial reasoning tasks may feature arcs, irregular cutouts, alignment labels, and rotated pieces under different instructions. Transfer the order of reasoning—understand permitted operations, preserve invariants, align specified features—rather than assuming every future problem uses the same colors or grid.
Practical pacing
Practice a fast first scan, then one careful verification pass. Spend more time only on candidates that meet all obvious constraints. Do not add unsupported operations merely to rescue an attractive image. With increasing fluency you can often reject a wrong option from a single decisive feature while still giving the survivor a final correctness check.
Five checks in one sentence
A valid answer preserves both source shapes, uses only permitted transformations, mates the designated connectors, respects nonoverlap requirements, and reproduces the correct whole silhouette. If any one of these fails, the option is out. Saying this compact rule before a practice set can reduce impulsive visual guessing.
From method to mastery
Move from easy to hard by increasing the similarity of the wrong images, not by changing the basic rules. An easy item may show a visible gap. A medium item may shift B by one square. A harder item may mirror B while leaving the outer envelope deceptively familiar. The same evidence-based elimination process works across those variations.
Checklist for your next quiz
Before each visual question: identify A and B; locate X and Y; read what is fixed; scan each candidate for missing or extra squares; compare one or two asymmetric landmarks; verify the marked faces meet exactly; confirm that the final candidate obeys every stated rule. The objective is to explain the result, not merely to recognize it.
Closing reminder
All practice diagrams and answer options in this unit were authored for ASVAB Prep. They illustrate the broad AO skill described by the official testing program. No material here claims to reproduce an official secure item or to guarantee an exam score. When you can identify the exact defect in each rejected candidate, you have developed the reasoning habit this lesson is designed to teach.
Two simultaneous errors
A candidate can have two defects, such as a reflected orange piece and a one-square gap. You need only one decisive defect to reject it, but noticing both strengthens your understanding. Do not treat a distractor as correct just because fixing one issue would make the overall silhouette attractive. The question asks for the option as printed, not for the nearest editable sketch.
Competing plausible answers
Sometimes two candidates seem to show a neat join. Compare the exact marker cells rather than the overall closeness of the pieces. One candidate may touch at an unmarked neighboring edge while missing the required labeled pair. When the rule explicitly identifies X and Y, generic contact is not equivalent to the specified contact.
Boundary tracing
Trace the outer perimeter of the blue source part clockwise, then trace the orange part independently. In each candidate, scan around these colored regions and confirm distinctive concave corners, convex corners, and extremities. This is especially helpful when two wrong options have the same square count and nearly the same overall bounding box.
Why correctness is unique
In these practice problems, we control the source geometry and the allowed operation: A remains fixed; B is translated upright until X and Y oppose each other. Because translation is determined by the two marked cells, there is one geometric placement. Our independent validation computes that placement and rejects every alternative that differs in shape or connector offset.
Quick self-test
Without looking at any illustration, answer these questions: Is diagonal corner contact the same as face contact? Does a mirror preserve handedness? Can an image with the right area still have the wrong geometry? May you rotate a part when the prompt permits only sliding? Each correct response should name the underlying invariant rather than relying on an isolated memorized example.
Transfer to new shapes
For freeform non-grid pieces, the same questions become: Which contour segments are supposed to meet? Which labels are attached to those segments? Is a piece rotated, mirrored, enlarged, or cut? Is the visible assembled outline consistent with the original parts? Practicing grid pieces helps make these relationships explicit before tackling more organic contours.
 English ▾