This lesson test has 30 original Assembling Objects questions built around one question: why is each wrong option wrong? Choices include mirrored pieces, one-square gaps, phantom cells, overlapping blocks and connectors that slipped out of place, and your job is to find the one assembly that breaks none of the rules.
A blue part has a connector X on the right face of a square. Which orange connector position creates the specified direct face-to-face join?
Show the answer
Answer: A
A correct side joint places Y immediately right of X, at the same row. Corner proximity, a gap and overlap are not equivalent to face contact.
A (correct): Correct. A correct side joint places Y immediately right of X, at the same row. Corner proximity, a gap and overlap are not equivalent to face contact.
B: Incorrect. A correct side joint places Y immediately right of X, at the same row. Corner proximity, a gap and overlap are not equivalent to face contact.
C: Incorrect. Putting Y on the square that X already occupies makes the pieces overlap instead of meeting face to face.
D: Incorrect. A diagonal neighbor touches the X square only at a corner, so the two marked faces never meet.
Question 2 of 30 · easy
A problem permits translation only. Which change is allowed?
Show the answer
Answer: A
Translation is a slide: every point of the piece moves the same distance in the same direction. That keeps the size, the outline and the orientation exactly as they were; only the location changes. To test a candidate, check that each feature still points the same way as in the source. Turning the piece is rotation and flipping it is reflection, both separate operations that the rule excludes, and removing material changes the piece itself rather than moving it.
A (correct): Correct. Translation changes position, not orientation, handedness or material. The other choices alter the source shape or its orientation.
B: Incorrect. Translation changes position, not orientation, handedness or material. The other choices alter the source shape or its orientation.
C: Incorrect. A flip reverses handedness, which a pure translation never changes.
D: Incorrect. Removing part of B changes the piece itself, which no rigid move, including a translation, can do.
Question 3 of 30 · easy
Two unit-square pieces meet only at one corner. What does that show about side contact?
Show the answer
Answer: B
A side connection on a square grid needs a full shared edge, a whole unit of length where the two squares touch. Squares that meet only at a corner share a single point, which has no length, so there is no side contact at all. This is the same distinction as rook moves versus diagonal moves on a chessboard. The tempting mistake is treating any touch as a connection; the pieces do not overlap either, since no area is shared.
A: Incorrect. Corner contact has zero shared side length; a proper side connection requires a whole adjacent face in the stated grid rule.
B (correct): Correct. Corner contact has zero shared side length; a proper side connection requires a whole adjacent face in the stated grid rule.
C: Incorrect. The pieces already touch; corner contact says nothing about whether either piece has been rotated.
D: Incorrect. A single shared point covers no area, so the pieces touch without overlapping.
Question 4 of 30 · easy
The source orange piece has seven occupied cells. A choice depicts the orange region using eight cells. What is the immediate issue?
Show the answer
Answer: B
Rigid moves such as slides and turns never change how many cells a piece occupies, so cell count is a fast identity test. A source piece with seven cells must still show exactly seven in any valid candidate, and an eighth cell means material was added. Counting is usually quicker than comparing shapes visually, so it makes a good first filter. The trap is accepting the extra cell because the result appears to fill the target region neatly.
A: Incorrect. An extra orange unit changes the identity of the source part even if it seems to fit the blue region.
B (correct): Correct. An extra orange unit changes the identity of the source part even if it seems to fit the blue region.
C: Incorrect. An extra orange unit changes the identity of the source part even if it seems to fit the blue region.
D: Incorrect. An extra orange unit changes the identity of the source part even if it seems to fit the blue region.
Question 5 of 30 · easy
Which sign most strongly indicates a mirror-image distractor for an asymmetric part?
Show the answer
Answer: C
A mirror image keeps the same size, cell count and color, so those features cannot expose it. What a reflection changes is handedness: the left-to-right order of distinctive features is reversed, like a left glove compared with a right glove. Pick two landmarks, such as a notch and a spur, and note which comes first going clockwise around the piece. Any rotation keeps that order; a mirror flips it. Same area or color is therefore no evidence of a match.
A: Incorrect. Page placement says nothing about handedness; a mirrored part can sit anywhere.
B: Incorrect. Reflection reverses handedness and the relative ordering of asymmetric landmarks. Color and area alone do not distinguish it.
C (correct): Correct. Reflection reverses handedness and the relative ordering of asymmetric landmarks. Color and area alone do not distinguish it.
D: Incorrect. A mirror image keeps the cell count and width, so these match both the true part and the decoy.
Question 6 of 30 · easy
The instructions say blue A stays fixed while orange B can slide but cannot turn. Which first action is best?
Show the answer
Answer: B
Start with the given constraints before comparing pictures: the fixed piece, the allowed motion, and the marked contact points. Finding X and Y and noting which sides face each other tells you exactly where B must end up, and because B can only slide, its orientation is already fixed. That narrows the choices quickly. Rotating B or reshaping A breaks the stated rules, and judging silhouettes alone ignores the details that separate the correct assembly from near misses.
A: Incorrect. The marked contact and transformation permissions constrain the solution before appearance-based comparison.
B (correct): Correct. The marked contact and transformation permissions constrain the solution before appearance-based comparison.
C: Incorrect. The marked contact and transformation permissions constrain the solution before appearance-based comparison.
D: Incorrect. The marked contact and transformation permissions constrain the solution before appearance-based comparison.
Question 7 of 30 · easy
A candidate leaves one empty column between X and Y, although they are in the same row. Which defect should eliminate it?
Show the answer
Answer: D
For two marked faces to meet, the squares must sit side by side with no space between them. Being in the same row satisfies only half the requirement; the columns must also be next to each other. A one-column gap means the faces never touch, so the required join fails even if everything else is right. Checking both row and column for the marked cells is a quick test. Extra contacts elsewhere are not a defect unless a rule forbids them.
A: Incorrect. Matching rows is necessary but not sufficient. The marked faces must occupy adjacent columns without a blank space.
B: Incorrect. Extra contacts elsewhere are not the defect described; the problem is that X and Y do not touch.
C: Incorrect. Nothing in the description shows a flip; the marked faces are simply one column apart.
D (correct): Correct. Matching rows is necessary but not sufficient. The marked faces must occupy adjacent columns without a blank space.
Question 8 of 30 · easy
Which condition is preserved when a rigid part is translated without turning?
Show the answer
Answer: B
A translation moves every point by the same amount in the same direction, so distances and directions within the piece are unchanged. A protrusion that pointed up and to the right in the source still points up and to the right after the slide, and features stay in the same arrangement. What does change is where the piece sits, measured as its coordinates or its position on the page. Do not confuse properties of the piece with its location.
A: Incorrect. A pure slide preserves internal geometry, contour and orientation while changing its absolute coordinates.
B (correct): Correct. A pure slide preserves internal geometry, contour and orientation while changing its absolute coordinates.
C: Incorrect. A translation changes exactly this: the location of the part on the page.
D: Incorrect. The number of candidates belongs to the question, not to the part, so a slide neither keeps nor changes it.
Question 9 of 30 · easy
A choice has the correct total square count. Is that enough to accept it?
Show the answer
Answer: A
Equal cell count is a necessary condition but not a sufficient one. Many different arrangements use the same number of squares, so a candidate can match the total while a piece is mirrored, rotated wrongly or shifted out of alignment. Use the count as a first filter to discard wrong candidates, then confirm shape, orientation and the required contacts. The tempting error is treating one passed check as proof; a valid answer must pass every condition the stem sets.
A (correct): Correct. Area is one invariant but does not prove that every individual square occupies the correct relative position.
B: Incorrect. Symmetry is not a test of correctness; the right assembly may well be lopsided.
C: Incorrect. Many wrong arrangements use the same number of squares, so area alone cannot prove the assembly.
D: Incorrect. Area is one invariant but does not prove that every individual square occupies the correct relative position.
Question 10 of 30 · easy
The instruction says no overlap. In one option, orange occupies the very square used by blue. What should you conclude?
Show the answer
Answer: D
Two solid pieces cannot occupy the same space, and on a grid that means no square can belong to both. When a candidate shows orange covering a blue square, the pieces overlap, which the instruction forbids, so that candidate fails regardless of how well the rest fits. A quick way to check is to count squares: two nonoverlapping pieces must cover exactly the sum of their cells. Explaining the conflict away as mixed colors or near contact ignores the rule.
A: Incorrect. With no permitted stacking, one grid square cannot be occupied by both solid pieces; this violates the stated assembly rule.
B: Incorrect. With no permitted stacking, one grid square cannot be occupied by both solid pieces; this violates the stated assembly rule.
C: Incorrect. With no permitted stacking, one grid square cannot be occupied by both solid pieces; this violates the stated assembly rule.
D (correct): Correct. With no permitted stacking, one grid square cannot be occupied by both solid pieces; this violates the stated assembly rule.
Question 11 of 30 · medium
Two pieces touch along several boundaries after a correct X–Y join. The instructions forbid overlap but say nothing about extra side contact. How should you judge this?
Show the answer
Answer: D
Judge a candidate only by the rules actually stated. Here those rules are the required X–Y join, the piece shapes and orientation, and no overlap. Pieces that touch along extra edges break none of them, so the candidate stays acceptable. Adding a rule the stem never gave, such as no extra contact, leads you to discard the correct answer. Extra contact is common when pieces nest closely and does not imply a reflection. List the constraints, test each, then decide.
A: Incorrect. Additional side contact is not inherently a violation. The explicit marker join, geometry, and nonoverlap rules are controlling.
B: Incorrect. Additional side contact is not inherently a violation. The explicit marker join, geometry, and nonoverlap rules are controlling.
C: Incorrect. Additional side contact is not inherently a violation. The explicit marker join, geometry, and nonoverlap rules are controlling.
D (correct): Correct. Additional side contact is not inherently a violation. The explicit marker join, geometry, and nonoverlap rules are controlling.
Question 12 of 30 · medium
In a computer-adaptive ASVAB question, you have narrowed four options to two but are uncertain. What is the sound next step?
Show the answer
Answer: B
On the computer-adaptive ASVAB you cannot return to a question after you submit it, so each answer must be settled before moving on. When two candidates remain, find one concrete feature that must be true, such as a marker position, cell count or handedness, and check it in both. That single test usually separates them. Planning to come back later fails on this format, and answer-letter patterns or which shape looks nicer carry no information about correctness.
A: Incorrect. Use evidence-based elimination and make a final decision. Official ASVAB guidance states that CAT answers cannot be revisited.
B (correct): Correct. Use evidence-based elimination and make a final decision. Official ASVAB guidance states that CAT answers cannot be revisited.
C: Incorrect. On the computer-adaptive test, an answer cannot be revisited once it is submitted.
D: Incorrect. Use evidence-based elimination and make a final decision. Official ASVAB guidance states that CAT answers cannot be revisited.
Question 13 of 30 · medium
The source shows a hooked blue A and a right-branched orange B. Keep both upright, keep blue A fixed, and slide only B so the marked right face X touches the marked left face Y in the same row. Do not reflect, rotate, add, delete, or overlap any square. Which diagram is the valid assembled whole?
Show the answer
Answer: C
Keep blue A fixed. Marked X is the right face of cell (2,1) and Y is the left face of B cell (0,1) in the source. The unique allowed upright placement of B is a three-column horizontal slide with zero vertical shift. Therefore the exact orange shape is placed to the right of A, with the marked cells adjacent at the same row. Every alternative contains a specific offset, shape, orientation, or cell-count violation.
A: Incorrect: B is one column too far right; the labeled connectors have an empty column between them. The printed candidate itself may not be edited.
B: Incorrect: an extra orange cell was attached. The source piece cannot gain material during translation. The printed candidate itself may not be edited.
C (correct): Correct: the source pieces are unchanged and upright. The blue X right-face and orange Y left-face cells are immediately adjacent at the same height, with no gap or forbidden overlap. The remaining contours also match both source pieces.
D: Incorrect: B was slid one grid row upward, so Y is not level with X even if other cells seem near the seam. The printed candidate itself may not be edited.
Question 14 of 30 · medium
Inspect both separately drawn pieces: the hooked A is fixed and the lower-armed B may translate only. X and Y must share their indicated facing boundary, with no gap or double occupancy. Select the one fully faithful assembly among the four drawings.
Show the answer
Answer: A
Keep blue A fixed. Marked X is the right face of cell (2,1) and Y is the left face of B cell (0,1) in the source. The unique allowed upright placement of B is a three-column horizontal slide with zero vertical shift. Therefore the exact orange shape is placed to the right of A, with the marked cells adjacent at the same row. Every alternative contains a specific offset, shape, orientation, or cell-count violation.
A (correct): Correct: the source pieces are unchanged and upright. The blue X right-face and orange Y left-face cells are immediately adjacent at the same height, with no gap or forbidden overlap. The remaining contours also match both source pieces.
B: Incorrect: the orange source silhouette has been reflected horizontally. Translation cannot reverse its characteristic notch or arm. The printed candidate itself may not be edited.
C: Incorrect: an orange cell is absent. A correct assembly retains every original source cell. The printed candidate itself may not be edited.
D: Incorrect: B was slid one grid row downward, placing the specified Y face below the blue X face. The printed candidate itself may not be edited.
Question 15 of 30 · medium
Blue A has the hooked outline; orange B has the double-stepped outline. Their X and Y side labels identify the exact join. Neither piece may turn or flip. Which choice keeps every cell and makes the labeled side-to-side connection?
Show the answer
Answer: C
Keep blue A fixed. Marked X is the right face of cell (2,1) and Y is the left face of B cell (0,1) in the source. The unique allowed upright placement of B is a three-column horizontal slide with zero vertical shift. Therefore the exact orange shape is placed to the right of A, with the marked cells adjacent at the same row. Every alternative contains a specific offset, shape, orientation, or cell-count violation.
A: Incorrect: B is one column too far right; the labeled connectors have an empty column between them. The printed candidate itself may not be edited.
B: Incorrect: B was shifted one column into the blue piece, creating overlap or putting Y on the wrong column rather than immediately to X’s right. The printed candidate itself may not be edited.
C (correct): Correct: the source pieces are unchanged and upright. The blue X right-face and orange Y left-face cells are immediately adjacent at the same height, with no gap or forbidden overlap. The remaining contours also match both source pieces.
D: Incorrect: an extra orange cell was attached. The source piece cannot gain material during translation. The printed candidate itself may not be edited.
Question 16 of 30 · medium
The source shows a stepped blue A and a right-branched orange B. Keep both upright, keep blue A fixed, and slide only B so the marked right face X touches the marked left face Y in the same row. Do not reflect, rotate, add, delete, or overlap any square. Which diagram is the valid assembled whole?
Show the answer
Answer: B
Keep blue A fixed. Marked X is the right face of cell (2,1) and Y is the left face of B cell (0,1) in the source. The unique allowed upright placement of B is a three-column horizontal slide with zero vertical shift. Therefore the exact orange shape is placed to the right of A, with the marked cells adjacent at the same row. Every alternative contains a specific offset, shape, orientation, or cell-count violation.
A: Incorrect: B was shifted one column into the blue piece, creating overlap or putting Y on the wrong column rather than immediately to X’s right. The printed candidate itself may not be edited.
B (correct): Correct: the source pieces are unchanged and upright. The blue X right-face and orange Y left-face cells are immediately adjacent at the same height, with no gap or forbidden overlap. The remaining contours also match both source pieces.
C: Incorrect: an extra orange cell was attached. The source piece cannot gain material during translation. The printed candidate itself may not be edited.
D: Incorrect: B was slid one grid row upward, so Y is not level with X even if other cells seem near the seam. The printed candidate itself may not be edited.
Question 17 of 30 · medium
Inspect both separately drawn pieces: the stepped A is fixed and the lower-armed B may translate only. X and Y must share their indicated facing boundary, with no gap or double occupancy. Select the one fully faithful assembly among the four drawings.
Show the answer
Answer: D
Keep blue A fixed. Marked X is the right face of cell (2,1) and Y is the left face of B cell (0,1) in the source. The unique allowed upright placement of B is a three-column horizontal slide with zero vertical shift. Therefore the exact orange shape is placed to the right of A, with the marked cells adjacent at the same row. Every alternative contains a specific offset, shape, orientation, or cell-count violation.
A: Incorrect: B’s orientation is changed by a half-turn. The prompt permits sliding only. The printed candidate itself may not be edited.
B: Incorrect: B was slid one grid row downward, placing the specified Y face below the blue X face. The printed candidate itself may not be edited.
C: Incorrect: an orange cell is absent. A correct assembly retains every original source cell. The printed candidate itself may not be edited.
D (correct): Correct: the source pieces are unchanged and upright. The blue X right-face and orange Y left-face cells are immediately adjacent at the same height, with no gap or forbidden overlap. The remaining contours also match both source pieces.
Question 18 of 30 · medium
Blue A has the stepped outline; orange B has the double-stepped outline. Their X and Y side labels identify the exact join. Neither piece may turn or flip. Which choice keeps every cell and makes the labeled side-to-side connection?
Show the answer
Answer: A
Keep blue A fixed. Marked X is the right face of cell (2,1) and Y is the left face of B cell (0,1) in the source. The unique allowed upright placement of B is a three-column horizontal slide with zero vertical shift. Therefore the exact orange shape is placed to the right of A, with the marked cells adjacent at the same row. Every alternative contains a specific offset, shape, orientation, or cell-count violation.
A (correct): Correct: the source pieces are unchanged and upright. The blue X right-face and orange Y left-face cells are immediately adjacent at the same height, with no gap or forbidden overlap. The remaining contours also match both source pieces.
B: Incorrect: B was shifted one column into the blue piece, creating overlap or putting Y on the wrong column rather than immediately to X’s right. The printed candidate itself may not be edited.
C: Incorrect: B was slid one grid row upward, so Y is not level with X even if other cells seem near the seam. The printed candidate itself may not be edited.
D: Incorrect: B is one column too far right; the labeled connectors have an empty column between them. The printed candidate itself may not be edited.
Question 19 of 30 · medium
The source shows a forked blue A and a right-branched orange B. Keep both upright, keep blue A fixed, and slide only B so the marked right face X touches the marked left face Y in the same row. Do not reflect, rotate, add, delete, or overlap any square. Which diagram is the valid assembled whole?
Show the answer
Answer: A
Keep blue A fixed. Marked X is the right face of cell (2,1) and Y is the left face of B cell (0,1) in the source. The unique allowed upright placement of B is a three-column horizontal slide with zero vertical shift. Therefore the exact orange shape is placed to the right of A, with the marked cells adjacent at the same row. Every alternative contains a specific offset, shape, orientation, or cell-count violation.
A (correct): Correct: the source pieces are unchanged and upright. The blue X right-face and orange Y left-face cells are immediately adjacent at the same height, with no gap or forbidden overlap. The remaining contours also match both source pieces.
B: Incorrect: an extra orange cell was attached. The source piece cannot gain material during translation. The printed candidate itself may not be edited.
C: Incorrect: B was slid one grid row upward, so Y is not level with X even if other cells seem near the seam. The printed candidate itself may not be edited.
D: Incorrect: B is one column too far right; the labeled connectors have an empty column between them. The printed candidate itself may not be edited.
Question 20 of 30 · medium
Inspect both separately drawn pieces: the forked A is fixed and the lower-armed B may translate only. X and Y must share their indicated facing boundary, with no gap or double occupancy. Select the one fully faithful assembly among the four drawings.
Show the answer
Answer: C
Keep blue A fixed. Marked X is the right face of cell (2,1) and Y is the left face of B cell (0,1) in the source. The unique allowed upright placement of B is a three-column horizontal slide with zero vertical shift. Therefore the exact orange shape is placed to the right of A, with the marked cells adjacent at the same row. Every alternative contains a specific offset, shape, orientation, or cell-count violation.
A: Incorrect: B was slid one grid row downward, placing the specified Y face below the blue X face. The printed candidate itself may not be edited.
B: Incorrect: an orange cell is absent. A correct assembly retains every original source cell. The printed candidate itself may not be edited.
C (correct): Correct: the source pieces are unchanged and upright. The blue X right-face and orange Y left-face cells are immediately adjacent at the same height, with no gap or forbidden overlap. The remaining contours also match both source pieces.
D: Incorrect: the orange source silhouette has been reflected horizontally. Translation cannot reverse its characteristic notch or arm. The printed candidate itself may not be edited.
Question 21 of 30 · medium
Blue A has the forked outline; orange B has the double-stepped outline. Their X and Y side labels identify the exact join. Neither piece may turn or flip. Which choice keeps every cell and makes the labeled side-to-side connection?
Show the answer
Answer: A
Keep blue A fixed. Marked X is the right face of cell (2,1) and Y is the left face of B cell (0,1) in the source. The unique allowed upright placement of B is a three-column horizontal slide with zero vertical shift. Therefore the exact orange shape is placed to the right of A, with the marked cells adjacent at the same row. Every alternative contains a specific offset, shape, orientation, or cell-count violation.
A (correct): Correct: the source pieces are unchanged and upright. The blue X right-face and orange Y left-face cells are immediately adjacent at the same height, with no gap or forbidden overlap. The remaining contours also match both source pieces.
B: Incorrect: B was shifted one column into the blue piece, creating overlap or putting Y on the wrong column rather than immediately to X’s right. The printed candidate itself may not be edited.
C: Incorrect: B is one column too far right; the labeled connectors have an empty column between them. The printed candidate itself may not be edited.
D: Incorrect: an extra orange cell was attached. The source piece cannot gain material during translation. The printed candidate itself may not be edited.
Question 22 of 30 · medium
The source shows a tapered blue A and a right-branched orange B. Keep both upright, keep blue A fixed, and slide only B so the marked right face X touches the marked left face Y in the same row. Do not reflect, rotate, add, delete, or overlap any square. Which diagram is the valid assembled whole?
Show the answer
Answer: D
Keep blue A fixed. Marked X is the right face of cell (2,1) and Y is the left face of B cell (0,1) in the source. The unique allowed upright placement of B is a three-column horizontal slide with zero vertical shift. Therefore the exact orange shape is placed to the right of A, with the marked cells adjacent at the same row. Every alternative contains a specific offset, shape, orientation, or cell-count violation.
A: Incorrect: B was shifted one column into the blue piece, creating overlap or putting Y on the wrong column rather than immediately to X’s right. The printed candidate itself may not be edited.
B: Incorrect: an extra orange cell was attached. The source piece cannot gain material during translation. The printed candidate itself may not be edited.
C: Incorrect: B was slid one grid row upward, so Y is not level with X even if other cells seem near the seam. The printed candidate itself may not be edited.
D (correct): Correct: the source pieces are unchanged and upright. The blue X right-face and orange Y left-face cells are immediately adjacent at the same height, with no gap or forbidden overlap. The remaining contours also match both source pieces.
Question 23 of 30 · medium
Inspect both separately drawn pieces: the tapered A is fixed and the lower-armed B may translate only. X and Y must share their indicated facing boundary, with no gap or double occupancy. Select the one fully faithful assembly among the four drawings.
Show the answer
Answer: D
Keep blue A fixed. Marked X is the right face of cell (2,1) and Y is the left face of B cell (0,1) in the source. The unique allowed upright placement of B is a three-column horizontal slide with zero vertical shift. Therefore the exact orange shape is placed to the right of A, with the marked cells adjacent at the same row. Every alternative contains a specific offset, shape, orientation, or cell-count violation.
A: Incorrect: B was slid one grid row downward, placing the specified Y face below the blue X face. The printed candidate itself may not be edited.
B: Incorrect: an orange cell is absent. A correct assembly retains every original source cell. The printed candidate itself may not be edited.
C: Incorrect: B’s orientation is changed by a half-turn. The prompt permits sliding only. The printed candidate itself may not be edited.
D (correct): Correct: the source pieces are unchanged and upright. The blue X right-face and orange Y left-face cells are immediately adjacent at the same height, with no gap or forbidden overlap. The remaining contours also match both source pieces.
Question 24 of 30 · medium
Blue A has the tapered outline; orange B has the double-stepped outline. Their X and Y side labels identify the exact join. Neither piece may turn or flip. Which choice keeps every cell and makes the labeled side-to-side connection?
Show the answer
Answer: C
Keep blue A fixed. Marked X is the right face of cell (2,1) and Y is the left face of B cell (0,1) in the source. The unique allowed upright placement of B is a three-column horizontal slide with zero vertical shift. Therefore the exact orange shape is placed to the right of A, with the marked cells adjacent at the same row. Every alternative contains a specific offset, shape, orientation, or cell-count violation.
A: Incorrect: B was slid one grid row upward, so Y is not level with X even if other cells seem near the seam. The printed candidate itself may not be edited.
B: Incorrect: B is one column too far right; the labeled connectors have an empty column between them. The printed candidate itself may not be edited.
C (correct): Correct: the source pieces are unchanged and upright. The blue X right-face and orange Y left-face cells are immediately adjacent at the same height, with no gap or forbidden overlap. The remaining contours also match both source pieces.
D: Incorrect: B was shifted one column into the blue piece, creating overlap or putting Y on the wrong column rather than immediately to X’s right. The printed candidate itself may not be edited.
Question 25 of 30 · hard
The source shows an elbowed blue A and a right-branched orange B. Keep both upright, keep blue A fixed, and slide only B so the marked right face X touches the marked left face Y in the same row. Do not reflect, rotate, add, delete, or overlap any square. Which diagram is the valid assembled whole?
Show the answer
Answer: D
Keep blue A fixed. Marked X is the right face of cell (2,1) and Y is the left face of B cell (0,1) in the source. The unique allowed upright placement of B is a three-column horizontal slide with zero vertical shift. Therefore the exact orange shape is placed to the right of A, with the marked cells adjacent at the same row. Every alternative contains a specific offset, shape, orientation, or cell-count violation.
A: Incorrect: B was slid one grid row upward, so Y is not level with X even if other cells seem near the seam. The printed candidate itself may not be edited.
B: Incorrect: B was shifted one column into the blue piece, creating overlap or putting Y on the wrong column rather than immediately to X’s right. The printed candidate itself may not be edited.
C: Incorrect: an extra orange cell was attached. The source piece cannot gain material during translation. The printed candidate itself may not be edited.
D (correct): Correct: the source pieces are unchanged and upright. The blue X right-face and orange Y left-face cells are immediately adjacent at the same height, with no gap or forbidden overlap. The remaining contours also match both source pieces.
Question 26 of 30 · hard
Inspect both separately drawn pieces: the elbowed A is fixed and the lower-armed B may translate only. X and Y must share their indicated facing boundary, with no gap or double occupancy. Select the one fully faithful assembly among the four drawings.
Show the answer
Answer: C
Keep blue A fixed. Marked X is the right face of cell (2,1) and Y is the left face of B cell (0,1) in the source. The unique allowed upright placement of B is a three-column horizontal slide with zero vertical shift. Therefore the exact orange shape is placed to the right of A, with the marked cells adjacent at the same row. Every alternative contains a specific offset, shape, orientation, or cell-count violation.
A: Incorrect: an orange cell is absent. A correct assembly retains every original source cell. The printed candidate itself may not be edited.
B: Incorrect: B’s orientation is changed by a half-turn. The prompt permits sliding only. The printed candidate itself may not be edited.
C (correct): Correct: the source pieces are unchanged and upright. The blue X right-face and orange Y left-face cells are immediately adjacent at the same height, with no gap or forbidden overlap. The remaining contours also match both source pieces.
D: Incorrect: B was slid one grid row downward, placing the specified Y face below the blue X face. The printed candidate itself may not be edited.
Question 27 of 30 · hard
Blue A has the elbowed outline; orange B has the double-stepped outline. Their X and Y side labels identify the exact join. Neither piece may turn or flip. Which choice keeps every cell and makes the labeled side-to-side connection?
Show the answer
Answer: B
Keep blue A fixed. Marked X is the right face of cell (2,1) and Y is the left face of B cell (0,1) in the source. The unique allowed upright placement of B is a three-column horizontal slide with zero vertical shift. Therefore the exact orange shape is placed to the right of A, with the marked cells adjacent at the same row. Every alternative contains a specific offset, shape, orientation, or cell-count violation.
A: Incorrect: B was shifted one column into the blue piece, creating overlap or putting Y on the wrong column rather than immediately to X’s right. The printed candidate itself may not be edited.
B (correct): Correct: the source pieces are unchanged and upright. The blue X right-face and orange Y left-face cells are immediately adjacent at the same height, with no gap or forbidden overlap. The remaining contours also match both source pieces.
C: Incorrect: B was slid one grid row upward, so Y is not level with X even if other cells seem near the seam. The printed candidate itself may not be edited.
D: Incorrect: B is one column too far right; the labeled connectors have an empty column between them. The printed candidate itself may not be edited.
Question 28 of 30 · hard
The source shows a ladder-like blue A and a right-branched orange B. Keep both upright, keep blue A fixed, and slide only B so the marked right face X touches the marked left face Y in the same row. Do not reflect, rotate, add, delete, or overlap any square. Which diagram is the valid assembled whole?
Show the answer
Answer: B
Keep blue A fixed. Marked X is the right face of cell (2,1) and Y is the left face of B cell (0,1) in the source. The unique allowed upright placement of B is a three-column horizontal slide with zero vertical shift. Therefore the exact orange shape is placed to the right of A, with the marked cells adjacent at the same row. Every alternative contains a specific offset, shape, orientation, or cell-count violation.
A: Incorrect: B is one column too far right; the labeled connectors have an empty column between them. The printed candidate itself may not be edited.
B (correct): Correct: the source pieces are unchanged and upright. The blue X right-face and orange Y left-face cells are immediately adjacent at the same height, with no gap or forbidden overlap. The remaining contours also match both source pieces.
C: Incorrect: an extra orange cell was attached. The source piece cannot gain material during translation. The printed candidate itself may not be edited.
D: Incorrect: B was slid one grid row upward, so Y is not level with X even if other cells seem near the seam. The printed candidate itself may not be edited.
Question 29 of 30 · hard
Inspect both separately drawn pieces: the ladder-like A is fixed and the lower-armed B may translate only. X and Y must share their indicated facing boundary, with no gap or double occupancy. Select the one fully faithful assembly among the four drawings.
Show the answer
Answer: A
Keep blue A fixed. Marked X is the right face of cell (2,1) and Y is the left face of B cell (0,1) in the source. The unique allowed upright placement of B is a three-column horizontal slide with zero vertical shift. Therefore the exact orange shape is placed to the right of A, with the marked cells adjacent at the same row. Every alternative contains a specific offset, shape, orientation, or cell-count violation.
A (correct): Correct: the source pieces are unchanged and upright. The blue X right-face and orange Y left-face cells are immediately adjacent at the same height, with no gap or forbidden overlap. The remaining contours also match both source pieces.
B: Incorrect: B was slid one grid row downward, placing the specified Y face below the blue X face. The printed candidate itself may not be edited.
C: Incorrect: the orange source silhouette has been reflected horizontally. Translation cannot reverse its characteristic notch or arm. The printed candidate itself may not be edited.
D: Incorrect: an orange cell is absent. A correct assembly retains every original source cell. The printed candidate itself may not be edited.
Question 30 of 30 · hard
Blue A has the ladder-like outline; orange B has the double-stepped outline. Their X and Y side labels identify the exact join. Neither piece may turn or flip. Which choice keeps every cell and makes the labeled side-to-side connection?
Show the answer
Answer: C
Keep blue A fixed. Marked X is the right face of cell (2,1) and Y is the left face of B cell (0,1) in the source. The unique allowed upright placement of B is a three-column horizontal slide with zero vertical shift. Therefore the exact orange shape is placed to the right of A, with the marked cells adjacent at the same row. Every alternative contains a specific offset, shape, orientation, or cell-count violation.
A: Incorrect: B was shifted one column into the blue piece, creating overlap or putting Y on the wrong column rather than immediately to X’s right. The printed candidate itself may not be edited.
B: Incorrect: an extra orange cell was attached. The source piece cannot gain material during translation. The printed candidate itself may not be edited.
C (correct): Correct: the source pieces are unchanged and upright. The blue X right-face and orange Y left-face cells are immediately adjacent at the same height, with no gap or forbidden overlap. The remaining contours also match both source pieces.
D: Incorrect: B is one column too far right; the labeled connectors have an empty column between them. The printed candidate itself may not be edited.
The left box shows two shapes, each with a lettered point, and a line with the same two letters on its ends. Which figure shows how the shapes connect when each end of the line is attached to the point with the same letter?
Show the answer
Answer: C
Check one letter at a time. Point X is at a corner where the roof meets a wall of the house shape, and point Y is at the middle of a side of the diamond. Cross out any figure where either end of the line lands somewhere else or where a shape has changed. The shapes may be turned, so find each point by its place on the shape (corner, middle of a side, center), not by up, down, left or right.
A: The line ends in the wrong place: it meets the house shape at a bottom corner, but point X is at a corner where the roof meets a wall and it meets the diamond at the center, but point Y is at the middle of a side.
B: The line ends in the wrong place: it meets the diamond at the center, but point Y is at the middle of a side.
C (correct): The line joins a corner where the roof meets a wall of the house shape to the middle of a side of the diamond, the same spots as points X and Y in the left box; turning a shape does not move a point on it.
D: The line ends in the wrong place: it meets the house shape at the middle of a wall, but point X is at a corner where the roof meets a wall.
Practice 2 of 40 · medium
The left box shows two shapes, each with a lettered point, and a line with the same two letters on its ends. Which figure shows how the shapes connect when each end of the line is attached to the point with the same letter?
Show the answer
Answer: A
Check one letter at a time. Point V is at the right-angle corner of the right triangle, and point W is at the middle of the short side of the trapezoid. Cross out any figure where either end of the line lands somewhere else or where a shape has changed. The shapes may be turned, so find each point by its place on the shape (corner, middle of a side, center), not by up, down, left or right.
A (correct): The line joins the right-angle corner of the right triangle to the middle of the short side of the trapezoid, the same spots as points V and W in the left box; turning a shape does not move a point on it.
B: The line ends in the wrong place: it meets the right triangle at the middle of the shorter leg, but point V is at the right-angle corner and it meets the trapezoid at the middle of the long side, but point W is at the middle of the short side.
C: The line ends in the wrong place: it meets the trapezoid at a corner of the long side, but point W is at the middle of the short side.
D: The line ends in the wrong place: it meets the right triangle at the sharpest corner, but point V is at the right-angle corner.
Practice 3 of 40 · medium
The left box shows two shapes, each with a lettered point, and a line with the same two letters on its ends. Which figure shows how the shapes connect when each end of the line is attached to the point with the same letter?
Show the answer
Answer: A
Check one letter at a time. Point K is at the middle of the bottom side of the house shape, and point L is at the middle of the short side of the trapezoid. Cross out any figure where either end of the line lands somewhere else or where a shape has changed. The shapes may be turned, so find each point by its place on the shape (corner, middle of a side, center), not by up, down, left or right.
A (correct): The line joins the middle of the bottom side of the house shape to the middle of the short side of the trapezoid, the same spots as points K and L in the left box; turning a shape does not move a point on it.
B: The line ends in the wrong place: it meets the trapezoid at a corner of the long side, but point L is at the middle of the short side.
C: The line ends in the wrong place: it meets the house shape at the peak of the roof, but point K is at the middle of the bottom side and it meets the trapezoid at the middle of a slanted side, but point L is at the middle of the short side.
D: The line ends in the wrong place: it meets the trapezoid at the middle of the long side, but point L is at the middle of the short side.
Practice 4 of 40 · easy
The left box shows two shapes, each with a lettered point, and a line with the same two letters on its ends. Which figure shows how the shapes connect when each end of the line is attached to the point with the same letter?
Show the answer
Answer: D
Check one letter at a time. Point X is at the center of the triangle, and point Y is at the middle of a side of the pentagon. Cross out any figure where either end of the line lands somewhere else or where a shape has changed. The shapes may be turned, so find each point by its place on the shape (corner, middle of a side, center), not by up, down, left or right.
A: The line ends in the wrong place: it meets the triangle at the middle of a side, but point X is at the center.
B: The line ends in the wrong place: it meets the triangle at the middle of a side, but point X is at the center and it meets the pentagon at the center, but point Y is at the middle of a side.
C: The line ends in the wrong place: it meets the pentagon at a corner, but point Y is at the middle of a side.
D (correct): The line joins the center of the triangle to the middle of a side of the pentagon, the same spots as points X and Y in the left box; turning a shape does not move a point on it.
Practice 5 of 40 · hard
The left box shows two shapes, each with a lettered point, and a line with the same two letters on its ends. Which figure shows how the shapes connect when each end of the line is attached to the point with the same letter?
Show the answer
Answer: B
Check one letter at a time. Point T is at the middle of a side of the hexagon, and point U is at the middle of the flat side of the half-circle. Cross out any figure where either end of the line lands somewhere else or where a shape has changed. The shapes may be turned, so find each point by its place on the shape (corner, middle of a side, center), not by up, down, left or right.
A: The line ends in the wrong place: it meets the half-circle at the top of the curved side, but point U is at the middle of the flat side.
B (correct): The line joins the middle of a side of the hexagon to the middle of the flat side of the half-circle, the same spots as points T and U in the left box; turning a shape does not move a point on it.
C: The line ends in the wrong place: it meets the half-circle at a corner of the flat side, but point U is at the middle of the flat side.
D: One of the shapes here is a pentagon, but the left box has a hexagon. Joining parts never changes a shape.
Practice 6 of 40 · hard
The left box shows two shapes, each with a lettered point, and a line with the same two letters on its ends. Which figure shows how the shapes connect when each end of the line is attached to the point with the same letter?
Show the answer
Answer: C
Check one letter at a time. Point G is at the middle of a side of the square, and point H is at the middle of the flat side of the half-circle. Cross out any figure where either end of the line lands somewhere else or where a shape has changed. The shapes may be turned, so find each point by its place on the shape (corner, middle of a side, center), not by up, down, left or right.
A: One of the shapes here is a diamond, but the left box has a square. Joining parts never changes a shape.
B: The line ends in the wrong place: it meets the half-circle at a corner of the flat side, but point H is at the middle of the flat side.
C (correct): The line joins the middle of a side of the square to the middle of the flat side of the half-circle, the same spots as points G and H in the left box; turning a shape does not move a point on it.
D: The line ends in the wrong place: it meets the square at a corner, but point G is at the middle of a side.
Practice 7 of 40 · hard
The left box shows two shapes, each with a lettered point, and a line with the same two letters on its ends. Which figure shows how the shapes connect when each end of the line is attached to the point with the same letter?
Show the answer
Answer: A
Check one letter at a time. Point G is at a wide corner of the parallelogram, and point H is at a corner of the flat side of the half-circle. Cross out any figure where either end of the line lands somewhere else or where a shape has changed. The shapes may be turned, so find each point by its place on the shape (corner, middle of a side, center), not by up, down, left or right.
A (correct): The line joins a wide corner of the parallelogram to a corner of the flat side of the half-circle, the same spots as points G and H in the left box; turning a shape does not move a point on it.
B: The line ends in the wrong place: it meets the parallelogram at the center, but point G is at a wide corner and it meets the half-circle at the middle of the flat side, but point H is at a corner of the flat side.
C: The line ends in the wrong place: it meets the half-circle at the top of the curved side, but point H is at a corner of the flat side.
D: The line ends in the wrong place: it meets the parallelogram at the center, but point G is at a wide corner.
Practice 8 of 40 · medium
The left box shows two shapes, each with a lettered point, and a line with the same two letters on its ends. Which figure shows how the shapes connect when each end of the line is attached to the point with the same letter?
Show the answer
Answer: D
Check one letter at a time. Point E is at the right-angle corner of the right triangle, and point F is at a corner of the triangle. Cross out any figure where either end of the line lands somewhere else or where a shape has changed. The shapes may be turned, so find each point by its place on the shape (corner, middle of a side, center), not by up, down, left or right.
A: The line ends in the wrong place: it meets the right triangle at the sharpest corner, but point E is at the right-angle corner.
B: The line ends in the wrong place: it meets the right triangle at the middle of the shorter leg, but point E is at the right-angle corner.
C: The line ends in the wrong place: it meets the right triangle at the middle of the slanted side, but point E is at the right-angle corner and it meets the triangle at the middle of a side, but point F is at a corner.
D (correct): The line joins the right-angle corner of the right triangle to a corner of the triangle, the same spots as points E and F in the left box; turning a shape does not move a point on it.
Practice 9 of 40 · hard
The left box shows two shapes, each with a lettered point, and a line with the same two letters on its ends. Which figure shows how the shapes connect when each end of the line is attached to the point with the same letter?
Show the answer
Answer: D
Check one letter at a time. Point E is at the middle of a short side of the rectangle, and point F is at a wide corner of the diamond. Cross out any figure where either end of the line lands somewhere else or where a shape has changed. The shapes may be turned, so find each point by its place on the shape (corner, middle of a side, center), not by up, down, left or right.
A: One of the shapes here is a parallelogram, but the left box has a rectangle. Joining parts never changes a shape.
B: The line ends in the wrong place: it meets the rectangle at a corner, but point E is at the middle of a short side.
C: The line ends in the wrong place: it meets the rectangle at the middle of a long side, but point E is at the middle of a short side.
D (correct): The line joins the middle of a short side of the rectangle to a wide corner of the diamond, the same spots as points E and F in the left box; turning a shape does not move a point on it.
Practice 10 of 40 · medium
The left box shows two shapes, each with a lettered point, and a line with the same two letters on its ends. Which figure shows how the shapes connect when each end of the line is attached to the point with the same letter?
Show the answer
Answer: B
Check one letter at a time. Point M is at the top of the curved side of the half-circle, and point N is at the peak of the roof of the house shape. Cross out any figure where either end of the line lands somewhere else or where a shape has changed. The shapes may be turned, so find each point by its place on the shape (corner, middle of a side, center), not by up, down, left or right.
A: The line ends in the wrong place: it meets the half-circle at the middle of the flat side, but point M is at the top of the curved side and it meets the house shape at a bottom corner, but point N is at the peak of the roof.
B (correct): The line joins the top of the curved side of the half-circle to the peak of the roof of the house shape, the same spots as points M and N in the left box; turning a shape does not move a point on it.
C: The line ends in the wrong place: it meets the half-circle at a corner of the flat side, but point M is at the top of the curved side.
D: The line ends in the wrong place: it meets the house shape at the middle of a wall, but point N is at the peak of the roof.
Practice 11 of 40 · easy
The left box shows two shapes, each with a lettered point, and a line with the same two letters on its ends. Which figure shows how the shapes connect when each end of the line is attached to the point with the same letter?
Show the answer
Answer: A
Check one letter at a time. Point X is at the center of the pentagon, and point Y is at the middle of a long side of the parallelogram. Cross out any figure where either end of the line lands somewhere else or where a shape has changed. The shapes may be turned, so find each point by its place on the shape (corner, middle of a side, center), not by up, down, left or right.
A (correct): The line joins the center of the pentagon to the middle of a long side of the parallelogram, the same spots as points X and Y in the left box; turning a shape does not move a point on it.
B: The line ends in the wrong place: it meets the pentagon at a corner, but point X is at the center and it meets the parallelogram at a wide corner, but point Y is at the middle of a long side.
C: The line ends in the wrong place: it meets the parallelogram at a sharp corner, but point Y is at the middle of a long side.
D: The line ends in the wrong place: it meets the parallelogram at the middle of a short side, but point Y is at the middle of a long side.
Practice 12 of 40 · medium
The left box shows two shapes, each with a lettered point, and a line with the same two letters on its ends. Which figure shows how the shapes connect when each end of the line is attached to the point with the same letter?
Show the answer
Answer: D
Check one letter at a time. Point R is at the top of the curved side of the half-circle, and point S is at the middle of a long side of the rectangle. Cross out any figure where either end of the line lands somewhere else or where a shape has changed. The shapes may be turned, so find each point by its place on the shape (corner, middle of a side, center), not by up, down, left or right.
A: The line ends in the wrong place: it meets the rectangle at the middle of a short side, but point S is at the middle of a long side.
B: One of the shapes here is a parallelogram, but the left box has a rectangle. Joining parts never changes a shape.
C: The line ends in the wrong place: it meets the half-circle at the middle of the flat side, but point R is at the top of the curved side.
D (correct): The line joins the top of the curved side of the half-circle to the middle of a long side of the rectangle, the same spots as points R and S in the left box; turning a shape does not move a point on it.
Practice 13 of 40 · medium
The left box shows two shapes, each with a lettered point, and a line with the same two letters on its ends. Which figure shows how the shapes connect when each end of the line is attached to the point with the same letter?
Show the answer
Answer: D
Check one letter at a time. Point J is at the middle of the shorter leg of the right triangle, and point K is at the top of the curved side of the half-circle. Cross out any figure where either end of the line lands somewhere else or where a shape has changed. The shapes may be turned, so find each point by its place on the shape (corner, middle of a side, center), not by up, down, left or right.
A: The line ends in the wrong place: it meets the right triangle at the middle of the longer leg, but point J is at the middle of the shorter leg and it meets the half-circle at a corner of the flat side, but point K is at the top of the curved side.
B: The line ends in the wrong place: it meets the half-circle at the middle of the flat side, but point K is at the top of the curved side.
C: The line ends in the wrong place: it meets the right triangle at the right-angle corner, but point J is at the middle of the shorter leg.
D (correct): The line joins the middle of the shorter leg of the right triangle to the top of the curved side of the half-circle, the same spots as points J and K in the left box; turning a shape does not move a point on it.
Practice 14 of 40 · medium
The left box shows two shapes, each with a lettered point, and a line with the same two letters on its ends. Which figure shows how the shapes connect when each end of the line is attached to the point with the same letter?
Show the answer
Answer: C
Check one letter at a time. Point E is at the middle of a side of the diamond, and point F is at the center of the rectangle. Cross out any figure where either end of the line lands somewhere else or where a shape has changed. The shapes may be turned, so find each point by its place on the shape (corner, middle of a side, center), not by up, down, left or right.
A: The line ends in the wrong place: it meets the rectangle at the middle of a long side, but point F is at the center.
B: The line ends in the wrong place: it meets the diamond at a wide corner, but point E is at the middle of a side.
C (correct): The line joins the middle of a side of the diamond to the center of the rectangle, the same spots as points E and F in the left box; turning a shape does not move a point on it.
D: One of the shapes here is a square, but the left box has a diamond. Joining parts never changes a shape.
Practice 15 of 40 · hard
The left box shows two shapes, each with a lettered point, and a line with the same two letters on its ends. Which figure shows how the shapes connect when each end of the line is attached to the point with the same letter?
Show the answer
Answer: A
Check one letter at a time. Point V is at a wide corner of the diamond, and point W is at a corner of the short side of the trapezoid. Cross out any figure where either end of the line lands somewhere else or where a shape has changed. The shapes may be turned, so find each point by its place on the shape (corner, middle of a side, center), not by up, down, left or right.
A (correct): The line joins a wide corner of the diamond to a corner of the short side of the trapezoid, the same spots as points V and W in the left box; turning a shape does not move a point on it.
B: The line ends in the wrong place: it meets the diamond at a sharp corner, but point V is at a wide corner and it meets the trapezoid at the middle of a slanted side, but point W is at a corner of the short side.
C: The line ends in the wrong place: it meets the trapezoid at the middle of the long side, but point W is at a corner of the short side.
D: The line ends in the wrong place: it meets the trapezoid at the middle of a slanted side, but point W is at a corner of the short side.
Practice 16 of 40 · medium
The left box shows two shapes, each with a lettered point, and a line with the same two letters on its ends. Which figure shows how the shapes connect when each end of the line is attached to the point with the same letter?
Show the answer
Answer: C
Check one letter at a time. Point M is at the middle of a side of the pentagon, and point N is at the peak of the roof of the house shape. Cross out any figure where either end of the line lands somewhere else or where a shape has changed. The shapes may be turned, so find each point by its place on the shape (corner, middle of a side, center), not by up, down, left or right.
A: The line ends in the wrong place: it meets the pentagon at the center, but point M is at the middle of a side.
B: One of the shapes here is a hexagon, but the left box has a pentagon. Joining parts never changes a shape.
C (correct): The line joins the middle of a side of the pentagon to the peak of the roof of the house shape, the same spots as points M and N in the left box; turning a shape does not move a point on it.
D: The line ends in the wrong place: it meets the house shape at the middle of the bottom side, but point N is at the peak of the roof.
Practice 17 of 40 · hard
The left box shows two shapes, each with a lettered point, and a line with the same two letters on its ends. Which figure shows how the shapes connect when each end of the line is attached to the point with the same letter?
Show the answer
Answer: A
Check one letter at a time. Point K is at a corner of the flat side of the half-circle, and point L is at the center of the square. Cross out any figure where either end of the line lands somewhere else or where a shape has changed. The shapes may be turned, so find each point by its place on the shape (corner, middle of a side, center), not by up, down, left or right.
A (correct): The line joins a corner of the flat side of the half-circle to the center of the square, the same spots as points K and L in the left box; turning a shape does not move a point on it.
B: The line ends in the wrong place: it meets the half-circle at the middle of the flat side, but point K is at a corner of the flat side.
C: The line ends in the wrong place: it meets the square at a corner, but point L is at the center.
D: One of the shapes here is a rectangle, but the left box has a square. Joining parts never changes a shape.
Practice 18 of 40 · hard
The left box shows two shapes, each with a lettered point, and a line with the same two letters on its ends. Which figure shows how the shapes connect when each end of the line is attached to the point with the same letter?
Show the answer
Answer: D
Check one letter at a time. Point J is at the middle of the shorter leg of the right triangle, and point K is at the middle of a side of the triangle. Cross out any figure where either end of the line lands somewhere else or where a shape has changed. The shapes may be turned, so find each point by its place on the shape (corner, middle of a side, center), not by up, down, left or right.
A: The line ends in the wrong place: it meets the right triangle at the middle of the slanted side, but point J is at the middle of the shorter leg and it meets the triangle at the center, but point K is at the middle of a side.
B: The line ends in the wrong place: it meets the triangle at the center, but point K is at the middle of a side.
C: The line ends in the wrong place: it meets the triangle at a corner, but point K is at the middle of a side.
D (correct): The line joins the middle of the shorter leg of the right triangle to the middle of a side of the triangle, the same spots as points J and K in the left box; turning a shape does not move a point on it.
Practice 19 of 40 · medium
The left box shows two shapes, each with a lettered point, and a line with the same two letters on its ends. Which figure shows how the shapes connect when each end of the line is attached to the point with the same letter?
Show the answer
Answer: A
Check one letter at a time. Point J is at the center of the rectangle, and point K is at a corner of the square. Cross out any figure where either end of the line lands somewhere else or where a shape has changed. The shapes may be turned, so find each point by its place on the shape (corner, middle of a side, center), not by up, down, left or right.
A (correct): The line joins the center of the rectangle to a corner of the square, the same spots as points J and K in the left box; turning a shape does not move a point on it.
B: The line ends in the wrong place: it meets the rectangle at the middle of a short side, but point J is at the center.
C: The line ends in the wrong place: it meets the rectangle at a corner, but point J is at the center.
D: One of the shapes here is a parallelogram, but the left box has a rectangle. Joining parts never changes a shape.
Practice 20 of 40 · hard
The left box shows two shapes, each with a lettered point, and a line with the same two letters on its ends. Which figure shows how the shapes connect when each end of the line is attached to the point with the same letter?
Show the answer
Answer: D
Check one letter at a time. Point G is at the middle of a side of the square, and point H is at the center of the diamond. Cross out any figure where either end of the line lands somewhere else or where a shape has changed. The shapes may be turned, so find each point by its place on the shape (corner, middle of a side, center), not by up, down, left or right.
A: The line ends in the wrong place: it meets the diamond at the middle of a side, but point H is at the center.
B: The line ends in the wrong place: it meets the square at the center, but point G is at the middle of a side.
C: The line ends in the wrong place: it meets the square at a corner, but point G is at the middle of a side and it meets the diamond at a wide corner, but point H is at the center.
D (correct): The line joins the middle of a side of the square to the center of the diamond, the same spots as points G and H in the left box; turning a shape does not move a point on it.
Practice 21 of 40 · easy
The left box shows two shapes, each with a lettered point, and a line with the same two letters on its ends. Which figure shows how the shapes connect when each end of the line is attached to the point with the same letter?
Show the answer
Answer: B
Check one letter at a time. Point E is at a wide corner of the diamond, and point F is at a corner of the square. Cross out any figure where either end of the line lands somewhere else or where a shape has changed. The shapes may be turned, so find each point by its place on the shape (corner, middle of a side, center), not by up, down, left or right.
A: The line ends in the wrong place: it meets the square at the center, but point F is at a corner.
B (correct): The line joins a wide corner of the diamond to a corner of the square, the same spots as points E and F in the left box; turning a shape does not move a point on it.
C: The line ends in the wrong place: it meets the diamond at a sharp corner, but point E is at a wide corner and it meets the square at the middle of a side, but point F is at a corner.
D: The line ends in the wrong place: it meets the diamond at a sharp corner, but point E is at a wide corner.
Practice 22 of 40 · medium
The left box shows two shapes, each with a lettered point, and a line with the same two letters on its ends. Which figure shows how the shapes connect when each end of the line is attached to the point with the same letter?
Show the answer
Answer: B
Check one letter at a time. Point V is at the center of the parallelogram, and point W is at a corner where the roof meets a wall of the house shape. Cross out any figure where either end of the line lands somewhere else or where a shape has changed. The shapes may be turned, so find each point by its place on the shape (corner, middle of a side, center), not by up, down, left or right.
A: One of the shapes here is a rectangle, but the left box has a parallelogram. Joining parts never changes a shape.
B (correct): The line joins the center of the parallelogram to a corner where the roof meets a wall of the house shape, the same spots as points V and W in the left box; turning a shape does not move a point on it.
C: The line ends in the wrong place: it meets the house shape at a bottom corner, but point W is at a corner where the roof meets a wall.
D: The line ends in the wrong place: it meets the parallelogram at the middle of a short side, but point V is at the center.
Practice 23 of 40 · medium
The left box shows two shapes, each with a lettered point, and a line with the same two letters on its ends. Which figure shows how the shapes connect when each end of the line is attached to the point with the same letter?
Show the answer
Answer: C
Check one letter at a time. Point M is at a corner of the rectangle, and point N is at the center of the pentagon. Cross out any figure where either end of the line lands somewhere else or where a shape has changed. The shapes may be turned, so find each point by its place on the shape (corner, middle of a side, center), not by up, down, left or right.
A: The line ends in the wrong place: it meets the pentagon at a corner, but point N is at the center.
B: The line ends in the wrong place: it meets the rectangle at the center, but point M is at a corner.
C (correct): The line joins a corner of the rectangle to the center of the pentagon, the same spots as points M and N in the left box; turning a shape does not move a point on it.
D: One of the shapes here is a hexagon, but the left box has a pentagon. Joining parts never changes a shape.
Practice 24 of 40 · easy
The left box shows two shapes, each with a lettered point, and a line with the same two letters on its ends. Which figure shows how the shapes connect when each end of the line is attached to the point with the same letter?
Show the answer
Answer: A
Check one letter at a time. Point G is at the center of the triangle, and point H is at the middle of the flat side of the half-circle. Cross out any figure where either end of the line lands somewhere else or where a shape has changed. The shapes may be turned, so find each point by its place on the shape (corner, middle of a side, center), not by up, down, left or right.
A (correct): The line joins the center of the triangle to the middle of the flat side of the half-circle, the same spots as points G and H in the left box; turning a shape does not move a point on it.
B: The line ends in the wrong place: it meets the triangle at a corner, but point G is at the center and it meets the half-circle at the top of the curved side, but point H is at the middle of the flat side.
C: The line ends in the wrong place: it meets the triangle at the middle of a side, but point G is at the center.
D: The line ends in the wrong place: it meets the triangle at a corner, but point G is at the center.
Practice 25 of 40 · medium
The left box shows two shapes, each with a lettered point, and a line with the same two letters on its ends. Which figure shows how the shapes connect when each end of the line is attached to the point with the same letter?
Show the answer
Answer: A
Check one letter at a time. Point G is at the middle of a side of the square, and point H is at the middle of a side of the pentagon. Cross out any figure where either end of the line lands somewhere else or where a shape has changed. The shapes may be turned, so find each point by its place on the shape (corner, middle of a side, center), not by up, down, left or right.
A (correct): The line joins the middle of a side of the square to the middle of a side of the pentagon, the same spots as points G and H in the left box; turning a shape does not move a point on it.
B: The line ends in the wrong place: it meets the pentagon at the center, but point H is at the middle of a side.
C: The line ends in the wrong place: it meets the square at a corner, but point G is at the middle of a side.
D: One of the shapes here is a hexagon, but the left box has a pentagon. Joining parts never changes a shape.
Practice 26 of 40 · easy
The left box shows two shapes, each with a lettered point, and a line with the same two letters on its ends. Which figure shows how the shapes connect when each end of the line is attached to the point with the same letter?
Show the answer
Answer: C
Check one letter at a time. Point T is at the middle of the longer leg of the right triangle, and point U is at the middle of a side of the hexagon. Cross out any figure where either end of the line lands somewhere else or where a shape has changed. The shapes may be turned, so find each point by its place on the shape (corner, middle of a side, center), not by up, down, left or right.
A: The line ends in the wrong place: it meets the right triangle at the sharpest corner, but point T is at the middle of the longer leg.
B: The line ends in the wrong place: it meets the right triangle at the right-angle corner, but point T is at the middle of the longer leg.
C (correct): The line joins the middle of the longer leg of the right triangle to the middle of a side of the hexagon, the same spots as points T and U in the left box; turning a shape does not move a point on it.
D: The line ends in the wrong place: it meets the right triangle at the middle of the shorter leg, but point T is at the middle of the longer leg and it meets the hexagon at the center, but point U is at the middle of a side.
Practice 27 of 40 · medium
The left box shows two shapes, each with a lettered point, and a line with the same two letters on its ends. Which figure shows how the shapes connect when each end of the line is attached to the point with the same letter?
Show the answer
Answer: B
Check one letter at a time. Point T is at a corner where the roof meets a wall of the house shape, and point U is at the middle of a side of the hexagon. Cross out any figure where either end of the line lands somewhere else or where a shape has changed. The shapes may be turned, so find each point by its place on the shape (corner, middle of a side, center), not by up, down, left or right.
A: The line ends in the wrong place: it meets the house shape at the middle of the bottom side, but point T is at a corner where the roof meets a wall.
B (correct): The line joins a corner where the roof meets a wall of the house shape to the middle of a side of the hexagon, the same spots as points T and U in the left box; turning a shape does not move a point on it.
C: One of the shapes here is a pentagon, but the left box has a hexagon. Joining parts never changes a shape.
D: The line ends in the wrong place: it meets the hexagon at a corner, but point U is at the middle of a side.
Practice 28 of 40 · medium
The left box shows two shapes, each with a lettered point, and a line with the same two letters on its ends. Which figure shows how the shapes connect when each end of the line is attached to the point with the same letter?
Show the answer
Answer: B
Check one letter at a time. Point M is at the middle of a side of the triangle, and point N is at the center of the diamond. Cross out any figure where either end of the line lands somewhere else or where a shape has changed. The shapes may be turned, so find each point by its place on the shape (corner, middle of a side, center), not by up, down, left or right.
A: The line ends in the wrong place: it meets the diamond at a wide corner, but point N is at the center.
B (correct): The line joins the middle of a side of the triangle to the center of the diamond, the same spots as points M and N in the left box; turning a shape does not move a point on it.
C: The line ends in the wrong place: it meets the diamond at the middle of a side, but point N is at the center.
D: One of the shapes here is a square, but the left box has a diamond. Joining parts never changes a shape.
Practice 29 of 40 · easy
The left box shows two shapes, each with a lettered point, and a line with the same two letters on its ends. Which figure shows how the shapes connect when each end of the line is attached to the point with the same letter?
Show the answer
Answer: C
Check one letter at a time. Point P is at the center of the pentagon, and point Q is at the center of the hexagon. Cross out any figure where either end of the line lands somewhere else or where a shape has changed. The shapes may be turned, so find each point by its place on the shape (corner, middle of a side, center), not by up, down, left or right.
A: The line ends in the wrong place: it meets the pentagon at the middle of a side, but point P is at the center and it meets the hexagon at a corner, but point Q is at the center.
B: The line ends in the wrong place: it meets the pentagon at the middle of a side, but point P is at the center.
C (correct): The line joins the center of the pentagon to the center of the hexagon, the same spots as points P and Q in the left box; turning a shape does not move a point on it.
D: The line ends in the wrong place: it meets the pentagon at a corner, but point P is at the center.
Practice 30 of 40 · medium
The left box shows two shapes, each with a lettered point, and a line with the same two letters on its ends. Which figure shows how the shapes connect when each end of the line is attached to the point with the same letter?
Show the answer
Answer: D
Check one letter at a time. Point V is at the middle of a side of the triangle, and point W is at a wide corner of the diamond. Cross out any figure where either end of the line lands somewhere else or where a shape has changed. The shapes may be turned, so find each point by its place on the shape (corner, middle of a side, center), not by up, down, left or right.
A: The line ends in the wrong place: it meets the triangle at the center, but point V is at the middle of a side and it meets the diamond at the middle of a side, but point W is at a wide corner.
B: The line ends in the wrong place: it meets the diamond at the center, but point W is at a wide corner.
C: The line ends in the wrong place: it meets the triangle at a corner, but point V is at the middle of a side.
D (correct): The line joins the middle of a side of the triangle to a wide corner of the diamond, the same spots as points V and W in the left box; turning a shape does not move a point on it.
Practice 31 of 40 · medium
The left box shows two shapes, each with a lettered point, and a line with the same two letters on its ends. Which figure shows how the shapes connect when each end of the line is attached to the point with the same letter?
Show the answer
Answer: B
Check one letter at a time. Point V is at the middle of a side of the square, and point W is at the top of the curved side of the half-circle. Cross out any figure where either end of the line lands somewhere else or where a shape has changed. The shapes may be turned, so find each point by its place on the shape (corner, middle of a side, center), not by up, down, left or right.
A: The line ends in the wrong place: it meets the half-circle at a corner of the flat side, but point W is at the top of the curved side.
B (correct): The line joins the middle of a side of the square to the top of the curved side of the half-circle, the same spots as points V and W in the left box; turning a shape does not move a point on it.
C: The line ends in the wrong place: it meets the square at a corner, but point V is at the middle of a side.
D: One of the shapes here is a diamond, but the left box has a square. Joining parts never changes a shape.
Practice 32 of 40 · medium
The left box shows two shapes, each with a lettered point, and a line with the same two letters on its ends. Which figure shows how the shapes connect when each end of the line is attached to the point with the same letter?
Show the answer
Answer: B
Check one letter at a time. Point R is at the middle of a side of the pentagon, and point S is at a corner of the square. Cross out any figure where either end of the line lands somewhere else or where a shape has changed. The shapes may be turned, so find each point by its place on the shape (corner, middle of a side, center), not by up, down, left or right.
A: The line ends in the wrong place: it meets the square at the middle of a side, but point S is at a corner.
B (correct): The line joins the middle of a side of the pentagon to a corner of the square, the same spots as points R and S in the left box; turning a shape does not move a point on it.
C: One of the shapes here is a hexagon, but the left box has a pentagon. Joining parts never changes a shape.
D: The line ends in the wrong place: it meets the pentagon at the center, but point R is at the middle of a side.
Practice 33 of 40 · easy
The left box shows two shapes, each with a lettered point, and a line with the same two letters on its ends. Which figure shows how the shapes connect when each end of the line is attached to the point with the same letter?
Show the answer
Answer: D
Check one letter at a time. Point G is at the center of the square, and point H is at a bottom corner of the house shape. Cross out any figure where either end of the line lands somewhere else or where a shape has changed. The shapes may be turned, so find each point by its place on the shape (corner, middle of a side, center), not by up, down, left or right.
A: The line ends in the wrong place: it meets the house shape at the middle of a wall, but point H is at a bottom corner.
B: The line ends in the wrong place: it meets the square at the middle of a side, but point G is at the center and it meets the house shape at the middle of the bottom side, but point H is at a bottom corner.
C: The line ends in the wrong place: it meets the square at the middle of a side, but point G is at the center.
D (correct): The line joins the center of the square to a bottom corner of the house shape, the same spots as points G and H in the left box; turning a shape does not move a point on it.
Practice 34 of 40 · hard
The left box shows two shapes, each with a lettered point, and a line with the same two letters on its ends. Which figure shows how the shapes connect when each end of the line is attached to the point with the same letter?
Show the answer
Answer: D
Check one letter at a time. Point V is at the middle of the flat side of the half-circle, and point W is at the middle of a side of the triangle. Cross out any figure where either end of the line lands somewhere else or where a shape has changed. The shapes may be turned, so find each point by its place on the shape (corner, middle of a side, center), not by up, down, left or right.
A: The line ends in the wrong place: it meets the triangle at the center, but point W is at the middle of a side.
B: The line ends in the wrong place: it meets the half-circle at a corner of the flat side, but point V is at the middle of the flat side.
C: The line ends in the wrong place: it meets the half-circle at the top of the curved side, but point V is at the middle of the flat side.
D (correct): The line joins the middle of the flat side of the half-circle to the middle of a side of the triangle, the same spots as points V and W in the left box; turning a shape does not move a point on it.
Practice 35 of 40 · easy
The left box shows two shapes, each with a lettered point, and a line with the same two letters on its ends. Which figure shows how the shapes connect when each end of the line is attached to the point with the same letter?
Show the answer
Answer: C
Check one letter at a time. Point P is at a sharp corner of the parallelogram, and point Q is at the center of the diamond. Cross out any figure where either end of the line lands somewhere else or where a shape has changed. The shapes may be turned, so find each point by its place on the shape (corner, middle of a side, center), not by up, down, left or right.
A: The line ends in the wrong place: it meets the parallelogram at the middle of a long side, but point P is at a sharp corner.
B: The line ends in the wrong place: it meets the parallelogram at the center, but point P is at a sharp corner and it meets the diamond at a wide corner, but point Q is at the center.
C (correct): The line joins a sharp corner of the parallelogram to the center of the diamond, the same spots as points P and Q in the left box; turning a shape does not move a point on it.
D: The line ends in the wrong place: it meets the parallelogram at the center, but point P is at a sharp corner.
Practice 36 of 40 · hard
The left box shows two shapes, each with a lettered point, and a line with the same two letters on its ends. Which figure shows how the shapes connect when each end of the line is attached to the point with the same letter?
Show the answer
Answer: C
Check one letter at a time. Point T is at the middle of a side of the hexagon, and point U is at a corner of the long side of the trapezoid. Cross out any figure where either end of the line lands somewhere else or where a shape has changed. The shapes may be turned, so find each point by its place on the shape (corner, middle of a side, center), not by up, down, left or right.
A: The line ends in the wrong place: it meets the trapezoid at the middle of a slanted side, but point U is at a corner of the long side.
B: One of the shapes here is a pentagon, but the left box has a hexagon. Joining parts never changes a shape.
C (correct): The line joins the middle of a side of the hexagon to a corner of the long side of the trapezoid, the same spots as points T and U in the left box; turning a shape does not move a point on it.
D: The line ends in the wrong place: it meets the trapezoid at a corner of the short side, but point U is at a corner of the long side.
Practice 37 of 40 · medium
The left box shows two shapes, each with a lettered point, and a line with the same two letters on its ends. Which figure shows how the shapes connect when each end of the line is attached to the point with the same letter?
Show the answer
Answer: A
Check one letter at a time. Point R is at the middle of the longer leg of the right triangle, and point S is at the middle of a long side of the parallelogram. Cross out any figure where either end of the line lands somewhere else or where a shape has changed. The shapes may be turned, so find each point by its place on the shape (corner, middle of a side, center), not by up, down, left or right.
A (correct): The line joins the middle of the longer leg of the right triangle to the middle of a long side of the parallelogram, the same spots as points R and S in the left box; turning a shape does not move a point on it.
B: The line ends in the wrong place: it meets the parallelogram at a wide corner, but point S is at the middle of a long side.
C: One of the shapes here is a rectangle, but the left box has a parallelogram. Joining parts never changes a shape.
D: The line ends in the wrong place: it meets the right triangle at the middle of the slanted side, but point R is at the middle of the longer leg.
Practice 38 of 40 · medium
The left box shows two shapes, each with a lettered point, and a line with the same two letters on its ends. Which figure shows how the shapes connect when each end of the line is attached to the point with the same letter?
Show the answer
Answer: B
Check one letter at a time. Point J is at a corner of the flat side of the half-circle, and point K is at the middle of the long side of the trapezoid. Cross out any figure where either end of the line lands somewhere else or where a shape has changed. The shapes may be turned, so find each point by its place on the shape (corner, middle of a side, center), not by up, down, left or right.
A: The line ends in the wrong place: it meets the half-circle at the middle of the flat side, but point J is at a corner of the flat side and it meets the trapezoid at the middle of the short side, but point K is at the middle of the long side.
B (correct): The line joins a corner of the flat side of the half-circle to the middle of the long side of the trapezoid, the same spots as points J and K in the left box; turning a shape does not move a point on it.
C: The line ends in the wrong place: it meets the half-circle at the top of the curved side, but point J is at a corner of the flat side.
D: The line ends in the wrong place: it meets the trapezoid at a corner of the long side, but point K is at the middle of the long side.
Practice 39 of 40 · medium
The left box shows two shapes, each with a lettered point, and a line with the same two letters on its ends. Which figure shows how the shapes connect when each end of the line is attached to the point with the same letter?
Show the answer
Answer: B
Check one letter at a time. Point X is at the center of the pentagon, and point Y is at a wide corner of the parallelogram. Cross out any figure where either end of the line lands somewhere else or where a shape has changed. The shapes may be turned, so find each point by its place on the shape (corner, middle of a side, center), not by up, down, left or right.
A: The line ends in the wrong place: it meets the parallelogram at a sharp corner, but point Y is at a wide corner.
B (correct): The line joins the center of the pentagon to a wide corner of the parallelogram, the same spots as points X and Y in the left box; turning a shape does not move a point on it.
C: The line ends in the wrong place: it meets the parallelogram at the middle of a short side, but point Y is at a wide corner.
D: One of the shapes here is a hexagon, but the left box has a pentagon. Joining parts never changes a shape.
Practice 40 of 40 · easy
The left box shows two shapes, each with a lettered point, and a line with the same two letters on its ends. Which figure shows how the shapes connect when each end of the line is attached to the point with the same letter?
Show the answer
Answer: C
Check one letter at a time. Point X is at a wide corner of the diamond, and point Y is at the middle of the bottom side of the house shape. Cross out any figure where either end of the line lands somewhere else or where a shape has changed. The shapes may be turned, so find each point by its place on the shape (corner, middle of a side, center), not by up, down, left or right.
A: The line ends in the wrong place: it meets the diamond at the center, but point X is at a wide corner and it meets the house shape at a bottom corner, but point Y is at the middle of the bottom side.
B: The line ends in the wrong place: it meets the diamond at the middle of a side, but point X is at a wide corner.
C (correct): The line joins a wide corner of the diamond to the middle of the bottom side of the house shape, the same spots as points X and Y in the left box; turning a shape does not move a point on it.
D: The line ends in the wrong place: it meets the house shape at the peak of the roof, but point Y is at the middle of the bottom side.
About this test
Explanations accompany every item. They name the specific flaw in each rejected choice, which helps you learn to give one decisive reason per rejection rather than relying on a general feeling that something looks off.
Read your result as feedback on your elimination order. If you missed items with mirrors, review the handedness test and rotation versus reflection; if gaps and overlaps caught you, revisit the sections on missing blocks, false joins and double occupancy. A second attempt after review shows whether the method has stuck.
The same 124 lessons, 6,516 questions and 82 timed practice tests on your phone, plus flashcards with spaced review and progress tracking. Free to download, and it works offline.
 ASVAB Camp
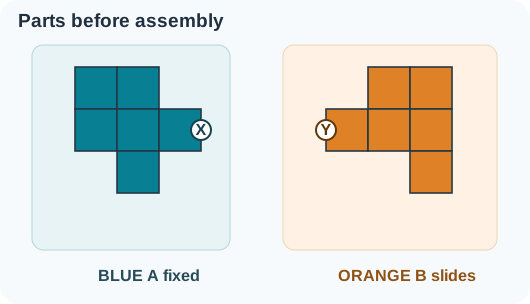
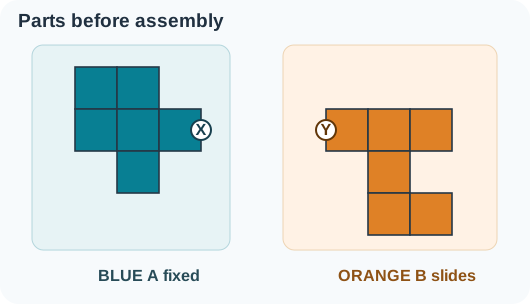
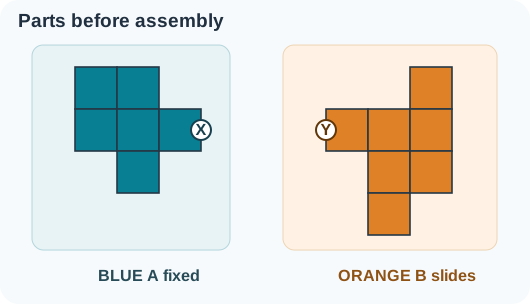
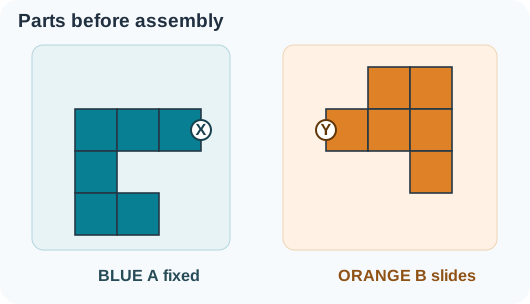
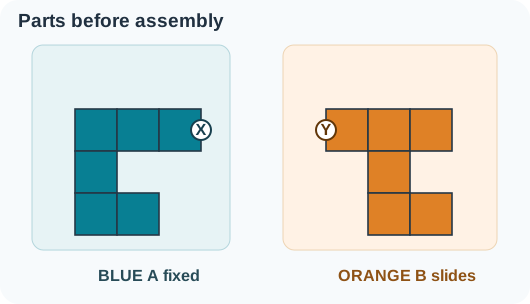
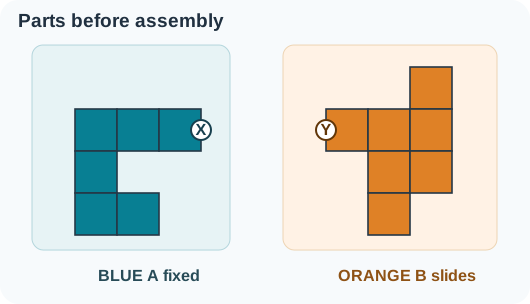
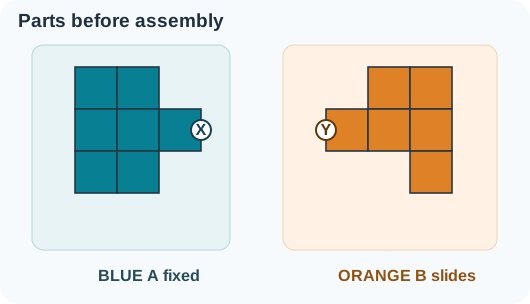
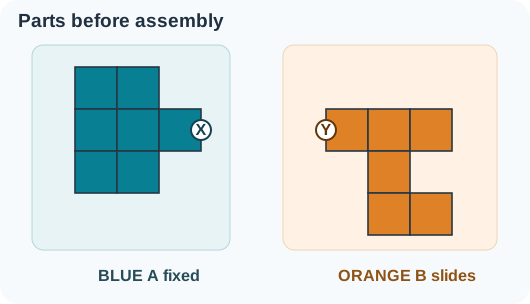
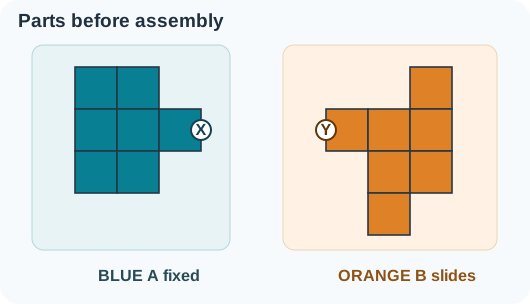
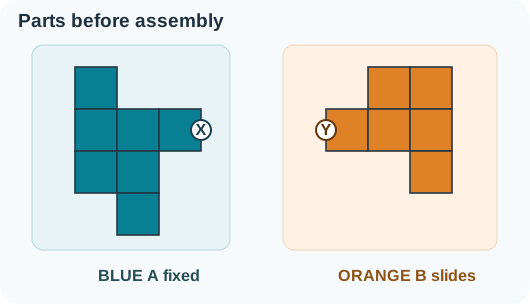
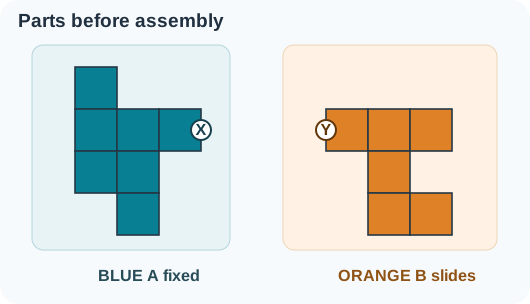
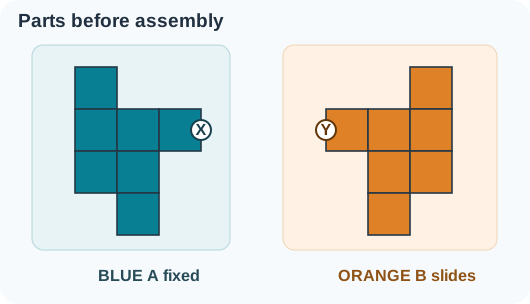
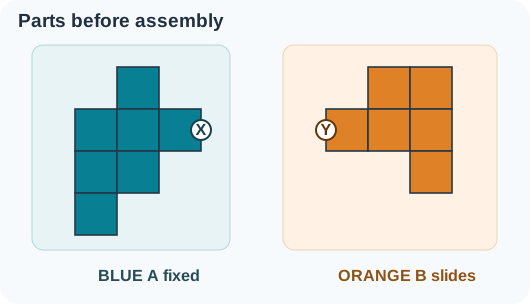
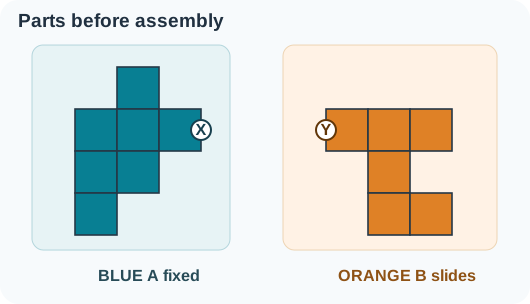
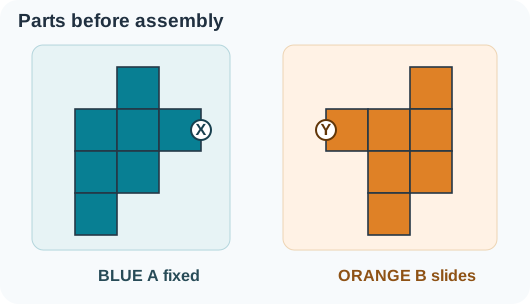
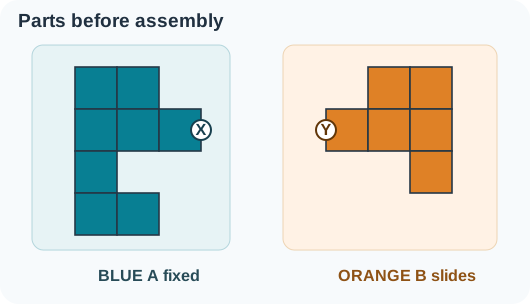
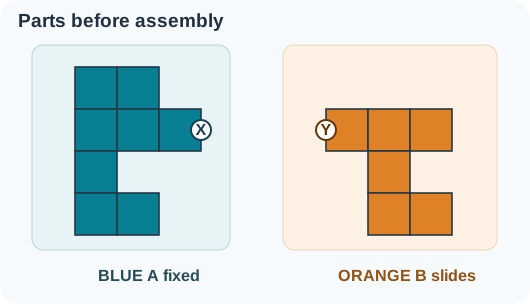
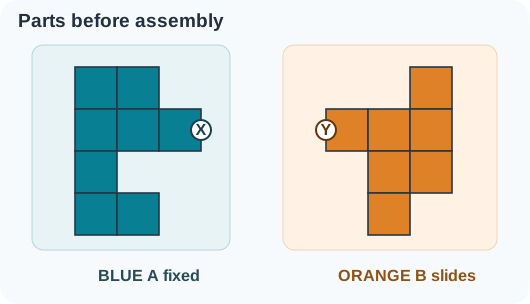
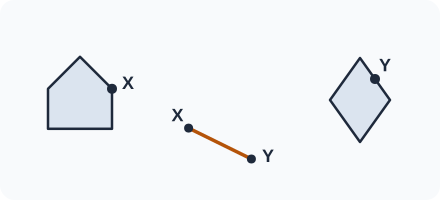
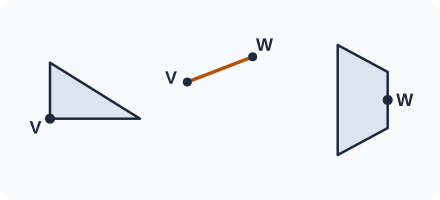
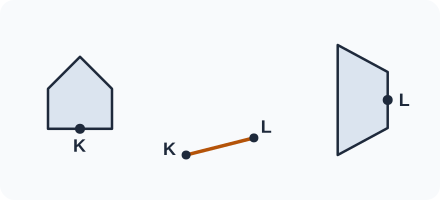
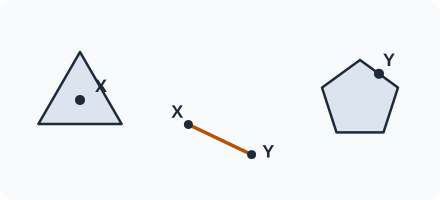
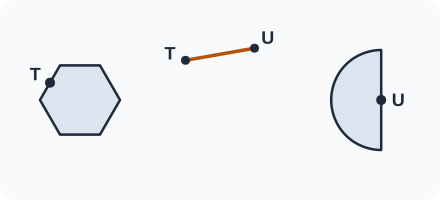
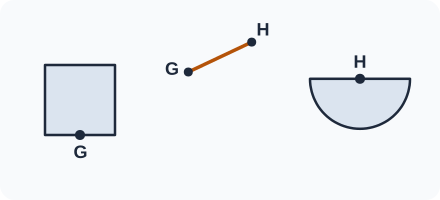
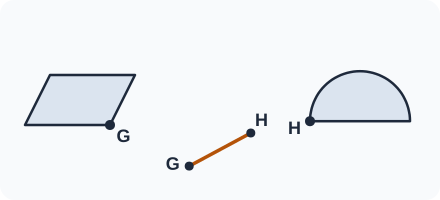
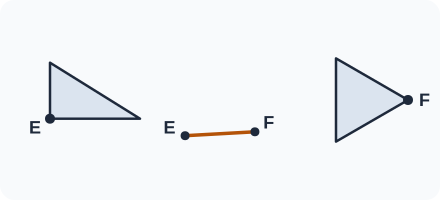
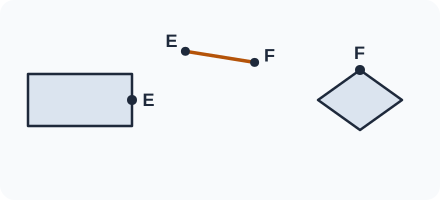
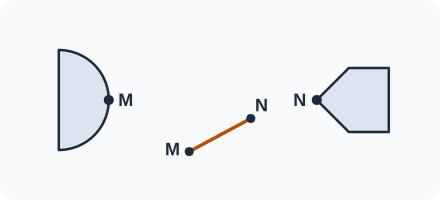
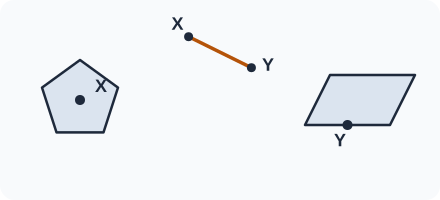
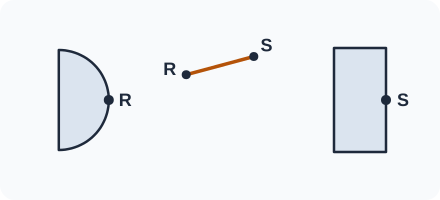
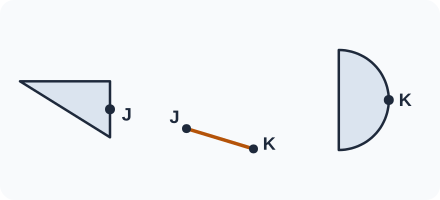
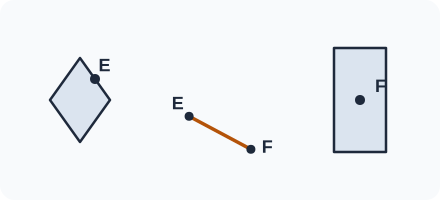
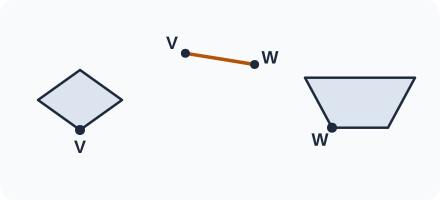
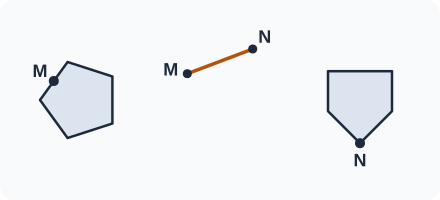
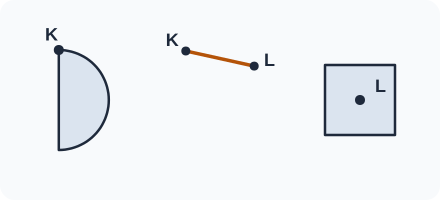
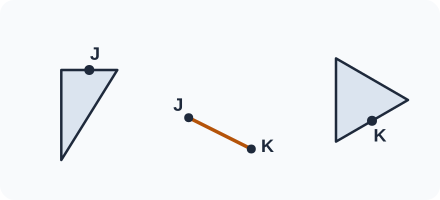
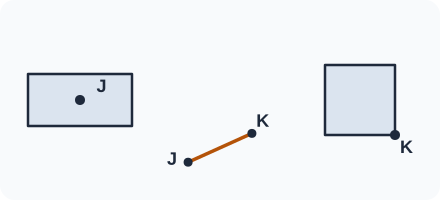
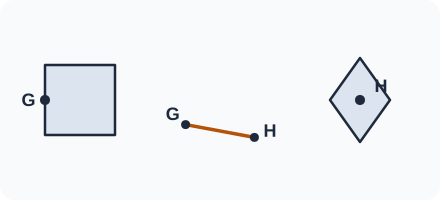
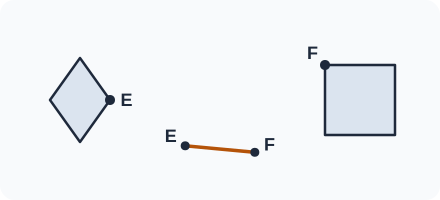
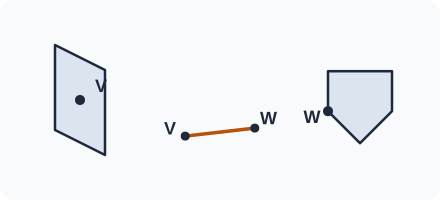
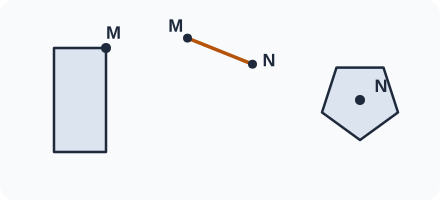
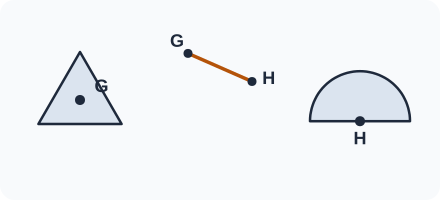
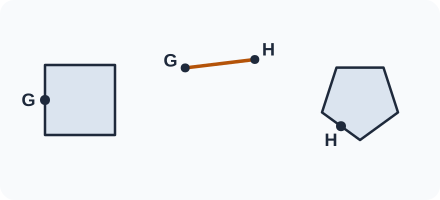
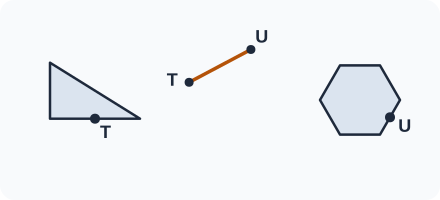
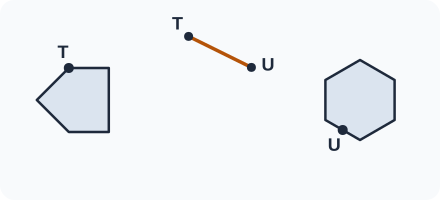
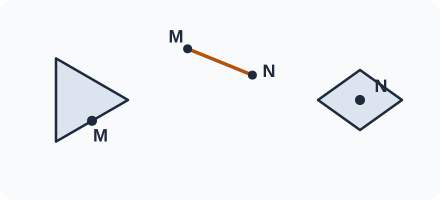
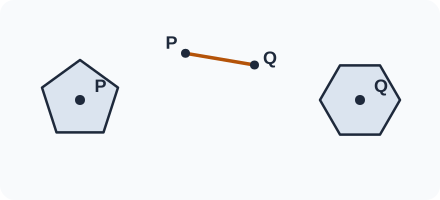
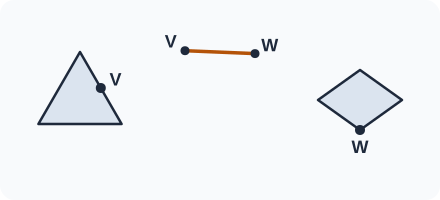
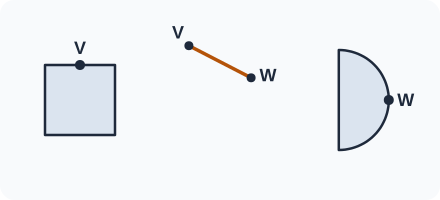
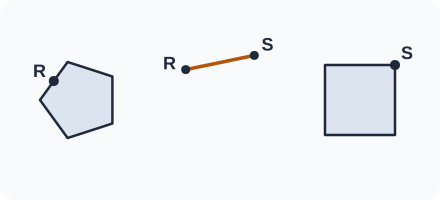
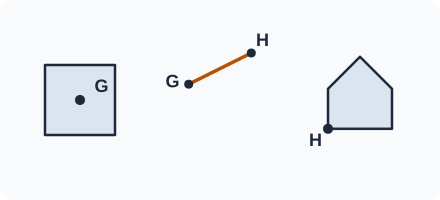
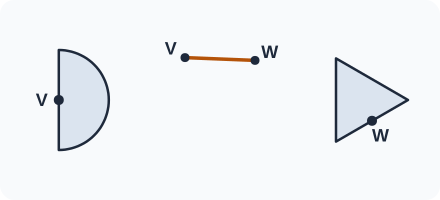
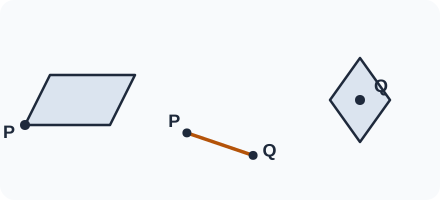
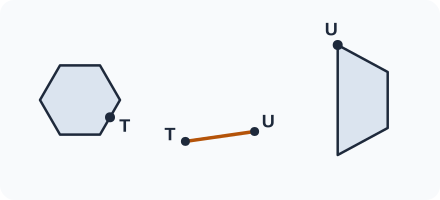
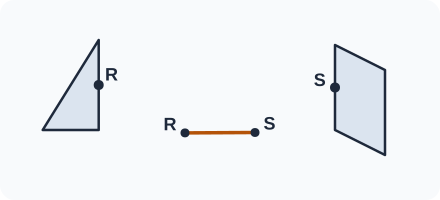
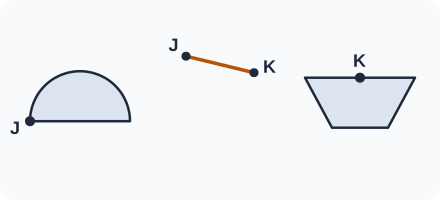
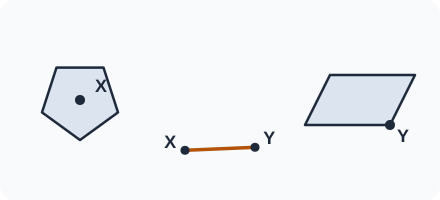
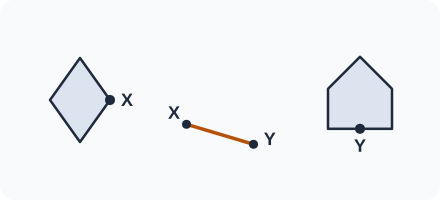
 English ▾