 ASVAB Camp
Objectives and the Mechanical Comprehension connection
By the end of this lesson you should be able to name the fulcrum, effort and load on any lever drawing and sort the lever into first, second or third class. You will compute the turning effect of a force, find the effort or distance that balances a bar, and work out ideal mechanical advantage, actual mechanical advantage and efficiency. You will also predict how far each end moves. The Mechanical Comprehension test leans on these skills in pictures of bars, handles, seesaws and hand tools, and it often checks whether you understand that a lever trades force for distance rather than creating energy.
Identify the three essential parts
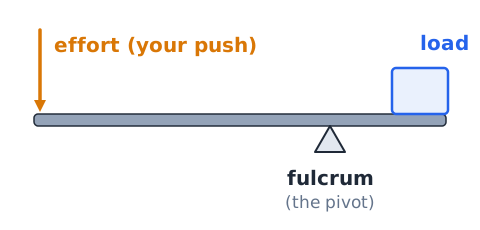
Every lever has three parts. The fulcrum is the fixed point the bar turns around. The effort is the push or pull you supply. The load is the resistance the lever works against, such as a rock, a lid or a weight. On a diagram, find the fulcrum first, since it is usually drawn as a triangle or hinge. Then look for the arrow you control (effort) and the object being moved (load). Naming those three positions correctly is the starting point for every lever question.
Why a rigid lever helps
A lever works because the bar is stiff. When you push one part of a rigid bar, the whole bar turns together around the fulcrum, so your push is carried to another place on the bar. If the bar bent like a rubber strip, most of your motion would go into flexing it and very little would reach the load. A stiff bar also lets you choose where to push. Pushing farther from the fulcrum gives a bigger turning effect, so a modest hand force can control a much heavier load placed close to the pivot.
Moment and torque have the same basic role
The turning effect of a force about a pivot is called its moment, and in many settings the same idea is called torque. Both are found by multiplying the force by its perpendicular distance from the pivot.
Here F is the force in newtons and d is the distance in meters, so the unit is the newton-meter, written N·m. A 45 N push applied 0.20 m from a hinge gives
N·m of turning effect.
The perpendicular distance rule
The distance used in a moment calculation is not just any distance. It is the shortest, perpendicular distance from the pivot to the line along which the force acts, called the moment arm. When you push straight across a bar at right angles, the moment arm equals the distance along the bar. For example, an 80 N pull at the end of a 25 cm wrench, applied at a right angle, gives
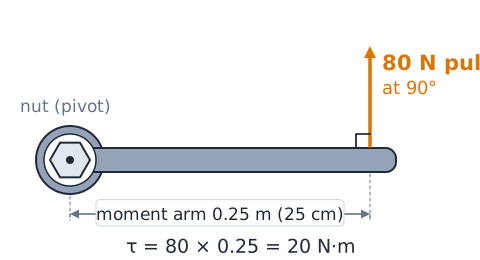
Double the moment arm with the same force and the torque doubles too.
Force angle changes turning effect
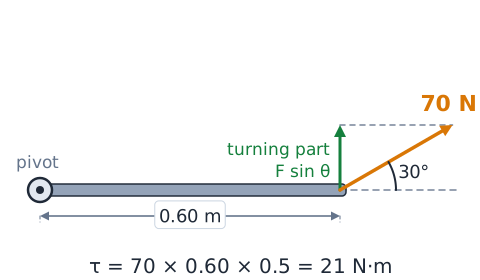
If the force is not at a right angle to the bar, only part of it turns the bar. The torque becomes
where is the angle between the force and the bar. At 90 degrees,
and you get the full turning effect. At 0 degrees the force points along the bar and the torque is zero. A 70 N pull at 0.60 m and 30 degrees gives
N·m.
Clockwise and counterclockwise signs
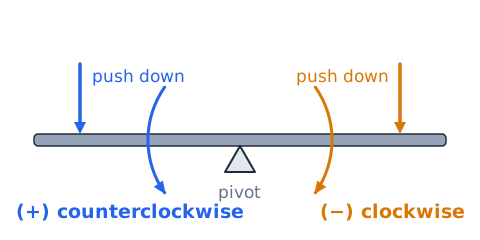
Moments have direction as well as size. A force that tends to turn the bar the way clock hands move produces a clockwise moment; one that turns it the other way produces a counterclockwise moment. Pick one direction as positive, commonly counterclockwise, and make the other negative. Then add all the moments with their signs. If the total is zero, the bar has no tendency to start rotating. Keeping signs straight prevents the common mistake of adding two moments that actually oppose each other. On a level beam, a downward force on the right of the pivot turns it clockwise, and a downward force on the left turns it counterclockwise.
Static equilibrium requires two conditions
A rigid bar held still must meet two conditions at once. First, the forces must cancel, so the bar does not slide or lift away:
Second, the moments about any point must cancel, so the bar does not start to rotate:
Meeting only one is not enough. Two equal and opposite forces applied at different points can cancel as forces yet still twist the bar. A balanced lever problem uses both conditions: moments to find the effort, forces to find the support reaction.
Equal moments do not mean equal forces
At balance the moments on each side are equal, but the forces usually are not. Suppose a 150 N load sits 0.40 m from a pivot. Its moment is
A 60 N effort placed 1.0 m from the pivot on the other side also gives 60 N·m, so the bar balances. The smaller force works because it acts at a larger distance. Force and distance swap roles, but their product matches.
First-class levers: fulcrum in the middle
In a first-class lever, the fulcrum sits between the effort and the load, so the order along the bar is effort, fulcrum, load. Pushing down on one side lifts the other side, which means a first-class lever reverses direction. Whether it multiplies force depends on where the fulcrum is placed. If the effort side is longer, you gain force. If the load side is longer, you gain speed and distance instead. Equal arms give no force gain but still flip the direction, as with a simple balance scale.
First-class lever in a seesaw
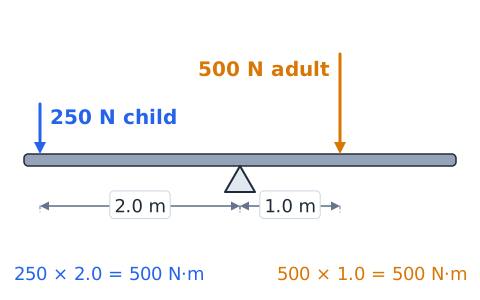
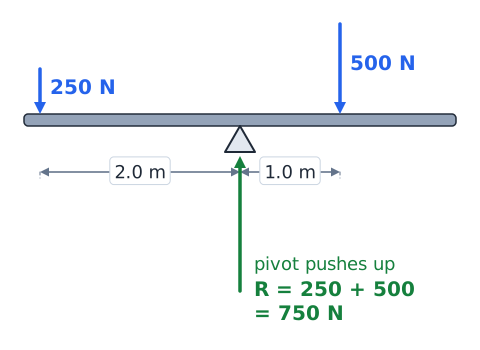
A seesaw with a central pivot is a classic first-class lever. Two riders balance when their moments match:
A 250 N child sitting 2.0 m from the pivot makes 500 N·m. A 500 N adult balances the child by sitting 1.0 m from the pivot on the other side, since
N·m. The heavier rider moves closer to the center. This is the same reasoning used for any balance problem on the test.
First-class lever in a pry bar
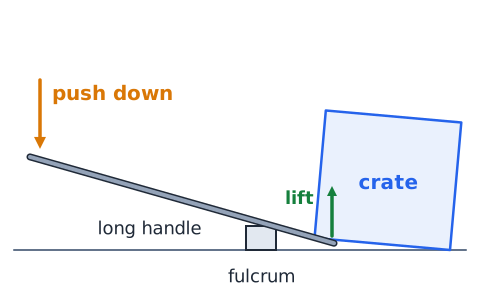
A pry bar lifting the edge of a heavy crate is also first class. The bar rests on a small block or the floor, which is the fulcrum. The short tip slides under the crate, and your hands push down on the long handle. Because the handle is many times longer than the tip, a moderate push becomes a large lifting force under the crate. The trade-off is motion: your hands travel a long way down while the crate edge rises only a little. Moving the fulcrum closer to the crate improves the force gain further.
Second-class levers: load in the middle
In a second-class lever, the load sits between the fulcrum and the effort, so the order is fulcrum, load, effort. The effort is always farther from the fulcrum than the load, which means the effort arm is longer than the load arm. As a result, a second-class lever always gives a force advantage greater than 1 in the ideal case. It does not reverse direction: lifting the effort end lifts the load too. Wheelbarrows, nutcrackers and bottle openers are common examples.
Wheelbarrow moment calculation
In a wheelbarrow, the wheel axle is the fulcrum, the cargo is the load and your hands lift the handles. Suppose 450 N of cargo sits 0.50 m from the axle and your hands are 1.5 m from it. Balance the moments:
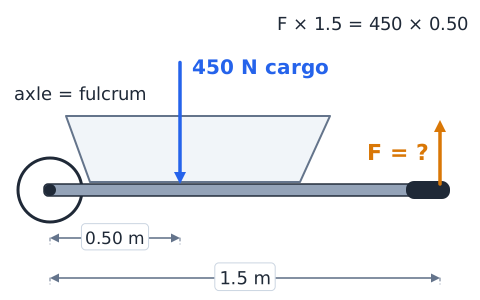
You lift only a third of the load, ignoring the barrow's own weight.
Nutcracker as a second-class lever
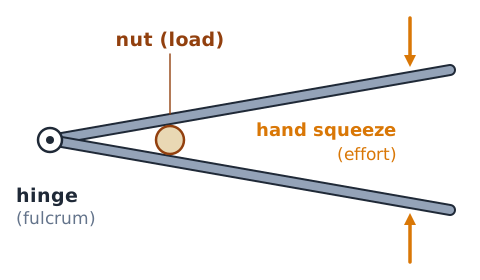
A common nutcracker has two arms joined by a hinge at one end. The nut sits partway along the arms, and you squeeze near the free ends. Hinge, nut, hand: that order makes each arm a second-class lever. Because your hand is much farther from the hinge than the nut, your squeeze is multiplied into a much larger crushing force on the shell. If you move the nut closer to the hinge, it cracks more easily. If you squeeze nearer the hinge instead of at the ends, you lose much of that advantage.
Third-class levers: effort in the middle
In a third-class lever, the effort is applied between the fulcrum and the load, so the order is fulcrum, effort, load. Now the load is the farthest point from the fulcrum, so the effort arm is shorter than the load arm. The ideal force advantage is always less than 1: you must push harder than the load you move. What you gain is speed and range of motion at the load end. Brooms, fishing rods, tongs and many body joints work this way.
Forearm as a third-class lever
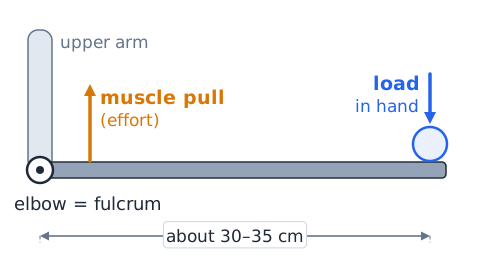
A simple model of your arm treats the elbow as the fulcrum. The biceps muscle attaches to the forearm a few centimeters from the elbow and pulls upward, while the object in your hand is about 30 to 35 cm away. Elbow, muscle, hand gives fulcrum, effort, load, so the forearm is a third-class lever. The muscle must pull with several times the weight of the object, but a small shortening of the muscle swings the hand through a large arc quickly. The body trades force for speed and reach.
Why tweezers often trade force for distance
Tweezers are two arms joined at one end. You press near the middle and the tips grip at the far ends, so the order is hinge, finger, tips: a third-class lever. The tip force is smaller than your finger force, which is exactly what you want for delicate work like removing a splinter. A small movement of your fingers opens and closes the tips over a wider gap, and the reduced force makes it harder to crush whatever you are holding. Food tongs and many grippers follow the same plan.
A fast test for lever classification
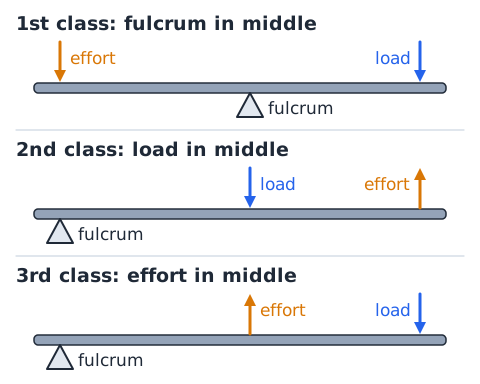
To classify a lever quickly, ask one question: what is in the middle? If the fulcrum is between the other two, it is first class. If the load is in the middle, it is second class. If the effort is in the middle, it is third class. A handy memory aid is F, L, E for 1, 2, 3: the middle item is Fulcrum, Load or Effort. Ignore the tool's name, its size and which way it points. Only the order of the three points along the bar decides the class.
A lever can be mirrored without changing class
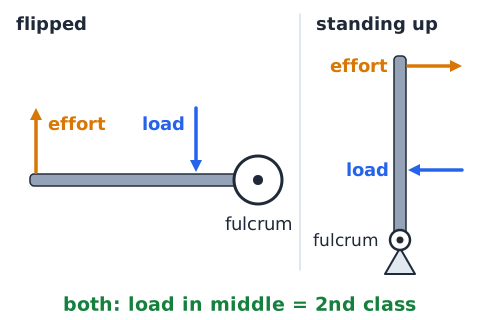
A diagram can be flipped left to right, turned upside down or rotated, and the lever class stays the same. A wheelbarrow drawn with its wheel on the right is still fulcrum, load, effort when read from the wheel, so it remains second class. Test questions sometimes draw a lever pointing an unfamiliar way or standing vertically to see if you rely on picture habits. Read the order of the three points from either end; the middle item is the same both ways. Orientation changes how the picture looks, not the physics.
Mechanical advantage is a ratio of forces
Mechanical advantage tells you how many times a machine multiplies your force. Actual mechanical advantage uses measured forces:
If a lever lifts a 600 N load while you push with 150 N, its actual mechanical advantage is
It has no units because newtons cancel. A value above 1 means force is multiplied; below 1 means force is reduced in exchange for more movement.
Ideal lever advantage comes from arm lengths
For a frictionless, rigid lever, the mechanical advantage depends only on geometry. The ideal mechanical advantage is
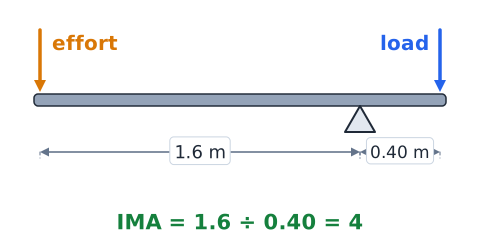
where each d is a perpendicular distance from the fulcrum. A lever with a 1.6 m effort arm and a 0.40 m load arm has an IMA of
Effort needed is the load divided by the IMA.
Long effort arm reduces required effort
Holding everything else fixed, the effort you need is inversely proportional to the effort arm. Double the effort arm and the effort is cut in half; triple it and the effort drops to one third. That is why mechanics slip a pipe over a stuck wrench handle, why door handles sit on the side away from the hinges, and why long-handled loppers cut thick branches that short shears cannot. The load and its distance have not changed, so the moment you must supply is the same. You simply supply it with a smaller force at a larger distance.
Moving the fulcrum changes leverage
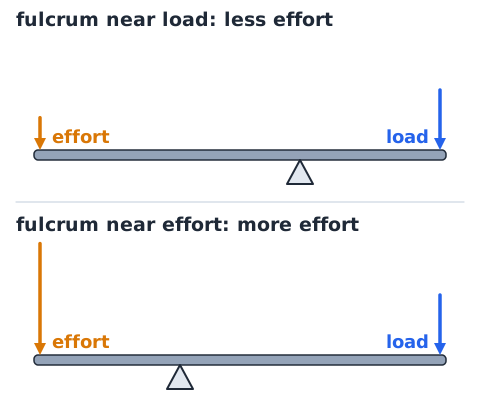
On a first-class lever, the position of the fulcrum sets the trade-off. Slide the fulcrum toward the load and the load arm shrinks while the effort arm grows, so less effort is needed but your hands must move farther. Slide it toward the effort and the opposite happens: more force is needed, but the load end moves farther and faster. The load's weight itself never changes; only the force you must apply does. If the fulcrum sits exactly in the middle, effort equals load.
An ideal lever cannot manufacture work
A lever can multiply force, but it cannot multiply work. Work is force times the distance moved along the force:
In an ideal lever, the work you put in equals the work done on the load. If you push with 100 N through 0.50 m, you supply 50 J. A lever with an IMA of 4 can lift a 400 N load, but only through 0.125 m, and
Force went up by four, distance went down by four.
Displacement ratio for the same rotation
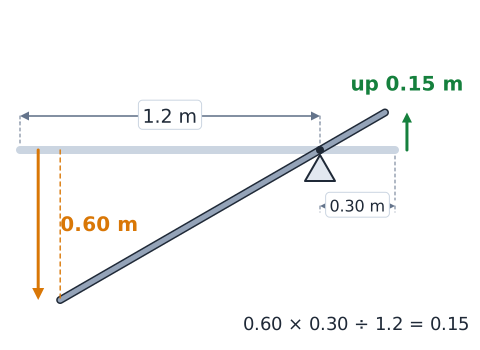
Every point on a rigid lever turns through the same angle. For a small rotation, each point travels a distance proportional to how far it is from the fulcrum:
With a 1.2 m effort arm and a 0.30 m load arm, pushing the handle down 0.60 m raises the load
Lever force and motion are reciprocal
Force gain and distance gain always pull in opposite directions. If a lever multiplies force by 5, the load end moves one fifth as far as the effort end. If a lever moves the load end 5 times as far, the load force is one fifth of the effort. You never get both at once from a simple lever. On the test, if a choice says a lever both increases force and increases the distance the load moves, rule it out. This reciprocal link is just the work rule seen from two sides.
Why actual mechanical advantage is smaller
Real levers lose some effort to friction at the pivot, to the bar flexing and to the bar's own weight. So the measured force gain is lower than geometry predicts:
For example, a lever with an IMA of 5 might deliver an actual mechanical advantage of only 4 because part of the effort is spent overcoming friction. The ideal value is an upper limit, not a promise of what you will measure.
Estimate efficiency from an idealized comparison
Efficiency compares what you actually get with what an ideal machine would give. For a lever, one quick form is
If a lever's arms give an IMA of 6 and measurements show an AMA of 4.8, the efficiency is
or 80 percent. Efficiency of a real machine is always below 100 percent.
Levers and the fulcrum reaction
The fulcrum does not just sit there; it pushes back. In a balanced lever, the support at the pivot provides whatever force is needed to make the total force zero. On a seesaw with two riders pushing down, the pivot pushes up with a force equal to both of their weights combined. On a wheelbarrow, the ground pushes up on the wheel with the load minus the lift from your hands. A useful check: after finding the effort from moments, use the force balance to find the pivot reaction.
Lever self-weight and its center of gravity
Real bars have weight, and that weight can matter. For a uniform bar, treat its whole weight as acting at its center, halfway along the length. If the pivot is not at the center, the bar's own weight creates a moment equal to the bar weight times the distance from the pivot to the center. That moment can help or hurt you depending on which side the center lies. A long, heavy plank pivoted near one end needs a noticeable effort just to hold itself level before any load is added.
Load position within a wheelbarrow
Where you put cargo in a wheelbarrow changes how hard it is to lift. Loading heavy material toward the front, over the wheel, shortens the load arm and reduces the force on your hands. Piling it near the handles lengthens the load arm, so you must lift more, and in the extreme the load sits almost at your hands. Workers often load bricks or soil forward for this reason. The total weight is the same either way; only its distance from the axle changes the effort.
Center of mass with several loads
Several loads on one side can be replaced by a single total load acting at a weighted average position:
A 60 N load at 0.30 m and a 40 N load at 0.80 m act together like 100 N at
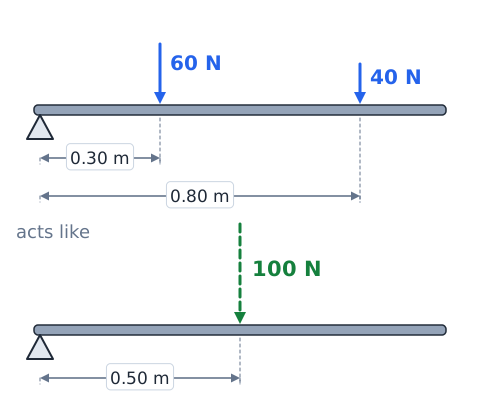
The combined position lies closer to the heavier load.
Distinguish moment arm from total handle length
The effort arm is the distance from the fulcrum to where the effort acts, not the full length of the tool. If you grip a 1.0 m pry bar halfway along its handle, your effort arm is shorter than the bar. Likewise, a wrench gives less torque if you hold it near the nut. On a diagram, measure from the pivot to the force arrow, and from the pivot to the load, using perpendicular distances. Distances printed for the whole bar may need to be split into two pieces.
Torque at the pivot is zero for a pivot force
Any force that acts right at the pivot has a moment arm of zero, so it produces no torque about that point. That is why the fulcrum reaction does not appear in a moment balance taken about the fulcrum. It is a helpful shortcut: choosing the pivot as your reference point removes the unknown support force from the moment equation, leaving only the effort and the load to compare.
Torque in opposite directions can balance
Two torques can cancel if they turn the bar in opposite directions. A load on the left of a pivot tends to rotate a level bar counterclockwise; an effort pushing down on the right tends to rotate it clockwise. When those two moments are equal in size, the net torque is zero and the bar stays still. Torques in the same direction add up instead. Before computing, mark each force with its turning direction.
Equal arms and equal loads
When the fulcrum is at the exact center and equal weights sit at equal distances on each side, the two moments are the same size and opposite in direction. The net moment is zero, and the bar balances. This is how a traditional pan balance compares an unknown mass with known masses. It also shows that a centered first-class lever has an ideal mechanical advantage of exactly 1: no force gain, no distance gain, only a reversal of direction. Any change in either weight or either distance tips the bar toward the larger moment.
A longer bar can be ineffective
A longer bar only helps if the extra length lengthens the effort arm. Grabbing a long bar near the pivot wastes the length. If the extra length ends up on the load side instead, it can make the job harder. A bar that bends noticeably also loses effectiveness, because some of your push goes into flexing it, and the angle between your push and the bar can drift away from 90 degrees. Length is only one factor; where you push, where the fulcrum sits and how stiff the bar is matter just as much.
First-class geometry does not guarantee gain
Many people assume every first-class lever multiplies force. It only does if the effort arm is longer than the load arm. Suppose the fulcrum sits closer to the effort: effort arm 0.30 m, load arm 0.60 m.
Now you must push twice as hard as the load. In exchange, the load end moves twice as far, which can be useful for throwing or signaling.
Second-class geometry favors force
In every second-class lever, the load sits between the fulcrum and the effort. The effort is therefore always the farthest point from the fulcrum, so its arm is always longer than the load arm. That guarantees an ideal mechanical advantage above 1. The price is that the load moves less than your hands and in the same direction. When a question asks which arrangement will always reduce the effort needed, the second-class lever is the safe answer.
Third-class geometry favors reach
A third-class lever puts the effort between the fulcrum and the load, so the effort arm is always shorter than the load arm. Its ideal mechanical advantage is always below 1. That sounds like a bad deal, but the load end moves farther and faster than the effort point. A baseball bat, a hockey stick or a shovel swung with one hand near the end and the other partway down gives the far end high speed. Tweezers and tongs use the reduced force for gentle control.
Tool examples are context dependent
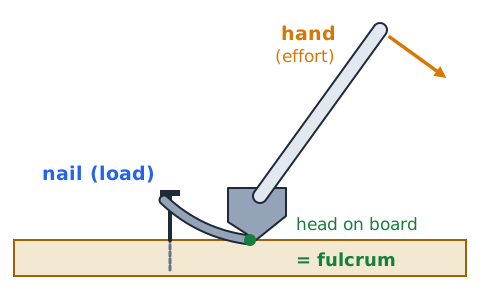
The same tool can be different lever classes depending on how it is used. A claw hammer pulling a nail is first class: the head rests on the board as a fulcrum, the nail is on one side and your hand on the other. Swinging that hammer from your wrist is closer to third class. A shovel lifting soil with one hand near the blade end acting as a pivot is not the same as prying with it on a rock. On the test, ignore the name of the tool and look at where the pivot, the effort and the load actually are in the picture.
Compound levers multiply stages
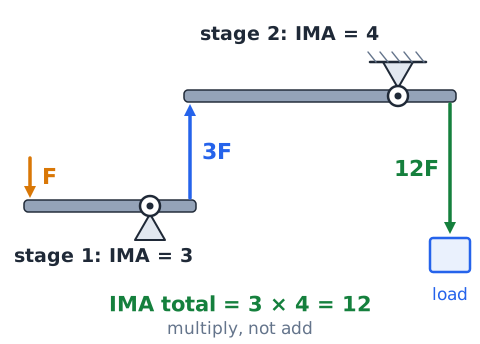
A compound lever links two or more levers so the output of one becomes the input of the next. The overall ideal advantage is the product of the stages:
Nail clippers and some heavy-duty cutters work this way. If one stage gives an advantage of 3 and the next gives 4, the combination gives
Multiply; do not add.
A pair of scissors has changing leverage
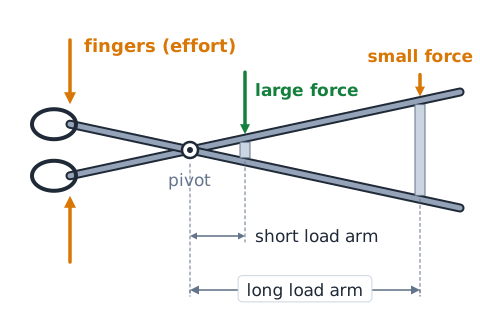
Scissors are two first-class levers sharing one pivot. Your fingers push on the handles on one side of the pivot, and the blades cut on the other side. The cutting point slides along the blades as you close them. When the material is near the pivot, the load arm is short, so the cutting force is largest. Near the tips, the load arm is long and the cutting force is smallest. That is why you move thick cardboard deep into the jaws close to the hinge instead of trying to cut it with the tips.
Crowbar versus screwdriver handle
A crowbar and a screwdriver both multiply force, but in different ways. The crowbar is a straight lever: a long handle on one side of a fulcrum against a short tip on the other, so the gain comes from the ratio of those two arms. A screwdriver handle acts like a wheel on an axle, where the effort arm is the handle radius and the load arm is the much smaller tip radius. A fatter handle gives more twisting force at the screw. Using a screwdriver to pry open a paint can turns it into a first-class lever, with the can rim as the fulcrum.
Units for length must be consistent
Moment calculations require all distances in the same unit. If one arm is given in centimeters and the other in meters, convert before you compare them. In a ratio such as IMA, both distances can be in centimeters, since the units cancel. In a torque value meant to be in N·m, distances must be in meters. Mixing units is a frequent source of answers that are off by a factor of 100, which test writers like to include as a distractor.
Convert centimeters before torque arithmetic
To get torque in newton-meters, change centimeters to meters by dividing by 100. A 120 N force applied at right angles 35 cm from a pivot:
Using 35 directly would give 4,200, which is wrong by a factor of 100.
Pounds of force are not kilograms
Kilograms measure mass, the amount of matter. Newtons and pounds measure force, including weight. To find the weight of a mass in newtons, multiply by gravitational acceleration, about 9.8 m/s squared, often rounded to 10 on tests. A 15 kg sandbag weighs about 147 N, or 150 N with the rounded value. Moments must use forces, so convert masses to weights first. In US customary units, pounds already measure force, and torque is given in pound-feet or pound-inches.
Torque and energy have different meanings
Torque and work can both be written as force times distance, and both can come out in newton-meters, but they are different quantities. In torque, the distance is the moment arm, measured perpendicular to the force, and it describes a twisting tendency even when nothing moves. In work, the distance is how far the force moves along its own direction, and the result is energy, measured in joules. A bolt held tight by 40 N·m of torque may not be moving at all, so no work is being done on it.
Lever input power and speed
Power is the rate of doing work:
where v is the speed of the point where force F acts. If you push a lever handle with 80 N while it moves at 0.50 m/s, your input power is
An ideal lever passes that same power to the load, so a slow, strong output and a fast, weak output carry equal power.
A handle's movement can surprise you
People are often surprised by how far a handle must travel. A lever with an advantage of 10 needs the handle to move ten times as far as the load. To lift a car jack's pad 5 cm with such a lever, your hand must travel 50 cm, which is why jacks use many short strokes. In the other direction, a third-class lever can make a small hand motion send the far end swinging much farther than expected, which matters for safety when using long poles near power lines or people.
Load distance is not the same as lever length
The load arm runs from the fulcrum to the point where the load force acts, which is often only a small piece of the lever. For a nutcracker, it is the distance from the hinge to the nut, not to the end of the arms. For a wheelbarrow, it is the horizontal distance from the axle to the center of the cargo. Reading a total length off the drawing and using it as the load arm is a common error. Find exactly where the load pushes on the bar, then measure from the pivot.
Compare two designs with the same load
Two levers must lift a 900 N load. Design A has arms of 1.5 m and 0.50 m; design B has 1.8 m and 0.30 m.
Design B needs half the effort, but its handle travels farther.
Determine an unknown load from effort
You can run a lever problem backward. A worker pushes with 120 N at 1.4 m from a fulcrum, and the bar is balanced. The load sits 0.35 m from the fulcrum. Set the moments equal:
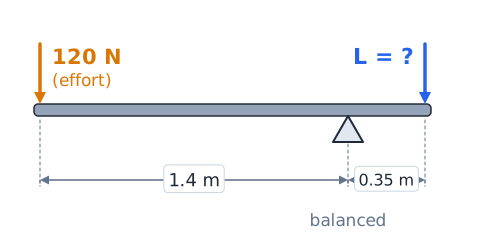
The lever supports a load four times the effort.
Determine an unknown distance from balance
A 200 N weight hangs 0.90 m left of a pivot. Where must a 600 N weight hang on the right for balance?
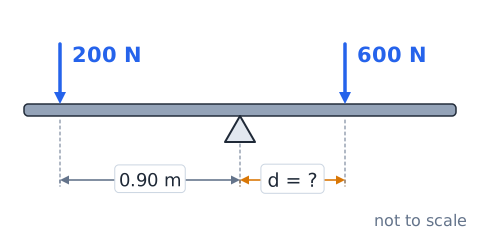
The heavier weight sits closer to the pivot, a third as far, since it is three times heavier.
Compare multiple loads on one side
When several loads sit on one side, add their moments. A 50 N load at 0.60 m and a 30 N load at 1.0 m on the right give
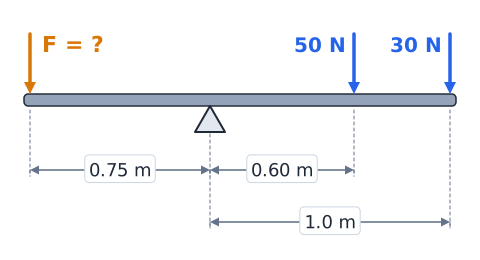
A single force on the left at 0.75 m must therefore be
The bar need not be horizontal
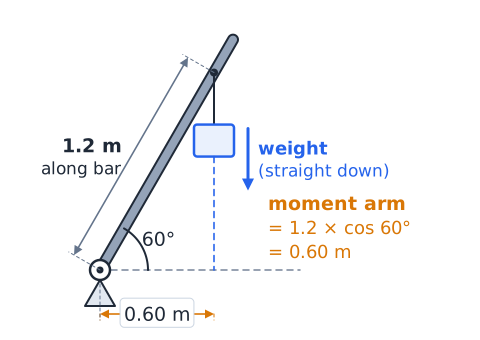
Lever rules still apply when the bar is tilted. What changes is the moment arm. For a vertical force such as a weight, the moment arm is the horizontal distance from the pivot to the force's line of action. If a weight hangs 1.2 m along a bar that is tilted 60 degrees above horizontal, its horizontal distance from the pivot is 1.2 times cos 60 degrees, or 0.60 m. As a bar tips toward vertical, the moment arm of a hanging weight shrinks, which is why a lever feels lighter near the top of its swing.
When a lever is accelerating
The balance equations in this lesson describe a lever that is still or turning at a steady rate. If the bar is speeding up its rotation, the moments do not cancel; the larger moment wins, and the difference produces angular acceleration. To start a load moving, you must push slightly more than the balance effort. Questions labeled ideal or balanced want the equilibrium value. Questions that describe a swinging bat or a lever being snapped quickly involve unbalanced moments, so the simple balance formula only gives a minimum effort.
Edge case: a force through the fulcrum
If a force points straight at the pivot, or straight away from it along the bar, its line of action passes through the fulcrum. Its moment arm is zero, so it produces zero torque no matter how large it is. Pushing along the length of a wrench toward the bolt will not loosen the bolt. In equilibrium problems, such a force affects only the force balance, such as the support reaction, and not the moment balance. A test choice claiming maximum torque for a force aimed at the pivot is wrong.
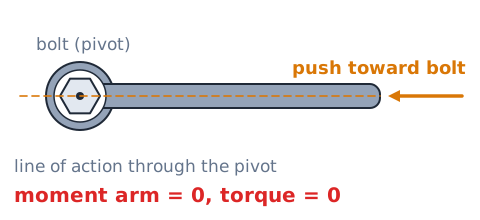
A lever can change force direction
Besides changing force size, a lever can redirect it. In a first-class lever, pushing down on one end raises the other. Oars push water backward so the boat moves forward. Piano keys go down while the hammers inside move up. Second- and third-class levers keep the direction the same: lifting the handles of a wheelbarrow lifts the load. Sometimes redirection is the main benefit, letting you push down with body weight to raise something else.
Everyday lever identification practice
Seesaw: fulcrum in the middle, so first class. Answer: first class.
Bottle opener prying a cap: the far edge of the cap is the fulcrum, the cap edge you lift is the load, your hand is at the end. Answer: second class.
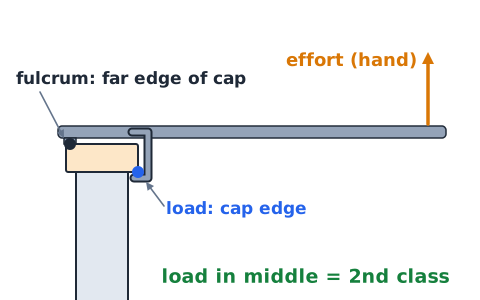
Fishing rod held with one hand at the butt and the other pulling partway up: effort in the middle. Answer: third class.
Pliers: pivot between handles and jaws. Answer: first class.
Distinguish lever advantage from pulley advantage
Levers and pulleys both trade force for distance, but you find their advantage differently. A lever's ideal advantage comes from the ratio of arm lengths measured from the fulcrum. A pulley system's ideal advantage is usually found by counting the rope segments that support the moving load. Do not count ropes on a lever diagram or measure arm lengths on a pulley diagram. The underlying rule is the same for both: input work equals output work in the ideal case, so any force gain costs extra distance.
Reading a mechanical advantage table
A table of levers may list effort arm, load arm, effort and load. Check each row the same way. The ratio of effort arm to load arm gives the ideal advantage. The ratio of load to effort gives the actual advantage. If actual is a bit below ideal, friction is present and the data look realistic. If actual is above ideal, something is mismeasured, because a real lever cannot beat its ideal value. Looking for that pattern lets you spot a wrong entry quickly.
Do not infer efficiency from force alone
A machine that needs a small effort is not automatically efficient. Efficiency compares useful output work with input work. A lever with a very long handle can need only a tiny push and still waste a large fraction of the input to friction. Another lever with a modest advantage can be almost frictionless. To judge efficiency, you need both forces and both distances, or both the actual and ideal mechanical advantages. Force advantage alone tells you nothing about losses.
Evaluate a weighted lever with an offset pivot
A uniform 3.0 m bar weighs 60 N and is pivoted 1.0 m from its left end. Its center is at 1.5 m, so its weight acts 0.50 m right of the pivot:
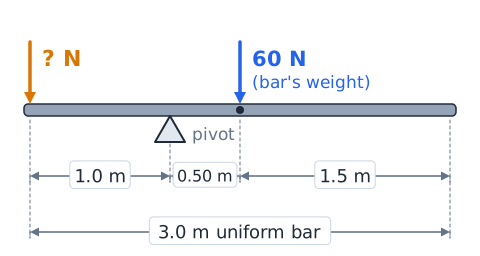
To hold it level with a weight hung at the left end, 1.0 m from the pivot, that weight must be
Approximate lever efficiency with work values
Efficiency can also be found from work:
A worker pushes with 75 N through 0.80 m, an input of 60 J. The lever raises a 270 N load by 0.20 m, an output of 54 J.
The missing 6 J went mainly to friction.
Step-by-step solution to a simple lever problem
Problem: a crowbar has 1.1 m from fulcrum to hand and 0.10 m from fulcrum to the crate. The crate presses down with 880 N. What ideal effort is needed?
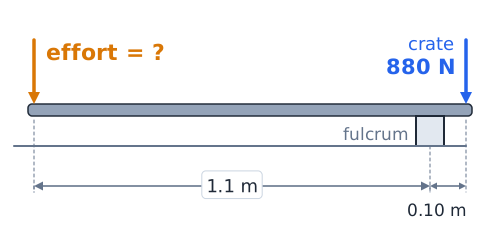
Step one: identify the class. The fulcrum is between hand and crate, so first class.
Step two: set moments equal. Effort times 1.1 equals 880 times 0.10, which is 88 N·m.
Step three: divide. 88 divided by 1.1 is 80 N.
Answer: 80 N.
Common trap: using the wrong arm ratio
A frequent error is flipping the arm ratio. With a 0.90 m effort arm, a 0.15 m load arm and a 540 N load, the correct effort is
Flipping the ratio gives 3,240 N, which makes no sense for a long handle. Check: a longer effort arm must mean less effort.
Common trap: confusing mass and load force
When a problem gives a mass in kilograms, do not plug it straight into a moment equation as if it were a force. A 20 kg box placed 0.5 m from a pivot does not produce 10 N·m. First find its weight, about 200 N using g equal to 10, then multiply: 100 N·m. Some answer choices are built from the unconverted mass to catch this slip. If the units in your answer should be newtons or newton-meters, make sure every input force is in newtons.
Common trap: calling any long tool first-class
Students often label any long tool with a handle as a first-class lever. Length and shape do not decide the class; the order of fulcrum, effort and load does. A wheelbarrow is long but is second class. A broom is long but is third class, with the top hand as the pivot and the lower hand applying effort. A pry bar used under a crate is first class only because the fulcrum sits between your hands and the load. Always locate the three points before choosing an answer.
Common trap: claiming mechanical advantage creates energy
A lever with an advantage of 5 does not give you five times the energy. It gives you five times the force while the load moves one fifth as far, so the work out is at most equal to the work in. Answer choices claiming a machine creates extra energy, produces more work than it receives or exceeds 100 percent efficiency are always wrong. Machines rearrange how force and distance combine; they do not add energy.
Exam review: what to read first
When a lever question appears, read the picture before the numbers. Find the fulcrum, then the effort and load, and decide which one is in the middle. Next, note which distances are given and whether they are measured from the fulcrum. Check units and convert masses or centimeters if needed. Then decide what is asked: an effort, a load, a distance, a force ratio, a travel distance or an efficiency. Estimate before calculating; if the effort arm is longer, the effort should be smaller than the load, so any answer bigger than the load can be ruled out.
Worked review: force and movement together
A lever has a 1.0 m effort arm and a 0.20 m load arm and lifts 350 N. The ideal effort is
If the handle moves 0.25 m, the load rises
The load moves one fifth as far as the handle because the arms are in a 1 to 5 ratio.
Check work:
J in and
J out. The force grew five times while the distance shrank five times, so the energy is unchanged. If a real lever needed 80 N for this same job, its efficiency would be 17.5 divided by 20, about 88 percent.
Practical limitations and safe interpretation
Ideal lever answers assume a rigid bar, a frictionless pivot and forces at right angles. Real tools fall short. Bars bend or snap if overloaded, fulcrums can slip and loads can shift suddenly. Adding a cheater pipe to a wrench raises the torque but can break the tool or the bolt and send your hand into something hard. When prying, keep fingers and feet out from under the load and use blocks to hold a raised object rather than relying on the bar. Treat calculated values as estimates, and leave a margin of safety.
Final summary and self-check
A lever is a rigid bar turning about a fulcrum. The middle item sets the class: fulcrum for first, load for second, effort for third. Torque is force times perpendicular arm, in N·m, and a bar balances when clockwise and counterclockwise moments match and forces also cancel. Ideal advantage is effort arm over load arm; actual advantage is load over effort; efficiency compares the two. Every force gain costs distance, so work out never exceeds work in. Self-check: a 400 N load sits 0.25 m from a fulcrum and the effort acts at 1.0 m. Ideal effort? Answer: 100 N.
 English ▾