 ASVAB Camp
Lesson objectives and examination boundaries
You will learn to name tire and wheel parts, decode sidewall size, load, speed and date markings, and find the correct inflation pressure. You will tell TPMS, balancing, alignment and rotation apart, read wear clues without overclaiming, and work simple diameter, friction and rotation problems. Tire mounting and repair stay with trained shops.
The vehicle-to-road force pathway
Every force that moves, stops or steers a car passes through the tires. Engine torque and brake torque travel through the hub to the wheel, from the wheel to the tire, and from the tire's small contact patch to the road. Grip at those four patches sets the limit for acceleration, braking and cornering.
Wheel, tire and hub are different parts
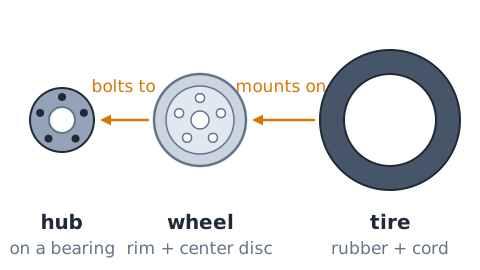
The hub is the rotating mount on the vehicle, carried by a wheel bearing, with studs or bolt holes. The wheel is the metal rim and center disc that bolts to the hub. The tire is the rubber and cord casing mounted on the wheel and filled with air.
Tread, shoulder and sidewall
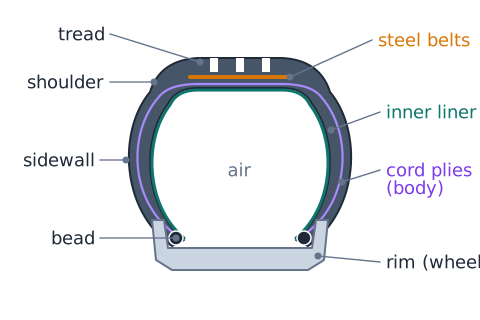
The tread is the thick, patterned rubber that touches the road and provides grip. The shoulder is the rounded edge where tread meets sidewall, and it works hard in turns. The sidewall is the flexible side between shoulder and rim. It carries the size and safety markings and is thinner than the tread.
Beads, liner and reinforcement
The beads are loops of steel wire at the tire's inner edges that seal and lock the tire onto the rim. An inner liner keeps air from seeping out. Under the tread, layers of cord plies and steel belts give the casing its strength and shape.
Radial construction and radial marking
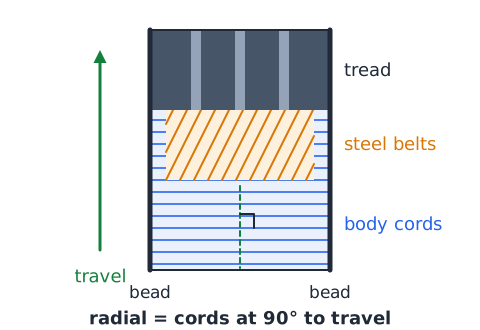
In a radial tire, the body cords run straight across from bead to bead, at right angles to the direction of travel, with belts under the tread. Nearly all modern car tires are radials. The letter R in a size such as 215/65R15 marks this radial construction.
Tire and wheel compatibility
A tire must match its wheel. The rim diameter must equal the tire's rim size exactly, and the rim width must fall within the range the tire maker allows. The combination must also clear the brakes, suspension and body. Mounting a tire on the wrong rim can stop the beads from seating safely.
Reading a typical size: P215/65R15
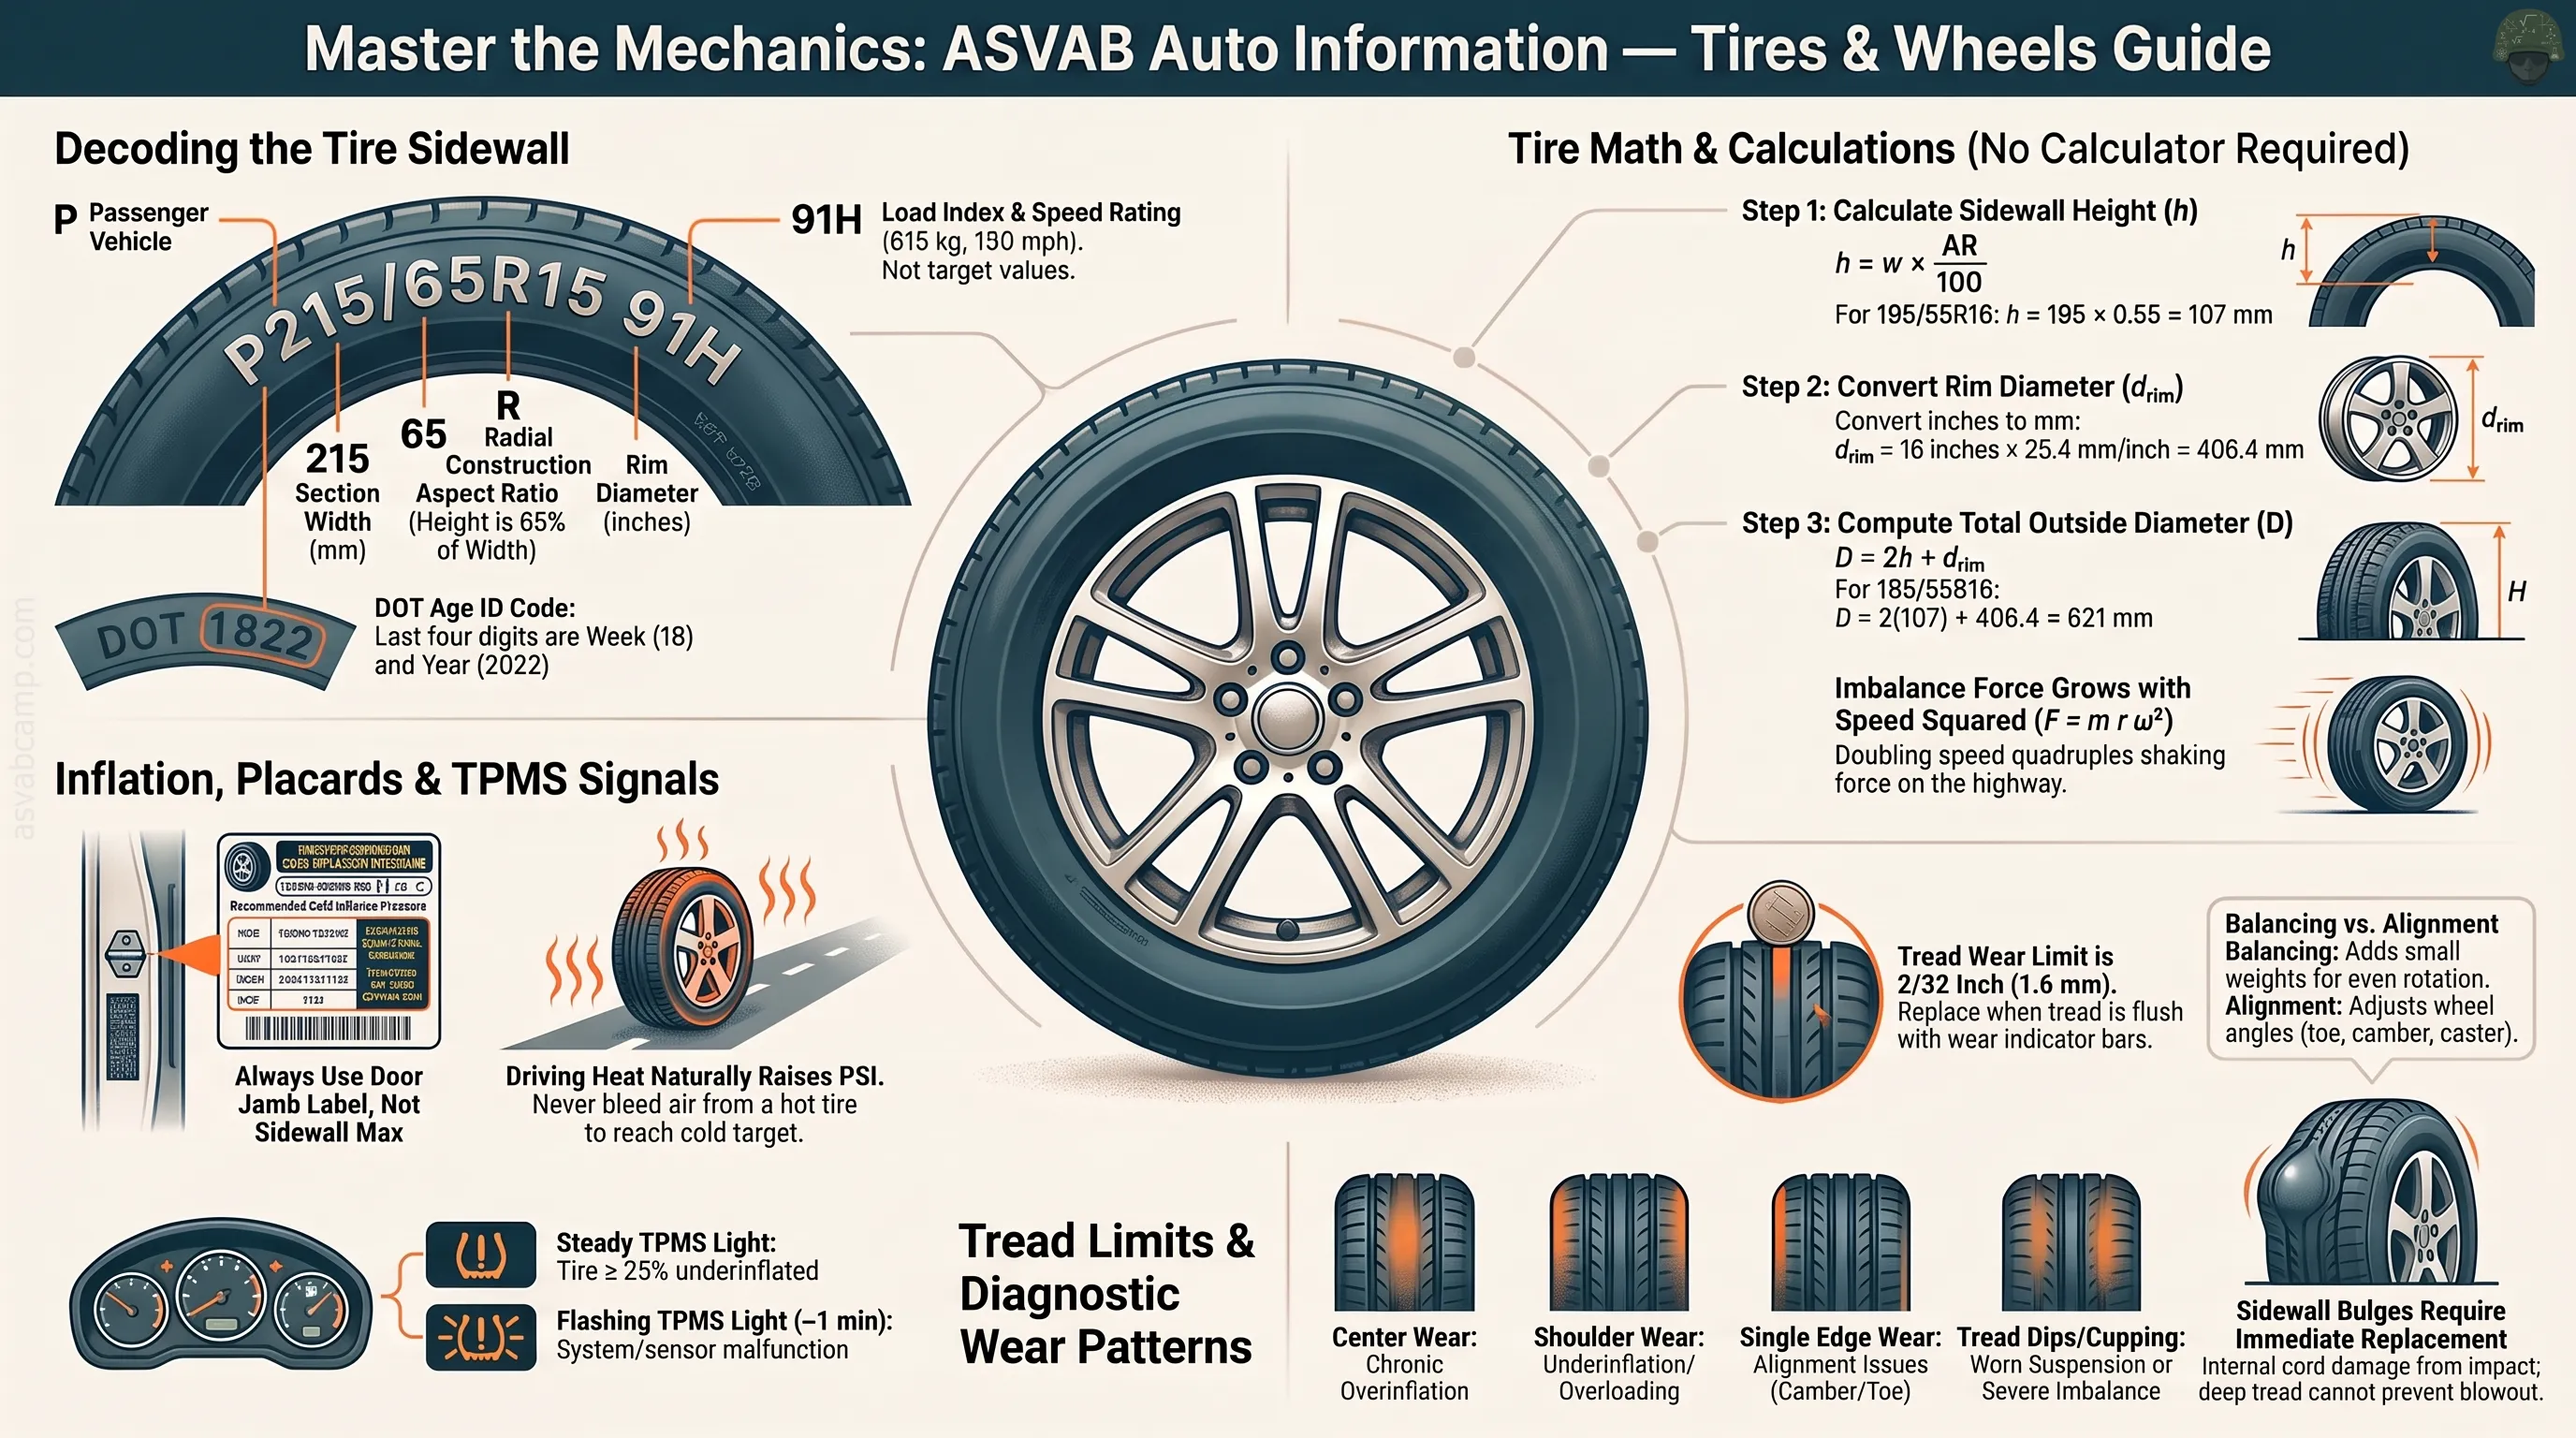
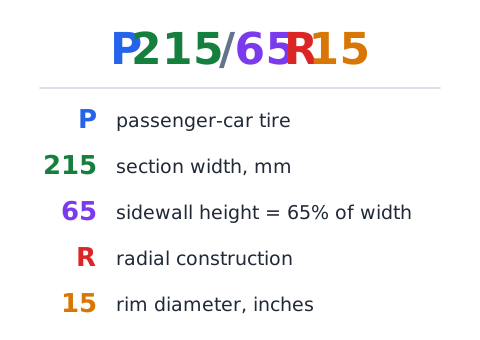
Take the size P215/65R15. P means a passenger-car tire. 215 is the section width in millimeters, sidewall to sidewall. 65 is the aspect ratio: sidewall height is 65 percent of width. R means radial construction. 15 is the wheel rim diameter in inches. Load and speed codes usually follow.
Aspect ratio is not the sidewall height in millimeters
The aspect ratio is a percentage, not a length. Sidewall height is
where w is width in mm and AR is the aspect ratio. For 195/55R16:
not 55 mm.
Converting rim diameter to millimeters
The rim size is given in inches, while width is in millimeters. Convert using exactly 25.4 mm per inch.
A 16-inch rim is
A 15-inch rim is 381 mm.
Approximate outside tire diameter
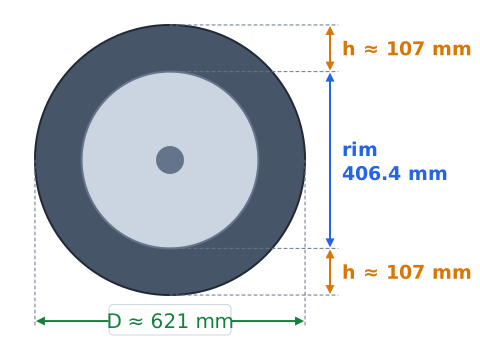
The outside diameter includes two sidewalls plus the rim.
h is sidewall height and is rim diameter, both in mm. For 195/55R16:
Circumference is a model, not exact revolutions per mile
Circumference follows from diameter.
For D = 0.621 m,
suggesting about 513 revolutions per kilometer. Real counts differ: the loaded tire flattens at the bottom, tread wears and pressure varies. Use the result as an estimate.
Load index and speed symbol
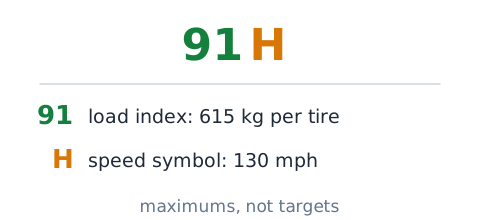
After the size, a code such as 91H appears. The number is the load index, a code you look up in a standard table; 91 corresponds to 615 kg per tire. The letter is the speed symbol, the maximum rated speed under proper conditions; H means 130 mph. Neither is a target to reach.
The sidewall maximum is not the vehicle setting
The sidewall lists a maximum inflation pressure, the most the tire can safely hold. That is not the pressure to run. The vehicle maker's recommended cold pressure is printed on the Tire and Loading Information label, usually on the driver's door jamb, and in the owner's manual. Use the label, not the tire.
Cold-pressure measurement and timing
Recommended pressures are cold pressures. Check with a tire pressure gauge before driving, or after the car has sat for a few hours, out of direct sun. Remove the valve cap, press the gauge squarely on the stem, read it, adjust as needed and replace the cap.
Why tire pressure often rises after driving
Driving flexes the tire and rubs it against the road, warming the air inside. Warmer air in the same space pushes harder, so pressure rises, often a few psi. This is normal and already allowed for by the cold recommendation. Do not let air out of a hot tire to reach the cold figure.
Pressure difference as a basic subtraction
How far a tire is from its target is a subtraction.
If the label calls for 35 psi cold and the cold reading is 30 psi:
The psi-to-kPa conversion
Many labels show both psi and kilopascals. One psi is about 6.895 kPa.
So 32 psi is about
Underinflation: the failure pathway
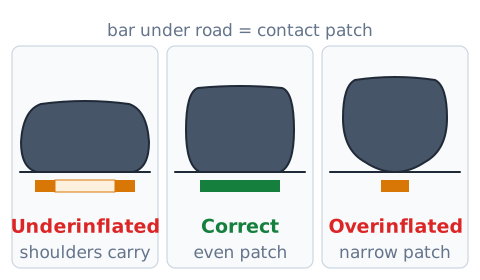
An underinflated tire sags more, so its sidewalls flex harder with every turn of the wheel. That flexing builds heat, which weakens the rubber and cords over time and can lead to tread separation or a blowout. It also wears the shoulders faster, dulls steering response and wastes fuel.
Overinflation and vehicle recommendations
Too much pressure makes the tire stiff and rounded, shrinking the contact patch. The ride gets harsher, grip and braking on wet roads can suffer, the center of the tread may wear faster and impacts are more likely to damage the tire. The label's cold pressure balances these tradeoffs.
Inflation is not corrected by adding more tread
Deep tread does not make up for wrong pressure. Pressure holds up the load and shapes the contact patch; tread depth only helps clear water. A new tire run low still overheats. Check both tread depth and cold pressure.
Valve stem, cap and bead leaks
Slow leaks often come from places other than punctures. A cracked rubber valve stem, a leaking valve core or a missing cap that lets dirt in can let air escape. Corrosion or damage where the bead meets the rim can too. A tire that keeps losing air needs professional inspection.
Direct versus indirect tire-pressure monitoring
Direct TPMS places a pressure sensor in each wheel that reports by radio. Indirect TPMS has no pressure sensors; it uses the antilock brake wheel-speed sensors, because a low tire is smaller and turns slightly faster.
Low-pressure TPMS warning meaning
A steady TPMS lamp means at least one tire is significantly low. On US vehicles the system must warn when a tire falls 25 percent or more below the recommended cold pressure. Check all tires with a gauge soon and inflate to the label value, or have the tire inspected.
Flashing then steady TPMS warning
When the TPMS lamp flashes for about a minute after starting and then stays lit, the usual meaning is a system malfunction, not low pressure. A dead sensor battery, a damaged sensor or a spare without a sensor can cause it. Until it is repaired, the system may not warn of low pressure, so check tires manually.
TPMS limitations after service
TPMS is a backup, not a replacement for checks. It warns only after a large drop, so a tire can be underinflated with the lamp off. It does not detect tread wear, sidewall damage or aging. After rotation, tire replacement or sensor work, some systems need a relearn or reset step.
Tread channels and water evacuation
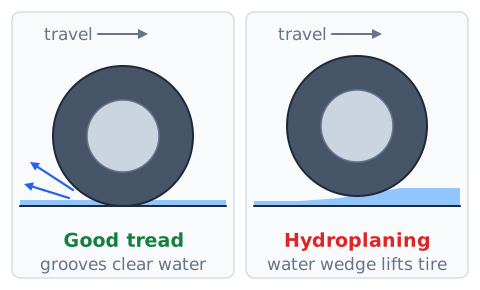
On a wet road, a tire must push water out of the way to keep rubber in contact with pavement. The grooves and sipes in the tread give that water somewhere to go, channeling it out the sides and back. As tread wears shallower, the channels hold less water and wet grip falls.
What hydroplaning means
Hydroplaning happens when the tire cannot clear water fast enough, so a wedge of water lifts it off the pavement. Steering and braking grip nearly vanish. Higher speed, deeper water, worn tread and low pressure all raise the risk. Slow down in heavy rain.
Tread depth and wear bars
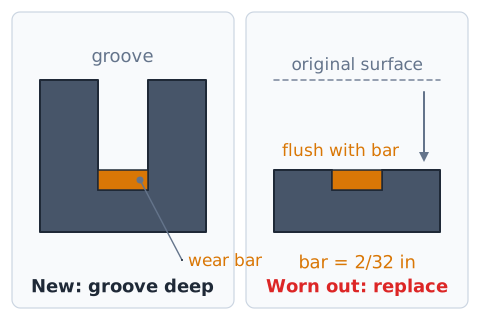
Tread depth is measured in 32nds of an inch in the US. Tires have built-in wear bars, raised rubber strips across the bottom of the grooves. When the tread wears down flush with the bars, it has reached 2/32 inch and the tire should be replaced.
Convert a tread limit between units
Convert 32nds of an inch to mm by multiplying the fraction by 25.4.
Likewise 4/32 inch is about 3.2 mm.
Where to measure tread
Measure tread depth in a main groove, not on a wear bar. Check several spots across the width, inner, center and outer, and at a few points around the tire, because wear is rarely even. Use the lowest reading for decisions. A simple tread-depth gauge reads directly.
Center, shoulder and one-edge wear
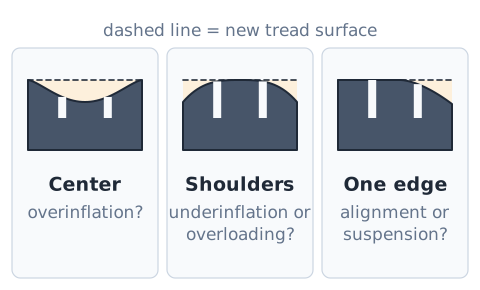
Wear patterns are clues. Center wear can suggest a history of overinflation. Wear on both shoulders can suggest underinflation or overloading. Wear on only one edge often relates to alignment, such as camber or toe, or to worn suspension parts. Each pattern points somewhere to check; none is proof by itself.
Cupping, scalloping and vibration
Cupping, or scalloping, is a pattern of dips worn around the tread, often felt as a rhythmic noise or vibration. It commonly suggests worn shock absorbers or struts, loose suspension parts or long-running imbalance. Replacing the tire alone may not fix the cause.
Wheel balancing versus alignment
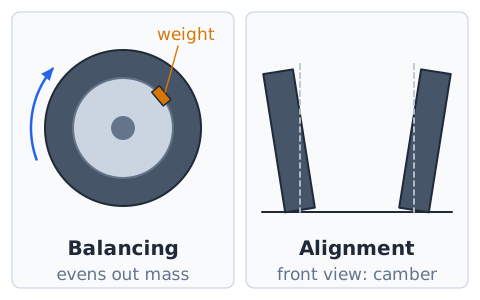
Balancing and alignment are different services. Balancing corrects uneven mass around the wheel and tire, usually with small weights, so it spins smoothly without vibration. Alignment adjusts the angles of the wheels relative to the vehicle and road, such as toe and camber, so the car tracks straight and the tires wear evenly.
Dynamic balancing and rotation speed
A dynamic balancer spins the wheel and senses imbalance on both the inner and outer planes, which a simple static check cannot. Imbalance forces grow with speed, so a small heavy spot unnoticed in town can shake the steering on the highway.
Simplified imbalance force model
Model the heavy spot as a point mass m at radius r spinning at angular speed .
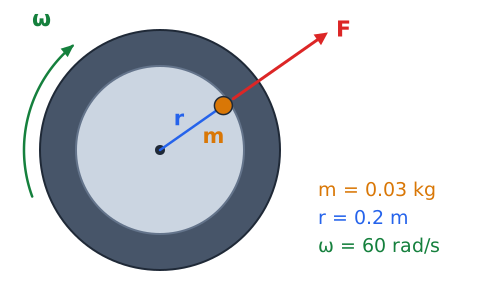
F is in newtons, m in kg, r in m, in rad/s. Example: 0.03 kg at 0.2 m and 60 rad/s gives
Angular velocity and frequency
Angular velocity and rotation frequency are linked by
where f is revolutions per second. A wheel at 10 rev/s has
rad/s. Multiply rev/s by 60 for rpm: 10 rev/s is 600 rpm.
Why a faster wheel increases an imbalance force
Because force depends on , it grows with the square of speed.
Doubling wheel speed makes the force
times larger. A 1.5 times faster wheel gives 2.25 times the force.
Toe, camber and caster: do not confuse terms
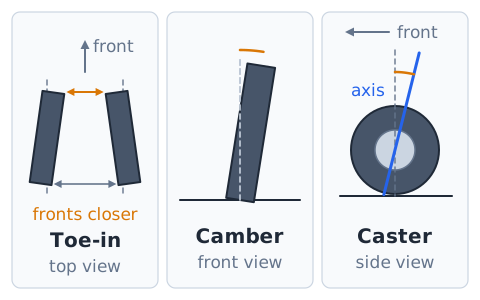
Toe compares the front edges of a pair of wheels seen from above, pointing in or out. Camber is the inward or outward tilt of the wheel's top seen from the front. Caster is the forward or backward tilt of the steering axis seen from the side; it helps straight-line stability and self-centering.
Rotation can distribute tire wear
Front and rear tires wear differently, because front tires steer and often drive. Rotation moves tires to different positions at set intervals so they wear more evenly and last longer. Follow the pattern and interval in the owner's manual.
Directional tires and sidewall arrows
A directional tire has a tread pattern designed to roll one way only, shown by an arrow on the sidewall. It must stay on the same side of the car, so it is usually rotated front to back only, unless it is remounted on the wheel by a shop.
Summer, winter and all-season tradeoffs
Summer tires use rubber and tread for strong dry and wet grip in warm weather but stiffen in the cold. Winter tires use soft compounds and many sipes for snow and ice, at the cost of faster wear in heat. All-season tires compromise between them and excel at neither extreme.
Spare tires and temporary-use restrictions
Many cars carry a compact temporary spare. It is smaller and lighter, often with a higher pressure and a speed limit printed on it, commonly 50 mph, and it is meant only to reach a repair shop. Check its pressure regularly. Some cars carry no spare at all, only a sealant kit.
Tire aging and DOT date identification
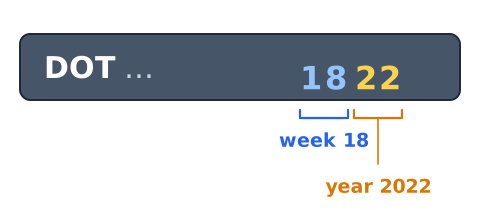
Rubber ages even when a tire is not used, as heat, sunlight and oxygen dry it out. The DOT tire identification number on the sidewall ends in a four-digit date code: the first two digits are the week and the last two the year. For example, 1822 means week 18 of 2022. Many makers give age guidance.
Reading a date code is not a safety certificate
A recent date code shows only when the tire was made. It does not prove the tire was stored well, inflated correctly or never damaged. An older tire with deep tread may still be unsafe. Combine age with inspection and maker guidance.
Sidewall bulges, cords and impact damage
A bulge or bubble on the sidewall means the inner cords are broken, often from hitting a pothole or curb, and air is pushing the outer rubber out. The tire can fail suddenly, however deep its tread. Visible cords, deep cuts or cracks also call for professional inspection and replacement.
Puncture versus repairability
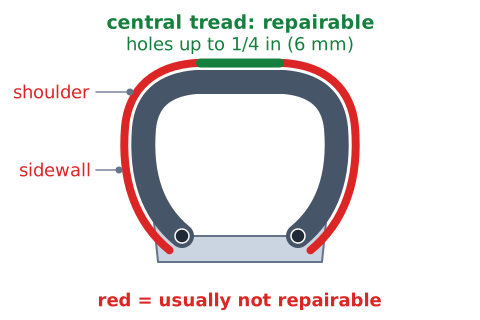
Not every puncture can be repaired. Industry guidance generally limits repairs to small holes, about a quarter inch (6 mm) or less, in the central tread area. Damage in the shoulder or sidewall is usually not repairable. A proper repair is done by a trained shop from inside the tire after removing it from the wheel.
Run-flat tires and pressure monitoring
Run-flat tires have stiff sidewalls that can carry the car for a limited distance after losing air, typically at reduced speed. Because they look nearly normal when flat, the driver may not notice, so TPMS is required with them. Follow the maker's distance and speed limits.
Tire loading and placard limits
The Tire and Loading Information label also states the maximum combined weight of passengers and cargo. Overloading makes tires flex and heat like underinflation, which raises the risk of failure. Stay within the placard limit.
Four-wheel load split is an assumption
An equal four-way split is a simplifying assumption. For a 1,600 kg car:
That is about 3,924 N per tire. Real cars carry more on one axle, and loads shift with braking and turning.
Pressure as force divided by area
Pressure is force per unit area.
p in pascals, F in newtons, A in square meters. A 4,000 N load on a 0.02 m patch averages
or 200 kPa, a simplified view.
Friction demand: braking, driving and turning
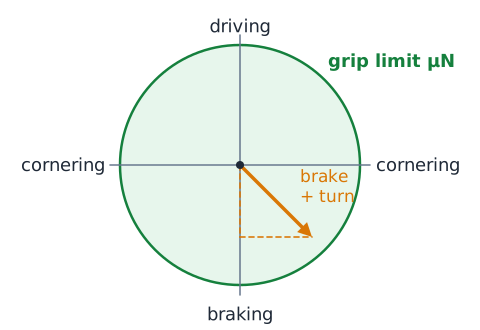
A tire has one grip budget, set by . Braking, driving and cornering all draw on it. The combined demand must stay within that limit:
Hard braking in a turn leaves less grip for steering.
A friction example with stated idealizations
Assume a constant friction coefficient and a fixed normal force. Maximum friction force is
With
and N = 3,500 N,
Real varies with surface, water, temperature and tire condition.
Why a wet road usually reduces grip
Water acts as a lubricant between rubber and road, lowering the friction coefficient. Fewer rubber-to-road contacts mean less grip for braking and steering. Worn tread and higher speed make this worse.
Tire rolling resistance
A rolling tire constantly deforms at the contact patch and recovers. Some of that energy is lost as heat in the rubber, so the engine must supply it. That loss is rolling resistance. Underinflation increases flexing and rolling resistance, wasting fuel.
Rolling resistance force: a simplified illustration
A simple model makes rolling resistance proportional to load.
is the unitless rolling-resistance coefficient and N the normal force in newtons. With
and N = 4,000 N,
Rolling-resistance work over distance
Work equals force times distance.
W in joules, F in newtons, d in meters. With 40 N over 1,000 m,
or 40 kJ per kilometer for that tire.
Circumference and theoretical wheel speed
Without slip, each revolution moves the car one circumference.
v in m/s, C in meters, n in rev/s. With C = 1.9 m and 8 rev/s,
about 54.7 km/h.
Torque and wheel radius
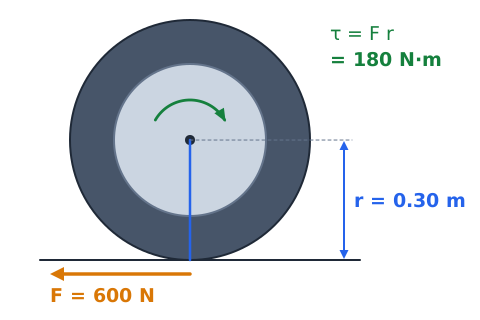
Torque is force times lever arm.
is in N·m, F is the tangential force in newtons and r the radius in meters. A 600 N force at 0.30 m gives
N·m.
Lug fasteners and torque specifications
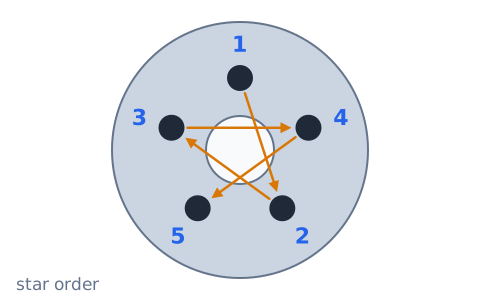
Lug nuts or bolts must be tightened to the vehicle maker's torque specification, using a torque wrench in a crisscross or star pattern so the wheel seats evenly. Too little torque lets a wheel loosen; too much can stretch studs or warp parts. Many makers advise rechecking after a short distance.
Studs, nuts and bolt seats
Lug nuts and bolts have seats, cone, ball or flat, that must match the wheel's holes. The wrong seat can clamp poorly even when the threads seem to fit, and the wheel may loosen. Use fasteners specified for that wheel.
Wheel offset, fitment and clearance
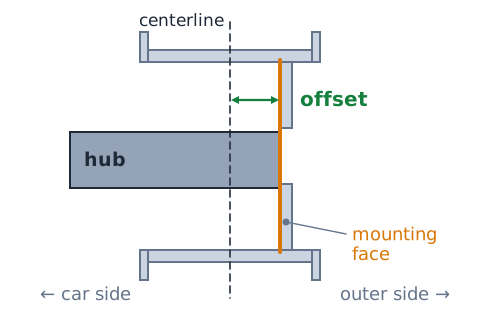
Offset is the distance from the wheel's hub-mounting face to its centerline. It sets how far in or out the wheel sits. Wrong offset can cause rubbing on suspension or body and change steering feel and bearing loads.
Avoid placing hands near a rotating wheel
A spinning wheel, whether on a balancing machine, on a lift or raised during testing, can catch fingers, sleeves or tools and cause serious injury. Keep hands, loose clothing and hair clear, and never try to slow or stop a turning wheel by hand. Shop machines must be used by trained people.
Tire and wheel inspection sequence
A routine check moves in order. Measure cold pressure with a gauge and compare with the door label. Measure tread depth in several grooves. Scan both sidewalls for bulges, cuts and cracks. Look for nails or embedded objects. Check valve stems and caps. Read the date code, and note wear patterns. Include the spare.
Scenario: low pressure with no warning lamp
A driver finds 27 psi cold where the label calls for 33, yet the TPMS lamp is off. Analysis: 6 psi low is about 18 percent, below the 25 percent drop that triggers a warning. The tire is still underinflated and should be filled and watched.
Scenario: highway steering vibration
The steering wheel shakes at about 60 to 70 mph but feels smooth in town. Analysis: speed-dependent shake fits a front wheel imbalance, but a bent wheel, a damaged tire or worn steering parts can do the same. Balance and inspect, rather than assuming one cause.
Scenario: car pulls to one side
A car drifts right on a level, straight road. Analysis: check the simple causes first, such as uneven pressure side to side. Then consider alignment, a dragging brake or a tire with internal construction pull. Swapping front tires side to side can help separate a tire cause from alignment.
Scenario: sidewall bulge despite deep tread
After hitting a pothole, a nearly new tire shows a bulge on its sidewall. Analysis: deep tread does not matter here; broken internal cords make the tire unsafe. Use the spare and have the tire replaced. The wheel should be checked for damage too.
Scenario: rotation blocked by two tire sizes
A sports car has wider rear tires than front tires. Analysis: the tires cannot simply swap axles because sizes differ. Only rotation patterns permitted by the vehicle and tire makers apply, which may mean side to side or none at all.
Scenario: warm pressure after a long trip
After two hours of highway driving, a tire reads 36 psi against a 32 psi cold label. Analysis: heating normally raises pressure, so this is expected. Do not let air out. Recheck cold before adjusting.
Uniform Tire Quality Grading (UTQG) basics
Most US passenger tires carry UTQG grades. Treadwear is a comparative number from a test; a 400 tire should last about twice as long as a 200 on that test. Traction is graded AA, A, B or C. Temperature resistance is graded A, B or C.
UTQG traction versus general road traction
The UTQG traction grade comes from straight-line braking tests on wet pavement. It does not measure cornering grip, hydroplaning resistance or snow performance. A high grade is useful but not a guarantee on every road.
Repeated misconception checks
False: "The sidewall maximum is the right pressure." Use the door label. False: "Deep tread means the tire is safe." Bulges, age and pressure still matter. False: "No TPMS lamp means correct pressure." It warns only for large drops. False: "Balancing and alignment are the same." One fixes mass, the other angles.
Exam recall: anatomy, labels and safety
The tread contacts the road; beads seal on the rim. R means radial; the last size number is rim diameter in inches. Cold pressure comes from the door label. Use a pressure gauge to check. The DOT code ends in week and year. Sidewall bulges need urgent attention.
Exam recall: diagnosis and calculation
Wear patterns and vibrations suggest causes but rarely prove one. A flashing then steady TPMS lamp signals a malfunction. Sidewall height is width times aspect ratio; diameter is two sidewalls plus rim in mm. Imbalance force grows with speed squared, friction limit is and torque is force times radius.
 English ▾