 ASVAB Camp
Learning objectives and accurate ASVAB scope
By the end of this lesson you should be able to pick the right hand, measuring, electrical and lifting tool for a routine car maintenance job and explain why it fits. You will also work simple torque, unit, runout and Ohm's law problems. On the ASVAB, these ideas appear in Auto Information, Shop Information and sometimes Mechanical Comprehension, usually as short tool-to-task or safety questions.
Work from a service plan, not from a guess
Good maintenance starts with the vehicle's service information: the owner's manual or the maker's procedure lists fluids, intervals, torque values and steps in order. Before you pick up a tool, confirm what the job is, which parts and specifications apply, and what hazards exist. A technician who guesses at a fluid type or skips a step can cause damage that costs far more than the original repair.
Distinguish hand tools and powered tools
Hand tools, such as wrenches, screwdrivers and pliers, are driven only by your own muscle, so you feel the fastener as it turns. Powered tools use electricity, compressed air or hydraulics to do the work faster. Speed has a price: a power tool can strip threads or overtighten a bolt before you notice, and it adds hazards such as cords, hoses and moving parts.
Open-end and box-end wrenches
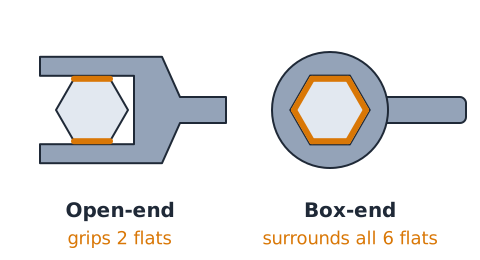
An open-end wrench has a U-shaped jaw that slides onto the flats of a nut from the side, which helps when a line or bracket blocks the top. It touches only two flats, so it can slip under heavy force. A box-end wrench is a closed ring that surrounds the whole head, giving a firmer grip and a better choice for a stubborn bolt.
Combination wrenches
A combination wrench has an open end on one side and a box end on the other, both the same size. A common habit is to break a tight bolt loose with the box end, then flip the wrench and spin the bolt quickly with the open end once it is free. One tool covers both needs.
Adjustable wrench limitations
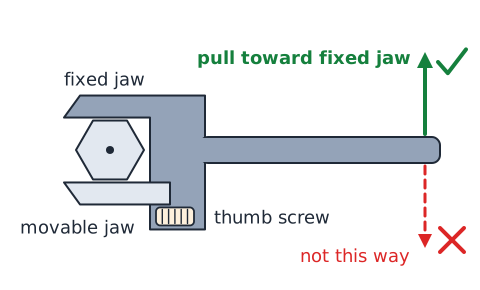
An adjustable wrench has a movable jaw set by a thumb screw, so one tool fits many sizes. That flexibility is also its weakness: the jaw can loosen and the fit is never as snug as a fixed wrench, so it tends to round corners. Use it for light work when the correct size is not available, and pull so the force goes toward the fixed jaw.
Sockets and ratchets are separate components
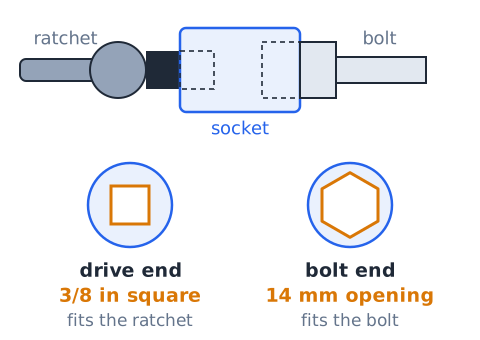
A socket is the cup that fits over the bolt head. A ratchet is the handle that turns the socket and has an internal pawl mechanism, so you can swing it back and forth without lifting it off. A small lever switches the direction between tightening and loosening. The socket engages the fastener; the ratchet provides the indexed turning action.
Socket drive size is not socket opening size
Two different sizes describe a socket. The drive size is the square hole that accepts the handle, commonly 1/4, 3/8 or 1/2 inch. The opening size is the bolt it fits, such as 14 mm. A 3/8-inch drive socket can have a 10 mm or a 19 mm opening; the two numbers are unrelated.
Six-point versus twelve-point sockets
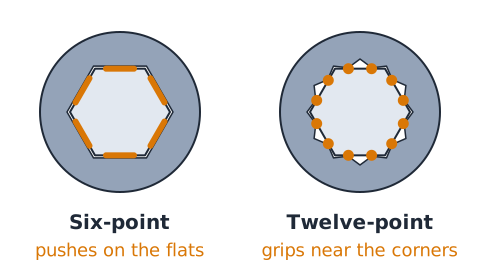
A six-point socket contacts the flat sides of a hex head and spreads force over a large area, so it is the best choice when you want to avoid rounding off a tight or rusty bolt. A twelve-point socket grips nearer the corners, but it can slip onto the head at twice as many positions, which helps when the swing room is tight or the angle is awkward.
Impact-rated versus hand sockets
Impact sockets are made of a tougher steel, have thicker walls and usually a black finish, so they can absorb the repeated hammer blows of an impact wrench. Ordinary chrome hand sockets are harder and more brittle and may not be rated for impact loads; they can crack and throw pieces. Match the socket rating to the tool driving it.
Extensions, universal joints and crowfoot attachments
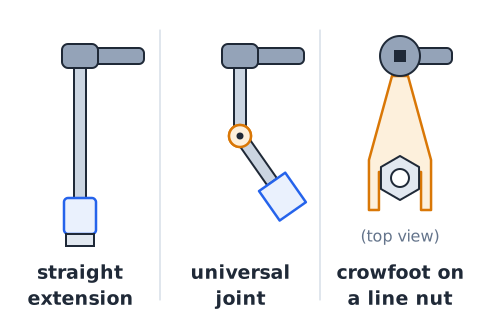
An extension is a straight bar that places the ratchet farther from the fastener so it clears nearby parts. A universal joint lets the socket work at an angle, though it can bind or flex. A crowfoot is an open-end or flare-nut head that slips onto the drive of a ratchet or torque wrench to reach fittings such as brake or fuel line nuts.
Breaker bar versus ratchet
A breaker bar is a long, solid handle with a pivoting head and no ratchet mechanism. Its length gives a large turning force for loosening a tight lug nut or axle nut. A ratchet is quicker for running fasteners in and out, but its internal pawl can be damaged by extreme force. Break loose with the bar, then spin with the ratchet.
Hex keys, Torx drivers and precise engagement
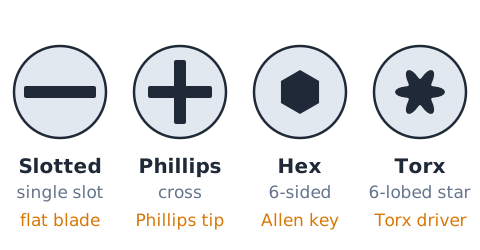
Hex keys, often called Allen wrenches, fit six-sided recesses in screw heads. Torx drivers fit a six-lobed star recess common on modern cars. Both must be the exact size and fully seated in the recess; a near fit or a worn tip twists out and ruins the screw head.
Slotted and Phillips screwdrivers
A slotted screwdriver has a flat blade that fits a single straight slot. A Phillips driver has a cross-shaped tip with a pointed end for cross-recess screws. Choose a tip that fills the recess, press firmly and keep the shaft in line with the screw. Never use a screwdriver as a pry bar or chisel; the tip bends or breaks.
Pliers grip but are not precision spanners
Slip-joint, needle-nose and locking pliers grip, bend, hold and pull parts such as clips, cotter pins and hoses. They are not a substitute for a wrench on a nut or bolt. Their jaws bite into the corners and leave a rounded, chewed head that then becomes hard to remove with any tool.
Cutters, punches and pullers
Diagonal cutters snip wire, cable ties and cotter pins. Punches drive pins out or mark a spot before drilling; a center punch makes a small dimple so the drill bit does not wander. Pullers use a center screw and arms or a plate to draw a pressed-on part, such as a pulley or gear, off its shaft evenly without hammering it.
Torque is a turning moment
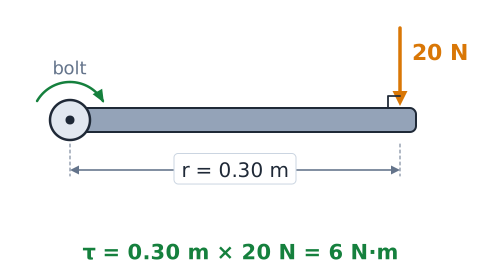
Torque is the twisting effect of a force about a pivot. For a force pushed at a right angle to a wrench handle:
Here is torque, is the distance from the center of the fastener to where the force acts, and is the force. In metric units torque is in newton-meters (N·m); in customary units it is pound-feet (lb-ft). A longer handle gives more torque for the same push.
Perpendicular torque example: 20 N at 0.30 m
A mechanic pulls with 20 N at a right angle, 0.30 m from the center of a bolt. Multiply distance by force:
The bolt receives 6 N·m of torque.
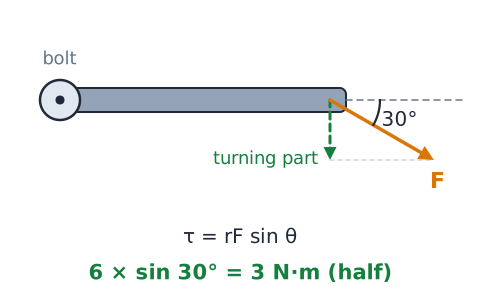
Torque changes with the angle of force
If the force is not at a right angle, only part of it turns the bolt:
With 6 N·m at 90 degrees, pulling at 30 degrees gives
N·m, half as much.
Torque wrench purpose and limits
A torque wrench lets you tighten a fastener to a stated value so it clamps parts properly without stretching or breaking. It is a measuring tool, not a breaker bar: do not use it to loosen stuck bolts, drop it or hold it past its range. It needs periodic calibration, and readings near the very bottom of its scale are less accurate.
Click-type torque wrench
A click-type torque wrench is set by turning the handle to align a scale. When the set torque is reached, an internal mechanism releases with a click you can feel and hear. Stop pulling at the click; continuing adds more torque. Pull smoothly by the handle grip, and store it at its lowest setting to keep the spring from weakening.
Beam and digital torque tools
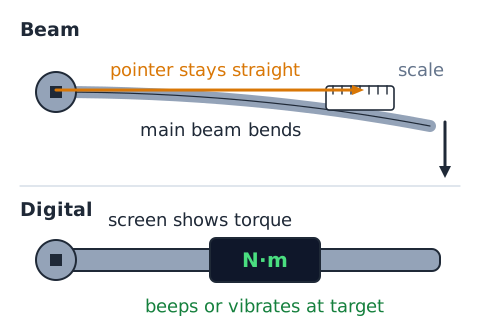
A beam torque wrench has a pointer that stays still while the main beam bends, so you read torque directly from a scale as you pull; it is simple and holds calibration well. A digital torque wrench shows the value on a screen and often beeps or vibrates at the target. Both still require a steady pull and a reading taken at right angles to the scale.
What is a torque specification?
A torque specification is the tightening value the manufacturer lists for a particular fastener, such as 110 N·m for a lug nut on one vehicle. It depends on the bolt size, material and the joint, and may assume clean, dry threads unless the procedure says to oil them. Always use the figure for that exact vehicle and part, not a value from memory.
Torque angle and fastener sequence
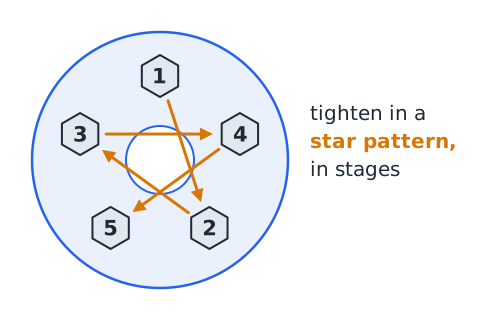
Some fasteners, such as many cylinder head bolts, are tightened to a torque and then turned an extra number of degrees, called torque-angle tightening; an angle gauge measures the turn. Groups of bolts are often tightened in a set order, such as a crisscross or spiral pattern, in stages so the part clamps evenly and does not warp.
Crowfoot geometry and torque reading
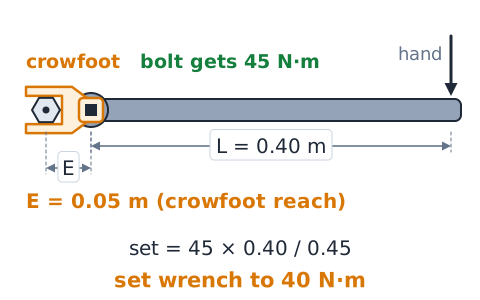
A crowfoot attached in line with a torque wrench makes the handle effectively longer, so the bolt receives more torque than the wrench shows. If is the wrench length and is the extra reach of the crowfoot, the setting is:
Turning the crowfoot 90 degrees to the handle makes the extra reach nearly zero, so no correction is needed.
Simple crowfoot calculation with defined geometry
A bolt needs 45 N·m. The torque wrench measures 0.40 m from its drive to the hand position, and the in-line crowfoot adds 0.05 m.
Set the wrench to 40 N·m; the fastener receives 45 N·m.
Metric and customary length units
Cars use both metric and customary (inch) sizes. One inch equals exactly 25.4 mm:
To change millimeters to inches, divide by 25.4; to change inches to millimeters, multiply by 25.4. Some metric and inch wrenches are close, but a near fit can slip and round a fastener.
Millimeters to inches example
Convert a 10 mm bolt head to inches:
That is close to 3/8 in (0.375 in) but not the same, so a 3/8-inch wrench is too small to fit; use a 10 mm wrench.
Feeler gauges measure small gaps
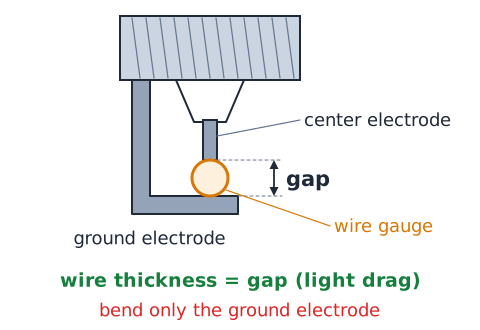
A feeler gauge is a set of thin steel blades, each marked with its thickness. To check a small gap, such as a valve clearance or a spark plug gap, slide blades into the gap until one passes with a light drag. That blade's thickness is the gap. Wire-type gauges work better on the curved electrodes of spark plugs.
Calipers and micrometers
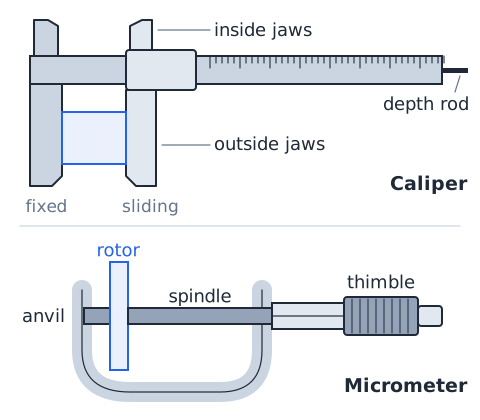
A caliper has a fixed and a sliding jaw and measures outside size, inside size and depth, usually to about 0.02 mm or 0.001 in. A micrometer closes a spindle onto the part with a thimble and gives finer precision for outside measurements such as brake rotor thickness. Each micrometer covers a limited range, such as 0 to 25 mm, so pick one sized for the part.
Micrometer difference calculation
Wear is the difference between the original size and the measured size:
A pin made at 25.00 mm now measures 24.62 mm. The wear is 25.00 minus 24.62, or 0.38 mm. Compare the result, or the measured size itself, to the service limit.
Dial indicators and runout
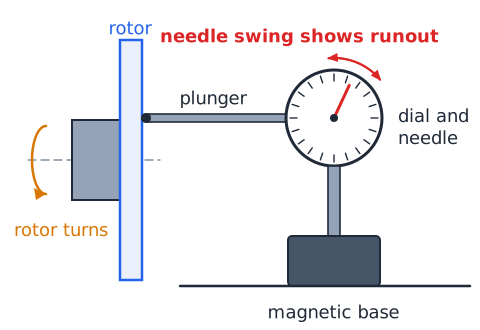
A dial indicator has a plunger that moves a needle over a scale as it rides on a surface. Mounted on a magnetic base with the plunger touching a turning brake rotor or shaft, it shows runout: how much the surface wobbles from a true circle or flat plane. Too much rotor runout can cause a pulsing brake pedal.
Simple runout calculation
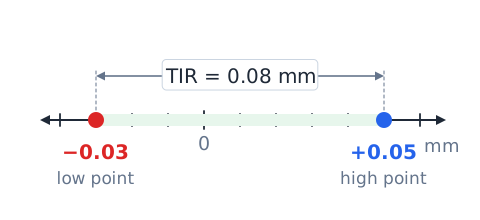
Total indicated runout is the full swing of the needle:
If a rotor reads +0.05 mm at its high point and -0.03 mm at its low point, the runout is 0.05 minus (-0.03), or 0.08 mm.
Multimeter safety begins with the circuit
A digital multimeter measures voltage, current and resistance, but using it safely starts with knowing the circuit. Check that the meter and leads are rated for the voltage, the leads are undamaged and the dial and jacks match the measurement. Plugging leads into the current jack and touching a battery can blow the fuse or damage the meter.
Measuring DC voltage as a parallel observation
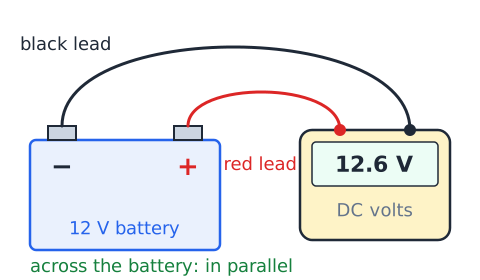
Voltage is a difference in electrical pressure between two points, so you measure it across a part, in parallel, without breaking the circuit. Set the meter to DC volts, place the black lead on ground or one side and the red lead on the other. A healthy, resting 12-volt car battery reads about 12.6 V.
Measuring current requires an appropriate path
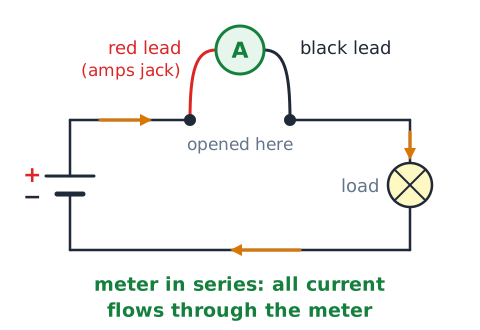
Current is the flow of charge, so the meter must become part of the path: open the circuit and connect the meter in series so all the current flows through it. Move the red lead to the amps jack and stay within its rating. Many technicians instead use an inductive clamp meter, which reads current around a wire without opening it.
Resistance measurements require power isolation
An ohmmeter sends its own small current through a part to measure resistance, so the circuit must be switched off and the part isolated. Any outside voltage gives a false reading and can damage the meter. Disconnect the component or remove its fuse first. A reading near zero means continuity; a reading of OL means an open circuit.
Ohm’s law for a simple ideal test circuit
Ohm's law links voltage, current and resistance in a simple ideal circuit:
V is voltage in volts, I is current in amperes and R is resistance in ohms (). A 12 V source across a 4 load gives
Series circuit resistance example
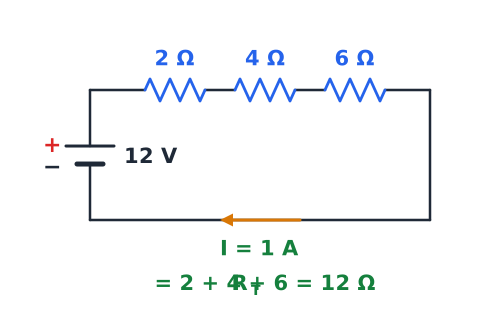
Resistors in series add:
With 2, 4 and 6 ,
On a 12 V supply:
Voltage drop and loaded circuits
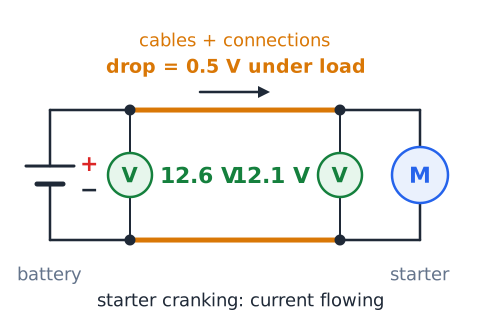
A voltage drop test measures the voltage lost across a wire, switch or connection while current is flowing. With no load, a corroded wire may still show full voltage; under load, its extra resistance steals voltage from the device. For example, if a battery reads 12.6 V but the starter sees only 12.1 V, the cables and connections dropped 0.5 V.
OBD scan tool and diagnostic trouble codes
Cars built for the US since 1996 have an OBD-II data link connector, usually under the dashboard. A compatible scan tool plugs in and retrieves diagnostic trouble codes (DTCs), such as a P-code for a powertrain fault, along with freeze-frame data. A code tells you which circuit or system a module flagged, not which part to replace.
Digital data and live sensor values
Beyond codes, many scan tools display live data: real-time values such as engine speed, coolant temperature, oxygen-sensor voltage and fuel trim. Watching how a reading changes when the engine warms up or the throttle opens helps you judge whether a sensor reports sensible values. Compare numbers to the service information.
Test lights versus high-impedance instruments
A test light is a probe with a bulb that glows when voltage is present; it is quick for checking fuses and power at a battery or lamp. It draws noticeable current, however, and can damage sensitive computer or sensor circuits. A digital multimeter has high input impedance and draws almost nothing, so it is the safer choice for module inputs.
Battery work and electrical arc hazards
A car battery has low voltage but can deliver very high current. A wrench touching the positive terminal and the body can glow red, weld or burn you, and batteries give off flammable hydrogen gas. Wear eye protection, remove jewelry, disconnect the negative cable first and reconnect it last, and keep sparks and flames away.
Hybrid and battery-electric high-voltage boundary
Hybrid and electric vehicles carry high-voltage systems, often several hundred volts, with cables usually colored bright orange. These can cause fatal shock. Routine maintainers should not touch orange cables or high-voltage parts; only trained technicians with insulated gloves and the maker's disabling procedure should work on them.
Floor jack: lifting is not sustained support
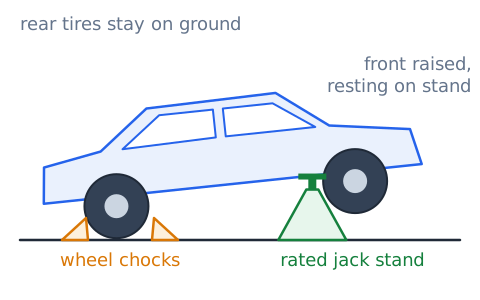
A hydraulic floor jack raises a vehicle by pumping fluid into a cylinder, but hydraulic seals can leak and a jack can roll or tip. It is a lifting tool only. Never get under a vehicle held only by a jack; once raised, lower it onto jack stands. Work on level, solid ground and use the lift points named in the owner's manual.
Jack stands, wheel chocks and rated supports
Jack stands are rated supports that hold a raised vehicle; set them under the frame or listed support points and lower the vehicle onto them. Wheel chocks are wedges placed against tires that stay on the ground to keep the car from rolling. Use stands rated for the load and in matching pairs, and never use bricks or blocks.
Capacity is not a simple vehicle mass comparison
A jack or stand rating, such as 3 tons, is not simply compared to the vehicle's total weight. Lifting one end puts only part of the weight on the tool, but that share depends on the vehicle, its load and the angle. Stands are rated as a pair. Follow the maker's ratings and leave a generous margin rather than working near the limit.
Chock placement is vehicle- and task-specific
Chocks go on the wheels that stay on the ground. Lifting the front means chocking the rear wheels, usually on both front and back of each tire. Lifting the rear means chocking the front. Set the parking brake, put an automatic in park or a manual in gear, and follow any special steps for that vehicle.
Engine running indoors and carbon monoxide
Engine exhaust contains carbon monoxide, an odorless, colorless gas that blocks the blood from carrying oxygen. Symptoms include headache, dizziness and confusion, and high levels can kill. Never run an engine in a closed garage. Use an exhaust extraction hose vented outdoors and good ventilation, and keep CO detectors working.
Hoists, lifts and support arms
A two-post or four-post lift raises the whole vehicle so a technician can stand underneath. Only trained users should run it. Position the arms or pads at the maker's lift points, raise the vehicle slightly and check balance, then raise it fully and set the mechanical safety locks before walking under it.
Fluid containers and contamination control
Keep each fluid in a clean, labeled container meant for it. Never put oil, coolant or brake fluid in a food or drink bottle, where someone could swallow it. Clean the area around a fill cap before opening it so dirt does not fall in, and use separate funnels for different fluids to avoid mixing.
Engine oil identification
Engine oil is labeled by viscosity grade, such as 5W-30. The first number with W describes flow in cold weather; the second describes thickness at operating temperature. Labels also list performance standards. Use the grade and specification the maker approves for that exact engine, and check the level on the dipstick, filling only to the full mark.
Oil filter and controlled replacement
Replace the oil filter with one listed for that engine. Use an oil filter wrench, designed to grip that filter type, for removal, and catch the oil in a drain pan. Wipe the mounting surface, make sure the old gasket did not stay stuck there, and coat the new gasket with a thin film of fresh oil. Tighten as the filter or service instructions say, usually by hand.
Used engine-oil handling
Used engine oil contains metals and other contaminants and must not be poured on the ground or into a drain. Drain it into a clean pan, pour it into a sealed container and take it to a recycling center or auto parts store that accepts it. Do not mix it with antifreeze or solvents, which can make it unrecyclable. Wash skin that touches it.
Cooling-system cap and thermal energy
A cooling system runs under pressure, which raises the boiling point of the coolant. Opening the cap on a hot engine can release a spray of scalding coolant and steam. Wait until the engine is cool to the touch, cover the cap with a cloth, and turn it slowly to the first stop to release pressure.
Brake fluid and friction-system contamination
Brake fluid absorbs moisture from the air, which lowers its boiling point, so keep the container sealed and use only the type shown on the reservoir cap. Brake fluid can also damage paint. Brake pads and rotors must stay clean; oil or grease on a friction surface reduces stopping power, so use brake cleaner and clean hands.
Grease gun and lubricant application
A grease gun forces grease through a grease fitting, called a zerk, into a joint. Wipe the fitting, attach the coupler squarely and pump until fresh grease just appears. Many modern joints are sealed for life and have no fitting, and some need a specific grease, so check the service information before greasing anything.
Thread-cleaning taps and dies
A tap cuts or cleans internal threads in a hole; a die cuts or cleans external threads on a bolt or stud. A thread chaser restores damaged or dirty threads without removing much metal. Use the exact size and thread pitch, lubricate, turn slowly and back up often to clear chips, so the fastener can turn freely and torque reads correctly.
Extractors and stripped fasteners
When a screw head strips or a bolt snaps, a screw extractor can remove it. You drill a centered pilot hole, then turn the reverse-threaded extractor counterclockwise so it bites and backs the fastener out. Extractors are hard and brittle; if one breaks inside, removal gets much harder, so use penetrating oil and steady, gentle force.
Service interval versus condition-based findings
A service interval is a scheduled time or mileage to perform a task, such as an oil change every set number of miles. Condition-based findings come from inspection, such as a worn belt or low tread. Both matter: follow the schedule, but if an inspection finds a problem before the interval, address it then. Severe driving may shorten intervals.
Maintenance records and inspection evidence
A maintenance record lists the date, mileage, work done, parts and fluids used, and measurements taken. Good records prove that scheduled service was done, which can matter for a warranty, and they show trends over time, such as brake pad thickness dropping on each visit. Write down the actual measurement, not just pass or fail.
Engine air filter versus cabin air filter
The engine air filter cleans air going into the engine; a clogged one can reduce performance and efficiency. The cabin air filter cleans air going into the passenger compartment through the heating and air-conditioning system; a clogged one causes weak airflow or odors. They are separate parts in different places with different intervals.
Spark plug gap and ignition service
A spark plug's gap is the space between its center and ground electrodes where the spark jumps. Check it with a wire-type feeler gauge against the specification and bend only the ground electrode if adjustment is allowed. Many modern iridium or platinum plugs come pregapped and can be damaged by bending. Install plugs to the specified torque.
PPE and rotating machinery
Personal protective equipment (PPE) includes safety glasses that guard eyes against flying particles and splashes, gloves suited to the task and hearing protection near loud tools. Around rotating parts, such as a running engine fan or a drill, remove jewelry, tie back long hair and avoid loose sleeves or gloves that could catch. PPE does not replace guards.
Compressed air does not replace protective controls
Compressed air is useful but dangerous. Blowing off parts can drive dust and chips into eyes, and air forced through the skin can cause an injection injury. Never aim air at a person or use it to clean clothing or skin. Wear eye protection, use a chip guard and pressure-reducing nozzle as safety rules require, and keep other workers clear.
Tool inspection and maintenance
Inspect tools before each use. Look for cracked sockets, mushroomed punch heads, worn screwdriver tips and frayed cords or broken plugs. If a power cord's insulation is damaged or a guard is loose or missing, remove the tool from service until it is properly repaired or replaced. Clean, oil and store tools in their places.
Energy isolation and unexpected startup
Before working near belts, fans or other moving parts, control the energy source. Turn the engine off, remove the key or disable push-button start, and disconnect the battery when the procedure calls for it. Electric cooling fans can start even with the engine off. In a shop, lockout and tagout keep a machine from being restarted while someone works on it.
Calibrated readings, resolution and tolerances
Every measurement has limits. Resolution is the smallest step an instrument can show, such as 0.01 mm on a micrometer. Accuracy is how close a reading is to the true value, which depends on calibration. A tolerance is the allowed range in a specification. A torque wrench or gauge that is out of calibration gives readings you cannot trust, even if they look precise.
Diagnostic reasoning: symptom, test, conclusion
Good diagnosis follows a chain: note the symptom, form a likely cause, run a test that can confirm or rule it out, and only then reach a conclusion. A code or symptom points to an area, not a guaranteed failed part. Testing before replacing saves money and avoids replacing good parts while the real fault remains.
Scenario: socket rounds a bolt
A 12-point socket slips and rounds the corners of a rusty bolt. Why? It grips nearer the corners and the head was weakened by corrosion. Better: apply penetrating oil, use a correctly sized six-point socket fully seated, and break the bolt loose with steady force from a breaker bar.
Scenario: pressure reading on a hot tire
A driver checks tire pressure after a highway trip and reads 38 psi when the door-jamb label says 35 psi. Heat raises the air pressure, so the reading is temporarily high. Letting air out now would leave the tire underinflated once it cools. Recheck when the tires are cold and adjust then.
Scenario: engine fault code points to a sensor
A scan tool shows a code for an oxygen-sensor circuit. The code proves only that the module saw a condition outside its limits. Causes can include a broken wire, a corroded connector, a blown fuse or the sensor itself. Inspect wiring and test before replacing anything. If codes are cleared and the light returns, the condition still exists.
Scenario: vehicle lifted on a hydraulic jack
A student raises a car with a floor jack and starts to slide under to look at the exhaust. Stop: a jack can leak down or slip. Chock the wheels still on the ground, place rated jack stands at the support points, lower the car onto the stands and test that it is steady before going underneath.
Scenario: electric impact tool and final torque
A technician spins lug nuts on with a cordless impact wrench. That is fine for running them down, but an impact wrench does not deliver a reliable final torque. Finish by tightening each nut to specification in a star pattern with a calibrated torque wrench, so the wheel seats evenly and the studs are not overstretched.
Scenario: micrometer reading below service limit
A brake rotor's minimum thickness is 26.0 mm, and a micrometer reads 25.7 mm. The rotor is 0.3 mm below the limit. It cannot be safely resurfaced or reused, because a thin rotor holds less heat and may crack. Record the reading and replace the rotor.
Scenario: resistance test on powered circuit
A technician sets a meter to ohms and probes a powered heater circuit, getting an odd, changing number. The reading is invalid because the circuit's own voltage interferes with the ohmmeter, and the meter may be damaged. Turn off power, isolate the part, then measure resistance.
Core recall: tool versus task
Quick matches: box-end or six-point socket for a hex bolt; feeler gauge for a small gap; micrometer for a precise outside thickness; dial indicator for runout; calibrated torque wrench for final torque; scan tool for trouble codes; multimeter for voltage, current and resistance; floor jack to lift, jack stands to support.
Exit checklist and ASVAB strategy
Before test day, be able to name a tool's job and its limit: wrenches and sockets turn fasteners, gauges measure, jacks only lift and stands support. Remember torque equals force times distance and V equals I times R. On ASVAB questions, eliminate silly choices first, then pick the answer that is safest and follows manufacturer instructions, since that is usually the key.
 English ▾