 ASVAB Camp
Mixed AO: the combined task
In a mixed Assembling Objects exercise, you may need to track a piece's location, turn it mentally, join its marked contact to another piece, and then reject an attractive but impossible final picture. Treat these as separate checks before making one decision. The official AO subtest measures how parts look when put together; the exact grid drawings in this lesson are original teaching devices, not live or secure examination questions. The goal is a reliable method that transfers to unfamiliar figures.
Read the operation before the picture
Before rotating anything, read the instruction in its own words. Does a piece slide, rotate, flip, join edge to edge, or sit in front of another? A slide preserves facing; a rotation changes facing but preserves handedness; a reflection reverses handedness. A candidate that is visually appealing can be wrong because it used an unpermitted operation. Make the operation a short verbal command—such as 'quarter turn clockwise, then join the red dots'—and carry the command into the comparison.
The four invariants worth saving
An invariant is a property that must remain unchanged through a permitted transformation. Four powerful invariants are the number of filled cells, the lengths of each rigid side, the order of features around a piece, and the identity of its marked point. If a colored corner belongs to part B, it must continue to belong to B after rotation or assembly. You can often reject a candidate using an invariant without reconstructing the entire figure. These checks are helpful but do not replace testing the actual connection.
Translation is not rotation
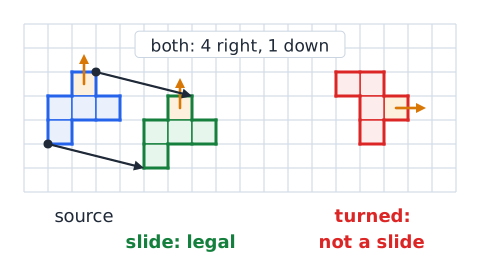
A translation moves every point by the same horizontal and vertical offset. A tab pointing up will continue pointing up after a slide. If the diagram requests translation alone, a candidate that turns the tab to the side is illegal even if it later connects neatly. On a square grid, you can verify a slide by comparing the relative displacement of two distinctive corners. Both must move by the same offset. Keep this distinction clear when a multi-step figure uses both sliding and turning.
Clockwise and counterclockwise
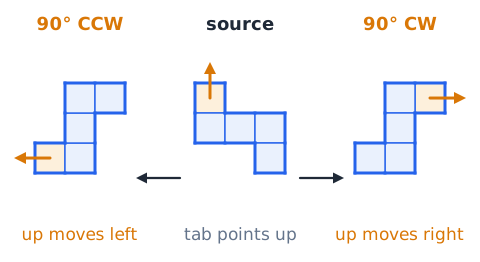
Clockwise means turning in the same sense as a clock hand. On a screen where rows increase downward, a feature pointing up moves to the right in a ninety-degree clockwise turn. In a counterclockwise quarter turn, up moves left. For a half turn, up points down; the clockwise and counterclockwise paths produce the same final orientation at exactly 180 degrees. Rather than relying on letters around the border, mentally rotate one unusual tab and then test the other features against it.
Follow the marked connector
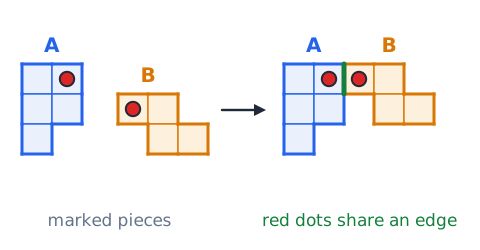
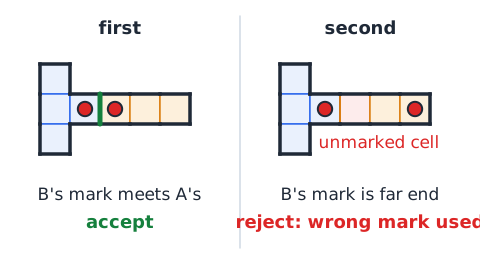
Some original exercises give a dot or letter on each piece. The mark identifies the exact contact point, not a new piece of material. When two points must touch, locate each mark first, then track it under every allowed rotation. Two shapes with nearly identical outer silhouettes may differ only in whether the right marked cell meets the intended partner. Do not silently swap a mark to a different corner. A connection is valid only when the named marks and their specified directions agree.
Matched marks versus coincident shapes
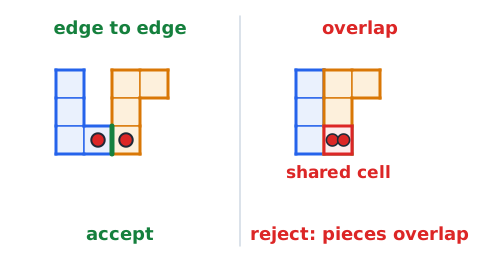
Matching a pair of connectors never permits the solid parts to occupy the same physical space unless an overlap is explicitly part of the drawing. In our grid questions, a red dot shows the cell from which a face-to-face contact is made. The marked cells remain distinct: the right-facing edge of A touches the left-facing edge of B. If their filled interiors overlap, the candidate is rejected even when dots look close. The contact rule and the nonoverlap rule must both hold.
The silhouette test
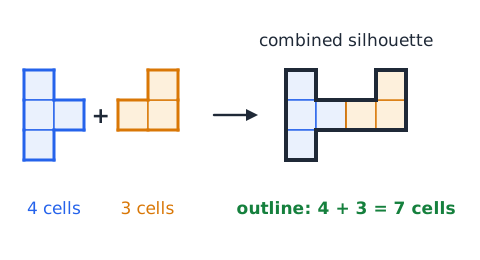
When pieces meet, their outside boundary forms a combined silhouette. Trace only the outermost boundary and look for a step, bump, notch, or corner whose presence is unavoidable. The exact union of the two outlines can eliminate a candidate before you analyze every internal seam. This test is particularly effective if one answer adds an extra square or removes a notch. For joined grid pieces, the total number of filled cells equals the sum of the parts when there is no overlap.
Keep seams separate from outer edges
A joined object can contain an internal seam where two pieces meet. That seam is not automatically part of the outside boundary. Distinguish the perimeter that air can reach from the line dividing the colored parts. In our visuals, two colors deliberately remain visible to show which cells belong to each part; this is an instructional aid. In an unfamiliar exam picture, the seam may be hidden. Use the marked contacts and individual features to reconstruct where the seam must lie.
Reflection changes handedness
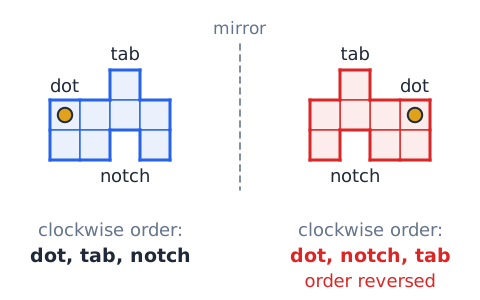
A mirror image reverses the order of asymmetric features. A right-handed notch pattern can become a left-handed pattern, even if its total area and many edge lengths remain identical. Ordinary rigid rotation cannot produce this reversal. To check, follow three distinct features around the boundary in clockwise order. A rotation preserves their cyclic order; a reflection reverses it. Reject reflected distractors whenever reflection is not permitted. Do not mistake a rotated L shape for a mirror image solely because its long arm points elsewhere.
A notch can identify a wrong answer
A notch is often more informative than a broad straight edge. If a source piece has a one-cell notch between two projections, every legal rigid transformation carries that notch with the piece. A candidate with the notch on the wrong side may be rotated incorrectly or mirrored. Focus first on the rarest feature rather than counting large uniform regions. Once you know where the notch must land, confirm that the marked connector and the rest of the boundary also agree.
Order of operations matters
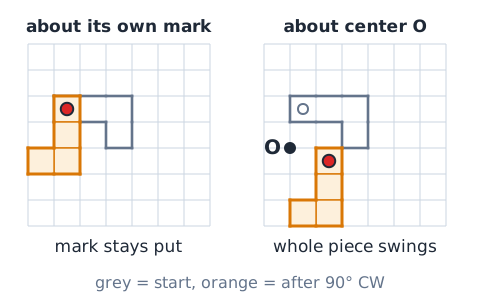
Rotation and translation can produce different final positions depending on the reference point and the order used. A safe method is to turn the part about its own marked point, then translate that marked point to its target. If the instruction instead fixes a global rotation center, obey that center. Say each stage explicitly: orient the piece, preserve its mark, place the mark, then check collision. Most mistakes in multistep assembly arise from skipping a stage while still imagining a plausible finished outline.
The anchor-first method
Select one source piece as a fixed anchor, usually A. Treat the marked position and orientation of A as nonnegotiable. Instead of mentally moving every part at once, move only B relative to A and verify the target side. Anchoring reduces the number of possibilities you hold in working memory. Once the first contact is secure, compare the combined silhouette to each answer. If the question includes C, keep the A–B assembly fixed and add C using the same procedure.
Recognize impossible overlap early
A distractor may show two pieces occupying the same grid square while their connection marks appear aligned. Unless the prompt explicitly allows layering, that candidate is invalid because solid parts cannot share the same space. Imagine the two pieces as cardboard cutouts lying flat on a table. They can meet along a boundary but not merge their areas. This physical image is more reliable than guessing from a pretty outline. On a grid, count repeated occupied cells at the suspected collision site.
Confirm edge-to-edge versus corner-to-corner
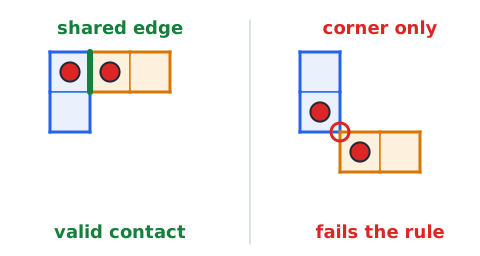
The word 'touch' can be ambiguous in informal language; a precise assembly problem defines the contact rule. Here, edge-to-edge means two marked squares share a whole side, not merely a corner. A diagonal neighboring square touches at one point only and fails our stated rule. Check the direction in the prompt: 'right face of A to left face of B' is stronger than a vague statement that the dots must be nearby. Every visual question in this lesson states its local contact conditions explicitly.
Use relative coordinates without arithmetic burden
Treat a grid cell as an ordered pair of column and row. Moving a piece two cells to the right adds two to each column and does not change rows. You rarely need to write coordinates during the test, but the idea clarifies why a translation preserves spacing. For a ninety-degree turn, track a distinctive cell relative to the marked cell; the direction vector turns with the piece. Thinking relatively keeps you from misplacing the mark when the diagram shifts across the page.
Three-point contour check
Choose three distinctive points: the marked connector, a far outer corner, and a notch or protrusion. A candidate must place all three consistently. One feature alone can be copied by a wrong alternative; three constraints are harder to fake. This check is efficient when the four options are all the same size. Move your attention in a fixed sequence rather than switching randomly among the answers. If any one point violates a required relation, reject the whole candidate.
The shape count cross-check
In a nonoverlapping assembly of pieces A and B, the number of occupied unit cells in the final figure equals the number in A plus the number in B. This is an independent sanity test, not the primary method. A candidate with one missing or added cell must be wrong. Equal cell count does not prove correctness because a mirrored or badly connected arrangement can have the same count. Use counting as a quick rejection tool, especially for images designed to tempt you with the correct outer scale.
Avoid chasing answer letters
Answer letters A through D are labels for choices, not predictable signals of where the correct geometry occurs. A strategy that assumes a letter tends to be correct has no sound foundation. Look at the object first; choose the letter last. In this bank, correct positions are deliberately distributed among the four choices. This helps practice full visual reasoning rather than memorizing response patterns. Even after ruling out three choices, identify the invariant that made the remaining option acceptable.
Hidden edges and occlusion
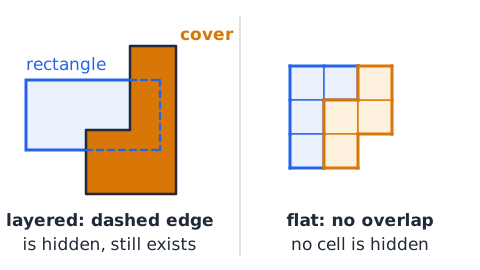
When one opaque piece covers part of another, the rear piece's hidden boundary is not normally visible through the front piece. The physical edge still exists; it is merely occluded. In a combined figure, decide which material lies in front before judging the visible contour. Do not infer that a missing visible line means the source piece was cut. In flat grid assembly with no overlap, occlusion is not permitted, so an apparently vanished cell is a signal to recheck the candidate.
Rotation by half a turn
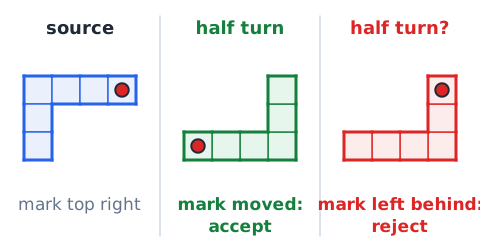
A 180-degree rotation sends a top feature to the bottom and a left feature to the right. It preserves lengths and the orientation order around the boundary, just as any rotation does. The marked cell must move with the figure, not remain at the original page location. A typical wrong option preserves the shape but leaves the mark behind. Another imitates the final direction of one arm while reversing the notch. Use both the feature direction and mark location to distinguish them.
Why a shifted match still fails
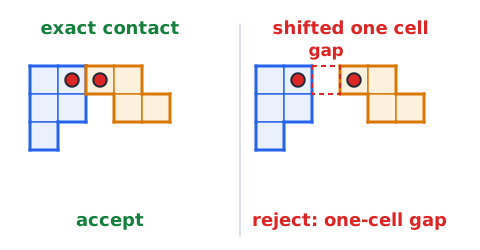
A correct orientation does not guarantee a correct placement. A part may be rotated exactly as instructed yet sit one cell away from the required contact edge, leaving a gap. Compare the location of the two marked contact cells, not merely their colors. If the problem requires an exact face-to-face meeting, any shift that creates a one-cell space is wrong. In a four-choice format, a one-cell translation is an effective distractor because the overall silhouette can remain nearly unchanged.
How to read an original grid diagram
Each colored square represents a filled unit cell. A gold or red circular marker identifies a specific square on its own piece. Borders separate cells visually; they are not grooves cut into the object. Source figures show pieces apart for clarity, while answer figures may show a completed assembly. Follow the caption's allowed operation and contact direction. If the caption says reflection is prohibited, do not turn the figure over like a sheet of paper. Rotating in the page plane is different.
The first ten seconds
An efficient first look does not involve detailed reconstruction of every option. Read the transformation rule, find the marked contact, then scan the options for the most obvious invariant violations. One answer may be mirrored; another may omit a cell; another may place the connector on the wrong side. Only after these quick rejections should you trace the surviving silhouette. The 'ten seconds' here is a teaching cue for a brief initial scan, not an official ASVAB per-question time allowance.
When to slow down
Slow down when two choices survive the quick scan. At that point, compare the least common feature—such as an asymmetric internal step—and follow the actual marked cell through each transformation. Spending a few more moments on a decisive geometric distinction is better than guessing from a general resemblance. On the CAT-ASVAB, you cannot return to change an answer once submitted, so use the time available to make the current decision deliberately. Do not treat this advice as permission to ignore the subtest clock.
CAT navigation matters
According to the official ASVAB guidance, the computerized adaptive format does not allow a test taker to return to an answered question. The official site lists AO as 15 scored questions with an 18-minute subtest limit without tryout questions, and a longer allocation when tryout questions are included. Practice banks with 40 items and suggested practice times are not official subtest replicas. Develop a consistent check-and-commit routine: read, transform, eliminate, verify, select, move on.
Paper administration differs
The official materials distinguish paper-and-pencil administration from CAT-ASVAB. Paper procedures can permit review within the current subtest, whereas CAT answers cannot be revisited after submission. Do not transfer a 'skip and come back later' plan directly from paper practice to the CAT. This application teaches geometric reasoning regardless of delivery format. When preparing for your appointment, use the current official instructions for the specific administration, because question counts, tryout procedures, and timing are not identical across formats.
The A–B–C elimination sequence
Use a three-pass decision process. In pass A, reject answers breaking explicit instructions: forbidden mirror, wrong turn, wrong contact. In pass B, test geometric invariants: same cells, correct mark identity, preserved notch. In pass C, validate the surviving assembly: contact is edge-to-edge, pieces do not overlap, and the outside silhouette is correct. Do not spend equal time on every candidate after a fatal error is found. This method reduces unnecessary visual workload and creates a reason you can explain after practice.
Use one decisive reason per rejection
When rejecting a distractor, articulate one short reason: 'mirror used,' 'red point moved to the wrong corner,' 'one-cell gap,' or 'extra filled square.' A candidate does not need five failures to be wrong; one demonstrated contradiction is enough. This explanation habit is important during study even if you work mentally during the real examination. It trains you to replace vague visual intuition with checkable evidence and reveals which type of spatial reasoning you need to practice next.
Classify distractors by error
A mirror distractor reverses handedness. A rotation distractor uses the wrong permitted angle. A placement distractor preserves shape but breaks contact. A marker distractor attaches the right silhouette using the wrong marked cell. A conservation distractor adds or removes material. Sort the choices into these categories, then use the simplest invariant for each category. The purpose is not to memorize a fixed order of letter answers but to recognize a small family of geometric contradictions in unfamiliar images.
Practice without overfitting
Rotate among practice problems featuring different contours, colors, marker locations, and instructions. If you always see the same shape, you may learn its outline instead of the transformation. After each question, explain why the correct response satisfies every rule and why each incorrect response fails. Revisit a category when errors concentrate there; no user-specific progress profile is required to practice carefully.
Example 1: rotate then attach
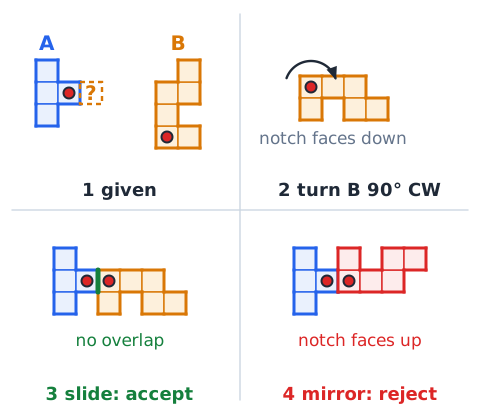
Imagine A has a red connector on its rightmost square. B has another red connector on a leftmost square after a ninety-degree clockwise turn. First perform the requested clockwise turn on B about its marked square. Next slide B until its marked square sits immediately to the right of A's marked square. Finally trace both shapes: there must be no overlapping filled squares, and the notch on B must face the predicted way. A mirror-shaped alternative fails even if the two red dots nearly touch.
Example 2: a correct turn with a wrong gap
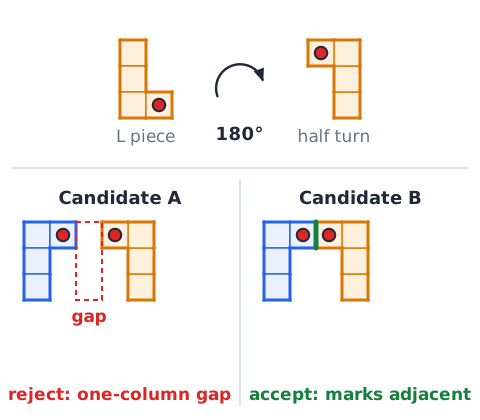
Suppose a four-cell L piece must rotate half a turn and join another piece along a shared vertical edge. Candidate A rotates it correctly but leaves one empty grid column between the contact squares. Candidate B places the marked cells as adjacent squares and retains the rotated notch. The correct decision is B; a correct rotation by itself is insufficient. The explanation has two independently testable conditions: orientation and face-to-face contact. When checking an option, ask both questions rather than accepting the first satisfied condition.
Example 3: forbidden reflection
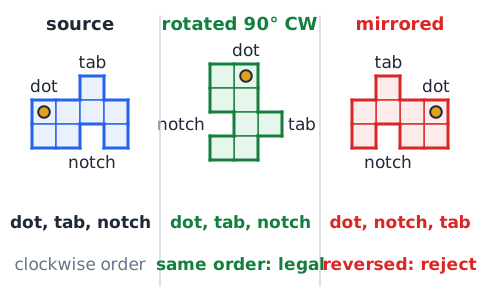
Three labeled features travel clockwise around a piece in the order dot, tab, notch. A legal rotation moves all three but preserves their cyclic order. A mirrored candidate changes their order to dot, notch, tab. That candidate is invalid whenever the instruction permits rotation but forbids reflection. Even if the perimeter area matches exactly, this order check exposes the error. You can use the same method for an asymmetric four-armed component, where a single long arm is not enough to distinguish rotation from reflection.
Example 4: three-part progressive fit
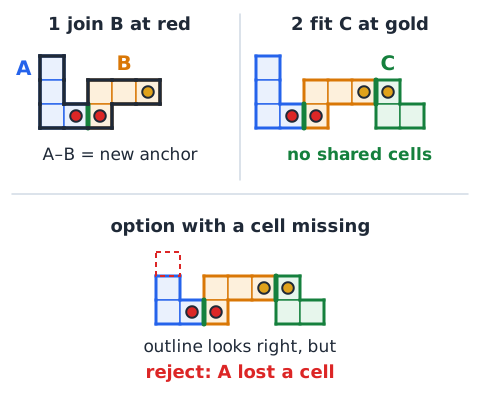
A, B, and C must form one nonoverlapping figure. Fix A in place. Connect B at its specified colored mark, then treat the A–B union as the new anchor. Fit C at its own stated connector and verify no interior overlaps. Do not redraw all three components every time an answer option changes one arm. Track only the component implicated by that difference. An option that omits one source cell cannot be correct no matter how attractive its general outline appears.
Example 5: the hidden-line confusion
Two opaque components are shown with the front component covering a rear edge. The rear edge is not visible, but that does not mean the component has lost material. In a flat nonoverlapping grid task, the parts can share a boundary but may not obscure one another's filled cells. Read the given rule rather than imposing assumptions from a different type of diagram. If an answer removes a cell simply because it is hidden in a layered reference picture, it confuses visibility with physical composition.
Example 6: two similar silhouettes
Two final pictures have identical outside boundaries. In the first, the red mark from B is adjacent to the named mark on A; in the second, a different red-looking corner has been used. Because the instructions name an exact contact cell, only the first is valid. This is why the final silhouette is a powerful filter but not always the last step. Carry the identity of every marked point throughout the operation and reject substitutions, even when they preserve the total shape.
Pitfall: guessing from the bounding box
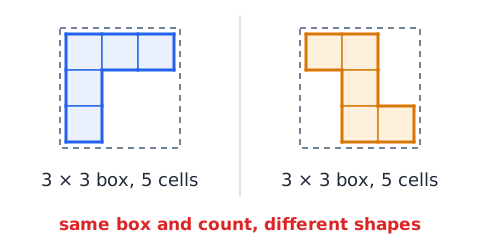
A bounding box tells you the rough width and height of a figure, but it hides the contour within. Two different polyominoes can occupy identical bounding boxes and contain the same number of cells. A correct answer may be narrower in one direction after an allowed rotation, depending on its longest arm. Do not discard a candidate merely because it has a different horizontal span unless that span contradicts the permitted transformation. Inspect a distinctive notch and the marked cell before deciding.
Pitfall: treating a corner as an edge
A diagonal touch at the corner of two squares is not equivalent to a shared unit-length edge. This difference can invalidate an otherwise neat-looking assembly. In this lesson, every connection question that uses an east–west face contact requires the marked cells to differ by exactly one column and zero rows. A diagonal displacement changes both coordinates and must be rejected. The mathematical precision is a tool for checking your work; during practice the same relationship can be judged visually.
Pitfall: losing the mark on a turn
When mentally turning a component, learners sometimes keep the mark in its old location on the screen. The mark belongs to a specific physical cell, so it rotates along with that cell. A wrong option can present the correct outline with the dot on the wrong corner. Track one marked cell as if it were painted permanently on the cardboard piece. After rotating, check the dot first and the other contour features second. A remembered outline without a remembered marker is incomplete.
Pitfall: confusing could fit with required fit
Sometimes several pieces could be positioned to touch in some way. The correct candidate must satisfy the exact stated operations and attachments, not merely any possible fit. If a direction calls for a clockwise quarter turn, a candidate obtained by a different rotation is not acceptable even if its pieces are perfectly adjacent. Likewise, if red must touch red, a blue-to-red contact is not a substitute. Read the rule as a list of mandatory constraints and require every item to hold simultaneously.
Pitfall: overusing cell counting
Counting squares can reject missing-piece alternatives but it cannot distinguish a mirror from a rotation when both contain the same cells. Nor can it identify which connector is used. Use counting as a secondary safeguard, especially when something looks strangely too short or too long. Then return to the properties that actually define this task: permitted transformation, exact mark, contact edge, and no collision. A successful answer survives multiple independent checks rather than one convenient shortcut.
A 40-item mixed practice routine
This lesson test contains forty original items, broader than a typical official AO subtest. Start by reading each instruction in full. Practice the same sequence throughout: identify the anchor, track the mark, orient the moving shape, compare the completed boundary, and reject a single violation in each distractor. If an item takes longer, finish the reasoning rather than relying on answer patterns. In review, read the rationale for all four answers, not only the correct one, because most improvement comes from understanding near-miss alternatives.
How to use timed drills honestly
Timed practice is useful when it encourages efficient checking, but a homemade forty-item quiz should not be presented as an exact reproduction of official test timing. The official CAT AO specification includes 15 scored items and an 18-minute limit without extra tryout questions; the conditions change with possible tryouts. Choose a practice pace appropriate to your learning stage and develop accuracy before speed. Never claim that completing a particular self-selected timer predicts an enlistment score or guarantees a particular occupational qualification.
After a wrong answer
Classify an error by its violated condition rather than by the letter you selected. If you missed a rotation, draw the turn in four ninety-degree steps. If you missed a contact, place two marked squares side by side and check their relative positions. If you missed a mirror, trace the notch order around the boundary. If you missed a collision, color A and B differently and find the shared filled cell. One targeted correction is more valuable than staring at a wrong picture without an explanation.
Guided drill 1: identify the rule
Given a source piece with a marked square and four proposed outputs, write the allowed operation in five words or fewer. For 'translate two cells east,' inspect whether every feature moved the same amount. For 'rotate clockwise ninety degrees,' track the notch and the marked square. For 'attach the red contacts,' insist on the stated contact edge. Reject any option that uses extra operations not mentioned. Then explain the best remaining candidate in terms of the rule, not visual similarity alone.
Guided drill 2: mark and outline
Sketch a seven-cell asymmetric component and put a dot near one end. Rotate it ninety degrees clockwise without removing or adding a cell. Compare your outcome with a mirrored version of the same seven-cell shape. The number of cells cannot distinguish them; the dot position and order of the features around the perimeter can. Next, slide the rotated version to a different part of the page. Notice that the slide changes the location of the shape but does not alter its orientation or handedness.
Guided drill 3: contact without overlap
Draw an anchor A with its contact mark on the right edge. Draw piece B with a marked cell that must sit immediately to the right of A's mark. Rotate B as instructed, align the marks, and shade every occupied cell. If a cell receives both colors, the placement is invalid for this nonoverlapping task. If there is an empty column between the two marks, the placement is also invalid. The correct assembly needs exact face contact and no shared interior. Practice rejecting one false condition at a time.
Guided drill 4: three-way elimination
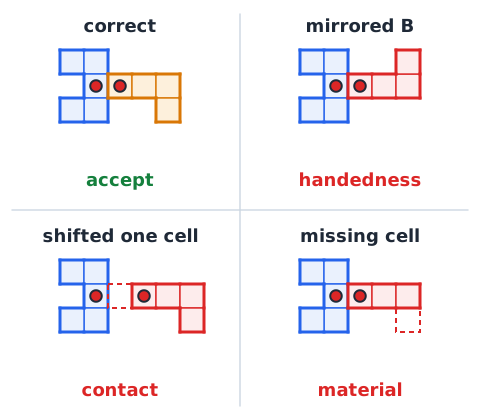
Take four answer sketches: one correctly joined, one mirrored, one shifted by a single cell, and one with a missing filled cell. Before doing full reconstruction, identify the easiest fatal clue in each wrong sketch. The mirror breaks handedness, the shift breaks contact, and the missing cell breaks material conservation. The correct sketch still needs explicit verification of the marked contact and absence of overlap. Describe why it is correct without referring to its position among the answer cards.
Guided drill 5: check a layered figure
Draw a small rectangle partly behind an opaque L-shaped cover. Mark which edges of the rectangle are visible and which continue underneath the cover. Then compare the scene to a flat edge-to-edge assembly where no part overlaps another. These tasks use different physical assumptions. In the first, hidden lines may represent real edges that are simply occluded. In the second, two filled cells must not occupy the same location. State the assumed model before choosing a final drawing.
Guided drill 6: practice a deliberate final check
Select a challenging three-part assembly and ask four yes-or-no questions immediately before committing: Was every piece used? Were only allowed transformations applied? Did the named marks meet at the required faces? Did all pieces remain nonoverlapping unless layering was expressly allowed? A 'no' means the option fails. This final check should be quick after the habit is learned. On CAT-ASVAB, make the check before submitting, because submitted answers cannot be revisited.
Six facts to remember
First, read the allowed operations. Second, preserve the material and any marked point. Third, distinguish rotation from reflection. Fourth, match the exact contact surfaces. Fifth, reject gap, overlap, and missing-piece distractors. Sixth, finish with the combined silhouette and a deliberate commitment. These are strategies, not a fixed algorithm supplied by the Department of Defense. They help you approach original grid exercises and more natural part-assembly figures with clear, testable reasoning.
Final mixed-AO checklist
Before answering, name the fixed anchor and the moving piece. State the requested turn, if any, and remember that a slide does not turn a shape. Carry each colored connector with its owning piece. Verify edge-to-edge contact, zero forbidden overlap, and preservation of distinctive notches. Examine the surviving candidate for an accidental mirror. In timed practice, use the shortest decisive reason to reject a wrong choice; in review, reconstruct the complete reason. The result is an informed choice, not a guess from the answer letter.
Exam relevance and accuracy boundary
The official AO skill is recognizing what objects look like when assembled. This course's square-cell rotation and contact problems are independently authored instructional approximations; their appearance and lesson length are not guarantees of official ASVAB item format, administration timing, or scores. Check the official ASVAB site for current CAT and paper-and-pencil rules. In particular, the CAT format does not permit changing answers after submission. Continue practicing until the constraints—not familiarity with these exact pictures—guide your selections.
 English ▾