This lesson test contains 39 original Assembling Objects questions that blend every rule from the mixed strategy lesson. One item may require a rotation and an exact connector match, another a handedness check plus a no-overlap check, so the test shows whether you run the whole routine instead of stopping at the first convincing match.
What is the first thing to check in a mixed AO item?
Show the answer
Answer: B
Mixed items combine several moves, such as a turn plus a slide, and the prompt states exactly which moves are allowed and which marked edges must meet. Those rules define a correct answer, so reading them first lets you reject candidates quickly instead of comparing pictures aimlessly. The tempting shortcuts are cues like card size, background shade or letter patterns from earlier items. None of these relate to the geometry, so they cannot identify a valid assembly.
A: Incorrect. Card size is a display feature and does not show which transformations are legal.
B (correct): Correct. The instruction determines which transformations and attachments are legal. This respects the stated spatial-assembly constraint.
C: Incorrect. “How dark the image background looks” does not satisfy the specific geometric rule being tested. The instruction determines which transformations and attachments are legal.
D: Incorrect. Answer letters from earlier items carry no information about the geometry of this one.
Question 2 of 39 · easy
If the prompt permits only sliding, which feature must remain unchanged?
Show the answer
Answer: D
Sliding moves a piece without turning it, so every feature keeps the same direction relative to the rest of the piece. A notch on the left side facing up stays on the left side facing up. That relation is the invariant to check in candidates. What changes is the piece's location: its position on the page and its distance from the card edges. Confusing these location measures with the piece's own shape is the most common error.
A: Incorrect. “The answer letter printed below” does not satisfy the specific geometric rule being tested. Translation changes page position but preserves a rigid piece’s direction and handedness.
B: Incorrect. Sliding moves the piece, so its distance to any border can change freely.
C: Incorrect. Absolute position is exactly what a slide changes.
D (correct): Correct. Translation changes page position but preserves a rigid piece’s direction and handedness. This respects the stated spatial-assembly constraint.
Question 3 of 39 · easy
Two marked squares must meet edge-to-edge. Which contact fails that rule?
Show the answer
Answer: C
An edge-to-edge connection needs the two squares to share a full side. When squares touch only at a diagonal corner, the shared contact is a single point with no length, so the rule fails. Both horizontal and vertical boundaries are full sides, so those contacts satisfy it. A quick check is to see whether the marked squares are in the same row in neighboring columns, or the same column in neighboring rows. A diagonal neighbor differs in both row and column.
A: Incorrect. “Sharing a complete horizontal boundary” does not satisfy the specific geometric rule being tested. Diagonal contact shares only a point, not a complete cell edge.
B: Incorrect. “Touching at the named opposing faces” does not satisfy the specific geometric rule being tested. Diagonal contact shares only a point, not a complete cell edge.
C (correct): Correct. Diagonal contact shares only a point, not a complete cell edge. This respects the stated spatial-assembly constraint.
D: Incorrect. “Sharing a complete vertical boundary” does not satisfy the specific geometric rule being tested. Diagonal contact shares only a point, not a complete cell edge.
Question 4 of 39 · easy
A candidate contains one fewer filled square than the two original nonoverlapping pieces. What is the decisive problem?
Show the answer
Answer: A
When two pieces join without overlapping and without being cut, every filled square of each piece appears in the result exactly once. So the assembled figure must contain exactly the sum of both pieces' squares. A candidate one square short has lost material, which no legal move can do, and it can be rejected immediately. Counting squares is a fast check that does not require mental rotation. Page width, seams and color are display features and do not decide the geometry.
A (correct): Correct. Without overlap or cutting, the final occupied-cell count equals the sum of both parts. This respects the stated spatial-assembly constraint.
B: Incorrect. Page width has nothing to do with the cell count, which must equal the sum of both pieces.
C: Incorrect. A visible seam is normal where two pieces meet; it does not explain a missing square.
D: Incorrect. “The color is too bright” does not satisfy the specific geometric rule being tested. Without overlap or cutting, the final occupied-cell count equals the sum of both parts.
Question 5 of 39 · easy
What is preserved by a rigid ninety-degree rotation but reversed by a mirror?
Show the answer
Answer: C
Walk around a shape clockwise and list its distinctive features: notch, spur, flat edge. Any rotation keeps that cyclic order, because the whole shape turns together. A mirror image reverses it, which is why a left-hand glove cannot be rotated into a right-hand one. This makes clockwise order a reliable test for spotting a forbidden flip. Position, column coordinates and arrow compass directions all change under rotation, so they cannot be what a rotation preserves.
A: Incorrect. “The absolute column coordinate of the marker” does not satisfy the specific geometric rule being tested. Rotations preserve handedness and cyclic feature order; reflection reverses them.
B: Incorrect. “The location of the entire shape” does not satisfy the specific geometric rule being tested. Rotations preserve handedness and cyclic feature order; reflection reverses them.
C (correct): Correct. Rotations preserve handedness and cyclic feature order; reflection reverses them. This respects the stated spatial-assembly constraint.
D: Incorrect. A ninety-degree rotation changes the direction every arrow points, so arrow directions are not preserved.
Question 6 of 39 · easy
What should stay attached to the same physical square during a turn?
Show the answer
Answer: C
A marker belongs to a particular square of the piece, so when the piece turns, the marker turns with it and stays on that same square. Its location on the screen changes, but its place within the piece does not. To check a candidate, identify the marked square by its position in the piece, such as the tip of the long arm, and confirm the marker is still there. Screen corners, grid borders and choice labels are fixed reference features, not part of the piece.
A: Incorrect. “The screen corner” does not satisfy the specific geometric rule being tested. A painted connector belongs to a specific square and rotates with the piece.
B: Incorrect. “The grid border” does not satisfy the specific geometric rule being tested. A painted connector belongs to a specific square and rotates with the piece.
C (correct): Correct. A painted connector belongs to a specific square and rotates with the piece. This respects the stated spatial-assembly constraint.
D: Incorrect. “The letter of the correct choice” does not satisfy the specific geometric rule being tested. A painted connector belongs to a specific square and rotates with the piece.
Question 7 of 39 · easy
Two candidates have the same silhouette. What extra evidence could distinguish them?
Show the answer
Answer: D
Two assemblies can share an identical outline yet differ in which squares meet inside it. Since the task requires specific marked squares to touch, the decisive test is whether those squares share an edge in each candidate. The outline is a useful first filter, but when it ties, look inside the shape at the contact points. Order in the list, typography and card spacing are display details, so they carry no information about the assembly.
A: Incorrect. List order is arbitrary and carries no geometric evidence.
B: Incorrect. “The card padding” does not satisfy the specific geometric rule being tested. The silhouette alone may not show whether the required marked connection is correct.
C: Incorrect. Lettering style is presentation only and says nothing about whether the marked squares meet.
D (correct): Correct. The silhouette alone may not show whether the required marked connection is correct. This respects the stated spatial-assembly constraint.
Question 8 of 39 · easy
What is the main role of an unusual notch in option elimination?
Show the answer
Answer: B
An asymmetric feature such as an unusual notch acts like a landmark. Because it looks different from every other part of the piece, you can follow exactly where it goes under a legal turn or slide. If a candidate shows the notch in the wrong place or facing the wrong way, the piece was turned incorrectly or mirrored. Symmetric shapes hide these errors, which is why test makers add notches. The notch does not change area or hint at answer positions.
A: Incorrect. A notch is a geometric feature of the piece; it says nothing about which answer position is correct.
B (correct): Correct. An asymmetric notch is informative because it can expose a wrong turn or mirror.
C: Incorrect. “It shows the official exam timer” does not satisfy the specific geometric rule being tested. An asymmetric notch is informative because it can expose a wrong turn or mirror.
D: Incorrect. Turning a rigid piece never changes its area, notch or no notch.
Question 9 of 39 · easy
What does a one-cell gap between required contact squares show?
Show the answer
Answer: B
A required contact means the marked squares must share an edge. If one empty cell separates them, the pieces do not touch at that point, so the specified connection is missing even when each piece has the correct orientation and shape. Correct orientation is necessary but not enough; both conditions must hold. A gap does not imply overlap, an added square or a mirror image, since none of those is shown by empty space between the markers.
A: Incorrect. “The pieces share an interior square” does not satisfy the specific geometric rule being tested. Correct orientation is insufficient if the required edge contact is absent.
B (correct): Correct. Correct orientation is insufficient if the required edge contact is absent. This respects the stated spatial-assembly constraint.
C: Incorrect. “The piece has gained a filled square” does not satisfy the specific geometric rule being tested. Correct orientation is insufficient if the required edge contact is absent.
D: Incorrect. A gap is a placement error; it does not show that either shape was flipped.
Question 10 of 39 · easy
Why should you not rely on the most common answer letter?
Show the answer
Answer: D
Each correct answer is determined by the geometry of its own question, and choice positions are typically shuffled or balanced, so no letter is reliably favored. Picking by letter frequency or by whether letters seem to alternate is guessing dressed up as strategy, and it ignores evidence you can check, such as cell counts, handedness and marked contacts. Only reason from the figure. If you must guess, eliminate impossible candidates first so that the guess is made among plausible ones.
A: Incorrect. “The four choices must have equal color” does not satisfy the specific geometric rule being tested. The answer letter is a label, not evidence that a geometric assembly is valid.
B: Incorrect. Correct answers do not follow a fixed alternating pattern, so letter order cannot be predicted.
C: Incorrect. “All letters mean different transformations” does not satisfy the specific geometric rule being tested. The answer letter is a label, not evidence that a geometric assembly is valid.
D (correct): Correct. The answer letter is a label, not evidence that a geometric assembly is valid.
Question 11 of 39 · medium
A piece is rotated correctly but its marked dot is redrawn on a different corner. Which rule fails?
Show the answer
Answer: A
In a rigid transformation, every physical point of the piece keeps its identity, so a dot on a specific corner must remain on that same corner after the turn. A candidate can show the correct outline and orientation and still be wrong if the marker has moved to a different corner, because that is no longer the same object. Check the marker by naming its location within the piece before and after. Color, grid size and timing do not test this rule.
A (correct): Correct. The marked square must remain the same material square through every rigid transformation. This respects the stated spatial-assembly constraint.
B: Incorrect. Color is unchanged here; the error is that the dot moved to a different part of the piece.
C: Incorrect. “The estimated item time” does not satisfy the specific geometric rule being tested. The marked square must remain the same material square through every rigid transformation.
D: Incorrect. Grid size is a display detail; the error is that the dot moved to a different part of the piece.
Question 12 of 39 · medium
Which sequence minimizes mental workload when A is fixed and B moves?
Show the answer
Answer: D
With A fixed, A serves as the reference, so only B needs mental manipulation. Work in a fixed order: first set B's orientation, then slide it until its marked square meets A's target face, and finally check that no squares overlap. Doing one operation at a time keeps each step simple to verify. Random trial and error hides which step went wrong, flips may be forbidden outright, and answer letters carry no geometric information.
A: Incorrect. “Flip all pieces first even if flips are forbidden” does not satisfy the specific geometric rule being tested. Anchor A, rotate B as required, translate B to contact, and verify no forbidden overlap.
B: Incorrect. Moving both pieces at random abandons the fixed anchor and multiplies the positions you must check.
C: Incorrect. “Examine answer letters before reading the stem” does not satisfy the specific geometric rule being tested. Anchor A, rotate B as required, translate B to contact, and verify no forbidden overlap.
D (correct): Correct. Anchor A, rotate B as required, translate B to contact, and verify no forbidden overlap. This respects the stated spatial-assembly constraint.
Question 13 of 39 · medium
Rotate the marked blue piece 90 degrees clockwise in the plane of the page. Do not reflect it or move the gold marker to a different material square. Which picture is the correct result?
Show the answer
Answer: A
The correct picture is the only rigid 90 degrees clockwise rotation of the original shape, including its painted marker. Its cell count, contour, and handedness remain unchanged.
A (correct): Correct. The gold-marked cell and every notch follow the requested 90 degrees clockwise rotation; the contour and filled-cell count are preserved.
B: Incorrect. This figure represents no turn rather than the required 90 degrees clockwise. Track the marked cell and the unusual outline to identify the mismatch.
C: Incorrect. This figure represents a 180-degree clockwise turn rather than the required 90 degrees clockwise. Track the marked cell and the unusual outline to identify the mismatch.
D: Incorrect. This figure represents a 270-degree clockwise turn rather than the required 90 degrees clockwise. Track the marked cell and the unusual outline to identify the mismatch.
Question 14 of 39 · medium
Rotate the marked blue piece 180 degrees in the plane of the page. Do not reflect it or move the gold marker to a different material square. Which picture is the correct result?
Show the answer
Answer: B
The correct picture is the only rigid 180 degrees rotation of the original shape, including its painted marker. Its cell count, contour, and handedness remain unchanged.
A: Incorrect. This figure represents no turn rather than the required 180 degrees. Track the marked cell and the unusual outline to identify the mismatch.
B (correct): Correct. The gold-marked cell and every notch follow the requested 180 degrees rotation; the contour and filled-cell count are preserved.
C: Incorrect. This figure represents a 90-degree clockwise turn rather than the required 180 degrees. Track the marked cell and the unusual outline to identify the mismatch.
D: Incorrect. This figure represents a 270-degree clockwise turn rather than the required 180 degrees. Track the marked cell and the unusual outline to identify the mismatch.
Question 15 of 39 · medium
Rotate the marked blue piece 90 degrees counterclockwise in the plane of the page. Do not reflect it or move the gold marker to a different material square. Which picture is the correct result?
Show the answer
Answer: B
The correct picture is the only rigid 90 degrees counterclockwise rotation of the original shape, including its painted marker. Its cell count, contour, and handedness remain unchanged.
A: Incorrect. This figure represents no turn rather than the required 90 degrees counterclockwise. Track the marked cell and the unusual outline to identify the mismatch.
B (correct): Correct. The gold-marked cell and every notch follow the requested 90 degrees counterclockwise rotation; the contour and filled-cell count are preserved.
C: Incorrect. This figure represents a 180-degree clockwise turn rather than the required 90 degrees counterclockwise. Track the marked cell and the unusual outline to identify the mismatch.
D: Incorrect. This figure represents a 90-degree clockwise turn rather than the required 90 degrees counterclockwise. Track the marked cell and the unusual outline to identify the mismatch.
Question 16 of 39 · medium
Rotate the marked blue piece 90 degrees clockwise in the plane of the page. Do not reflect it or move the gold marker to a different material square. Which picture is the correct result?
Show the answer
Answer: A
The correct picture is the only rigid 90 degrees clockwise rotation of the original shape, including its painted marker. Its cell count, contour, and handedness remain unchanged.
A (correct): Correct. The gold-marked cell and every notch follow the requested 90 degrees clockwise rotation; the contour and filled-cell count are preserved.
B: Incorrect. This figure represents a 180-degree clockwise turn rather than the required 90 degrees clockwise. Track the marked cell and the unusual outline to identify the mismatch.
C: Incorrect. This figure represents no turn rather than the required 90 degrees clockwise. Track the marked cell and the unusual outline to identify the mismatch.
D: Incorrect. This figure represents a 270-degree clockwise turn rather than the required 90 degrees clockwise. Track the marked cell and the unusual outline to identify the mismatch.
Question 17 of 39 · medium
Rotate the marked blue piece 90 degrees counterclockwise in the plane of the page. Do not reflect it or move the gold marker to a different material square. Which picture is the correct result?
Show the answer
Answer: D
The correct picture is the only rigid 90 degrees counterclockwise rotation of the original shape, including its painted marker. Its cell count, contour, and handedness remain unchanged.
A: Incorrect. This figure represents a 180-degree clockwise turn rather than the required 90 degrees counterclockwise. Track the marked cell and the unusual outline to identify the mismatch.
B: Incorrect. This figure represents a 90-degree clockwise turn rather than the required 90 degrees counterclockwise. Track the marked cell and the unusual outline to identify the mismatch.
C: Incorrect. This figure represents no turn rather than the required 90 degrees counterclockwise. Track the marked cell and the unusual outline to identify the mismatch.
D (correct): Correct. The gold-marked cell and every notch follow the requested 90 degrees counterclockwise rotation; the contour and filled-cell count are preserved.
Question 18 of 39 · medium
Rotate the marked blue piece 90 degrees clockwise in the plane of the page. Do not reflect it or move the gold marker to a different material square. Which picture is the correct result?
Show the answer
Answer: A
The correct picture is the only rigid 90 degrees clockwise rotation of the original shape, including its painted marker. Its cell count, contour, and handedness remain unchanged.
A (correct): Correct. The gold-marked cell and every notch follow the requested 90 degrees clockwise rotation; the contour and filled-cell count are preserved.
B: Incorrect. This figure represents no turn rather than the required 90 degrees clockwise. Track the marked cell and the unusual outline to identify the mismatch.
C: Incorrect. This figure represents a 180-degree clockwise turn rather than the required 90 degrees clockwise. Track the marked cell and the unusual outline to identify the mismatch.
D: Incorrect. This figure represents a 270-degree clockwise turn rather than the required 90 degrees clockwise. Track the marked cell and the unusual outline to identify the mismatch.
Question 19 of 39 · medium
Rotate the marked blue piece 180 degrees in the plane of the page. Do not reflect it or move the gold marker to a different material square. Which picture is the correct result?
Show the answer
Answer: D
The correct picture is the only rigid 180 degrees rotation of the original shape, including its painted marker. Its cell count, contour, and handedness remain unchanged.
A: Incorrect. This figure represents a 270-degree clockwise turn rather than the required 180 degrees. Track the marked cell and the unusual outline to identify the mismatch.
B: Incorrect. This figure represents no turn rather than the required 180 degrees. Track the marked cell and the unusual outline to identify the mismatch.
C: Incorrect. This figure represents a 90-degree clockwise turn rather than the required 180 degrees. Track the marked cell and the unusual outline to identify the mismatch.
D (correct): Correct. The gold-marked cell and every notch follow the requested 180 degrees rotation; the contour and filled-cell count are preserved.
Question 20 of 39 · medium
Rotate the marked blue piece 90 degrees counterclockwise in the plane of the page. Do not reflect it or move the gold marker to a different material square. Which picture is the correct result?
Show the answer
Answer: D
The correct picture is the only rigid 90 degrees counterclockwise rotation of the original shape, including its painted marker. Its cell count, contour, and handedness remain unchanged.
A: Incorrect. This figure represents a 90-degree clockwise turn rather than the required 90 degrees counterclockwise. Track the marked cell and the unusual outline to identify the mismatch.
B: Incorrect. This figure represents no turn rather than the required 90 degrees counterclockwise. Track the marked cell and the unusual outline to identify the mismatch.
C: Incorrect. This figure represents a 180-degree clockwise turn rather than the required 90 degrees counterclockwise. Track the marked cell and the unusual outline to identify the mismatch.
D (correct): Correct. The gold-marked cell and every notch follow the requested 90 degrees counterclockwise rotation; the contour and filled-cell count are preserved.
Question 21 of 39 · medium
Rotate the marked blue piece 90 degrees clockwise in the plane of the page. Do not reflect it or move the gold marker to a different material square. Which picture is the correct result?
Show the answer
Answer: C
The correct picture is the only rigid 90 degrees clockwise rotation of the original shape, including its painted marker. Its cell count, contour, and handedness remain unchanged.
A: Incorrect. This figure represents no turn rather than the required 90 degrees clockwise. Track the marked cell and the unusual outline to identify the mismatch.
B: Incorrect. This figure represents a 180-degree clockwise turn rather than the required 90 degrees clockwise. Track the marked cell and the unusual outline to identify the mismatch.
C (correct): Correct. The gold-marked cell and every notch follow the requested 90 degrees clockwise rotation; the contour and filled-cell count are preserved.
D: Incorrect. This figure represents a 270-degree clockwise turn rather than the required 90 degrees clockwise. Track the marked cell and the unusual outline to identify the mismatch.
Question 22 of 39 · medium
Rotate the marked blue piece 180 degrees in the plane of the page. Do not reflect it or move the gold marker to a different material square. Which picture is the correct result?
Show the answer
Answer: A
The correct picture is the only rigid 180 degrees rotation of the original shape, including its painted marker. Its cell count, contour, and handedness remain unchanged.
A (correct): Correct. The gold-marked cell and every notch follow the requested 180 degrees rotation; the contour and filled-cell count are preserved.
B: Incorrect. This figure represents no turn rather than the required 180 degrees. Track the marked cell and the unusual outline to identify the mismatch.
C: Incorrect. This figure represents a 270-degree clockwise turn rather than the required 180 degrees. Track the marked cell and the unusual outline to identify the mismatch.
D: Incorrect. This figure represents a 90-degree clockwise turn rather than the required 180 degrees. Track the marked cell and the unusual outline to identify the mismatch.
Question 23 of 39 · medium
Rotate the marked blue piece 90 degrees counterclockwise in the plane of the page. Do not reflect it or move the gold marker to a different material square. Which picture is the correct result?
Show the answer
Answer: D
The correct picture is the only rigid 90 degrees counterclockwise rotation of the original shape, including its painted marker. Its cell count, contour, and handedness remain unchanged.
A: Incorrect. This figure represents a 90-degree clockwise turn rather than the required 90 degrees counterclockwise. Track the marked cell and the unusual outline to identify the mismatch.
B: Incorrect. This figure represents a 180-degree clockwise turn rather than the required 90 degrees counterclockwise. Track the marked cell and the unusual outline to identify the mismatch.
C: Incorrect. This figure represents no turn rather than the required 90 degrees counterclockwise. Track the marked cell and the unusual outline to identify the mismatch.
D (correct): Correct. The gold-marked cell and every notch follow the requested 90 degrees counterclockwise rotation; the contour and filled-cell count are preserved.
Question 24 of 39 · medium
Keep blue piece A fixed. Keep B unturned. Place the gold-marked square of orange piece B immediately to the RIGHT of the gold-marked square on A (full face-to-face contact). The pieces must not overlap, and flipping is forbidden. Which option follows every rule?
Show the answer
Answer: B
Only the correct candidate follows the required B orientation and places the original marked B square one cell east of the marked A square while keeping the two interiors disjoint. Rotated near-misses and one-cell gaps are invalid.
A: Incorrect. The orientation of B is allowed, but the marked square is two columns east of A’s mark, creating a one-cell gap rather than full edge contact.
B (correct): Correct. Piece B uses the prescribed orientation (keep B unturned) and its marked square is immediately east of the mark on A; no filled cells overlap.
C: Incorrect. The marked squares may be aligned, but B was turned by an unauthorized amount, so the notch and feature directions are wrong. The required operation is: keep B unturned.
D: Incorrect. The marked squares may be aligned, but B was turned by an unauthorized amount, so the notch and feature directions are wrong. The required operation is: keep B unturned.
Question 25 of 39 · medium
Keep blue piece A fixed. Rotate B 90° clockwise. Place the gold-marked square of orange piece B immediately to the RIGHT of the gold-marked square on A (full face-to-face contact). The pieces must not overlap, and flipping is forbidden. Which option follows every rule?
Show the answer
Answer: C
Only the correct candidate follows the required B orientation and places the original marked B square one cell east of the marked A square while keeping the two interiors disjoint. Rotated near-misses and one-cell gaps are invalid.
A: Incorrect. The marked squares may be aligned, but B was turned by an unauthorized amount, so the notch and feature directions are wrong. The required operation is: rotate B 90° clockwise.
B: Incorrect. The marked squares may be aligned, but B was turned by an unauthorized amount, so the notch and feature directions are wrong. The required operation is: rotate B 90° clockwise.
C (correct): Correct. Piece B uses the prescribed orientation (rotate B 90° clockwise) and its marked square is immediately east of the mark on A; no filled cells overlap.
D: Incorrect. The orientation of B is allowed, but the marked square is two columns east of A’s mark, creating a one-cell gap rather than full edge contact.
Question 26 of 39 · medium
Keep blue piece A fixed. Rotate B 180°. Place the gold-marked square of orange piece B immediately to the RIGHT of the gold-marked square on A (full face-to-face contact). The pieces must not overlap, and flipping is forbidden. Which option follows every rule?
Show the answer
Answer: B
Only the correct candidate follows the required B orientation and places the original marked B square one cell east of the marked A square while keeping the two interiors disjoint. Rotated near-misses and one-cell gaps are invalid.
A: Incorrect. The marked squares may be aligned, but B was turned by an unauthorized amount, so the notch and feature directions are wrong. The required operation is: rotate B 180°.
B (correct): Correct. Piece B uses the prescribed orientation (rotate B 180°) and its marked square is immediately east of the mark on A; no filled cells overlap.
C: Incorrect. The orientation of B is allowed, but the marked square is two columns east of A’s mark, creating a one-cell gap rather than full edge contact.
D: Incorrect. The marked squares may be aligned, but B was turned by an unauthorized amount, so the notch and feature directions are wrong. The required operation is: rotate B 180°.
Question 27 of 39 · medium
Keep blue piece A fixed. Rotate B 90° counterclockwise. Place the gold-marked square of orange piece B immediately to the RIGHT of the gold-marked square on A (full face-to-face contact). The pieces must not overlap, and flipping is forbidden. Which option follows every rule?
Show the answer
Answer: C
Only the correct candidate follows the required B orientation and places the original marked B square one cell east of the marked A square while keeping the two interiors disjoint. Rotated near-misses and one-cell gaps are invalid.
A: Incorrect. The marked squares may be aligned, but B was turned by an unauthorized amount, so the notch and feature directions are wrong. The required operation is: rotate B 90° counterclockwise.
B: Incorrect. The orientation of B is allowed, but the marked square is two columns east of A’s mark, creating a one-cell gap rather than full edge contact.
C (correct): Correct. Piece B uses the prescribed orientation (rotate B 90° counterclockwise) and its marked square is immediately east of the mark on A; no filled cells overlap.
D: Incorrect. The marked squares may be aligned, but B was turned by an unauthorized amount, so the notch and feature directions are wrong. The required operation is: rotate B 90° counterclockwise.
Question 28 of 39 · medium
Keep blue piece A fixed. Keep B unturned. Place the gold-marked square of orange piece B immediately to the RIGHT of the gold-marked square on A (full face-to-face contact). The pieces must not overlap, and flipping is forbidden. Which option follows every rule?
Show the answer
Answer: A
Only the correct candidate follows the required B orientation and places the original marked B square one cell east of the marked A square while keeping the two interiors disjoint. Rotated near-misses and one-cell gaps are invalid.
A (correct): Correct. Piece B uses the prescribed orientation (keep B unturned) and its marked square is immediately east of the mark on A; no filled cells overlap.
B: Incorrect. The marked squares may be aligned, but B was turned by an unauthorized amount, so the notch and feature directions are wrong. The required operation is: keep B unturned.
C: Incorrect. The orientation of B is allowed, but the marked square is two columns east of A’s mark, creating a one-cell gap rather than full edge contact.
D: Incorrect. The marked squares may be aligned, but B was turned by an unauthorized amount, so the notch and feature directions are wrong. The required operation is: keep B unturned.
Question 29 of 39 · medium
Keep blue piece A fixed. Rotate B 90° clockwise. Place the gold-marked square of orange piece B immediately to the RIGHT of the gold-marked square on A (full face-to-face contact). The pieces must not overlap, and flipping is forbidden. Which option follows every rule?
Show the answer
Answer: C
Only the correct candidate follows the required B orientation and places the original marked B square one cell east of the marked A square while keeping the two interiors disjoint. Rotated near-misses and one-cell gaps are invalid.
A: Incorrect. The orientation of B is allowed, but the marked square is two columns east of A’s mark, creating a one-cell gap rather than full edge contact.
B: Incorrect. The marked squares may be aligned, but B was turned by an unauthorized amount, so the notch and feature directions are wrong. The required operation is: rotate B 90° clockwise.
C (correct): Correct. Piece B uses the prescribed orientation (rotate B 90° clockwise) and its marked square is immediately east of the mark on A; no filled cells overlap.
D: Incorrect. The marked squares may be aligned, but B was turned by an unauthorized amount, so the notch and feature directions are wrong. The required operation is: rotate B 90° clockwise.
Question 30 of 39 · hard
Keep blue piece A fixed. Rotate B 180°. Place the gold-marked square of orange piece B immediately to the RIGHT of the gold-marked square on A (full face-to-face contact). The pieces must not overlap, and flipping is forbidden. Which option follows every rule?
Show the answer
Answer: A
Only the correct candidate follows the required B orientation and places the original marked B square one cell east of the marked A square while keeping the two interiors disjoint. Rotated near-misses and one-cell gaps are invalid.
A (correct): Correct. Piece B uses the prescribed orientation (rotate B 180°) and its marked square is immediately east of the mark on A; no filled cells overlap.
B: Incorrect. The marked squares may be aligned, but B was turned by an unauthorized amount, so the notch and feature directions are wrong. The required operation is: rotate B 180°.
C: Incorrect. The marked squares may be aligned, but B was turned by an unauthorized amount, so the notch and feature directions are wrong. The required operation is: rotate B 180°.
D: Incorrect. The orientation of B is allowed, but the marked square is two columns east of A’s mark, creating a one-cell gap rather than full edge contact.
Question 31 of 39 · hard
Keep blue piece A fixed. Rotate B 90° counterclockwise. Place the gold-marked square of orange piece B immediately to the RIGHT of the gold-marked square on A (full face-to-face contact). The pieces must not overlap, and flipping is forbidden. Which option follows every rule?
Show the answer
Answer: B
Only the correct candidate follows the required B orientation and places the original marked B square one cell east of the marked A square while keeping the two interiors disjoint. Rotated near-misses and one-cell gaps are invalid.
A: Incorrect. The marked squares may be aligned, but B was turned by an unauthorized amount, so the notch and feature directions are wrong. The required operation is: rotate B 90° counterclockwise.
B (correct): Correct. Piece B uses the prescribed orientation (rotate B 90° counterclockwise) and its marked square is immediately east of the mark on A; no filled cells overlap.
C: Incorrect. The marked squares may be aligned, but B was turned by an unauthorized amount, so the notch and feature directions are wrong. The required operation is: rotate B 90° counterclockwise.
D: Incorrect. The orientation of B is allowed, but the marked square is two columns east of A’s mark, creating a one-cell gap rather than full edge contact.
Question 32 of 39 · hard
Keep blue piece A fixed. Keep B unturned. Place the gold-marked square of orange piece B immediately to the RIGHT of the gold-marked square on A (full face-to-face contact). The pieces must not overlap, and flipping is forbidden. Which option follows every rule?
Show the answer
Answer: C
Only the correct candidate follows the required B orientation and places the original marked B square one cell east of the marked A square while keeping the two interiors disjoint. Rotated near-misses and one-cell gaps are invalid.
A: Incorrect. The marked squares may be aligned, but B was turned by an unauthorized amount, so the notch and feature directions are wrong. The required operation is: keep B unturned.
B: Incorrect. The marked squares may be aligned, but B was turned by an unauthorized amount, so the notch and feature directions are wrong. The required operation is: keep B unturned.
C (correct): Correct. Piece B uses the prescribed orientation (keep B unturned) and its marked square is immediately east of the mark on A; no filled cells overlap.
D: Incorrect. The orientation of B is allowed, but the marked square is two columns east of A’s mark, creating a one-cell gap rather than full edge contact.
Question 33 of 39 · hard
Keep blue piece A fixed. Rotate B 90° clockwise. Place the gold-marked square of orange piece B immediately to the RIGHT of the gold-marked square on A (full face-to-face contact). The pieces must not overlap, and flipping is forbidden. Which option follows every rule?
Show the answer
Answer: A
Only the correct candidate follows the required B orientation and places the original marked B square one cell east of the marked A square while keeping the two interiors disjoint. Rotated near-misses and one-cell gaps are invalid.
A (correct): Correct. Piece B uses the prescribed orientation (rotate B 90° clockwise) and its marked square is immediately east of the mark on A; no filled cells overlap.
B: Incorrect. The marked squares may be aligned, but B was turned by an unauthorized amount, so the notch and feature directions are wrong. The required operation is: rotate B 90° clockwise.
C: Incorrect. The marked squares may be aligned, but B was turned by an unauthorized amount, so the notch and feature directions are wrong. The required operation is: rotate B 90° clockwise.
D: Incorrect. The orientation of B is allowed, but the marked square is two columns east of A’s mark, creating a one-cell gap rather than full edge contact.
Question 34 of 39 · hard
Keep blue piece A fixed. Rotate B 180°. Place the gold-marked square of orange piece B immediately to the RIGHT of the gold-marked square on A (full face-to-face contact). The pieces must not overlap, and flipping is forbidden. Which option follows every rule?
Show the answer
Answer: C
Only the correct candidate follows the required B orientation and places the original marked B square one cell east of the marked A square while keeping the two interiors disjoint. Rotated near-misses and one-cell gaps are invalid.
A: Incorrect. The orientation of B is allowed, but the marked square is two columns east of A’s mark, creating a one-cell gap rather than full edge contact.
B: Incorrect. The marked squares may be aligned, but B was turned by an unauthorized amount, so the notch and feature directions are wrong. The required operation is: rotate B 180°.
C (correct): Correct. Piece B uses the prescribed orientation (rotate B 180°) and its marked square is immediately east of the mark on A; no filled cells overlap.
D: Incorrect. The marked squares may be aligned, but B was turned by an unauthorized amount, so the notch and feature directions are wrong. The required operation is: rotate B 180°.
Question 35 of 39 · hard
Keep blue piece A fixed. Rotate B 90° counterclockwise. Place the gold-marked square of orange piece B immediately to the RIGHT of the gold-marked square on A (full face-to-face contact). The pieces must not overlap, and flipping is forbidden. Which option follows every rule?
Show the answer
Answer: A
Only the correct candidate follows the required B orientation and places the original marked B square one cell east of the marked A square while keeping the two interiors disjoint. Rotated near-misses and one-cell gaps are invalid.
A (correct): Correct. Piece B uses the prescribed orientation (rotate B 90° counterclockwise) and its marked square is immediately east of the mark on A; no filled cells overlap.
B: Incorrect. The marked squares may be aligned, but B was turned by an unauthorized amount, so the notch and feature directions are wrong. The required operation is: rotate B 90° counterclockwise.
C: Incorrect. The marked squares may be aligned, but B was turned by an unauthorized amount, so the notch and feature directions are wrong. The required operation is: rotate B 90° counterclockwise.
D: Incorrect. The orientation of B is allowed, but the marked square is two columns east of A’s mark, creating a one-cell gap rather than full edge contact.
Question 36 of 39 · hard
Keep blue piece A fixed. Keep B unturned. Place the gold-marked square of orange piece B immediately to the RIGHT of the gold-marked square on A (full face-to-face contact). The pieces must not overlap, and flipping is forbidden. Which option follows every rule?
Show the answer
Answer: D
Only the correct candidate follows the required B orientation and places the original marked B square one cell east of the marked A square while keeping the two interiors disjoint. Rotated near-misses and one-cell gaps are invalid.
A: Incorrect. The marked squares may be aligned, but B was turned by an unauthorized amount, so the notch and feature directions are wrong. The required operation is: keep B unturned.
B: Incorrect. The orientation of B is allowed, but the marked square is two columns east of A’s mark, creating a one-cell gap rather than full edge contact.
C: Incorrect. The marked squares may be aligned, but B was turned by an unauthorized amount, so the notch and feature directions are wrong. The required operation is: keep B unturned.
D (correct): Correct. Piece B uses the prescribed orientation (keep B unturned) and its marked square is immediately east of the mark on A; no filled cells overlap.
Question 37 of 39 · hard
Keep blue piece A fixed. Rotate B 90° clockwise. Place the gold-marked square of orange piece B immediately to the RIGHT of the gold-marked square on A (full face-to-face contact). The pieces must not overlap, and flipping is forbidden. Which option follows every rule?
Show the answer
Answer: B
Only the correct candidate follows the required B orientation and places the original marked B square one cell east of the marked A square while keeping the two interiors disjoint. Rotated near-misses and one-cell gaps are invalid.
A: Incorrect. The orientation of B is allowed, but the marked square is two columns east of A’s mark, creating a one-cell gap rather than full edge contact.
B (correct): Correct. Piece B uses the prescribed orientation (rotate B 90° clockwise) and its marked square is immediately east of the mark on A; no filled cells overlap.
C: Incorrect. The marked squares may be aligned, but B was turned by an unauthorized amount, so the notch and feature directions are wrong. The required operation is: rotate B 90° clockwise.
D: Incorrect. The marked squares may be aligned, but B was turned by an unauthorized amount, so the notch and feature directions are wrong. The required operation is: rotate B 90° clockwise.
Question 38 of 39 · hard
Keep blue piece A fixed. Rotate B 180°. Place the gold-marked square of orange piece B immediately to the RIGHT of the gold-marked square on A (full face-to-face contact). The pieces must not overlap, and flipping is forbidden. Which option follows every rule?
Show the answer
Answer: C
Only the correct candidate follows the required B orientation and places the original marked B square one cell east of the marked A square while keeping the two interiors disjoint. Rotated near-misses and one-cell gaps are invalid.
A: Incorrect. The marked squares may be aligned, but B was turned by an unauthorized amount, so the notch and feature directions are wrong. The required operation is: rotate B 180°.
B: Incorrect. The orientation of B is allowed, but the marked square is two columns east of A’s mark, creating a one-cell gap rather than full edge contact.
C (correct): Correct. Piece B uses the prescribed orientation (rotate B 180°) and its marked square is immediately east of the mark on A; no filled cells overlap.
D: Incorrect. The marked squares may be aligned, but B was turned by an unauthorized amount, so the notch and feature directions are wrong. The required operation is: rotate B 180°.
Question 39 of 39 · hard
Keep blue piece A fixed. Rotate B 90° counterclockwise. Place the gold-marked square of orange piece B immediately to the RIGHT of the gold-marked square on A (full face-to-face contact). The pieces must not overlap, and flipping is forbidden. Which option follows every rule?
Show the answer
Answer: B
Only the correct candidate follows the required B orientation and places the original marked B square one cell east of the marked A square while keeping the two interiors disjoint. Rotated near-misses and one-cell gaps are invalid.
A: Incorrect. The orientation of B is allowed, but the marked square is two columns east of A’s mark, creating a one-cell gap rather than full edge contact.
B (correct): Correct. Piece B uses the prescribed orientation (rotate B 90° counterclockwise) and its marked square is immediately east of the mark on A; no filled cells overlap.
C: Incorrect. The marked squares may be aligned, but B was turned by an unauthorized amount, so the notch and feature directions are wrong. The required operation is: rotate B 90° counterclockwise.
D: Incorrect. The marked squares may be aligned, but B was turned by an unauthorized amount, so the notch and feature directions are wrong. The required operation is: rotate B 90° counterclockwise.
The left box shows two shapes, each with a lettered point, and a line with the same two letters on its ends. Which figure shows how the shapes connect when each end of the line is attached to the point with the same letter?
Show the answer
Answer: B
Check one letter at a time. Point K is at a corner of the rectangle, and point L is at the peak of the roof of the house shape. Cross out any figure where either end of the line lands somewhere else or where a shape has changed. The shapes may be turned, so find each point by its place on the shape (corner, middle of a side, center), not by up, down, left or right.
A: The line ends in the wrong place: it meets the house shape at the middle of a wall, but point L is at the peak of the roof.
B (correct): The line joins a corner of the rectangle to the peak of the roof of the house shape, the same spots as points K and L in the left box; turning a shape does not move a point on it.
C: The line ends in the wrong place: it meets the house shape at a corner where the roof meets a wall, but point L is at the peak of the roof.
D: The line ends in the wrong place: it meets the rectangle at the middle of a long side, but point K is at a corner and it meets the house shape at a bottom corner, but point L is at the peak of the roof.
Practice 2 of 80 · easy
The left box shows two shapes, each with a lettered point, and a line with the same two letters on its ends. Which figure shows how the shapes connect when each end of the line is attached to the point with the same letter?
Show the answer
Answer: A
Check one letter at a time. Point K is at the top of the curved side of the half-circle, and point L is at the sharpest corner of the right triangle. Cross out any figure where either end of the line lands somewhere else or where a shape has changed. The shapes may be turned, so find each point by its place on the shape (corner, middle of a side, center), not by up, down, left or right.
A (correct): The line joins the top of the curved side of the half-circle to the sharpest corner of the right triangle, the same spots as points K and L in the left box; turning a shape does not move a point on it.
B: The line ends in the wrong place: it meets the right triangle at the right-angle corner, but point L is at the sharpest corner.
C: The line ends in the wrong place: it meets the right triangle at the middle of the slanted side, but point L is at the sharpest corner.
D: The line ends in the wrong place: it meets the half-circle at the middle of the flat side, but point K is at the top of the curved side and it meets the right triangle at the middle of the longer leg, but point L is at the sharpest corner.
Practice 3 of 80 · hard
The left box shows two shapes, each with a lettered point, and a line with the same two letters on its ends. Which figure shows how the shapes connect when each end of the line is attached to the point with the same letter?
Show the answer
Answer: D
Check one letter at a time. Point X is at the middle of a long side of the parallelogram, and point Y is at the middle of a side of the triangle. Cross out any figure where either end of the line lands somewhere else or where a shape has changed. The shapes may be turned, so find each point by its place on the shape (corner, middle of a side, center), not by up, down, left or right.
A: The line ends in the wrong place: it meets the parallelogram at a sharp corner, but point X is at the middle of a long side.
B: The line ends in the wrong place: it meets the triangle at the center, but point Y is at the middle of a side.
C: One of the shapes here is a rectangle, but the left box has a parallelogram. Joining parts never changes a shape.
D (correct): The line joins the middle of a long side of the parallelogram to the middle of a side of the triangle, the same spots as points X and Y in the left box; turning a shape does not move a point on it.
Practice 4 of 80 · hard
The left box shows two shapes, each with a lettered point, and a line with the same two letters on its ends. Which figure shows how the shapes connect when each end of the line is attached to the point with the same letter?
Show the answer
Answer: B
Check one letter at a time. Point G is at the middle of the short side of the trapezoid, and point H is at a sharp corner of the parallelogram. Cross out any figure where either end of the line lands somewhere else or where a shape has changed. The shapes may be turned, so find each point by its place on the shape (corner, middle of a side, center), not by up, down, left or right.
A: The line ends in the wrong place: it meets the trapezoid at a corner of the long side, but point G is at the middle of the short side.
B (correct): The line joins the middle of the short side of the trapezoid to a sharp corner of the parallelogram, the same spots as points G and H in the left box; turning a shape does not move a point on it.
C: The line ends in the wrong place: it meets the parallelogram at the middle of a short side, but point H is at a sharp corner.
D: The line ends in the wrong place: it meets the trapezoid at the middle of a slanted side, but point G is at the middle of the short side and it meets the parallelogram at a wide corner, but point H is at a sharp corner.
Practice 5 of 80 · hard
The left box shows two shapes, each with a lettered point, and a line with the same two letters on its ends. Which figure shows how the shapes connect when each end of the line is attached to the point with the same letter?
Show the answer
Answer: D
Check one letter at a time. Point J is at the center of the triangle, and point K is at the center of the diamond. Cross out any figure where either end of the line lands somewhere else or where a shape has changed. The shapes may be turned, so find each point by its place on the shape (corner, middle of a side, center), not by up, down, left or right.
A: The line ends in the wrong place: it meets the diamond at a wide corner, but point K is at the center.
B: The line ends in the wrong place: it meets the diamond at the middle of a side, but point K is at the center.
C: One of the shapes here is a square, but the left box has a diamond. Joining parts never changes a shape.
D (correct): The line joins the center of the triangle to the center of the diamond, the same spots as points J and K in the left box; turning a shape does not move a point on it.
Practice 6 of 80 · medium
The left box shows two shapes, each with a lettered point, and a line with the same two letters on its ends. Which figure shows how the shapes connect when each end of the line is attached to the point with the same letter?
Show the answer
Answer: D
Check one letter at a time. Point X is at the middle of a short side of the parallelogram, and point Y is at the center of the rectangle. Cross out any figure where either end of the line lands somewhere else or where a shape has changed. The shapes may be turned, so find each point by its place on the shape (corner, middle of a side, center), not by up, down, left or right.
A: The line ends in the wrong place: it meets the parallelogram at a wide corner, but point X is at the middle of a short side.
B: One of the shapes here is a square, but the left box has a rectangle. Joining parts never changes a shape.
C: The line ends in the wrong place: it meets the rectangle at the middle of a long side, but point Y is at the center.
D (correct): The line joins the middle of a short side of the parallelogram to the center of the rectangle, the same spots as points X and Y in the left box; turning a shape does not move a point on it.
Practice 7 of 80 · easy
The left box shows two shapes, each with a lettered point, and a line with the same two letters on its ends. Which figure shows how the shapes connect when each end of the line is attached to the point with the same letter?
Show the answer
Answer: A
Check one letter at a time. Point M is at a corner of the rectangle, and point N is at the middle of a side of the square. Cross out any figure where either end of the line lands somewhere else or where a shape has changed. The shapes may be turned, so find each point by its place on the shape (corner, middle of a side, center), not by up, down, left or right.
A (correct): The line joins a corner of the rectangle to the middle of a side of the square, the same spots as points M and N in the left box; turning a shape does not move a point on it.
B: The line ends in the wrong place: it meets the square at a corner, but point N is at the middle of a side.
C: The line ends in the wrong place: it meets the rectangle at the center, but point M is at a corner.
D: The line ends in the wrong place: it meets the rectangle at the middle of a short side, but point M is at a corner and it meets the square at the center, but point N is at the middle of a side.
Practice 8 of 80 · medium
The left box shows two shapes, each with a lettered point, and a line with the same two letters on its ends. Which figure shows how the shapes connect when each end of the line is attached to the point with the same letter?
Show the answer
Answer: D
Check one letter at a time. Point P is at the top of the curved side of the half-circle, and point Q is at the middle of a side of the hexagon. Cross out any figure where either end of the line lands somewhere else or where a shape has changed. The shapes may be turned, so find each point by its place on the shape (corner, middle of a side, center), not by up, down, left or right.
A: One of the shapes here is a pentagon, but the left box has a hexagon. Joining parts never changes a shape.
B: The line ends in the wrong place: it meets the half-circle at the middle of the flat side, but point P is at the top of the curved side.
C: The line ends in the wrong place: it meets the hexagon at a corner, but point Q is at the middle of a side.
D (correct): The line joins the top of the curved side of the half-circle to the middle of a side of the hexagon, the same spots as points P and Q in the left box; turning a shape does not move a point on it.
Practice 9 of 80 · easy
The left box shows two shapes, each with a lettered point, and a line with the same two letters on its ends. Which figure shows how the shapes connect when each end of the line is attached to the point with the same letter?
Show the answer
Answer: D
Check one letter at a time. Point J is at a wide corner of the parallelogram, and point K is at the sharpest corner of the right triangle. Cross out any figure where either end of the line lands somewhere else or where a shape has changed. The shapes may be turned, so find each point by its place on the shape (corner, middle of a side, center), not by up, down, left or right.
A: The line ends in the wrong place: it meets the right triangle at the right-angle corner, but point K is at the sharpest corner.
B: The line ends in the wrong place: it meets the parallelogram at the middle of a long side, but point J is at a wide corner and it meets the right triangle at the middle of the shorter leg, but point K is at the sharpest corner.
C: The line ends in the wrong place: it meets the right triangle at the middle of the longer leg, but point K is at the sharpest corner.
D (correct): The line joins a wide corner of the parallelogram to the sharpest corner of the right triangle, the same spots as points J and K in the left box; turning a shape does not move a point on it.
Practice 10 of 80 · medium
The left box shows two shapes, each with a lettered point, and a line with the same two letters on its ends. Which figure shows how the shapes connect when each end of the line is attached to the point with the same letter?
Show the answer
Answer: A
Check one letter at a time. Point K is at the top of the curved side of the half-circle, and point L is at the middle of a side of the triangle. Cross out any figure where either end of the line lands somewhere else or where a shape has changed. The shapes may be turned, so find each point by its place on the shape (corner, middle of a side, center), not by up, down, left or right.
A (correct): The line joins the top of the curved side of the half-circle to the middle of a side of the triangle, the same spots as points K and L in the left box; turning a shape does not move a point on it.
B: The line ends in the wrong place: it meets the half-circle at a corner of the flat side, but point K is at the top of the curved side.
C: The line ends in the wrong place: it meets the half-circle at the middle of the flat side, but point K is at the top of the curved side and it meets the triangle at a corner, but point L is at the middle of a side.
D: The line ends in the wrong place: it meets the triangle at a corner, but point L is at the middle of a side.
Practice 11 of 80 · hard
The left box shows two shapes, each with a lettered point, and a line with the same two letters on its ends. Which figure shows how the shapes connect when each end of the line is attached to the point with the same letter?
Show the answer
Answer: C
Check one letter at a time. Point V is at a corner of the hexagon, and point W is at a corner of the flat side of the half-circle. Cross out any figure where either end of the line lands somewhere else or where a shape has changed. The shapes may be turned, so find each point by its place on the shape (corner, middle of a side, center), not by up, down, left or right.
A: The line ends in the wrong place: it meets the hexagon at the center, but point V is at a corner.
B: The line ends in the wrong place: it meets the half-circle at the middle of the flat side, but point W is at a corner of the flat side.
C (correct): The line joins a corner of the hexagon to a corner of the flat side of the half-circle, the same spots as points V and W in the left box; turning a shape does not move a point on it.
D: One of the shapes here is a pentagon, but the left box has a hexagon. Joining parts never changes a shape.
Practice 12 of 80 · hard
The left box shows two shapes, each with a lettered point, and a line with the same two letters on its ends. Which figure shows how the shapes connect when each end of the line is attached to the point with the same letter?
Show the answer
Answer: A
Check one letter at a time. Point E is at a corner of the flat side of the half-circle, and point F is at the center of the hexagon. Cross out any figure where either end of the line lands somewhere else or where a shape has changed. The shapes may be turned, so find each point by its place on the shape (corner, middle of a side, center), not by up, down, left or right.
A (correct): The line joins a corner of the flat side of the half-circle to the center of the hexagon, the same spots as points E and F in the left box; turning a shape does not move a point on it.
B: One of the shapes here is a pentagon, but the left box has a hexagon. Joining parts never changes a shape.
C: The line ends in the wrong place: it meets the half-circle at the top of the curved side, but point E is at a corner of the flat side.
D: The line ends in the wrong place: it meets the hexagon at the middle of a side, but point F is at the center.
Practice 13 of 80 · easy
The left box shows two shapes, each with a lettered point, and a line with the same two letters on its ends. Which figure shows how the shapes connect when each end of the line is attached to the point with the same letter?
Show the answer
Answer: A
Check one letter at a time. Point R is at the middle of a short side of the parallelogram, and point S is at the top of the curved side of the half-circle. Cross out any figure where either end of the line lands somewhere else or where a shape has changed. The shapes may be turned, so find each point by its place on the shape (corner, middle of a side, center), not by up, down, left or right.
A (correct): The line joins the middle of a short side of the parallelogram to the top of the curved side of the half-circle, the same spots as points R and S in the left box; turning a shape does not move a point on it.
B: The line ends in the wrong place: it meets the parallelogram at a sharp corner, but point R is at the middle of a short side and it meets the half-circle at the middle of the flat side, but point S is at the top of the curved side.
C: The line ends in the wrong place: it meets the parallelogram at a wide corner, but point R is at the middle of a short side.
D: The line ends in the wrong place: it meets the parallelogram at the center, but point R is at the middle of a short side.
Practice 14 of 80 · medium
The left box shows two shapes, each with a lettered point, and a line with the same two letters on its ends. Which figure shows how the shapes connect when each end of the line is attached to the point with the same letter?
Show the answer
Answer: C
Check one letter at a time. Point T is at a corner of the pentagon, and point U is at a corner where the roof meets a wall of the house shape. Cross out any figure where either end of the line lands somewhere else or where a shape has changed. The shapes may be turned, so find each point by its place on the shape (corner, middle of a side, center), not by up, down, left or right.
A: The line ends in the wrong place: it meets the pentagon at the middle of a side, but point T is at a corner.
B: The line ends in the wrong place: it meets the house shape at the peak of the roof, but point U is at a corner where the roof meets a wall.
C (correct): The line joins a corner of the pentagon to a corner where the roof meets a wall of the house shape, the same spots as points T and U in the left box; turning a shape does not move a point on it.
D: One of the shapes here is a hexagon, but the left box has a pentagon. Joining parts never changes a shape.
Practice 15 of 80 · hard
The left box shows two shapes, each with a lettered point, and a line with the same two letters on its ends. Which figure shows how the shapes connect when each end of the line is attached to the point with the same letter?
Show the answer
Answer: A
Check one letter at a time. Point R is at the center of the diamond, and point S is at the center of the pentagon. Cross out any figure where either end of the line lands somewhere else or where a shape has changed. The shapes may be turned, so find each point by its place on the shape (corner, middle of a side, center), not by up, down, left or right.
A (correct): The line joins the center of the diamond to the center of the pentagon, the same spots as points R and S in the left box; turning a shape does not move a point on it.
B: The line ends in the wrong place: it meets the diamond at a wide corner, but point R is at the center.
C: The line ends in the wrong place: it meets the diamond at the middle of a side, but point R is at the center.
D: One of the shapes here is a hexagon, but the left box has a pentagon. Joining parts never changes a shape.
Practice 16 of 80 · medium
The left box shows two shapes, each with a lettered point, and a line with the same two letters on its ends. Which figure shows how the shapes connect when each end of the line is attached to the point with the same letter?
Show the answer
Answer: D
Check one letter at a time. Point R is at the center of the rectangle, and point S is at a corner of the triangle. Cross out any figure where either end of the line lands somewhere else or where a shape has changed. The shapes may be turned, so find each point by its place on the shape (corner, middle of a side, center), not by up, down, left or right.
A: One of the shapes here is a parallelogram, but the left box has a rectangle. Joining parts never changes a shape.
B: The line ends in the wrong place: it meets the triangle at the middle of a side, but point S is at a corner.
C: The line ends in the wrong place: it meets the rectangle at a corner, but point R is at the center.
D (correct): The line joins the center of the rectangle to a corner of the triangle, the same spots as points R and S in the left box; turning a shape does not move a point on it.
Practice 17 of 80 · medium
The left box shows two shapes, each with a lettered point, and a line with the same two letters on its ends. Which figure shows how the shapes connect when each end of the line is attached to the point with the same letter?
Show the answer
Answer: B
Check one letter at a time. Point M is at a corner of the flat side of the half-circle, and point N is at the center of the square. Cross out any figure where either end of the line lands somewhere else or where a shape has changed. The shapes may be turned, so find each point by its place on the shape (corner, middle of a side, center), not by up, down, left or right.
A: One of the shapes here is a rectangle, but the left box has a square. Joining parts never changes a shape.
B (correct): The line joins a corner of the flat side of the half-circle to the center of the square, the same spots as points M and N in the left box; turning a shape does not move a point on it.
C: The line ends in the wrong place: it meets the half-circle at the middle of the flat side, but point M is at a corner of the flat side.
D: The line ends in the wrong place: it meets the half-circle at the top of the curved side, but point M is at a corner of the flat side.
Practice 18 of 80 · easy
The left box shows two shapes, each with a lettered point, and a line with the same two letters on its ends. Which figure shows how the shapes connect when each end of the line is attached to the point with the same letter?
Show the answer
Answer: B
Check one letter at a time. Point E is at a corner of the short side of the trapezoid, and point F is at the middle of a long side of the rectangle. Cross out any figure where either end of the line lands somewhere else or where a shape has changed. The shapes may be turned, so find each point by its place on the shape (corner, middle of a side, center), not by up, down, left or right.
A: The line ends in the wrong place: it meets the rectangle at the center, but point F is at the middle of a long side.
B (correct): The line joins a corner of the short side of the trapezoid to the middle of a long side of the rectangle, the same spots as points E and F in the left box; turning a shape does not move a point on it.
C: The line ends in the wrong place: it meets the trapezoid at the middle of a slanted side, but point E is at a corner of the short side and it meets the rectangle at the middle of a short side, but point F is at the middle of a long side.
D: The line ends in the wrong place: it meets the trapezoid at the middle of the short side, but point E is at a corner of the short side.
Practice 19 of 80 · medium
The left box shows two shapes, each with a lettered point, and a line with the same two letters on its ends. Which figure shows how the shapes connect when each end of the line is attached to the point with the same letter?
Show the answer
Answer: D
Check one letter at a time. Point R is at the middle of a side of the hexagon, and point S is at the middle of a side of the pentagon. Cross out any figure where either end of the line lands somewhere else or where a shape has changed. The shapes may be turned, so find each point by its place on the shape (corner, middle of a side, center), not by up, down, left or right.
A: The line ends in the wrong place: it meets the hexagon at a corner, but point R is at the middle of a side.
B: The line ends in the wrong place: it meets the hexagon at the center, but point R is at the middle of a side and it meets the pentagon at a corner, but point S is at the middle of a side.
C: The line ends in the wrong place: it meets the hexagon at the center, but point R is at the middle of a side.
D (correct): The line joins the middle of a side of the hexagon to the middle of a side of the pentagon, the same spots as points R and S in the left box; turning a shape does not move a point on it.
Practice 20 of 80 · hard
The left box shows two shapes, each with a lettered point, and a line with the same two letters on its ends. Which figure shows how the shapes connect when each end of the line is attached to the point with the same letter?
Show the answer
Answer: A
Check one letter at a time. Point X is at the center of the triangle, and point Y is at the middle of the longer leg of the right triangle. Cross out any figure where either end of the line lands somewhere else or where a shape has changed. The shapes may be turned, so find each point by its place on the shape (corner, middle of a side, center), not by up, down, left or right.
A (correct): The line joins the center of the triangle to the middle of the longer leg of the right triangle, the same spots as points X and Y in the left box; turning a shape does not move a point on it.
B: The line ends in the wrong place: it meets the right triangle at the middle of the slanted side, but point Y is at the middle of the longer leg.
C: The line ends in the wrong place: it meets the triangle at a corner, but point X is at the center and it meets the right triangle at the sharpest corner, but point Y is at the middle of the longer leg.
D: The line ends in the wrong place: it meets the triangle at a corner, but point X is at the center.
Practice 21 of 80 · medium
The left box shows two shapes, each with a lettered point, and a line with the same two letters on its ends. Which figure shows how the shapes connect when each end of the line is attached to the point with the same letter?
Show the answer
Answer: C
Check one letter at a time. Point V is at the center of the triangle, and point W is at the top of the curved side of the half-circle. Cross out any figure where either end of the line lands somewhere else or where a shape has changed. The shapes may be turned, so find each point by its place on the shape (corner, middle of a side, center), not by up, down, left or right.
A: The line ends in the wrong place: it meets the triangle at a corner, but point V is at the center.
B: The line ends in the wrong place: it meets the triangle at the middle of a side, but point V is at the center and it meets the half-circle at a corner of the flat side, but point W is at the top of the curved side.
C (correct): The line joins the center of the triangle to the top of the curved side of the half-circle, the same spots as points V and W in the left box; turning a shape does not move a point on it.
D: The line ends in the wrong place: it meets the triangle at the middle of a side, but point V is at the center.
Practice 22 of 80 · medium
The left box shows two shapes, each with a lettered point, and a line with the same two letters on its ends. Which figure shows how the shapes connect when each end of the line is attached to the point with the same letter?
Show the answer
Answer: A
Check one letter at a time. Point X is at the center of the hexagon, and point Y is at a corner of the long side of the trapezoid. Cross out any figure where either end of the line lands somewhere else or where a shape has changed. The shapes may be turned, so find each point by its place on the shape (corner, middle of a side, center), not by up, down, left or right.
A (correct): The line joins the center of the hexagon to a corner of the long side of the trapezoid, the same spots as points X and Y in the left box; turning a shape does not move a point on it.
B: The line ends in the wrong place: it meets the trapezoid at the middle of the long side, but point Y is at a corner of the long side.
C: The line ends in the wrong place: it meets the hexagon at the middle of a side, but point X is at the center.
D: One of the shapes here is a pentagon, but the left box has a hexagon. Joining parts never changes a shape.
Practice 23 of 80 · medium
The left box shows two shapes, each with a lettered point, and a line with the same two letters on its ends. Which figure shows how the shapes connect when each end of the line is attached to the point with the same letter?
Show the answer
Answer: D
Check one letter at a time. Point G is at the top of the curved side of the half-circle, and point H is at the peak of the roof of the house shape. Cross out any figure where either end of the line lands somewhere else or where a shape has changed. The shapes may be turned, so find each point by its place on the shape (corner, middle of a side, center), not by up, down, left or right.
A: The line ends in the wrong place: it meets the half-circle at a corner of the flat side, but point G is at the top of the curved side.
B: The line ends in the wrong place: it meets the house shape at the middle of the bottom side, but point H is at the peak of the roof.
C: The line ends in the wrong place: it meets the half-circle at the middle of the flat side, but point G is at the top of the curved side.
D (correct): The line joins the top of the curved side of the half-circle to the peak of the roof of the house shape, the same spots as points G and H in the left box; turning a shape does not move a point on it.
Practice 24 of 80 · hard
The left box shows two shapes, each with a lettered point, and a line with the same two letters on its ends. Which figure shows how the shapes connect when each end of the line is attached to the point with the same letter?
Show the answer
Answer: C
Check one letter at a time. Point G is at a corner of the triangle, and point H is at the middle of a side of the pentagon. Cross out any figure where either end of the line lands somewhere else or where a shape has changed. The shapes may be turned, so find each point by its place on the shape (corner, middle of a side, center), not by up, down, left or right.
A: The line ends in the wrong place: it meets the triangle at the center, but point G is at a corner.
B: One of the shapes here is a hexagon, but the left box has a pentagon. Joining parts never changes a shape.
C (correct): The line joins a corner of the triangle to the middle of a side of the pentagon, the same spots as points G and H in the left box; turning a shape does not move a point on it.
D: The line ends in the wrong place: it meets the triangle at the middle of a side, but point G is at a corner.
Practice 25 of 80 · medium
The left box shows two shapes, each with a lettered point, and a line with the same two letters on its ends. Which figure shows how the shapes connect when each end of the line is attached to the point with the same letter?
Show the answer
Answer: D
Check one letter at a time. Point T is at the middle of a side of the pentagon, and point U is at the center of the hexagon. Cross out any figure where either end of the line lands somewhere else or where a shape has changed. The shapes may be turned, so find each point by its place on the shape (corner, middle of a side, center), not by up, down, left or right.
A: The line ends in the wrong place: it meets the hexagon at the middle of a side, but point U is at the center.
B: The line ends in the wrong place: it meets the pentagon at a corner, but point T is at the middle of a side.
C: The line ends in the wrong place: it meets the pentagon at the center, but point T is at the middle of a side and it meets the hexagon at a corner, but point U is at the center.
D (correct): The line joins the middle of a side of the pentagon to the center of the hexagon, the same spots as points T and U in the left box; turning a shape does not move a point on it.
Practice 26 of 80 · hard
The left box shows two shapes, each with a lettered point, and a line with the same two letters on its ends. Which figure shows how the shapes connect when each end of the line is attached to the point with the same letter?
Show the answer
Answer: D
Check one letter at a time. Point E is at a corner of the triangle, and point F is at the center of the rectangle. Cross out any figure where either end of the line lands somewhere else or where a shape has changed. The shapes may be turned, so find each point by its place on the shape (corner, middle of a side, center), not by up, down, left or right.
A: The line ends in the wrong place: it meets the triangle at the center, but point E is at a corner.
B: One of the shapes here is a parallelogram, but the left box has a rectangle. Joining parts never changes a shape.
C: The line ends in the wrong place: it meets the rectangle at the middle of a short side, but point F is at the center.
D (correct): The line joins a corner of the triangle to the center of the rectangle, the same spots as points E and F in the left box; turning a shape does not move a point on it.
Practice 27 of 80 · medium
The left box shows two shapes, each with a lettered point, and a line with the same two letters on its ends. Which figure shows how the shapes connect when each end of the line is attached to the point with the same letter?
Show the answer
Answer: B
Check one letter at a time. Point J is at a corner of the rectangle, and point K is at a wide corner of the diamond. Cross out any figure where either end of the line lands somewhere else or where a shape has changed. The shapes may be turned, so find each point by its place on the shape (corner, middle of a side, center), not by up, down, left or right.
A: The line ends in the wrong place: it meets the rectangle at the center, but point J is at a corner.
B (correct): The line joins a corner of the rectangle to a wide corner of the diamond, the same spots as points J and K in the left box; turning a shape does not move a point on it.
C: The line ends in the wrong place: it meets the diamond at the middle of a side, but point K is at a wide corner.
D: One of the shapes here is a square, but the left box has a rectangle. Joining parts never changes a shape.
Practice 28 of 80 · medium
The left box shows two shapes, each with a lettered point, and a line with the same two letters on its ends. Which figure shows how the shapes connect when each end of the line is attached to the point with the same letter?
Show the answer
Answer: A
Check one letter at a time. Point P is at the middle of the slanted side of the right triangle, and point Q is at a corner of the square. Cross out any figure where either end of the line lands somewhere else or where a shape has changed. The shapes may be turned, so find each point by its place on the shape (corner, middle of a side, center), not by up, down, left or right.
A (correct): The line joins the middle of the slanted side of the right triangle to a corner of the square, the same spots as points P and Q in the left box; turning a shape does not move a point on it.
B: The line ends in the wrong place: it meets the right triangle at the middle of the longer leg, but point P is at the middle of the slanted side.
C: One of the shapes here is a rectangle, but the left box has a square. Joining parts never changes a shape.
D: The line ends in the wrong place: it meets the right triangle at the right-angle corner, but point P is at the middle of the slanted side.
Practice 29 of 80 · easy
The left box shows two shapes, each with a lettered point, and a line with the same two letters on its ends. Which figure shows how the shapes connect when each end of the line is attached to the point with the same letter?
Show the answer
Answer: B
Check one letter at a time. Point P is at the center of the pentagon, and point Q is at the middle of a side of the square. Cross out any figure where either end of the line lands somewhere else or where a shape has changed. The shapes may be turned, so find each point by its place on the shape (corner, middle of a side, center), not by up, down, left or right.
A: The line ends in the wrong place: it meets the pentagon at the middle of a side, but point P is at the center and it meets the square at the center, but point Q is at the middle of a side.
B (correct): The line joins the center of the pentagon to the middle of a side of the square, the same spots as points P and Q in the left box; turning a shape does not move a point on it.
C: The line ends in the wrong place: it meets the pentagon at a corner, but point P is at the center.
D: The line ends in the wrong place: it meets the square at a corner, but point Q is at the middle of a side.
Practice 30 of 80 · medium
The left box shows two shapes, each with a lettered point, and a line with the same two letters on its ends. Which figure shows how the shapes connect when each end of the line is attached to the point with the same letter?
Show the answer
Answer: B
Check one letter at a time. Point V is at the middle of a side of the diamond, and point W is at the middle of a side of the pentagon. Cross out any figure where either end of the line lands somewhere else or where a shape has changed. The shapes may be turned, so find each point by its place on the shape (corner, middle of a side, center), not by up, down, left or right.
A: The line ends in the wrong place: it meets the diamond at the center, but point V is at the middle of a side.
B (correct): The line joins the middle of a side of the diamond to the middle of a side of the pentagon, the same spots as points V and W in the left box; turning a shape does not move a point on it.
C: One of the shapes here is a square, but the left box has a diamond. Joining parts never changes a shape.
D: The line ends in the wrong place: it meets the pentagon at the center, but point W is at the middle of a side.
Practice 31 of 80 · easy
The left box shows two shapes, each with a lettered point, and a line with the same two letters on its ends. Which figure shows how the shapes connect when each end of the line is attached to the point with the same letter?
Show the answer
Answer: C
Check one letter at a time. Point P is at the center of the hexagon, and point Q is at the center of the diamond. Cross out any figure where either end of the line lands somewhere else or where a shape has changed. The shapes may be turned, so find each point by its place on the shape (corner, middle of a side, center), not by up, down, left or right.
A: The line ends in the wrong place: it meets the diamond at a sharp corner, but point Q is at the center.
B: The line ends in the wrong place: it meets the hexagon at the middle of a side, but point P is at the center and it meets the diamond at a sharp corner, but point Q is at the center.
C (correct): The line joins the center of the hexagon to the center of the diamond, the same spots as points P and Q in the left box; turning a shape does not move a point on it.
D: The line ends in the wrong place: it meets the diamond at the middle of a side, but point Q is at the center.
Practice 32 of 80 · medium
The left box shows two shapes, each with a lettered point, and a line with the same two letters on its ends. Which figure shows how the shapes connect when each end of the line is attached to the point with the same letter?
Show the answer
Answer: B
Check one letter at a time. Point M is at the middle of the slanted side of the right triangle, and point N is at the peak of the roof of the house shape. Cross out any figure where either end of the line lands somewhere else or where a shape has changed. The shapes may be turned, so find each point by its place on the shape (corner, middle of a side, center), not by up, down, left or right.
A: The line ends in the wrong place: it meets the right triangle at the right-angle corner, but point M is at the middle of the slanted side and it meets the house shape at a corner where the roof meets a wall, but point N is at the peak of the roof.
B (correct): The line joins the middle of the slanted side of the right triangle to the peak of the roof of the house shape, the same spots as points M and N in the left box; turning a shape does not move a point on it.
C: The line ends in the wrong place: it meets the right triangle at the middle of the shorter leg, but point M is at the middle of the slanted side.
D: The line ends in the wrong place: it meets the right triangle at the middle of the longer leg, but point M is at the middle of the slanted side.
Practice 33 of 80 · medium
The left box shows two shapes, each with a lettered point, and a line with the same two letters on its ends. Which figure shows how the shapes connect when each end of the line is attached to the point with the same letter?
Show the answer
Answer: B
Check one letter at a time. Point K is at a corner of the triangle, and point L is at the middle of a side of the square. Cross out any figure where either end of the line lands somewhere else or where a shape has changed. The shapes may be turned, so find each point by its place on the shape (corner, middle of a side, center), not by up, down, left or right.
A: One of the shapes here is a diamond, but the left box has a square. Joining parts never changes a shape.
B (correct): The line joins a corner of the triangle to the middle of a side of the square, the same spots as points K and L in the left box; turning a shape does not move a point on it.
C: The line ends in the wrong place: it meets the square at the center, but point L is at the middle of a side.
D: The line ends in the wrong place: it meets the triangle at the center, but point K is at a corner.
Practice 34 of 80 · medium
The left box shows two shapes, each with a lettered point, and a line with the same two letters on its ends. Which figure shows how the shapes connect when each end of the line is attached to the point with the same letter?
Show the answer
Answer: A
Check one letter at a time. Point G is at the center of the pentagon, and point H is at a bottom corner of the house shape. Cross out any figure where either end of the line lands somewhere else or where a shape has changed. The shapes may be turned, so find each point by its place on the shape (corner, middle of a side, center), not by up, down, left or right.
A (correct): The line joins the center of the pentagon to a bottom corner of the house shape, the same spots as points G and H in the left box; turning a shape does not move a point on it.
B: One of the shapes here is a hexagon, but the left box has a pentagon. Joining parts never changes a shape.
C: The line ends in the wrong place: it meets the pentagon at a corner, but point G is at the center.
D: The line ends in the wrong place: it meets the house shape at the peak of the roof, but point H is at a bottom corner.
Practice 35 of 80 · easy
The left box shows two shapes, each with a lettered point, and a line with the same two letters on its ends. Which figure shows how the shapes connect when each end of the line is attached to the point with the same letter?
Show the answer
Answer: C
Check one letter at a time. Point G is at a corner of the square, and point H is at the center of the parallelogram. Cross out any figure where either end of the line lands somewhere else or where a shape has changed. The shapes may be turned, so find each point by its place on the shape (corner, middle of a side, center), not by up, down, left or right.
A: The line ends in the wrong place: it meets the square at the center, but point G is at a corner.
B: The line ends in the wrong place: it meets the parallelogram at the middle of a short side, but point H is at the center.
C (correct): The line joins a corner of the square to the center of the parallelogram, the same spots as points G and H in the left box; turning a shape does not move a point on it.
D: The line ends in the wrong place: it meets the square at the middle of a side, but point G is at a corner and it meets the parallelogram at the middle of a short side, but point H is at the center.
Practice 36 of 80 · medium
The left box shows two shapes, each with a lettered point, and a line with the same two letters on its ends. Which figure shows how the shapes connect when each end of the line is attached to the point with the same letter?
Show the answer
Answer: B
Check one letter at a time. Point E is at a corner of the hexagon, and point F is at the middle of a side of the square. Cross out any figure where either end of the line lands somewhere else or where a shape has changed. The shapes may be turned, so find each point by its place on the shape (corner, middle of a side, center), not by up, down, left or right.
A: The line ends in the wrong place: it meets the square at a corner, but point F is at the middle of a side.
B (correct): The line joins a corner of the hexagon to the middle of a side of the square, the same spots as points E and F in the left box; turning a shape does not move a point on it.
C: The line ends in the wrong place: it meets the square at the center, but point F is at the middle of a side.
D: One of the shapes here is a diamond, but the left box has a square. Joining parts never changes a shape.
Practice 37 of 80 · medium
The left box shows two shapes, each with a lettered point, and a line with the same two letters on its ends. Which figure shows how the shapes connect when each end of the line is attached to the point with the same letter?
Show the answer
Answer: A
Check one letter at a time. Point J is at the middle of the flat side of the half-circle, and point K is at the middle of a slanted side of the trapezoid. Cross out any figure where either end of the line lands somewhere else or where a shape has changed. The shapes may be turned, so find each point by its place on the shape (corner, middle of a side, center), not by up, down, left or right.
A (correct): The line joins the middle of the flat side of the half-circle to the middle of a slanted side of the trapezoid, the same spots as points J and K in the left box; turning a shape does not move a point on it.
B: The line ends in the wrong place: it meets the trapezoid at a corner of the short side, but point K is at the middle of a slanted side.
C: The line ends in the wrong place: it meets the half-circle at a corner of the flat side, but point J is at the middle of the flat side and it meets the trapezoid at the middle of the long side, but point K is at the middle of a slanted side.
D: The line ends in the wrong place: it meets the trapezoid at the middle of the short side, but point K is at the middle of a slanted side.
Practice 38 of 80 · easy
The left box shows two shapes, each with a lettered point, and a line with the same two letters on its ends. Which figure shows how the shapes connect when each end of the line is attached to the point with the same letter?
Show the answer
Answer: C
Check one letter at a time. Point V is at the middle of the longer leg of the right triangle, and point W is at a wide corner of the diamond. Cross out any figure where either end of the line lands somewhere else or where a shape has changed. The shapes may be turned, so find each point by its place on the shape (corner, middle of a side, center), not by up, down, left or right.
A: The line ends in the wrong place: it meets the diamond at the center, but point W is at a wide corner.
B: The line ends in the wrong place: it meets the right triangle at the middle of the slanted side, but point V is at the middle of the longer leg.
C (correct): The line joins the middle of the longer leg of the right triangle to a wide corner of the diamond, the same spots as points V and W in the left box; turning a shape does not move a point on it.
D: The line ends in the wrong place: it meets the right triangle at the sharpest corner, but point V is at the middle of the longer leg and it meets the diamond at the center, but point W is at a wide corner.
Practice 39 of 80 · medium
The left box shows two shapes, each with a lettered point, and a line with the same two letters on its ends. Which figure shows how the shapes connect when each end of the line is attached to the point with the same letter?
Show the answer
Answer: C
Check one letter at a time. Point K is at the center of the pentagon, and point L is at a sharp corner of the diamond. Cross out any figure where either end of the line lands somewhere else or where a shape has changed. The shapes may be turned, so find each point by its place on the shape (corner, middle of a side, center), not by up, down, left or right.
A: One of the shapes here is a hexagon, but the left box has a pentagon. Joining parts never changes a shape.
B: The line ends in the wrong place: it meets the pentagon at a corner, but point K is at the center.
C (correct): The line joins the center of the pentagon to a sharp corner of the diamond, the same spots as points K and L in the left box; turning a shape does not move a point on it.
D: The line ends in the wrong place: it meets the diamond at a wide corner, but point L is at a sharp corner.
Practice 40 of 80 · hard
The left box shows two shapes, each with a lettered point, and a line with the same two letters on its ends. Which figure shows how the shapes connect when each end of the line is attached to the point with the same letter?
Show the answer
Answer: B
Check one letter at a time. Point T is at the middle of a side of the triangle, and point U is at the center of the pentagon. Cross out any figure where either end of the line lands somewhere else or where a shape has changed. The shapes may be turned, so find each point by its place on the shape (corner, middle of a side, center), not by up, down, left or right.
A: One of the shapes here is a hexagon, but the left box has a pentagon. Joining parts never changes a shape.
B (correct): The line joins the middle of a side of the triangle to the center of the pentagon, the same spots as points T and U in the left box; turning a shape does not move a point on it.
C: The line ends in the wrong place: it meets the triangle at a corner, but point T is at the middle of a side.
D: The line ends in the wrong place: it meets the pentagon at the middle of a side, but point U is at the center.
Practice 41 of 80 · medium
The left box shows separate flat pieces. Which figure shows how the pieces look when they are fitted together?
Show the answer
Answer: C
Count the pieces first: every figure must use each piece exactly once, with nothing added. Then pick one distinctive piece, such as the largest one or one with a curved or sharply pointed edge, and look for it in each figure; pieces may be turned but never flipped over. A figure whose cut lines are in different places has pieces of different sizes and can be crossed out. Here the pieces fit together into a parallelogram.
A: This figure is a rectangle. The pieces in the left box do not have these shapes, so they cannot fill this outline without gaps or overlaps.
B: A cut is in a different place, so the pieces do not match: one piece here covers about 63% of the shape, but the matching piece in the left box covers about 45%.
C (correct): This parallelogram is made of exactly the 3 pieces in the left box, each only turned and slid into place.
D: This figure has 4 pieces, but the left box has 3. Every piece must be used once, and nothing may be added.
Practice 42 of 80 · hard
The left box shows separate flat pieces. Which figure shows how the pieces look when they are fitted together?
Show the answer
Answer: B
Count the pieces first: every figure must use each piece exactly once, with nothing added. Then pick one distinctive piece, such as the largest one or one with a curved or sharply pointed edge, and look for it in each figure; pieces may be turned but never flipped over. A figure whose cut lines are in different places has pieces of different sizes and can be crossed out. Here the pieces fit together into a circle.
A: A cut is in a different place, so the pieces do not match: one piece here covers about 27% of the shape, but the matching piece in the left box covers about 37%.
B (correct): This circle is made of exactly the 4 pieces in the left box, each only turned and slid into place.
C: A cut is in a different place, so the pieces do not match: one piece here covers about 45% of the shape, but the matching piece in the left box covers about 37%.
D: This figure is a hexagon. The pieces in the left box do not have these shapes, so they cannot fill this outline without gaps or overlaps.
Practice 43 of 80 · medium
The left box shows separate flat pieces. Which figure shows how the pieces look when they are fitted together?
Show the answer
Answer: C
Count the pieces first: every figure must use each piece exactly once, with nothing added. Then pick one distinctive piece, such as the largest one or one with a curved or sharply pointed edge, and look for it in each figure; pieces may be turned but never flipped over. A figure whose cut lines are in different places has pieces of different sizes and can be crossed out. Here the pieces fit together into a circle.
A: A cut is in a different place, so the pieces do not match: one piece here covers about 26% of the shape, but the matching piece in the left box covers about 15%.
B: A cut is in a different place, so the pieces do not match: one piece here covers about 34% of the shape, but the matching piece in the left box covers about 42%.
C (correct): This circle is made of exactly the 3 pieces in the left box, each only turned and slid into place.
D: This figure has 4 pieces, but the left box has 3. Every piece must be used once, and nothing may be added.
Practice 44 of 80 · easy
The left box shows separate flat pieces. Which figure shows how the pieces look when they are fitted together?
Show the answer
Answer: D
Count the pieces first: every figure must use each piece exactly once, with nothing added. Then pick one distinctive piece, such as the largest one or one with a curved or sharply pointed edge, and look for it in each figure; pieces may be turned but never flipped over. A figure whose cut lines are in different places has pieces of different sizes and can be crossed out. Here the pieces fit together into a triangle.
A: This figure has 4 pieces, but the left box has 3. Every piece must be used once, and nothing may be added.
B: A cut is in a different place, so the pieces do not match: one piece here covers about 51% of the shape, but the matching piece in the left box covers about 43%.
C: This figure is a right triangle. The pieces in the left box do not have these shapes, so they cannot fill this outline without gaps or overlaps.
D (correct): This triangle is made of exactly the 3 pieces in the left box, each only turned and slid into place.
Practice 45 of 80 · easy
The left box shows separate flat pieces. Which figure shows how the pieces look when they are fitted together?
Show the answer
Answer: B
Count the pieces first: every figure must use each piece exactly once, with nothing added. Then pick one distinctive piece, such as the largest one or one with a curved or sharply pointed edge, and look for it in each figure; pieces may be turned but never flipped over. A figure whose cut lines are in different places has pieces of different sizes and can be crossed out. Here the pieces fit together into a trapezoid.
A: This figure is a parallelogram. The pieces in the left box do not have these shapes, so they cannot fill this outline without gaps or overlaps.
B (correct): This trapezoid is made of exactly the 2 pieces in the left box, each only turned and slid into place.
C: A cut is in a different place, so the pieces do not match: one piece here covers about 68% of the shape, but the matching piece in the left box covers about 78%.
D: This figure has 3 pieces, but the left box has 2. Every piece must be used once, and nothing may be added.
Practice 46 of 80 · medium
The left box shows separate flat pieces. Which figure shows how the pieces look when they are fitted together?
Show the answer
Answer: C
Count the pieces first: every figure must use each piece exactly once, with nothing added. Then pick one distinctive piece, such as the largest one or one with a curved or sharply pointed edge, and look for it in each figure; pieces may be turned but never flipped over. A figure whose cut lines are in different places has pieces of different sizes and can be crossed out. Here the pieces fit together into a circle.
A: A cut is in a different place, so the pieces do not match: one piece here covers about 49% of the shape, but the matching piece in the left box covers about 57%.
B: This figure has 4 pieces, but the left box has 3. Every piece must be used once, and nothing may be added.
C (correct): This circle is made of exactly the 3 pieces in the left box, each only turned and slid into place.
D: A cut is in a different place, so the pieces do not match: one piece here covers about 41% of the shape, but the matching piece in the left box covers about 57%.
Practice 47 of 80 · medium
The left box shows separate flat pieces. Which figure shows how the pieces look when they are fitted together?
Show the answer
Answer: A
Count the pieces first: every figure must use each piece exactly once, with nothing added. Then pick one distinctive piece, such as the largest one or one with a curved or sharply pointed edge, and look for it in each figure; pieces may be turned but never flipped over. A figure whose cut lines are in different places has pieces of different sizes and can be crossed out. Here the pieces fit together into a rectangle.
A (correct): This rectangle is made of exactly the 3 pieces in the left box, each only turned and slid into place.
B: This figure has 4 pieces, but the left box has 3. Every piece must be used once, and nothing may be added.
C: A cut is in a different place, so the pieces do not match: one piece here covers about 66% of the shape, but the matching piece in the left box covers about 48%.
D: This figure is a square. The pieces in the left box do not have these shapes, so they cannot fill this outline without gaps or overlaps.
Practice 48 of 80 · medium
The left box shows separate flat pieces. Which figure shows how the pieces look when they are fitted together?
Show the answer
Answer: B
Count the pieces first: every figure must use each piece exactly once, with nothing added. Then pick one distinctive piece, such as the largest one or one with a curved or sharply pointed edge, and look for it in each figure; pieces may be turned but never flipped over. A figure whose cut lines are in different places has pieces of different sizes and can be crossed out. Here the pieces fit together into a rectangle.
A: A cut is in a different place, so the pieces do not match: one piece here covers about 30% of the shape, but the matching piece in the left box covers about 22%.
B (correct): This rectangle is made of exactly the 3 pieces in the left box, each only turned and slid into place.
C: A cut is in a different place, so the pieces do not match: one piece here covers about 55% of the shape, but the matching piece in the left box covers about 44%.
D: This figure has 4 pieces, but the left box has 3. Every piece must be used once, and nothing may be added.
Practice 49 of 80 · hard
The left box shows separate flat pieces. Which figure shows how the pieces look when they are fitted together?
Show the answer
Answer: A
Count the pieces first: every figure must use each piece exactly once, with nothing added. Then pick one distinctive piece, such as the largest one or one with a curved or sharply pointed edge, and look for it in each figure; pieces may be turned but never flipped over. A figure whose cut lines are in different places has pieces of different sizes and can be crossed out. Here the pieces fit together into a trapezoid.
A (correct): This trapezoid is made of exactly the 4 pieces in the left box, each only turned and slid into place.
B: This figure is a half-circle. The pieces in the left box do not have these shapes, so they cannot fill this outline without gaps or overlaps.
C: A cut is in a different place, so the pieces do not match: one piece here covers about 23% of the shape, but the matching piece in the left box covers about 30%.
D: A cut is in a different place, so the pieces do not match: one piece here covers about 47% of the shape, but the matching piece in the left box covers about 33%.
Practice 50 of 80 · hard
The left box shows separate flat pieces. Which figure shows how the pieces look when they are fitted together?
Show the answer
Answer: C
Count the pieces first: every figure must use each piece exactly once, with nothing added. Then pick one distinctive piece, such as the largest one or one with a curved or sharply pointed edge, and look for it in each figure; pieces may be turned but never flipped over. A figure whose cut lines are in different places has pieces of different sizes and can be crossed out. Here the pieces fit together into a half-circle.
A: This figure is a trapezoid. The pieces in the left box do not have these shapes, so they cannot fill this outline without gaps or overlaps.
B: A cut is in a different place, so the pieces do not match: one piece here covers about 45% of the shape, but the matching piece in the left box covers about 37%.
C (correct): This half-circle is made of exactly the 4 pieces in the left box, each only turned and slid into place.
D: A cut is in a different place, so the pieces do not match: one piece here covers about 29% of the shape, but the matching piece in the left box covers about 37%.
Practice 51 of 80 · hard
The left box shows separate flat pieces. Which figure shows how the pieces look when they are fitted together?
Show the answer
Answer: D
Count the pieces first: every figure must use each piece exactly once, with nothing added. Then pick one distinctive piece, such as the largest one or one with a curved or sharply pointed edge, and look for it in each figure; pieces may be turned but never flipped over. A figure whose cut lines are in different places has pieces of different sizes and can be crossed out. Here the pieces fit together into a pentagon.
A: A cut is in a different place, so the pieces do not match: one piece here covers about 35% of the shape, but the matching piece in the left box covers about 28%.
B: This figure is a hexagon. The pieces in the left box do not have these shapes, so they cannot fill this outline without gaps or overlaps.
C: A cut is in a different place, so the pieces do not match: one piece here covers about 51% of the shape, but the matching piece in the left box covers about 38%.
D (correct): This pentagon is made of exactly the 4 pieces in the left box, each only turned and slid into place.
Practice 52 of 80 · medium
The left box shows separate flat pieces. Which figure shows how the pieces look when they are fitted together?
Show the answer
Answer: C
Count the pieces first: every figure must use each piece exactly once, with nothing added. Then pick one distinctive piece, such as the largest one or one with a curved or sharply pointed edge, and look for it in each figure; pieces may be turned but never flipped over. A figure whose cut lines are in different places has pieces of different sizes and can be crossed out. Here the pieces fit together into a square.
A: This figure has 4 pieces, but the left box has 3. Every piece must be used once, and nothing may be added.
B: This figure is a rectangle. The pieces in the left box do not have these shapes, so they cannot fill this outline without gaps or overlaps.
C (correct): This square is made of exactly the 3 pieces in the left box, each only turned and slid into place.
D: A cut is in a different place, so the pieces do not match: one piece here covers about 37% of the shape, but the matching piece in the left box covers about 23%.
Practice 53 of 80 · medium
The left box shows separate flat pieces. Which figure shows how the pieces look when they are fitted together?
Show the answer
Answer: A
Count the pieces first: every figure must use each piece exactly once, with nothing added. Then pick one distinctive piece, such as the largest one or one with a curved or sharply pointed edge, and look for it in each figure; pieces may be turned but never flipped over. A figure whose cut lines are in different places has pieces of different sizes and can be crossed out. Here the pieces fit together into a circle.
A (correct): This circle is made of exactly the 3 pieces in the left box, each only turned and slid into place.
B: This figure has 4 pieces, but the left box has 3. Every piece must be used once, and nothing may be added.
C: This figure is a hexagon. The pieces in the left box do not have these shapes, so they cannot fill this outline without gaps or overlaps.
D: A cut is in a different place, so the pieces do not match: one piece here covers about 68% of the shape, but the matching piece in the left box covers about 55%.
Practice 54 of 80 · medium
The left box shows separate flat pieces. Which figure shows how the pieces look when they are fitted together?
Show the answer
Answer: C
Count the pieces first: every figure must use each piece exactly once, with nothing added. Then pick one distinctive piece, such as the largest one or one with a curved or sharply pointed edge, and look for it in each figure; pieces may be turned but never flipped over. A figure whose cut lines are in different places has pieces of different sizes and can be crossed out. Here the pieces fit together into a circle.
A: This figure is a hexagon. The pieces in the left box do not have these shapes, so they cannot fill this outline without gaps or overlaps.
B: This figure has 4 pieces, but the left box has 3. Every piece must be used once, and nothing may be added.
C (correct): This circle is made of exactly the 3 pieces in the left box, each only turned and slid into place.
D: A cut is in a different place, so the pieces do not match: one piece here covers about 36% of the shape, but the matching piece in the left box covers about 53%.
Practice 55 of 80 · hard
The left box shows separate flat pieces. Which figure shows how the pieces look when they are fitted together?
Show the answer
Answer: D
Count the pieces first: every figure must use each piece exactly once, with nothing added. Then pick one distinctive piece, such as the largest one or one with a curved or sharply pointed edge, and look for it in each figure; pieces may be turned but never flipped over. A figure whose cut lines are in different places has pieces of different sizes and can be crossed out. Here the pieces fit together into a pentagon.
A: A cut is in a different place, so the pieces do not match: one piece here covers about 34% of the shape, but the matching piece in the left box covers about 52%.
B: A cut is in a different place, so the pieces do not match: one piece here covers about 40% of the shape, but the matching piece in the left box covers about 52%.
C: This figure is a hexagon. The pieces in the left box do not have these shapes, so they cannot fill this outline without gaps or overlaps.
D (correct): This pentagon is made of exactly the 4 pieces in the left box, each only turned and slid into place.
Practice 56 of 80 · medium
The left box shows separate flat pieces. Which figure shows how the pieces look when they are fitted together?
Show the answer
Answer: A
Count the pieces first: every figure must use each piece exactly once, with nothing added. Then pick one distinctive piece, such as the largest one or one with a curved or sharply pointed edge, and look for it in each figure; pieces may be turned but never flipped over. A figure whose cut lines are in different places has pieces of different sizes and can be crossed out. Here the pieces fit together into a diamond.
A (correct): This diamond is made of exactly the 3 pieces in the left box, each only turned and slid into place.
B: A cut is in a different place, so the pieces do not match: one piece here covers about 15% of the shape, but the matching piece in the left box covers about 31%.
C: This figure is a square. The pieces in the left box do not have these shapes, so they cannot fill this outline without gaps or overlaps.
D: This figure has 4 pieces, but the left box has 3. Every piece must be used once, and nothing may be added.
Practice 57 of 80 · medium
The left box shows separate flat pieces. Which figure shows how the pieces look when they are fitted together?
Show the answer
Answer: D
Count the pieces first: every figure must use each piece exactly once, with nothing added. Then pick one distinctive piece, such as the largest one or one with a curved or sharply pointed edge, and look for it in each figure; pieces may be turned but never flipped over. A figure whose cut lines are in different places has pieces of different sizes and can be crossed out. Here the pieces fit together into a right triangle.
A: A cut is in a different place, so the pieces do not match: one piece here covers about 34% of the shape, but the matching piece in the left box covers about 46%.
B: This figure is a triangle. The pieces in the left box do not have these shapes, so they cannot fill this outline without gaps or overlaps.
C: This figure has 4 pieces, but the left box has 3. Every piece must be used once, and nothing may be added.
D (correct): This right triangle is made of exactly the 3 pieces in the left box, each only turned and slid into place.
Practice 58 of 80 · hard
The left box shows separate flat pieces. Which figure shows how the pieces look when they are fitted together?
Show the answer
Answer: D
Count the pieces first: every figure must use each piece exactly once, with nothing added. Then pick one distinctive piece, such as the largest one or one with a curved or sharply pointed edge, and look for it in each figure; pieces may be turned but never flipped over. A figure whose cut lines are in different places has pieces of different sizes and can be crossed out. Here the pieces fit together into a half-circle.
A: A cut is in a different place, so the pieces do not match: one piece here covers about 22% of the shape, but the matching piece in the left box covers about 15%.
B: This figure is a trapezoid. The pieces in the left box do not have these shapes, so they cannot fill this outline without gaps or overlaps.
C: A cut is in a different place, so the pieces do not match: one piece here covers about 44% of the shape, but the matching piece in the left box covers about 30%.
D (correct): This half-circle is made of exactly the 4 pieces in the left box, each only turned and slid into place.
Practice 59 of 80 · hard
The left box shows separate flat pieces. Which figure shows how the pieces look when they are fitted together?
Show the answer
Answer: C
Count the pieces first: every figure must use each piece exactly once, with nothing added. Then pick one distinctive piece, such as the largest one or one with a curved or sharply pointed edge, and look for it in each figure; pieces may be turned but never flipped over. A figure whose cut lines are in different places has pieces of different sizes and can be crossed out. Here the pieces fit together into a rectangle.
A: A cut is in a different place, so the pieces do not match: one piece here covers about 39% of the shape, but the matching piece in the left box covers about 29%.
B: This figure is a square. The pieces in the left box do not have these shapes, so they cannot fill this outline without gaps or overlaps.
C (correct): This rectangle is made of exactly the 4 pieces in the left box, each only turned and slid into place.
D: A cut is in a different place, so the pieces do not match: one piece here covers about 12% of the shape, but the matching piece in the left box covers about 19%.
Practice 60 of 80 · medium
The left box shows separate flat pieces. Which figure shows how the pieces look when they are fitted together?
Show the answer
Answer: A
Count the pieces first: every figure must use each piece exactly once, with nothing added. Then pick one distinctive piece, such as the largest one or one with a curved or sharply pointed edge, and look for it in each figure; pieces may be turned but never flipped over. A figure whose cut lines are in different places has pieces of different sizes and can be crossed out. Here the pieces fit together into a rectangle.
A (correct): This rectangle is made of exactly the 3 pieces in the left box, each only turned and slid into place.
B: This figure is a square. The pieces in the left box do not have these shapes, so they cannot fill this outline without gaps or overlaps.
C: A cut is in a different place, so the pieces do not match: one piece here covers about 48% of the shape, but the matching piece in the left box covers about 40%.
D: This figure has 4 pieces, but the left box has 3. Every piece must be used once, and nothing may be added.
Practice 61 of 80 · hard
The left box shows separate flat pieces. Which figure shows how the pieces look when they are fitted together?
Show the answer
Answer: A
Count the pieces first: every figure must use each piece exactly once, with nothing added. Then pick one distinctive piece, such as the largest one or one with a curved or sharply pointed edge, and look for it in each figure; pieces may be turned but never flipped over. A figure whose cut lines are in different places has pieces of different sizes and can be crossed out. Here the pieces fit together into a parallelogram.
A (correct): This parallelogram is made of exactly the 4 pieces in the left box, each only turned and slid into place.
B: This figure is a rectangle. The pieces in the left box do not have these shapes, so they cannot fill this outline without gaps or overlaps.
C: A cut is in a different place, so the pieces do not match: one piece here covers about 32% of the shape, but the matching piece in the left box covers about 24%.
D: A cut is in a different place, so the pieces do not match: one piece here covers about 51% of the shape, but the matching piece in the left box covers about 43%.
Practice 62 of 80 · medium
The left box shows separate flat pieces. Which figure shows how the pieces look when they are fitted together?
Show the answer
Answer: C
Count the pieces first: every figure must use each piece exactly once, with nothing added. Then pick one distinctive piece, such as the largest one or one with a curved or sharply pointed edge, and look for it in each figure; pieces may be turned but never flipped over. A figure whose cut lines are in different places has pieces of different sizes and can be crossed out. Here the pieces fit together into a parallelogram.
A: This figure is a rectangle. The pieces in the left box do not have these shapes, so they cannot fill this outline without gaps or overlaps.
B: This figure has 4 pieces, but the left box has 3. Every piece must be used once, and nothing may be added.
C (correct): This parallelogram is made of exactly the 3 pieces in the left box, each only turned and slid into place.
D: A cut is in a different place, so the pieces do not match: one piece here covers about 64% of the shape, but the matching piece in the left box covers about 49%.
Practice 63 of 80 · easy
The left box shows separate flat pieces. Which figure shows how the pieces look when they are fitted together?
Show the answer
Answer: C
Count the pieces first: every figure must use each piece exactly once, with nothing added. Then pick one distinctive piece, such as the largest one or one with a curved or sharply pointed edge, and look for it in each figure; pieces may be turned but never flipped over. A figure whose cut lines are in different places has pieces of different sizes and can be crossed out. Here the pieces fit together into a hexagon.
A: This figure has 3 pieces, but the left box has 2. Every piece must be used once, and nothing may be added.
B: This figure is a pentagon. The pieces in the left box do not have these shapes, so they cannot fill this outline without gaps or overlaps.
C (correct): This hexagon is made of exactly the 2 pieces in the left box, each only turned and slid into place.
D: A cut is in a different place, so the pieces do not match: one piece here covers about 26% of the shape, but the matching piece in the left box covers about 33%.
Practice 64 of 80 · easy
The left box shows separate flat pieces. Which figure shows how the pieces look when they are fitted together?
Show the answer
Answer: B
Count the pieces first: every figure must use each piece exactly once, with nothing added. Then pick one distinctive piece, such as the largest one or one with a curved or sharply pointed edge, and look for it in each figure; pieces may be turned but never flipped over. A figure whose cut lines are in different places has pieces of different sizes and can be crossed out. Here the pieces fit together into a hexagon.
A: This figure is a circle. The pieces in the left box do not have these shapes, so they cannot fill this outline without gaps or overlaps.
B (correct): This hexagon is made of exactly the 3 pieces in the left box, each only turned and slid into place.
C: A cut is in a different place, so the pieces do not match: one piece here covers about 53% of the shape, but the matching piece in the left box covers about 45%.
D: This figure has 4 pieces, but the left box has 3. Every piece must be used once, and nothing may be added.
Practice 65 of 80 · easy
The left box shows separate flat pieces. Which figure shows how the pieces look when they are fitted together?
Show the answer
Answer: C
Count the pieces first: every figure must use each piece exactly once, with nothing added. Then pick one distinctive piece, such as the largest one or one with a curved or sharply pointed edge, and look for it in each figure; pieces may be turned but never flipped over. A figure whose cut lines are in different places has pieces of different sizes and can be crossed out. Here the pieces fit together into a right triangle.
A: A cut is in a different place, so the pieces do not match: one piece here covers about 26% of the shape, but the matching piece in the left box covers about 44%.
B: A cut is in a different place, so the pieces do not match: one piece here covers about 36% of the shape, but the matching piece in the left box covers about 44%.
C (correct): This right triangle is made of exactly the 2 pieces in the left box, each only turned and slid into place.
D: This figure has 3 pieces, but the left box has 2. Every piece must be used once, and nothing may be added.
Practice 66 of 80 · medium
The left box shows separate flat pieces. Which figure shows how the pieces look when they are fitted together?
Show the answer
Answer: D
Count the pieces first: every figure must use each piece exactly once, with nothing added. Then pick one distinctive piece, such as the largest one or one with a curved or sharply pointed edge, and look for it in each figure; pieces may be turned but never flipped over. A figure whose cut lines are in different places has pieces of different sizes and can be crossed out. Here the pieces fit together into a hexagon.
A: This figure has 4 pieces, but the left box has 3. Every piece must be used once, and nothing may be added.
B: A cut is in a different place, so the pieces do not match: one piece here covers about 35% of the shape, but the matching piece in the left box covers about 48%.
C: This figure is a pentagon. The pieces in the left box do not have these shapes, so they cannot fill this outline without gaps or overlaps.
D (correct): This hexagon is made of exactly the 3 pieces in the left box, each only turned and slid into place.
Practice 67 of 80 · medium
The left box shows separate flat pieces. Which figure shows how the pieces look when they are fitted together?
Show the answer
Answer: D
Count the pieces first: every figure must use each piece exactly once, with nothing added. Then pick one distinctive piece, such as the largest one or one with a curved or sharply pointed edge, and look for it in each figure; pieces may be turned but never flipped over. A figure whose cut lines are in different places has pieces of different sizes and can be crossed out. Here the pieces fit together into a pentagon.
A: A cut is in a different place, so the pieces do not match: one piece here covers about 46% of the shape, but the matching piece in the left box covers about 57%.
B: This figure has 4 pieces, but the left box has 3. Every piece must be used once, and nothing may be added.
C: A cut is in a different place, so the pieces do not match: one piece here covers about 21% of the shape, but the matching piece in the left box covers about 13%.
D (correct): This pentagon is made of exactly the 3 pieces in the left box, each only turned and slid into place.
Practice 68 of 80 · easy
The left box shows separate flat pieces. Which figure shows how the pieces look when they are fitted together?
Show the answer
Answer: B
Count the pieces first: every figure must use each piece exactly once, with nothing added. Then pick one distinctive piece, such as the largest one or one with a curved or sharply pointed edge, and look for it in each figure; pieces may be turned but never flipped over. A figure whose cut lines are in different places has pieces of different sizes and can be crossed out. Here the pieces fit together into a square.
A: A cut is in a different place, so the pieces do not match: one piece here covers about 41% of the shape, but the matching piece in the left box covers about 49%.
B (correct): This square is made of exactly the 2 pieces in the left box, each only turned and slid into place.
C: This figure is a rectangle. The pieces in the left box do not have these shapes, so they cannot fill this outline without gaps or overlaps.
D: This figure has 3 pieces, but the left box has 2. Every piece must be used once, and nothing may be added.
Practice 69 of 80 · medium
The left box shows separate flat pieces. Which figure shows how the pieces look when they are fitted together?
Show the answer
Answer: A
Count the pieces first: every figure must use each piece exactly once, with nothing added. Then pick one distinctive piece, such as the largest one or one with a curved or sharply pointed edge, and look for it in each figure; pieces may be turned but never flipped over. A figure whose cut lines are in different places has pieces of different sizes and can be crossed out. Here the pieces fit together into a hexagon.
A (correct): This hexagon is made of exactly the 3 pieces in the left box, each only turned and slid into place.
B: This figure is a pentagon. The pieces in the left box do not have these shapes, so they cannot fill this outline without gaps or overlaps.
C: A cut is in a different place, so the pieces do not match: one piece here covers about 29% of the shape, but the matching piece in the left box covers about 19%.
D: This figure has 4 pieces, but the left box has 3. Every piece must be used once, and nothing may be added.
Practice 70 of 80 · easy
The left box shows separate flat pieces. Which figure shows how the pieces look when they are fitted together?
Show the answer
Answer: D
Count the pieces first: every figure must use each piece exactly once, with nothing added. Then pick one distinctive piece, such as the largest one or one with a curved or sharply pointed edge, and look for it in each figure; pieces may be turned but never flipped over. A figure whose cut lines are in different places has pieces of different sizes and can be crossed out. Here the pieces fit together into a diamond.
A: This figure has 3 pieces, but the left box has 2. Every piece must be used once, and nothing may be added.
B: This figure is a square. The pieces in the left box do not have these shapes, so they cannot fill this outline without gaps or overlaps.
C: A cut is in a different place, so the pieces do not match: one piece here covers about 40% of the shape, but the matching piece in the left box covers about 23%.
D (correct): This diamond is made of exactly the 2 pieces in the left box, each only turned and slid into place.
Practice 71 of 80 · medium
The left box shows separate flat pieces. Which figure shows how the pieces look when they are fitted together?
Show the answer
Answer: B
Count the pieces first: every figure must use each piece exactly once, with nothing added. Then pick one distinctive piece, such as the largest one or one with a curved or sharply pointed edge, and look for it in each figure; pieces may be turned but never flipped over. A figure whose cut lines are in different places has pieces of different sizes and can be crossed out. Here the pieces fit together into a pentagon.
A: A cut is in a different place, so the pieces do not match: one piece here covers about 60% of the shape, but the matching piece in the left box covers about 46%.
B (correct): This pentagon is made of exactly the 3 pieces in the left box, each only turned and slid into place.
C: This figure has 4 pieces, but the left box has 3. Every piece must be used once, and nothing may be added.
D: A cut is in a different place, so the pieces do not match: one piece here covers about 38% of the shape, but the matching piece in the left box covers about 30%.
Practice 72 of 80 · medium
The left box shows separate flat pieces. Which figure shows how the pieces look when they are fitted together?
Show the answer
Answer: B
Count the pieces first: every figure must use each piece exactly once, with nothing added. Then pick one distinctive piece, such as the largest one or one with a curved or sharply pointed edge, and look for it in each figure; pieces may be turned but never flipped over. A figure whose cut lines are in different places has pieces of different sizes and can be crossed out. Here the pieces fit together into a circle.
A: A cut is in a different place, so the pieces do not match: one piece here covers about 25% of the shape, but the matching piece in the left box covers about 18%.
B (correct): This circle is made of exactly the 3 pieces in the left box, each only turned and slid into place.
C: A cut is in a different place, so the pieces do not match: one piece here covers about 66% of the shape, but the matching piece in the left box covers about 50%.
D: This figure has 4 pieces, but the left box has 3. Every piece must be used once, and nothing may be added.
Practice 73 of 80 · hard
The left box shows separate flat pieces. Which figure shows how the pieces look when they are fitted together?
Show the answer
Answer: A
Count the pieces first: every figure must use each piece exactly once, with nothing added. Then pick one distinctive piece, such as the largest one or one with a curved or sharply pointed edge, and look for it in each figure; pieces may be turned but never flipped over. A figure whose cut lines are in different places has pieces of different sizes and can be crossed out. Here the pieces fit together into a triangle.
A (correct): This triangle is made of exactly the 4 pieces in the left box, each only turned and slid into place.
B: A cut is in a different place, so the pieces do not match: one piece here covers about 58% of the shape, but the matching piece in the left box covers about 37%.
C: A cut is in a different place, so the pieces do not match: one piece here covers about 49% of the shape, but the matching piece in the left box covers about 37%.
D: This figure is a right triangle. The pieces in the left box do not have these shapes, so they cannot fill this outline without gaps or overlaps.
Practice 74 of 80 · easy
The left box shows separate flat pieces. Which figure shows how the pieces look when they are fitted together?
Show the answer
Answer: A
Count the pieces first: every figure must use each piece exactly once, with nothing added. Then pick one distinctive piece, such as the largest one or one with a curved or sharply pointed edge, and look for it in each figure; pieces may be turned but never flipped over. A figure whose cut lines are in different places has pieces of different sizes and can be crossed out. Here the pieces fit together into a square.
A (correct): This square is made of exactly the 2 pieces in the left box, each only turned and slid into place.
B: A cut is in a different place, so the pieces do not match: one piece here covers about 47% of the shape, but the matching piece in the left box covers about 33%.
C: This figure is a rectangle. The pieces in the left box do not have these shapes, so they cannot fill this outline without gaps or overlaps.
D: This figure has 3 pieces, but the left box has 2. Every piece must be used once, and nothing may be added.
Practice 75 of 80 · medium
The left box shows separate flat pieces. Which figure shows how the pieces look when they are fitted together?
Show the answer
Answer: C
Count the pieces first: every figure must use each piece exactly once, with nothing added. Then pick one distinctive piece, such as the largest one or one with a curved or sharply pointed edge, and look for it in each figure; pieces may be turned but never flipped over. A figure whose cut lines are in different places has pieces of different sizes and can be crossed out. Here the pieces fit together into a pentagon.
A: This figure has 4 pieces, but the left box has 3. Every piece must be used once, and nothing may be added.
B: A cut is in a different place, so the pieces do not match: one piece here covers about 49% of the shape, but the matching piece in the left box covers about 37%.
C (correct): This pentagon is made of exactly the 3 pieces in the left box, each only turned and slid into place.
D: A cut is in a different place, so the pieces do not match: one piece here covers about 67% of the shape, but the matching piece in the left box covers about 37%.
Practice 76 of 80 · medium
The left box shows separate flat pieces. Which figure shows how the pieces look when they are fitted together?
Show the answer
Answer: C
Count the pieces first: every figure must use each piece exactly once, with nothing added. Then pick one distinctive piece, such as the largest one or one with a curved or sharply pointed edge, and look for it in each figure; pieces may be turned but never flipped over. A figure whose cut lines are in different places has pieces of different sizes and can be crossed out. Here the pieces fit together into a trapezoid.
A: This figure is a parallelogram. The pieces in the left box do not have these shapes, so they cannot fill this outline without gaps or overlaps.
B: This figure has 4 pieces, but the left box has 3. Every piece must be used once, and nothing may be added.
C (correct): This trapezoid is made of exactly the 3 pieces in the left box, each only turned and slid into place.
D: A cut is in a different place, so the pieces do not match: one piece here covers about 12% of the shape, but the matching piece in the left box covers about 25%.
Practice 77 of 80 · hard
The left box shows separate flat pieces. Which figure shows how the pieces look when they are fitted together?
Show the answer
Answer: B
Count the pieces first: every figure must use each piece exactly once, with nothing added. Then pick one distinctive piece, such as the largest one or one with a curved or sharply pointed edge, and look for it in each figure; pieces may be turned but never flipped over. A figure whose cut lines are in different places has pieces of different sizes and can be crossed out. Here the pieces fit together into a square.
A: This figure is a rectangle. The pieces in the left box do not have these shapes, so they cannot fill this outline without gaps or overlaps.
B (correct): This square is made of exactly the 4 pieces in the left box, each only turned and slid into place.
C: A cut is in a different place, so the pieces do not match: one piece here covers about 49% of the shape, but the matching piece in the left box covers about 29%.
D: A cut is in a different place, so the pieces do not match: one piece here covers about 40% of the shape, but the matching piece in the left box covers about 29%.
Practice 78 of 80 · easy
The left box shows separate flat pieces. Which figure shows how the pieces look when they are fitted together?
Show the answer
Answer: B
Count the pieces first: every figure must use each piece exactly once, with nothing added. Then pick one distinctive piece, such as the largest one or one with a curved or sharply pointed edge, and look for it in each figure; pieces may be turned but never flipped over. A figure whose cut lines are in different places has pieces of different sizes and can be crossed out. Here the pieces fit together into a diamond.
A: A cut is in a different place, so the pieces do not match: one piece here covers about 27% of the shape, but the matching piece in the left box covers about 20%.
B (correct): This diamond is made of exactly the 3 pieces in the left box, each only turned and slid into place.
C: A cut is in a different place, so the pieces do not match: one piece here covers about 44% of the shape, but the matching piece in the left box covers about 36%.
D: This figure has 4 pieces, but the left box has 3. Every piece must be used once, and nothing may be added.
Practice 79 of 80 · medium
The left box shows separate flat pieces. Which figure shows how the pieces look when they are fitted together?
Show the answer
Answer: D
Count the pieces first: every figure must use each piece exactly once, with nothing added. Then pick one distinctive piece, such as the largest one or one with a curved or sharply pointed edge, and look for it in each figure; pieces may be turned but never flipped over. A figure whose cut lines are in different places has pieces of different sizes and can be crossed out. Here the pieces fit together into a hexagon.
A: A cut is in a different place, so the pieces do not match: one piece here covers about 25% of the shape, but the matching piece in the left box covers about 16%.
B: This figure is a pentagon. The pieces in the left box do not have these shapes, so they cannot fill this outline without gaps or overlaps.
C: This figure has 4 pieces, but the left box has 3. Every piece must be used once, and nothing may be added.
D (correct): This hexagon is made of exactly the 3 pieces in the left box, each only turned and slid into place.
Practice 80 of 80 · easy
The left box shows separate flat pieces. Which figure shows how the pieces look when they are fitted together?
Show the answer
Answer: D
Count the pieces first: every figure must use each piece exactly once, with nothing added. Then pick one distinctive piece, such as the largest one or one with a curved or sharply pointed edge, and look for it in each figure; pieces may be turned but never flipped over. A figure whose cut lines are in different places has pieces of different sizes and can be crossed out. Here the pieces fit together into a diamond.
A: This figure has 4 pieces, but the left box has 3. Every piece must be used once, and nothing may be added.
B: This figure is a square. The pieces in the left box do not have these shapes, so they cannot fill this outline without gaps or overlaps.
C: A cut is in a different place, so the pieces do not match: one piece here covers about 58% of the shape, but the matching piece in the left box covers about 47%.
D (correct): This diamond is made of exactly the 3 pieces in the left box, each only turned and slid into place.
About this test
Explanations come with each answer and identify which invariant decides the item. That is useful when two silhouettes look nearly the same and only a mark, a notch or a seam separates them.
Use your result to decide what to revisit. Missed reflections point to the handedness sections, shifted matches to the explanation of why a shifted match still fails, and layered-figure errors to the hidden-edges material. Classify each miss, review the matching examples, and then retake the test.
The same 124 lessons, 6,516 questions and 82 timed practice tests on your phone, plus flashcards with spaced review and progress tracking. Free to download, and it works offline.
 ASVAB Camp
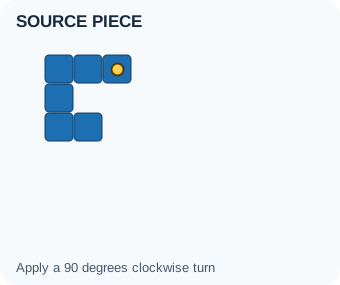
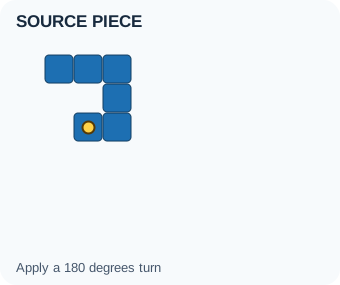
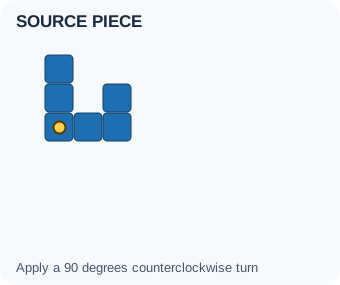
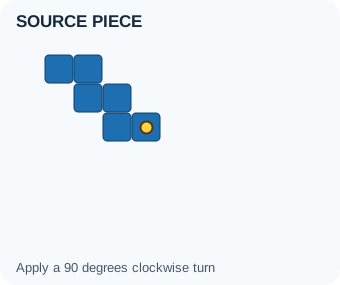
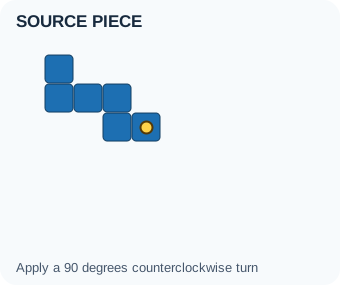
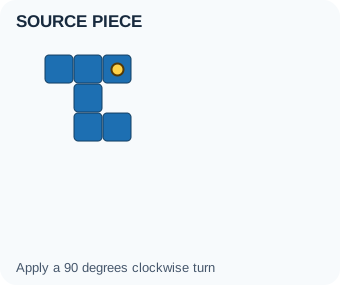
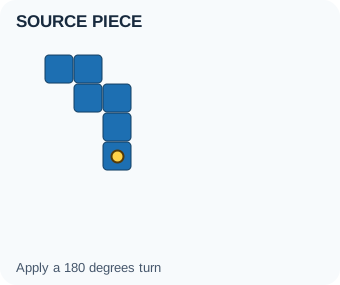
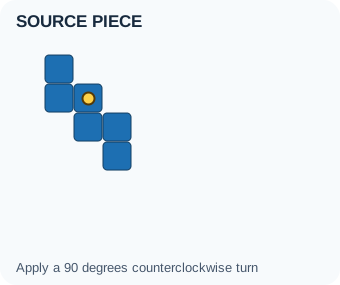
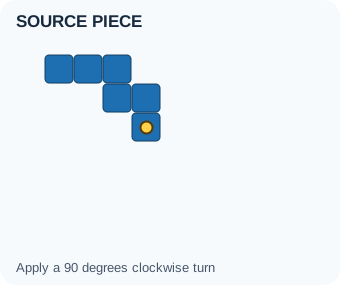
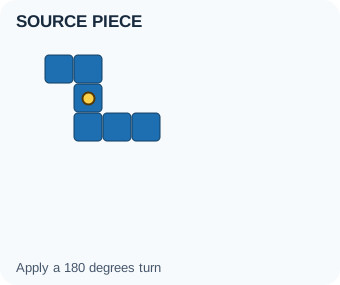
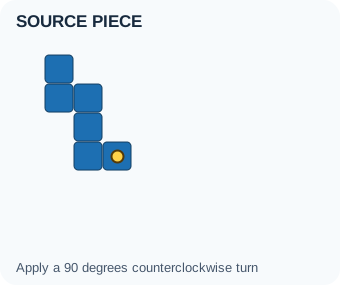
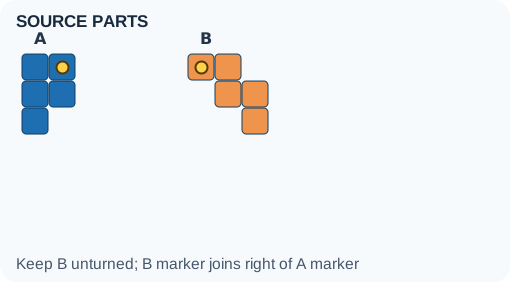
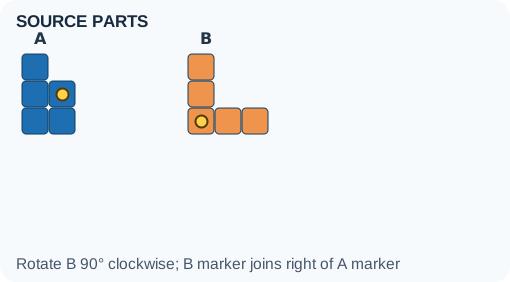
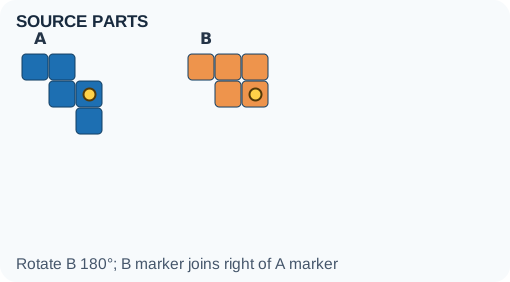
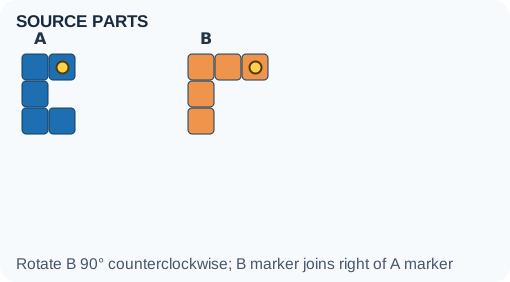
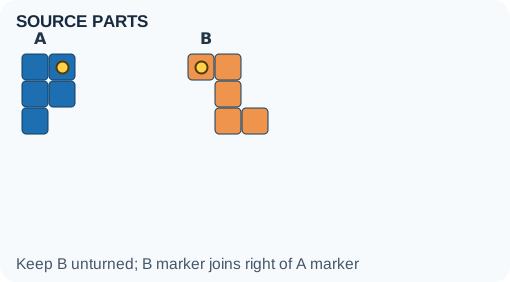
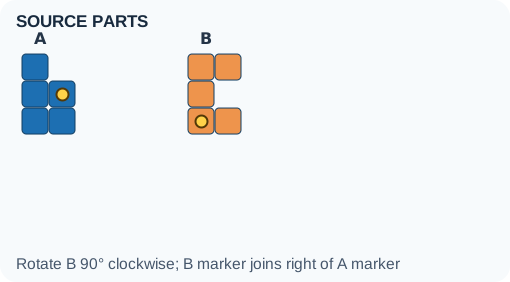
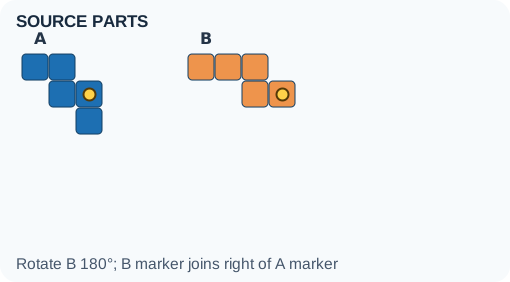
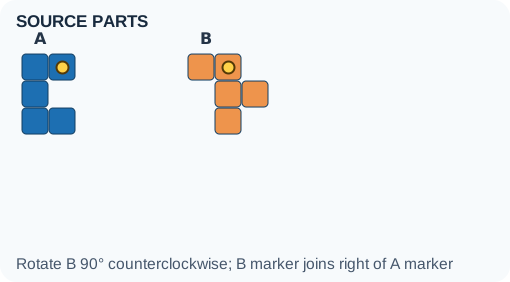
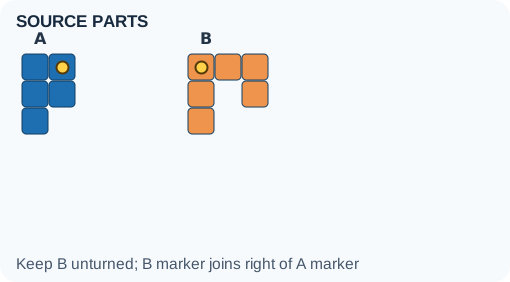
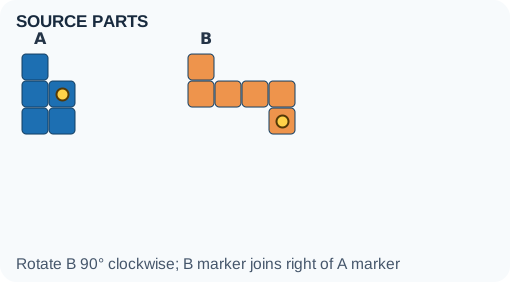
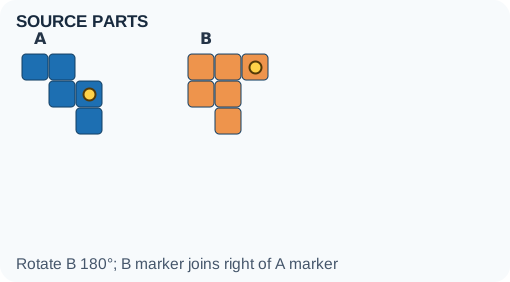
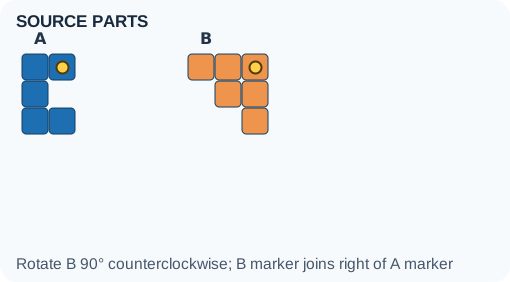
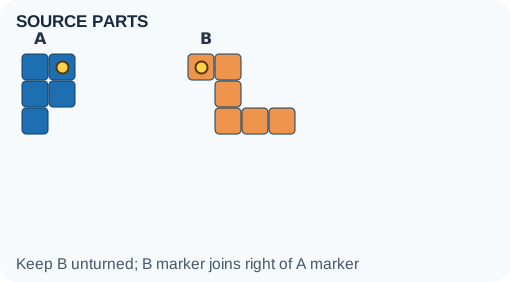
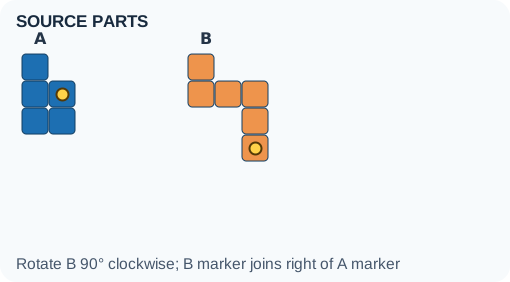
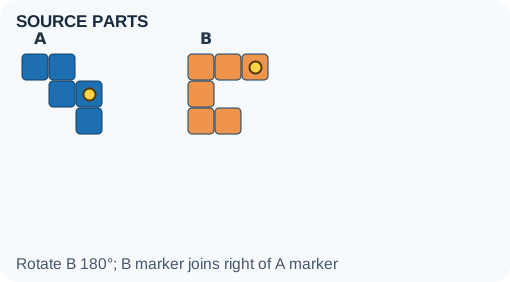
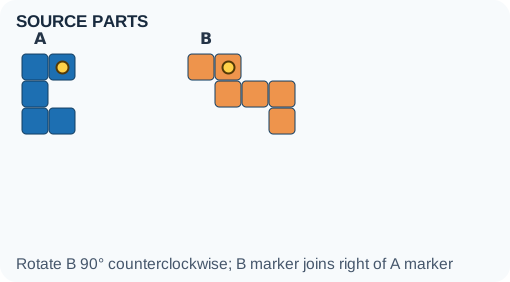
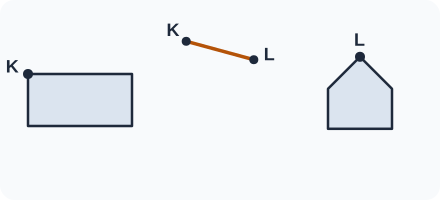
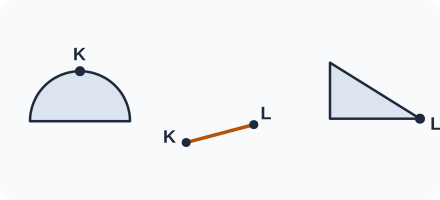
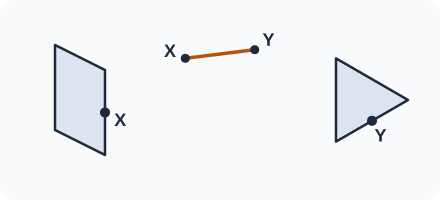
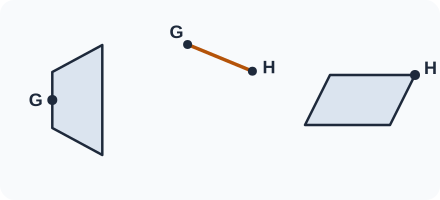
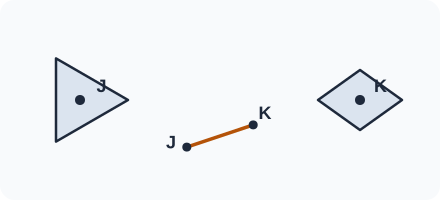
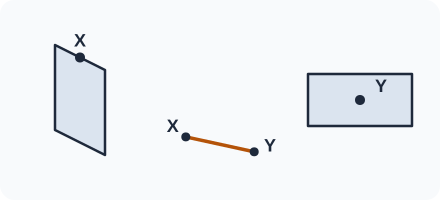
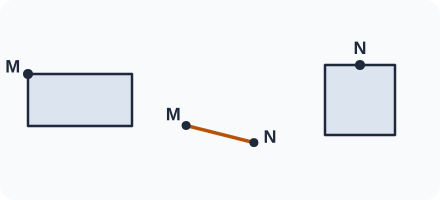
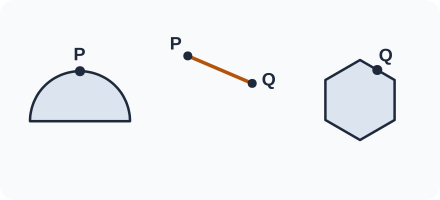
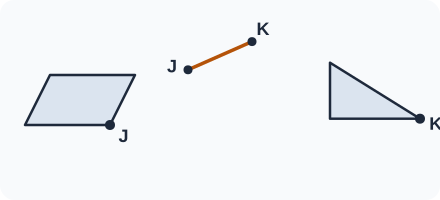
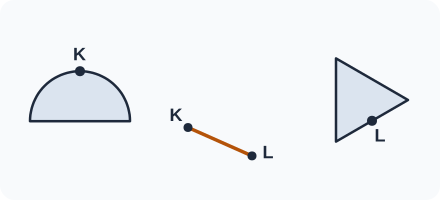
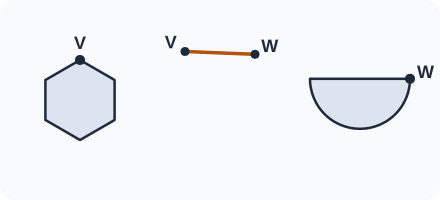
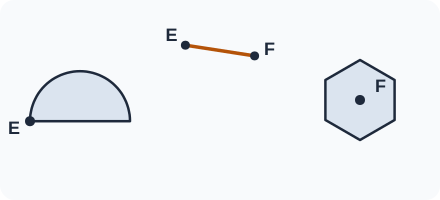
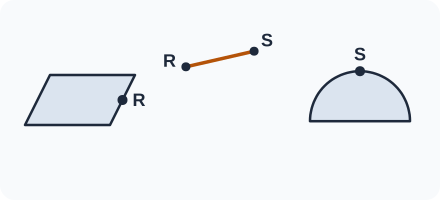
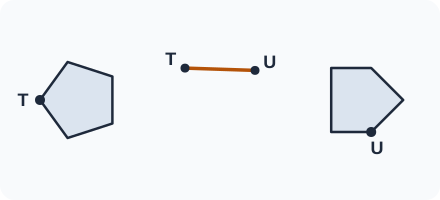
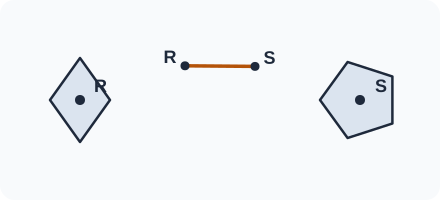
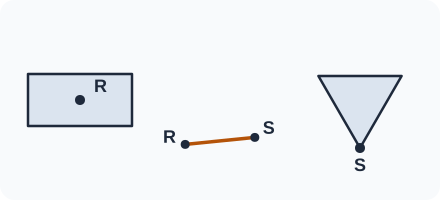
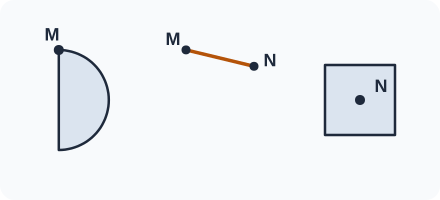
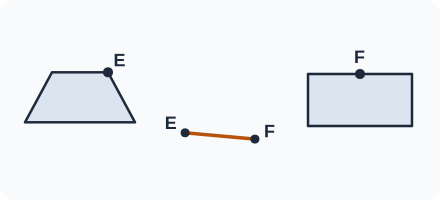
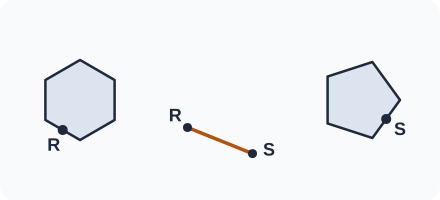
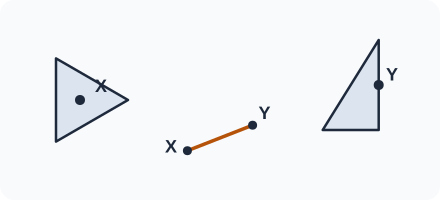
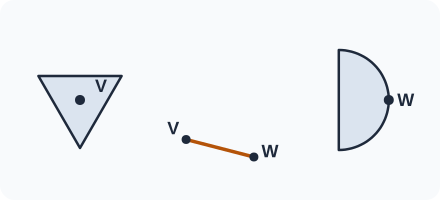
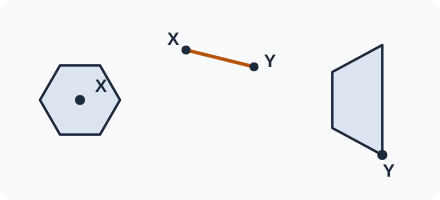
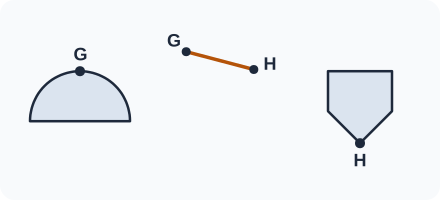
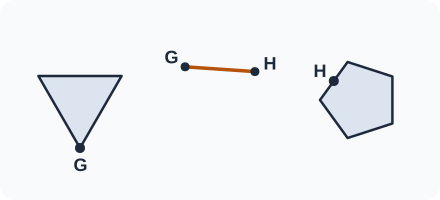
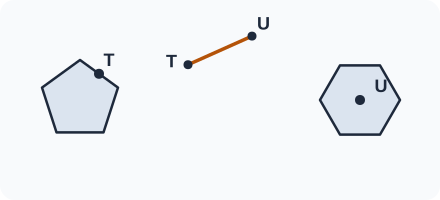
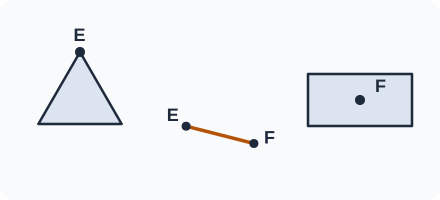
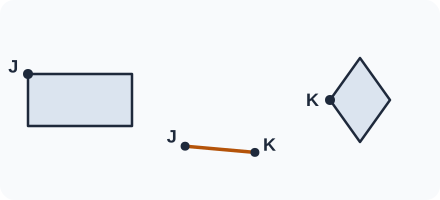
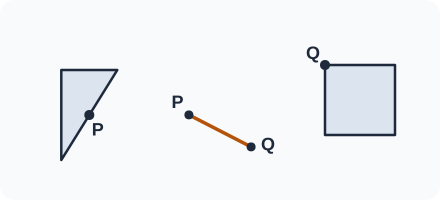
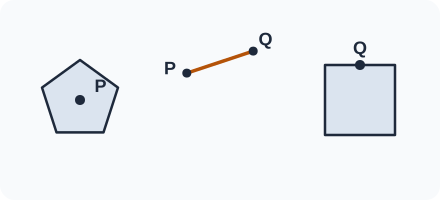
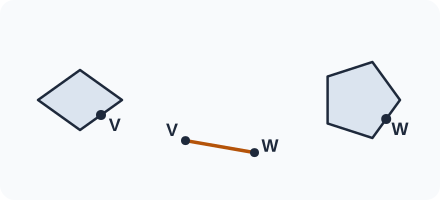
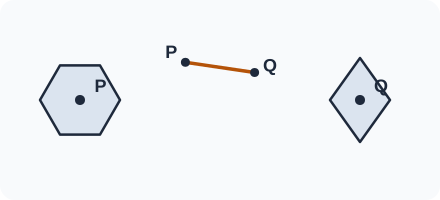
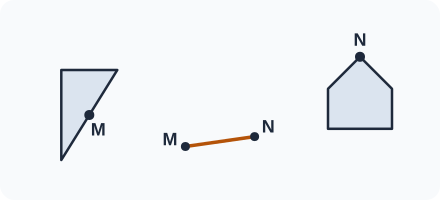
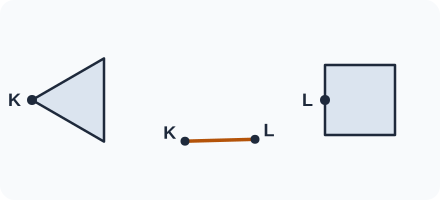
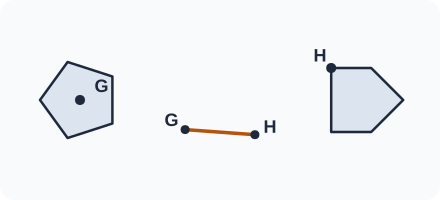
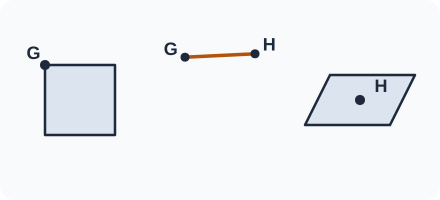
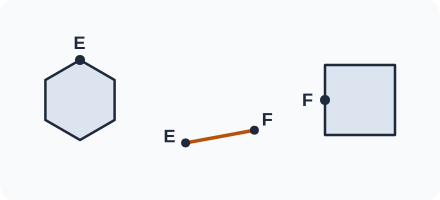
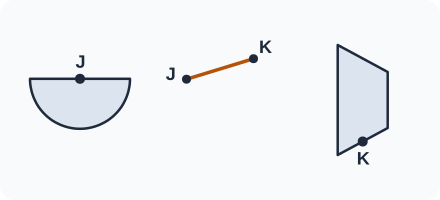
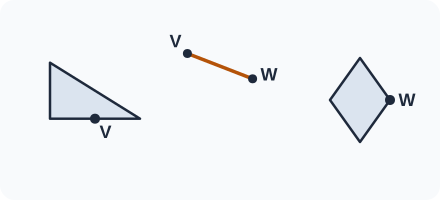
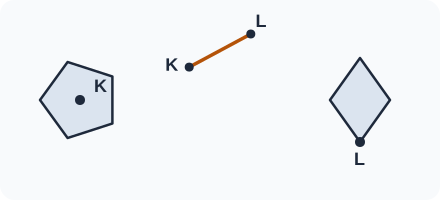
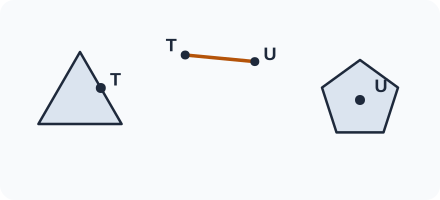
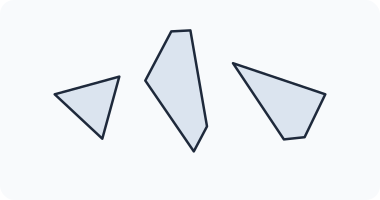
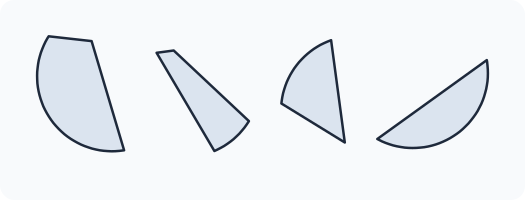
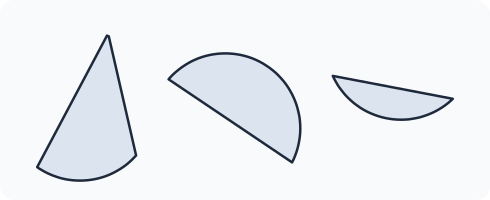
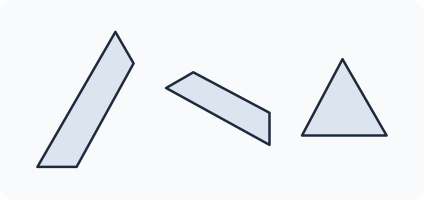
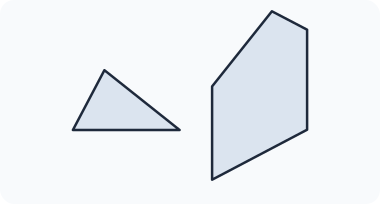
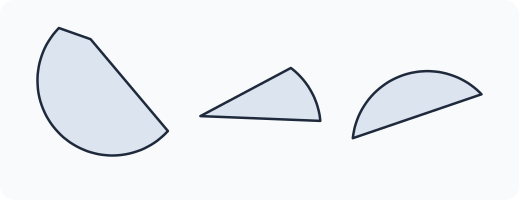
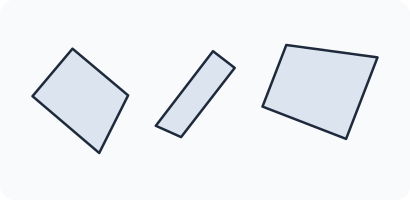
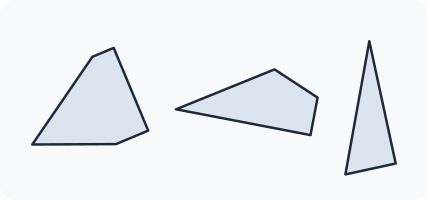
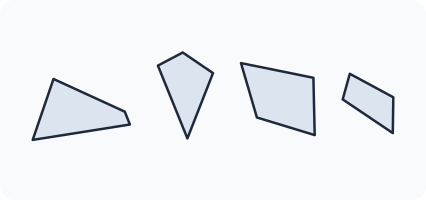
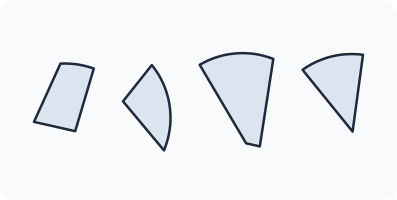
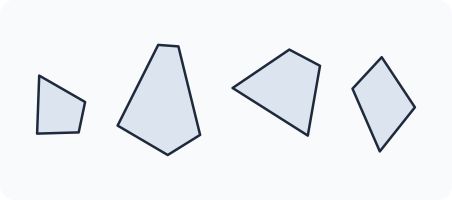
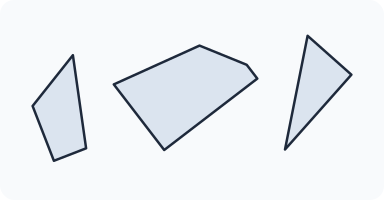
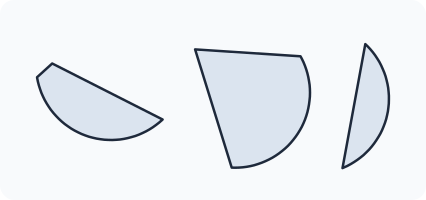
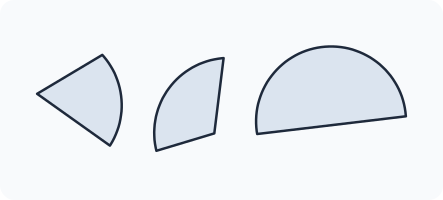
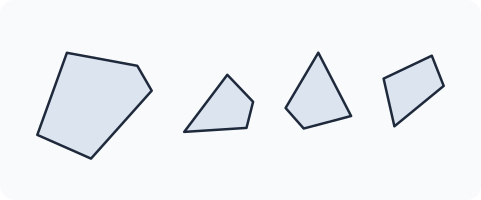
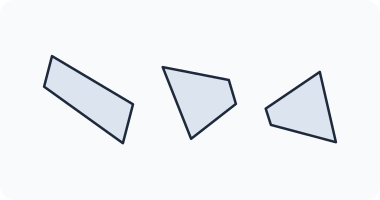
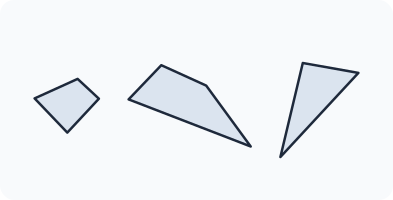
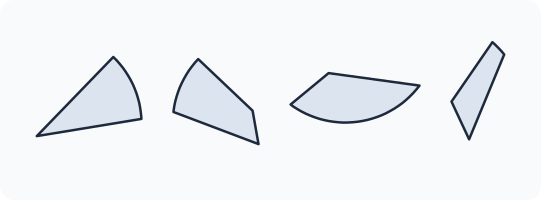
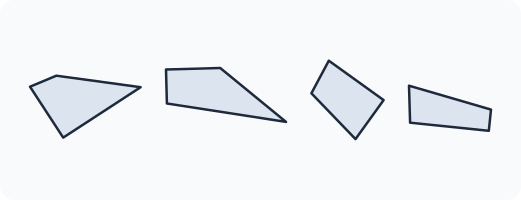
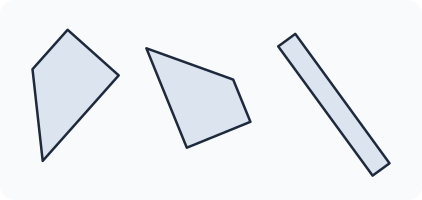
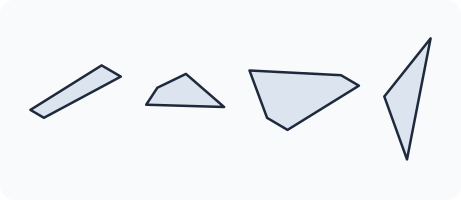
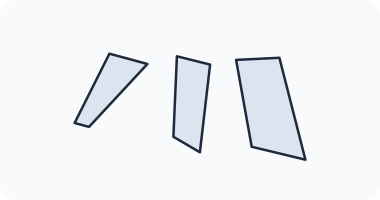
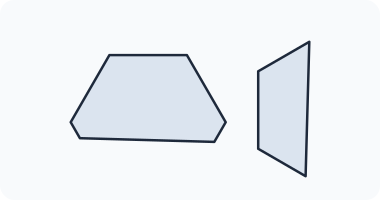
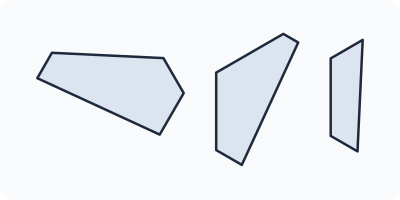
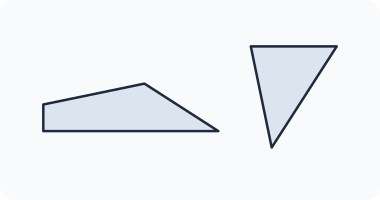
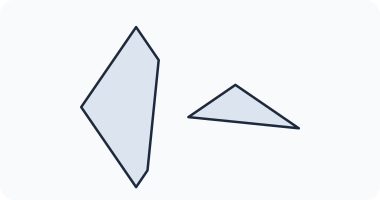
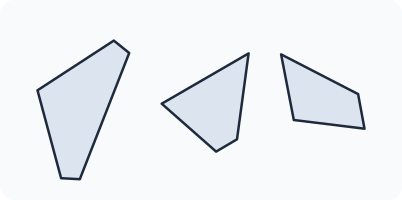
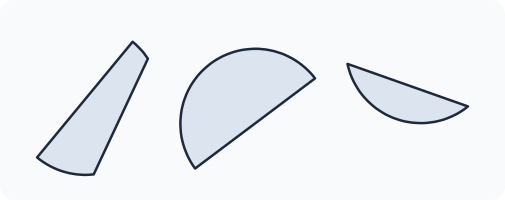
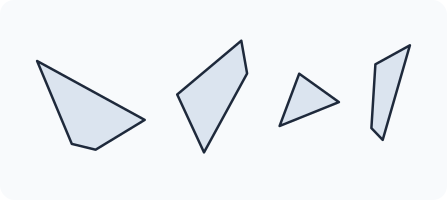
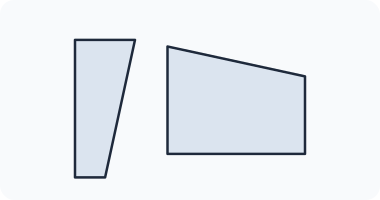
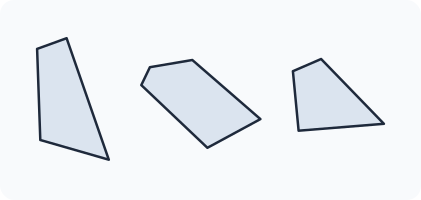
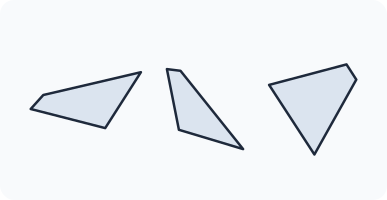
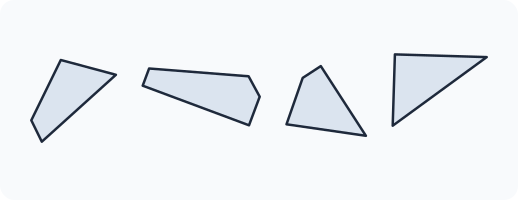
 English ▾