How reliably can you predict where a shape lands after a quarter turn, a half turn or three quarters of a turn? This lesson test answers that with 40 original practice questions on Assembling Objects rotation. Items ask you to pick the correctly turned figure, keep a marked dot on the right cell, and reject options that rotate the wrong way or quietly flip into a mirror image.
A cardboard arrow lies flat on a desk, pointing toward the top of the desk. It is given a quarter-turn clockwise. Which way does it point now?
Show the answer
Answer: D
Correct answer: Toward the right side of the desk. A quarter-turn clockwise moves the arrow like a minute hand going from the 12 to the 3. The top of the shape swings to the right, so the arrow points right.
A: Up goes to left only under a counterclockwise quarter-turn, the opposite direction.
B: Only a full turn or no turn leaves the facing unchanged; a quarter-turn changes it.
C: Pointing down would take a half-turn of 180 degrees, not a quarter-turn.
D (correct): Clockwise follows the clock hands from 12 to 3, so whatever pointed up now points right.
Question 2 of 40 · easy
Which statement correctly describes a rigid transformation such as a rotation?
Show the answer
Answer: D
Correct answer: It keeps every side length, angle and connection the same. A rigid transformation moves a figure without bending, stretching or tearing it. Lengths, angles, the square count and which parts touch which all stay the same; only position or facing changes.
A: The number of squares is fixed under any rigid motion, so a changed count rules a picture out.
B: Stretching changes side lengths, and a rigid motion never changes any length.
C: Rotations keep handedness; producing a mirror image takes a flip, which is a different operation.
D (correct): A rigid motion only moves the figure; its size, angles and neighboring parts are all unchanged.
Question 3 of 40 · easy
A road sign cutout has its arrow pointing west. The sign is turned 180 degrees while staying face up. Which way does the arrow point now?
Show the answer
Answer: A
Correct answer: East. A half-turn swaps left with right and top with bottom, so every direction becomes its opposite. West becomes east, and the direction of the half-turn does not matter.
A (correct): A half-turn sends any direction to its opposite, and the opposite of west is east.
B: North is a quarter-turn clockwise from west, which is only half of the required turn.
C: Leaving the arrow pointing west would mean no turn or a full 360-degree turn.
D: South is a quarter-turn counterclockwise from west, which is only half of the required turn.
Question 4 of 40 · easy
Which instruction describes a reflection rather than a rotation?
Show the answer
Answer: D
Correct answer: Turn the piece over so its back faces up. Rotations spin a piece in its own plane while it stays face up. Turning it over, or flipping it, shows the back side and produces a mirror image, so that is the reflection.
A: Keeping the piece face up and turning it upside down is a 180-degree rotation.
B: A three-quarter turn clockwise is a 270-degree rotation, the same as a quarter-turn counterclockwise.
C: A quarter-turn to the left is a 90-degree counterclockwise rotation.
D (correct): Turning a flat piece over produces its mirror image, which is a reflection and reverses handedness.
Question 5 of 40 · easy
On a five-by-five practice grid, cells are named (row, column), with rows counted from the top and columns from the left. Which cell is the bottom-left corner?
Show the answer
Answer: D
Correct answer: (5, 1). Row numbers grow as you move down the screen, so the bottom row is row 5. The leftmost column is column 1. The bottom-left corner is therefore (5, 1).
A: Row 1 is the top row, so (1, 1) is the top-left corner.
B: Column 5 is the rightmost column, so (5, 5) is the bottom-right corner.
C: Row 1 and column 5 together give the top-right corner.
D (correct): Row 5 is the bottom row and column 1 is the leftmost column, so this is the bottom-left corner.
Question 6 of 40 · easy
A puzzle piece is turned 270 degrees clockwise. Which single turn leaves it facing exactly the same way?
Show the answer
Answer: C
Correct answer: 90 degrees counterclockwise. Turning clockwise from 12 by three quarter-turns passes 3 and 6 and stops at 9. A single counterclockwise quarter-turn from 12 also lands on 9, so 270 degrees clockwise equals 90 degrees counterclockwise.
A: One clockwise quarter-turn ends at the 3, not the 9; it faces the opposite way from the 270-degree result.
B: A full turn returns the piece to its starting facing, which 270 degrees does not do.
C (correct): Three quarter-turns clockwise end at the 9 on the clock face, the same place one quarter-turn counterclockwise reaches.
D: A half-turn in either direction is only two quarter-turns, one short of the three that were made.
Question 7 of 40 · easy
A flat tile is turned 540 degrees clockwise in total. Which single turn gives the same final facing?
Show the answer
Answer: A
Correct answer: 180 degrees. Remove whole turns of 360 degrees, which do not change the facing.
540−360=180
The tile ends up as if it had made a single half-turn.
A (correct): Removing one full turn leaves 540 - 360 = 180 degrees, a half-turn.
B: No change needs a multiple of 360 such as 360 or 720; 540 is not one.
C: This comes from subtracting 450 instead of a whole multiple of 360; only full 360-degree turns can be removed.
D: This would match a total of 270 degrees clockwise, not 540.
Question 8 of 40 · easy
A shape has a gold dot in the cell at the end of its short arm. The shape is rotated 90 degrees. Where must the dot be in the correct picture?
Show the answer
Answer: C
Correct answer: In the end cell of the short arm, wherever that arm now points. A marker is attached to one cell of the shape. When the shape turns, that cell travels with it, so the dot is still at the end of the short arm after any rotation.
A: Switching the dot to the other arm changes which cell holds it, which a rigid turn never does.
B: Leaving the dot where it was on the page is the classic trap; the dot is welded to its cell and moves with the shape.
C (correct): The marker turns with the shape, so it stays in the same cell of the shape even though that cell moves.
D: Nothing moves the dot to the center; it stays in whichever cell it started in.
Question 9 of 40 · medium
On a five-by-five grid, a dot sits in cell (2, 1), where rows are counted from the top and columns from the left. The grid is turned 90 degrees clockwise about the center cell (3, 3). In which cell is the dot now?
Show the answer
Answer: A
Correct answer: (1, 4). Use the clockwise rule for a five-by-five grid.
(r,c)→(c,6−r)
With r = 2 and c = 1, the dot moves to (1, 4). Audit: both (2, 1) and (1, 4) are 5 from the center.
A (correct): The clockwise rule (r, c) to (c, 6 - r) gives (1, 6 - 2) = (1, 4).
B: This only mirrors the column across the center, which is a flip rather than a turn.
C: This uses the counterclockwise rule (6 - c, r), so it is a turn in the wrong direction.
D: This is the half-turn image (6 - r, 6 - c), which turns twice as far as asked.
Question 10 of 40 · medium
A marker is in cell (1, 4) of a five-by-five grid, with rows counted from the top and columns from the left. The grid is turned 90 degrees counterclockwise about the center cell (3, 3). Where is the marker now?
Show the answer
Answer: B
Correct answer: (2, 1). Use the counterclockwise rule.
(r,c)→(6−c,r)
With r = 1 and c = 4, the marker lands at (2, 1). Check with the clock picture: the cell was near the top, and counterclockwise sends the top to the left side.
A: This comes from the clockwise rule (c, 6 - r), the opposite direction.
B (correct): The counterclockwise rule (6 - c, r) gives (6 - 4, 1) = (2, 1).
C: This is the half-turn image, which is two quarter-turns instead of one.
D: Simply swapping the row and column numbers is a diagonal flip, not a rotation.
Question 11 of 40 · medium
A three-square piece covers cells (1, 3), (2, 3) and (2, 4) of a five-by-five grid, with rows counted from the top. It is turned 180 degrees about the center cell (3, 3). Which cells does it cover now?
Show the answer
Answer: A
Correct answer: (5, 3), (4, 3) and (4, 2). For a half-turn, replace each cell (r, c) with (6 - r, 6 - c). Cell (1, 3) goes to (5, 3), (2, 3) goes to (4, 3), and (2, 4) goes to (4, 2). The piece still has three squares in the same corner pattern.
A (correct): Applying (6 - r, 6 - c) to each cell gives exactly these three cells.
B: These are the images under a 90-degree counterclockwise turn, not a half-turn.
C: Only the rows were flipped here; the columns must be flipped too, so this is a mirror image.
D: These are the images under a 90-degree clockwise turn, only half of the required turn.
Question 12 of 40 · medium
A key-shaped cutout points east. It is turned 90 degrees counterclockwise and then turned 180 degrees. Which way does it point at the end?
Show the answer
Answer: A
Correct answer: South. Step 1: a counterclockwise quarter-turn sends right to up, so east becomes north. Step 2: a half-turn sends north to south. The total, 270 degrees counterclockwise, equals 90 degrees clockwise, which also takes east to south.
A (correct): Counterclockwise from east is north, and a half-turn from north gives south.
B: Returning to east would need the turns to cancel, but 90 counterclockwise plus 180 does not add up to a full turn.
C: North is where the key points after the first turn only; the half-turn still has to be applied.
D: West would follow from a single half-turn of the original east-pointing key, skipping the quarter-turn.
Question 13 of 40 · medium
On a math graph with x to the right and y upward, the point (2, -3) is rotated 90 degrees counterclockwise about the origin. What is its image?
Show the answer
Answer: B
Correct answer: (3, 2). On a math graph, a 90-degree counterclockwise turn about the origin sends (x, y) to (-y, x). With x = 2 and
y = -3
the image is (3, 2). Audit: both points are 13 from the origin.
A: This swaps the numbers but changes the sign of the wrong one, so it is not a rotation at all.
B (correct): The counterclockwise rule (x, y) to (-y, x) gives (3, 2).
C: This uses the clockwise rule (x, y) to (y, -x), the opposite direction.
D: This is the 180-degree image (-x, -y), which turns twice as far.
Question 14 of 40 · medium
A shape is a long upright bar with a short arm sticking out to the left from the bar's top end. The shape is turned 90 degrees clockwise. Which description matches the result?
Show the answer
Answer: B
Correct answer: The bar lies flat, and the arm points up from its right end. Track two landmarks. The top end of the bar moves to the right under a clockwise quarter-turn, so the arm is at the right end. The arm pointed left, and clockwise sends left to up, so it now points up from the right end.
A: The arm is on the correct end but points the wrong way, so this picture has been flipped.
B (correct): Clockwise sends the top of the bar to the right and turns a left-pointing arm to point up.
C: This is the counterclockwise result: the top went to the left instead of the right.
D: The arm direction is right, but it sits on the wrong end, which makes this a mirror image.
Question 15 of 40 · hard
An L-shaped piece covers cells (2, 2), (2, 3), (2, 4) and (3, 4) of a five-by-five grid, with rows counted from the top. It is turned 90 degrees counterclockwise about the center cell (3, 3). Which cells does it cover afterward?
Show the answer
Answer: C
Correct answer: (4, 2), (3, 2), (2, 2) and (2, 3). Use the counterclockwise rule (r, c) to (6 - c, r). Cell (2, 2) goes to (4, 2), (2, 3) to (3, 2), (2, 4) to (2, 2), and the foot (3, 4) to (2, 3). Handedness check: the foot that hung below the right end of the bar now sticks out to the right of the bar's top end, not its bottom end.
A: These come from the clockwise rule, so the piece was turned the wrong way.
B: The bar is right, but the foot sits beside the bottom end, which makes this the mirror image.
C (correct): Applying (6 - c, r) to each cell gives these four, a column-2 bar with its foot beside the top end.
D: These come from the half-turn rule, which turns the piece twice as far as asked.
Question 16 of 40 · hard
A gold dot is in cell (1, 2) of a five-by-five grid, with rows counted from the top. The grid is turned 90 degrees clockwise three times, then 90 degrees counterclockwise once, then 180 degrees, always about the center cell (3, 3). Where is the dot at the end?
Show the answer
Answer: B
Correct answer: (1, 2). Add the clockwise turns and subtract the counterclockwise one.
270−90+180=360
A full turn changes nothing, so the dot is back in cell (1, 2).
A: This is the result of a single counterclockwise quarter-turn, which does not match the net turn.
B (correct): The net turn is 270 - 90 + 180 = 360 degrees, a full turn, so the dot returns to where it started.
C: This is the result of a single clockwise quarter-turn, which does not match the net turn.
D: This stops after the first four turns, which net to a half-turn, and leaves out the final 180 degrees.
Question 17 of 40 · easy
The source picture shows 6 blue squares on a 5-by-5 grid (row 2, column 2; row 3, columns 2 to 4; row 4, columns 2 and 4), with the gold marker in row 3, column 3. Imagine the whole shape turned 90 degrees clockwise about the center of the grid. The shape is rigid, the gold-marked cell moves with it, and it may not be flipped over. Which picture shows the result?
Show the answer
Answer: C
Use the rule
(r,c)→(c,6−r)
(in words: top goes to the right). As a landmark, take the source square in row 3, column 2; it lands in row 2, column 3. The gold cell is the center, row 3, column 3, so it stays exactly where it is under any turn; that is why the landmark matters here. The only picture with the same 6 squares, the landmark square and the gold cell all in those places is the correct one.
A: This is the shape turned 180 degrees, twice as far as the quarter-turn asked for; the square in row 2, column 3, where the source square in row 3, column 2 must land, is empty here.
B: This is a mirror image, flipped left to right, so its handedness is reversed and no turn can produce it; the square in row 2, column 3, where the source square in row 3, column 2 must land, is empty here.
C (correct): Every square lands where the rule sends it: the landmark from row 3, column 2 ends in row 2, column 3, and the gold center cell stays in place.
D: This is the source shape exactly as given, with no turn at all; the square in row 2, column 3, where the source square in row 3, column 2 must land, is empty here.
Question 18 of 40 · easy
Turn the source shape 180 degrees about the middle cell of its 5-by-5 grid. Treat it as a rigid cutout glued face up: its 7 squares keep their connections, the gold-marked square turns along with them, and no mirror image is allowed. Its squares are in row 2, columns 2 and 3; row 3, columns 1 to 3; row 4, columns 3 and 4. Which picture shows the shape after exactly this turn?
Show the answer
Answer: B
Use the rule
(r,c)→(6−r,6−c)
(in words: top and bottom swap, and so do left and right). As a landmark, take the source square in row 3, column 1; it lands in row 3, column 5. The gold cell moves from row 3, column 2 to row 3, column 4. The only picture with the same 7 squares, the landmark square and the gold cell all in those places is the correct one.
A: This is the shape turned only 90 degrees clockwise, a quarter-turn instead of a half-turn; the gold marker sits in row 2, column 3 instead of row 3, column 4.
B (correct): Every square lands where the rule sends it: the landmark from row 3, column 1 ends in row 3, column 5, and the gold marker sits in row 3, column 4.
C: This is a mirror image, flipped top to bottom, so its handedness is reversed and no turn can produce it; the gold marker sits in row 3, column 2 instead of row 3, column 4.
D: This is a mirror image, flipped across the diagonal running from the top-left corner to the bottom-right corner, so its handedness is reversed and no turn can produce it; the gold marker sits in row 2, column 3 instead of row 3, column 4.
Question 19 of 40 · medium
Which picture shows the source shape after a turn of exactly 90 degrees counterclockwise about the grid's center, row 3, column 3? The shape (blue squares in row 1, column 4; row 2, columns 2 to 4; row 3, column 3; row 4, columns 3 and 4; row 5, column 3) is rigid, the gold marker in row 5, column 3 stays welded to its square, and flipping the shape over is not permitted.
Show the answer
Answer: C
Use the rule
(r,c)→(6−c,r)
(in words: top goes to the left). As a landmark, take the source square in row 1, column 4; it lands in row 2, column 1. The gold cell moves from row 5, column 3 to row 3, column 5. The only picture with the same 8 squares, the landmark square and the gold cell all in those places is the correct one.
A: This is a mirror image, flipped across the diagonal running from the top-left corner to the bottom-right corner, so its handedness is reversed and no turn can produce it; the square in row 2, column 1, where the source square in row 1, column 4 must land, is empty here.
B: This is the shape turned 180 degrees, twice as far as the quarter-turn asked for; the gold marker sits in row 1, column 3 instead of row 3, column 5.
C (correct): Every square lands where the rule sends it: the landmark from row 1, column 4 ends in row 2, column 1, and the gold marker sits in row 3, column 5.
D: This is the source shape exactly as given, with no turn at all; the gold marker sits in row 5, column 3 instead of row 3, column 5.
Question 20 of 40 · medium
A 6-square cutout lies on a 5-by-5 grid covering row 2, column 2; row 3, columns 2 to 4; row 4, column 4; row 5, column 4, and its gold mark is in row 3, column 2. It is spun 90 degrees clockwise around the center of the grid without being lifted or flipped, so the gold cell travels with the rest of the shape. Which picture shows where the cutout ends up?
Show the answer
Answer: A
Use the rule
(r,c)→(c,6−r)
(in words: top goes to the right). As a landmark, take the source square in row 5, column 4; it lands in row 4, column 1. The gold cell moves from row 3, column 2 to row 2, column 3. The only picture with the same 6 squares, the landmark square and the gold cell all in those places is the correct one.
A (correct): Every square lands where the rule sends it: the landmark from row 5, column 4 ends in row 4, column 1, and the gold marker sits in row 2, column 3.
B: This is the source shape exactly as given, with no turn at all; the gold marker sits in row 3, column 2 instead of row 2, column 3.
C: This is a mirror image, flipped left to right, so its handedness is reversed and no turn can produce it; the gold marker sits in row 3, column 4 instead of row 2, column 3.
D: This is a mirror image, flipped across the diagonal running from the top-right corner to the bottom-left corner, so its handedness is reversed and no turn can produce it; the gold marker sits in row 4, column 3 instead of row 2, column 3.
Question 21 of 40 · medium
Rotate the source shape 90 degrees counterclockwise around the center of its 5-by-5 grid. Nothing may be stretched or reflected, and the gold-marked square must turn with the shape rather than stay put on the page. The shape covers row 1, column 5; row 2, columns 3 and 5; row 3, columns 2 to 5, with gold in row 3, column 4. Which picture matches the rotated shape exactly?
Show the answer
Answer: B
Use the rule
(r,c)→(6−c,r)
(in words: top goes to the left). As a landmark, take the source square in row 2, column 5; it lands in row 1, column 2. The gold cell moves from row 3, column 4 to row 2, column 3. The only picture with the same 7 squares, the landmark square and the gold cell all in those places is the correct one.
A: This is a mirror image, flipped left to right, so its handedness is reversed and no turn can produce it; the gold marker sits in row 3, column 2 instead of row 2, column 3.
B (correct): Every square lands where the rule sends it: the landmark from row 2, column 5 ends in row 1, column 2, and the gold marker sits in row 2, column 3.
C: This is the shape turned 180 degrees, twice as far as the quarter-turn asked for; the gold marker sits in row 3, column 2 instead of row 2, column 3.
D: This is the shape turned 90 degrees clockwise, the opposite direction from the one asked for; the gold marker sits in row 4, column 3 instead of row 2, column 3.
Question 22 of 40 · medium
Think of the source shape as a stiff card pinned through the center square of the 5-by-5 grid. The card, made of the squares in row 2, columns 2 and 3; row 3, column 3; row 4, columns 1 to 4; row 5, column 3, is swung 180 degrees. It stays face up, so a mirror image cannot appear, and the gold square goes wherever the card takes it. Which picture shows the card after the swing?
Show the answer
Answer: C
Use the rule
(r,c)→(6−r,6−c)
(in words: top and bottom swap, and so do left and right). As a landmark, take the source square in row 4, column 1; it lands in row 2, column 5. The gold cell moves from row 4, column 4 to row 2, column 2. The only picture with the same 8 squares, the landmark square and the gold cell all in those places is the correct one.
A: This is a mirror image, flipped across the diagonal running from the top-left corner to the bottom-right corner, so its handedness is reversed and no turn can produce it; the gold marker sits in row 4, column 4 instead of row 2, column 2.
B: This is a mirror image, flipped top to bottom, so its handedness is reversed and no turn can produce it; the gold marker sits in row 2, column 4 instead of row 2, column 2.
C (correct): Every square lands where the rule sends it: the landmark from row 4, column 1 ends in row 2, column 5, and the gold marker sits in row 2, column 2.
D: This is the shape turned only 90 degrees counterclockwise, a quarter-turn instead of a half-turn; the gold marker sits in row 2, column 4 instead of row 2, column 2.
Question 23 of 40 · medium
The blue shape in the source picture occupies row 2, columns 3 to 5; row 3, columns 2 to 4, with gold in row 2, column 4. After a rigid rotation of 90 degrees clockwise about the grid center, with the gold cell carried along and no flipping allowed, which picture shows the shape?
Show the answer
Answer: B
Use the rule
(r,c)→(c,6−r)
(in words: top goes to the right). As a landmark, take the source square in row 2, column 5; it lands in row 5, column 4. The gold cell moves from row 2, column 4 to row 4, column 4. The only picture with the same 6 squares, the landmark square and the gold cell all in those places is the correct one.
A: This is a mirror image, flipped across the diagonal running from the top-left corner to the bottom-right corner, so its handedness is reversed and no turn can produce it; the gold marker sits in row 4, column 2 instead of row 4, column 4.
B (correct): Every square lands where the rule sends it: the landmark from row 2, column 5 ends in row 5, column 4, and the gold marker sits in row 4, column 4.
C: This is the source shape exactly as given, with no turn at all; the gold marker sits in row 2, column 4 instead of row 4, column 4.
D: This is the shape turned 180 degrees, twice as far as the quarter-turn asked for; the gold marker sits in row 4, column 2 instead of row 4, column 4.
Question 24 of 40 · medium
In the source picture, rows are counted from the top and columns from the left; the shape fills row 1, column 3; row 2, columns 2 and 3; row 3, columns 2 and 3; row 4, columns 3 and 4, and the gold marker is in row 4, column 4. Which picture shows that same rigid shape turned 180 degrees about the center of the grid, with its gold cell moved along and without any mirroring?
Show the answer
Answer: C
Use the rule
(r,c)→(6−r,6−c)
(in words: top and bottom swap, and so do left and right). As a landmark, take the source square in row 1, column 3; it lands in row 5, column 3. The gold cell moves from row 4, column 4 to row 2, column 2. The only picture with the same 7 squares, the landmark square and the gold cell all in those places is the correct one.
A: This is a mirror image, flipped across the diagonal running from the top-right corner to the bottom-left corner, so its handedness is reversed and no turn can produce it; the square in row 5, column 3, where the source square in row 1, column 3 must land, is empty here.
B: This is a mirror image, flipped left to right, so its handedness is reversed and no turn can produce it; the gold marker sits in row 4, column 2 instead of row 2, column 2.
C (correct): Every square lands where the rule sends it: the landmark from row 1, column 3 ends in row 5, column 3, and the gold marker sits in row 2, column 2.
D: This is the shape turned only 90 degrees clockwise, a quarter-turn instead of a half-turn; the gold marker sits in row 4, column 2 instead of row 2, column 2.
Question 25 of 40 · medium
Picture the source shape, which covers row 3, columns 2 and 3; row 4, columns 1 to 5; row 5, column 4, swinging around the grid's center square as one solid piece until it has turned 90 degrees counterclockwise. Its gold square, starting in row 3, column 3, rides along, and the piece is never turned face down. Which picture shows it at the end of that turn?
Show the answer
Answer: A
Use the rule
(r,c)→(6−c,r)
(in words: top goes to the left). As a landmark, take the source square in row 4, column 5; it lands in row 1, column 4. The gold cell is the center, row 3, column 3, so it stays exactly where it is under any turn; that is why the landmark matters here. The only picture with the same 8 squares, the landmark square and the gold cell all in those places is the correct one.
A (correct): Every square lands where the rule sends it: the landmark from row 4, column 5 ends in row 1, column 4, and the gold center cell stays in place.
B: This is the shape turned 180 degrees, twice as far as the quarter-turn asked for; the square in row 1, column 4, where the source square in row 4, column 5 must land, is empty here.
C: This is a mirror image, flipped left to right, so its handedness is reversed and no turn can produce it; the square in row 1, column 4, where the source square in row 4, column 5 must land, is empty here.
D: This is the source shape exactly as given, with no turn at all; the square in row 1, column 4, where the source square in row 4, column 5 must land, is empty here.
Question 26 of 40 · medium
A student must give the source shape a turn of 90 degrees clockwise around the center of the 5-by-5 grid. The 6 squares cannot change, separate or be mirrored, and the gold cell must still mark the same square of the shape. Which picture should the student pick?
Show the answer
Answer: B
Use the rule
(r,c)→(c,6−r)
(in words: top goes to the right). As a landmark, take the source square in row 2, column 2; it lands in row 2, column 4. The gold cell is the center, row 3, column 3, so it stays exactly where it is under any turn; that is why the landmark matters here. The only picture with the same 6 squares, the landmark square and the gold cell all in those places is the correct one.
A: This is a mirror image, flipped across the diagonal running from the top-left corner to the bottom-right corner, so its handedness is reversed and no turn can produce it; the square in row 3, column 2, where the source square in row 4, column 3 must land, is empty here.
B (correct): Every square lands where the rule sends it: the landmark from row 2, column 2 ends in row 2, column 4, and the gold center cell stays in place.
C: This is a mirror image, flipped top to bottom, so its handedness is reversed and no turn can produce it; the square in row 2, column 4, where the source square in row 2, column 2 must land, is empty here.
D: This is the source shape exactly as given, with no turn at all; the square in row 2, column 4, where the source square in row 2, column 2 must land, is empty here.
Question 27 of 40 · medium
Here is a flat 7-square tile whose blue squares fill row 2, columns 2 to 5; row 3, columns 2, 3 and 5. Spin it 90 degrees counterclockwise about the center cell of the grid. It is not allowed to be turned over, and the gold mark is fixed to its own square. Which picture shows the spun tile?
Show the answer
Answer: C
Use the rule
(r,c)→(6−c,r)
(in words: top goes to the left). As a landmark, take the source square in row 2, column 5; it lands in row 1, column 2. The gold cell moves from row 2, column 3 to row 3, column 2. The only picture with the same 7 squares, the landmark square and the gold cell all in those places is the correct one.
A: This is the shape turned 90 degrees clockwise, the opposite direction from the one asked for; the gold marker sits in row 3, column 4 instead of row 3, column 2.
B: This is the shape turned 180 degrees, twice as far as the quarter-turn asked for; the gold marker sits in row 4, column 3 instead of row 3, column 2.
C (correct): Every square lands where the rule sends it: the landmark from row 2, column 5 ends in row 1, column 2, and the gold marker sits in row 3, column 2.
D: This is a mirror image, flipped across the diagonal running from the top-left corner to the bottom-right corner, so its handedness is reversed and no turn can produce it; the square in row 1, column 2, where the source square in row 2, column 5 must land, is empty here.
Question 28 of 40 · medium
Starting from the source picture, apply exactly one rotation: 180 degrees about the center of the 5-by-5 grid. The shape stays rigid and face up, and its gold-marked square, which starts in row 1, column 4, must move with it. Which picture is the outcome?
Show the answer
Answer: C
Use the rule
(r,c)→(6−r,6−c)
(in words: top and bottom swap, and so do left and right). As a landmark, take the source square in row 1, column 3; it lands in row 5, column 3. The gold cell moves from row 1, column 4 to row 5, column 2. The only picture with the same 8 squares, the landmark square and the gold cell all in those places is the correct one.
A: This is a mirror image, flipped left to right, so its handedness is reversed and no turn can produce it; the gold marker sits in row 1, column 2 instead of row 5, column 2.
B: This is the shape turned only 90 degrees counterclockwise, a quarter-turn instead of a half-turn; the gold marker sits in row 2, column 1 instead of row 5, column 2.
C (correct): Every square lands where the rule sends it: the landmark from row 1, column 3 ends in row 5, column 3, and the gold marker sits in row 5, column 2.
D: This is a mirror image, flipped across the diagonal running from the top-right corner to the bottom-left corner, so its handedness is reversed and no turn can produce it; the gold marker sits in row 2, column 5 instead of row 5, column 2.
Question 29 of 40 · medium
The source shape (blue in row 3, columns 2 to 5; row 4, columns 3 and 4) is to be rotated, not reflected. Which picture shows it after a turn of 90 degrees clockwise about the grid's center, with the gold-marked square still attached to the same part of the shape?
Show the answer
Answer: D
Use the rule
(r,c)→(c,6−r)
(in words: top goes to the right). As a landmark, take the source square in row 4, column 4; it lands in row 4, column 2. The gold cell moves from row 3, column 5 to row 5, column 3. The only picture with the same 6 squares, the landmark square and the gold cell all in those places is the correct one.
A: This is a mirror image, flipped left to right, so its handedness is reversed and no turn can produce it; the gold marker sits in row 3, column 1 instead of row 5, column 3.
B: This is the shape turned 180 degrees, twice as far as the quarter-turn asked for; the gold marker sits in row 3, column 1 instead of row 5, column 3.
C: This is the source shape exactly as given, with no turn at all; the gold marker sits in row 3, column 5 instead of row 5, column 3.
D (correct): Every square lands where the rule sends it: the landmark from row 4, column 4 ends in row 4, column 2, and the gold marker sits in row 5, column 3.
Question 30 of 40 · medium
Suppose the whole 5-by-5 grid, carrying the source shape and its gold mark in row 2, column 2, is turned 180 degrees around its center like a page spun on a desk. The shape cannot bend or flip. Which picture shows how the shape now looks?
Show the answer
Answer: D
Use the rule
(r,c)→(6−r,6−c)
(in words: top and bottom swap, and so do left and right). As a landmark, take the source square in row 4, column 5; it lands in row 2, column 1. The gold cell moves from row 2, column 2 to row 4, column 4. The only picture with the same 7 squares, the landmark square and the gold cell all in those places is the correct one.
A: This is a mirror image, flipped top to bottom, so its handedness is reversed and no turn can produce it; the gold marker sits in row 4, column 2 instead of row 4, column 4.
B: This is a mirror image, flipped across the diagonal running from the top-left corner to the bottom-right corner, so its handedness is reversed and no turn can produce it; the gold marker sits in row 2, column 2 instead of row 4, column 4.
C: This is the shape turned only 90 degrees clockwise, a quarter-turn instead of a half-turn; the gold marker sits in row 2, column 4 instead of row 4, column 4.
D (correct): Every square lands where the rule sends it: the landmark from row 4, column 5 ends in row 2, column 1, and the gold marker sits in row 4, column 4.
Question 31 of 40 · medium
Which picture is the source shape after turning it 90 degrees counterclockwise around the middle of the grid? Keep in mind that a turn never flips a shape, never changes its 8 squares, and carries the gold-marked square (row 3, column 4 at the start) along with the rest.
Show the answer
Answer: B
Use the rule
(r,c)→(6−c,r)
(in words: top goes to the left). As a landmark, take the source square in row 4, column 1; it lands in row 5, column 4. The gold cell moves from row 3, column 4 to row 2, column 3. The only picture with the same 8 squares, the landmark square and the gold cell all in those places is the correct one.
A: This is the shape turned 180 degrees, twice as far as the quarter-turn asked for; the gold marker sits in row 3, column 2 instead of row 2, column 3.
B (correct): Every square lands where the rule sends it: the landmark from row 4, column 1 ends in row 5, column 4, and the gold marker sits in row 2, column 3.
C: This is the source shape exactly as given, with no turn at all; the gold marker sits in row 3, column 4 instead of row 2, column 3.
D: This is a mirror image, flipped across the diagonal running from the top-left corner to the bottom-right corner, so its handedness is reversed and no turn can produce it; the gold marker sits in row 4, column 3 instead of row 2, column 3.
Question 32 of 40 · medium
Track the source shape, which covers row 3, columns 2 to 5; row 4, columns 3 and 4, through a single rigid turn of 90 degrees clockwise about the center square of the grid. Mirror images do not count, and the gold cell must move together with the shape. Which picture shows the final position?
Show the answer
Answer: D
Use the rule
(r,c)→(c,6−r)
(in words: top goes to the right). As a landmark, take the source square in row 3, column 5; it lands in row 5, column 3. The gold cell moves from row 4, column 4 to row 4, column 2. The only picture with the same 6 squares, the landmark square and the gold cell all in those places is the correct one.
A: This is the source shape exactly as given, with no turn at all; the gold marker sits in row 4, column 4 instead of row 4, column 2.
B: This is a mirror image, flipped across the diagonal running from the top-right corner to the bottom-left corner, so its handedness is reversed and no turn can produce it; the gold marker sits in row 2, column 2 instead of row 4, column 2.
C: This is a mirror image, flipped left to right, so its handedness is reversed and no turn can produce it; the square in row 5, column 3, where the source square in row 3, column 5 must land, is empty here.
D (correct): Every square lands where the rule sends it: the landmark from row 3, column 5 ends in row 5, column 3, and the gold marker sits in row 4, column 2.
Question 33 of 40 · hard
An Assembling Objects warm-up: the source piece covers row 3, columns 3 to 5; row 4, columns 2 and 3; row 5, columns 2 and 3 and carries a gold mark in row 3, column 3. Turn it 90 degrees counterclockwise about the center of the 5-by-5 grid, keeping it face up and in one rigid piece. Which picture shows the turned piece?
Show the answer
Answer: D
Use the rule
(r,c)→(6−c,r)
(in words: top goes to the left). As a landmark, take the source square in row 5, column 2; it lands in row 4, column 5. The gold cell is the center, row 3, column 3, so it stays exactly where it is under any turn; that is why the landmark matters here. The only picture with the same 7 squares, the landmark square and the gold cell all in those places is the correct one.
A: This is the shape turned 180 degrees, twice as far as the quarter-turn asked for; the square in row 4, column 5, where the source square in row 5, column 2 must land, is empty here.
B: This is the shape turned 90 degrees clockwise, the opposite direction from the one asked for; the square in row 4, column 5, where the source square in row 5, column 2 must land, is empty here.
C: This is a mirror image, flipped left to right, so its handedness is reversed and no turn can produce it; the square in row 4, column 5, where the source square in row 5, column 2 must land, is empty here.
D (correct): Every square lands where the rule sends it: the landmark from row 5, column 2 ends in row 4, column 5, and the gold center cell stays in place.
Question 34 of 40 · hard
Mentally rotate the source shape by 180 degrees, using the center cell of the 5-by-5 grid as the pivot. The shape is solid, it may not be flipped into its mirror image, and its gold square must turn with it. Which picture shows the rotated shape?
Show the answer
Answer: A
Use the rule
(r,c)→(6−r,6−c)
(in words: top and bottom swap, and so do left and right). As a landmark, take the source square in row 2, column 1; it lands in row 4, column 5. The gold cell moves from row 1, column 2 to row 5, column 4. The only picture with the same 8 squares, the landmark square and the gold cell all in those places is the correct one.
A (correct): Every square lands where the rule sends it: the landmark from row 2, column 1 ends in row 4, column 5, and the gold marker sits in row 5, column 4.
B: This is a mirror image, flipped across the diagonal running from the top-left corner to the bottom-right corner, so its handedness is reversed and no turn can produce it; the gold marker sits in row 2, column 1 instead of row 5, column 4.
C: This is the shape turned only 90 degrees counterclockwise, a quarter-turn instead of a half-turn; the gold marker sits in row 4, column 1 instead of row 5, column 4.
D: This is a mirror image, flipped top to bottom, so its handedness is reversed and no turn can produce it; the gold marker sits in row 5, column 2 instead of row 5, column 4.
Question 35 of 40 · hard
The source picture holds a lopsided shape of 6 squares, row 2, columns 2 to 4; row 3, columns 2 and 3; row 4, column 3, with gold in row 3, column 2. If that shape is rotated 90 degrees clockwise about the grid center, keeping its handedness and its gold-marked square, which picture shows it?
Show the answer
Answer: A
Use the rule
(r,c)→(c,6−r)
(in words: top goes to the right). As a landmark, take the source square in row 2, column 2; it lands in row 2, column 4. The gold cell moves from row 3, column 2 to row 2, column 3. The only picture with the same 6 squares, the landmark square and the gold cell all in those places is the correct one.
A (correct): Every square lands where the rule sends it: the landmark from row 2, column 2 ends in row 2, column 4, and the gold marker sits in row 2, column 3.
B: This is the shape turned 180 degrees, twice as far as the quarter-turn asked for; the gold marker sits in row 3, column 4 instead of row 2, column 3.
C: This is the source shape exactly as given, with no turn at all; the gold marker sits in row 3, column 2 instead of row 2, column 3.
D: This is a mirror image, flipped across the diagonal running from the top-left corner to the bottom-right corner, so its handedness is reversed and no turn can produce it; the square in row 2, column 4, where the source square in row 2, column 2 must land, is empty here.
Question 36 of 40 · hard
Rotate, do not flip: the source shape is turned 180 degrees around the center of its 5-by-5 grid as one rigid piece, and the gold-marked square goes along with it. Its squares start in row 1, columns 3 and 4; row 2, columns 1 to 4; row 3, column 3. Which picture shows the shape after the rotation?
Show the answer
Answer: C
Use the rule
(r,c)→(6−r,6−c)
(in words: top and bottom swap, and so do left and right). As a landmark, take the source square in row 1, column 4; it lands in row 5, column 2. The gold cell moves from row 1, column 3 to row 5, column 3. The only picture with the same 7 squares, the landmark square and the gold cell all in those places is the correct one.
A: This is a mirror image, flipped left to right, so its handedness is reversed and no turn can produce it; the gold marker sits in row 1, column 3 instead of row 5, column 3.
B: This is a mirror image, flipped across the diagonal running from the top-right corner to the bottom-left corner, so its handedness is reversed and no turn can produce it; the gold marker sits in row 3, column 5 instead of row 5, column 3.
C (correct): Every square lands where the rule sends it: the landmark from row 1, column 4 ends in row 5, column 2, and the gold marker sits in row 5, column 3.
D: This is the shape turned only 90 degrees clockwise, a quarter-turn instead of a half-turn; the gold marker sits in row 3, column 5 instead of row 5, column 3.
Question 37 of 40 · hard
Which picture shows what the source shape becomes after one rotation of 90 degrees counterclockwise about the center cell of the grid? Every square keeps its neighbors, the gold square (starting in row 3, column 3) keeps its place within the shape, and no reflection is allowed.
Show the answer
Answer: A
Use the rule
(r,c)→(6−c,r)
(in words: top goes to the left). As a landmark, take the source square in row 5, column 2; it lands in row 4, column 5. The gold cell is the center, row 3, column 3, so it stays exactly where it is under any turn; that is why the landmark matters here. The only picture with the same 8 squares, the landmark square and the gold cell all in those places is the correct one.
A (correct): Every square lands where the rule sends it: the landmark from row 5, column 2 ends in row 4, column 5, and the gold center cell stays in place.
B: This is a mirror image, flipped left to right, so its handedness is reversed and no turn can produce it; the square in row 4, column 5, where the source square in row 5, column 2 must land, is empty here.
C: This is the shape turned 180 degrees, twice as far as the quarter-turn asked for; the square in row 4, column 5, where the source square in row 5, column 2 must land, is empty here.
D: This is the source shape exactly as given, with no turn at all; the square in row 4, column 5, where the source square in row 5, column 2 must land, is empty here.
Question 38 of 40 · hard
The 6 blue squares of the source shape sit in row 1, column 3; row 2, columns 2 and 3; row 3, columns 2 to 4. Give the shape a rigid turn of 90 degrees clockwise about the grid's center, with the gold-marked square moving along and no flipping. Which picture shows the shape afterward?
Show the answer
Answer: D
Use the rule
(r,c)→(c,6−r)
(in words: top goes to the right). As a landmark, take the source square in row 2, column 2; it lands in row 2, column 4. The gold cell moves from row 1, column 3 to row 3, column 5. The only picture with the same 6 squares, the landmark square and the gold cell all in those places is the correct one.
A: This is a mirror image, flipped across the diagonal running from the top-left corner to the bottom-right corner, so its handedness is reversed and no turn can produce it; the gold marker sits in row 3, column 1 instead of row 3, column 5.
B: This is a mirror image, flipped top to bottom, so its handedness is reversed and no turn can produce it; the gold marker sits in row 5, column 3 instead of row 3, column 5.
C: This is the source shape exactly as given, with no turn at all; the gold marker sits in row 1, column 3 instead of row 3, column 5.
D (correct): Every square lands where the rule sends it: the landmark from row 2, column 2 ends in row 2, column 4, and the gold marker sits in row 3, column 5.
Question 39 of 40 · hard
Consider the source shape with its gold mark in row 4, column 3. It is turned 90 degrees counterclockwise about the center of the 5-by-5 grid; it stays in one rigid piece, stays face up, and keeps the gold mark on the same square. Which picture shows the result of that turn?
Show the answer
Answer: D
Use the rule
(r,c)→(6−c,r)
(in words: top goes to the left). As a landmark, take the source square in row 1, column 2; it lands in row 4, column 1. The gold cell moves from row 4, column 3 to row 3, column 4. The only picture with the same 7 squares, the landmark square and the gold cell all in those places is the correct one.
A: This is the shape turned 90 degrees clockwise, the opposite direction from the one asked for; the gold marker sits in row 3, column 2 instead of row 3, column 4.
B: This is a mirror image, flipped across the diagonal running from the top-left corner to the bottom-right corner, so its handedness is reversed and no turn can produce it; the square in row 4, column 1, where the source square in row 1, column 2 must land, is empty here.
C: This is the shape turned 180 degrees, twice as far as the quarter-turn asked for; the gold marker sits in row 2, column 3 instead of row 3, column 4.
D (correct): Every square lands where the rule sends it: the landmark from row 1, column 2 ends in row 4, column 1, and the gold marker sits in row 3, column 4.
Question 40 of 40 · hard
Use the source picture: blue squares in row 1, columns 2 to 4; row 2, columns 2 and 3; row 3, columns 1 to 3, gold marker in row 3, column 1. The shape is rotated 180 degrees about the middle square of the grid, without stretching or mirroring, and the gold square moves with it. Which picture shows the rotated shape?
Show the answer
Answer: B
Use the rule
(r,c)→(6−r,6−c)
(in words: top and bottom swap, and so do left and right). As a landmark, take the source square in row 1, column 2; it lands in row 5, column 4. The gold cell moves from row 3, column 1 to row 3, column 5. The only picture with the same 8 squares, the landmark square and the gold cell all in those places is the correct one.
A: This is a mirror image, flipped across the diagonal running from the top-right corner to the bottom-left corner, so its handedness is reversed and no turn can produce it; the gold marker sits in row 5, column 3 instead of row 3, column 5.
B (correct): Every square lands where the rule sends it: the landmark from row 1, column 2 ends in row 5, column 4, and the gold marker sits in row 3, column 5.
C: This is a mirror image, flipped left to right, so its handedness is reversed and no turn can produce it; the square in row 5, column 4, where the source square in row 1, column 2 must land, is empty here.
D: This is the shape turned only 90 degrees counterclockwise, a quarter-turn instead of a half-turn; the gold marker sits in row 5, column 3 instead of row 3, column 5.
The left box shows separate flat pieces. Which figure shows how the pieces look when they are fitted together?
Show the answer
Answer: C
Count the pieces first: every figure must use each piece exactly once, with nothing added. Then pick one distinctive piece, such as the largest one or one with a curved or sharply pointed edge, and look for it in each figure; pieces may be turned but never flipped over. A figure whose cut lines are in different places has pieces of different sizes and can be crossed out. Here the pieces fit together into a triangle.
A: A cut is in a different place, so the pieces do not match: one piece here covers about 49% of the shape, but the matching piece in the left box covers about 34%.
B: A cut is in a different place, so the pieces do not match: one piece here covers about 22% of the shape, but the matching piece in the left box covers about 29%.
C (correct): This triangle is made of exactly the 4 pieces in the left box, each only turned and slid into place.
D: This figure is a right triangle. The pieces in the left box do not have these shapes, so they cannot fill this outline without gaps or overlaps.
Practice 2 of 40 · medium
The left box shows separate flat pieces. Which figure shows how the pieces look when they are fitted together?
Show the answer
Answer: B
Count the pieces first: every figure must use each piece exactly once, with nothing added. Then pick one distinctive piece, such as the largest one or one with a curved or sharply pointed edge, and look for it in each figure; pieces may be turned but never flipped over. A figure whose cut lines are in different places has pieces of different sizes and can be crossed out. Here the pieces fit together into a circle.
A: A cut is in a different place, so the pieces do not match: one piece here covers about 54% of the shape, but the matching piece in the left box covers about 46%.
B (correct): This circle is made of exactly the 3 pieces in the left box, each only turned and slid into place.
C: This figure has 4 pieces, but the left box has 3. Every piece must be used once, and nothing may be added.
D: A cut is in a different place, so the pieces do not match: one piece here covers about 26% of the shape, but the matching piece in the left box covers about 35%.
Practice 3 of 40 · easy
The left box shows separate flat pieces. Which figure shows how the pieces look when they are fitted together?
Show the answer
Answer: D
Count the pieces first: every figure must use each piece exactly once, with nothing added. Then pick one distinctive piece, such as the largest one or one with a curved or sharply pointed edge, and look for it in each figure; pieces may be turned but never flipped over. A figure whose cut lines are in different places has pieces of different sizes and can be crossed out. Here the pieces fit together into a parallelogram.
A: This figure is a rectangle. The pieces in the left box do not have these shapes, so they cannot fill this outline without gaps or overlaps.
B: This figure has 3 pieces, but the left box has 2. Every piece must be used once, and nothing may be added.
C: A cut is in a different place, so the pieces do not match: one piece here covers about 48% of the shape, but the matching piece in the left box covers about 20%.
D (correct): This parallelogram is made of exactly the 2 pieces in the left box, each only turned and slid into place.
Practice 4 of 40 · medium
The left box shows separate flat pieces. Which figure shows how the pieces look when they are fitted together?
Show the answer
Answer: D
Count the pieces first: every figure must use each piece exactly once, with nothing added. Then pick one distinctive piece, such as the largest one or one with a curved or sharply pointed edge, and look for it in each figure; pieces may be turned but never flipped over. A figure whose cut lines are in different places has pieces of different sizes and can be crossed out. Here the pieces fit together into a trapezoid.
A: A cut is in a different place, so the pieces do not match: one piece here covers about 56% of the shape, but the matching piece in the left box covers about 43%.
B: This figure is a half-circle. The pieces in the left box do not have these shapes, so they cannot fill this outline without gaps or overlaps.
C: This figure has 4 pieces, but the left box has 3. Every piece must be used once, and nothing may be added.
D (correct): This trapezoid is made of exactly the 3 pieces in the left box, each only turned and slid into place.
Practice 5 of 40 · medium
The left box shows separate flat pieces. Which figure shows how the pieces look when they are fitted together?
Show the answer
Answer: C
Count the pieces first: every figure must use each piece exactly once, with nothing added. Then pick one distinctive piece, such as the largest one or one with a curved or sharply pointed edge, and look for it in each figure; pieces may be turned but never flipped over. A figure whose cut lines are in different places has pieces of different sizes and can be crossed out. Here the pieces fit together into a diamond.
A: This figure has 4 pieces, but the left box has 3. Every piece must be used once, and nothing may be added.
B: This figure is a square. The pieces in the left box do not have these shapes, so they cannot fill this outline without gaps or overlaps.
C (correct): This diamond is made of exactly the 3 pieces in the left box, each only turned and slid into place.
D: A cut is in a different place, so the pieces do not match: one piece here covers about 51% of the shape, but the matching piece in the left box covers about 44%.
Practice 6 of 40 · medium
The left box shows separate flat pieces. Which figure shows how the pieces look when they are fitted together?
Show the answer
Answer: B
Count the pieces first: every figure must use each piece exactly once, with nothing added. Then pick one distinctive piece, such as the largest one or one with a curved or sharply pointed edge, and look for it in each figure; pieces may be turned but never flipped over. A figure whose cut lines are in different places has pieces of different sizes and can be crossed out. Here the pieces fit together into a half-circle.
A: This figure is a trapezoid. The pieces in the left box do not have these shapes, so they cannot fill this outline without gaps or overlaps.
B (correct): This half-circle is made of exactly the 3 pieces in the left box, each only turned and slid into place.
C: This figure has 4 pieces, but the left box has 3. Every piece must be used once, and nothing may be added.
D: A cut is in a different place, so the pieces do not match: one piece here covers about 66% of the shape, but the matching piece in the left box covers about 46%.
Practice 7 of 40 · easy
The left box shows separate flat pieces. Which figure shows how the pieces look when they are fitted together?
Show the answer
Answer: D
Count the pieces first: every figure must use each piece exactly once, with nothing added. Then pick one distinctive piece, such as the largest one or one with a curved or sharply pointed edge, and look for it in each figure; pieces may be turned but never flipped over. A figure whose cut lines are in different places has pieces of different sizes and can be crossed out. Here the pieces fit together into a trapezoid.
A: This figure has 3 pieces, but the left box has 2. Every piece must be used once, and nothing may be added.
B: This figure is a parallelogram. The pieces in the left box do not have these shapes, so they cannot fill this outline without gaps or overlaps.
C: A cut is in a different place, so the pieces do not match: one piece here covers about 13% of the shape, but the matching piece in the left box covers about 48%.
D (correct): This trapezoid is made of exactly the 2 pieces in the left box, each only turned and slid into place.
Practice 8 of 40 · medium
The left box shows separate flat pieces. Which figure shows how the pieces look when they are fitted together?
Show the answer
Answer: B
Count the pieces first: every figure must use each piece exactly once, with nothing added. Then pick one distinctive piece, such as the largest one or one with a curved or sharply pointed edge, and look for it in each figure; pieces may be turned but never flipped over. A figure whose cut lines are in different places has pieces of different sizes and can be crossed out. Here the pieces fit together into a triangle.
A: This figure has 4 pieces, but the left box has 3. Every piece must be used once, and nothing may be added.
B (correct): This triangle is made of exactly the 3 pieces in the left box, each only turned and slid into place.
C: A cut is in a different place, so the pieces do not match: one piece here covers about 54% of the shape, but the matching piece in the left box covers about 36%.
D: This figure is a right triangle. The pieces in the left box do not have these shapes, so they cannot fill this outline without gaps or overlaps.
Practice 9 of 40 · easy
The left box shows separate flat pieces. Which figure shows how the pieces look when they are fitted together?
Show the answer
Answer: C
Count the pieces first: every figure must use each piece exactly once, with nothing added. Then pick one distinctive piece, such as the largest one or one with a curved or sharply pointed edge, and look for it in each figure; pieces may be turned but never flipped over. A figure whose cut lines are in different places has pieces of different sizes and can be crossed out. Here the pieces fit together into a right triangle.
A: This figure is a triangle. The pieces in the left box do not have these shapes, so they cannot fill this outline without gaps or overlaps.
B: This figure has 3 pieces, but the left box has 2. Every piece must be used once, and nothing may be added.
C (correct): This right triangle is made of exactly the 2 pieces in the left box, each only turned and slid into place.
D: A cut is in a different place, so the pieces do not match: one piece here covers about 54% of the shape, but the matching piece in the left box covers about 72%.
Practice 10 of 40 · easy
The left box shows separate flat pieces. Which figure shows how the pieces look when they are fitted together?
Show the answer
Answer: C
Count the pieces first: every figure must use each piece exactly once, with nothing added. Then pick one distinctive piece, such as the largest one or one with a curved or sharply pointed edge, and look for it in each figure; pieces may be turned but never flipped over. A figure whose cut lines are in different places has pieces of different sizes and can be crossed out. Here the pieces fit together into a hexagon.
A: This figure is a circle. The pieces in the left box do not have these shapes, so they cannot fill this outline without gaps or overlaps.
B: This figure has 3 pieces, but the left box has 2. Every piece must be used once, and nothing may be added.
C (correct): This hexagon is made of exactly the 2 pieces in the left box, each only turned and slid into place.
D: A cut is in a different place, so the pieces do not match: one piece here covers about 48% of the shape, but the matching piece in the left box covers about 37%.
Practice 11 of 40 · easy
The left box shows separate flat pieces. Which figure shows how the pieces look when they are fitted together?
Show the answer
Answer: B
Count the pieces first: every figure must use each piece exactly once, with nothing added. Then pick one distinctive piece, such as the largest one or one with a curved or sharply pointed edge, and look for it in each figure; pieces may be turned but never flipped over. A figure whose cut lines are in different places has pieces of different sizes and can be crossed out. Here the pieces fit together into a triangle.
A: This figure is a right triangle. The pieces in the left box do not have these shapes, so they cannot fill this outline without gaps or overlaps.
B (correct): This triangle is made of exactly the 2 pieces in the left box, each only turned and slid into place.
C: This figure has 3 pieces, but the left box has 2. Every piece must be used once, and nothing may be added.
D: A cut is in a different place, so the pieces do not match: one piece here covers about 31% of the shape, but the matching piece in the left box covers about 46%.
Practice 12 of 40 · easy
The left box shows separate flat pieces. Which figure shows how the pieces look when they are fitted together?
Show the answer
Answer: D
Count the pieces first: every figure must use each piece exactly once, with nothing added. Then pick one distinctive piece, such as the largest one or one with a curved or sharply pointed edge, and look for it in each figure; pieces may be turned but never flipped over. A figure whose cut lines are in different places has pieces of different sizes and can be crossed out. Here the pieces fit together into a circle.
A: A cut is in a different place, so the pieces do not match: one piece here covers about 25% of the shape, but the matching piece in the left box covers about 34%.
B: This figure is a hexagon. The pieces in the left box do not have these shapes, so they cannot fill this outline without gaps or overlaps.
C: This figure has 4 pieces, but the left box has 3. Every piece must be used once, and nothing may be added.
D (correct): This circle is made of exactly the 3 pieces in the left box, each only turned and slid into place.
Practice 13 of 40 · easy
The left box shows separate flat pieces. Which figure shows how the pieces look when they are fitted together?
Show the answer
Answer: B
Count the pieces first: every figure must use each piece exactly once, with nothing added. Then pick one distinctive piece, such as the largest one or one with a curved or sharply pointed edge, and look for it in each figure; pieces may be turned but never flipped over. A figure whose cut lines are in different places has pieces of different sizes and can be crossed out. Here the pieces fit together into a trapezoid.
A: This figure has 4 pieces, but the left box has 3. Every piece must be used once, and nothing may be added.
B (correct): This trapezoid is made of exactly the 3 pieces in the left box, each only turned and slid into place.
C: This figure is a half-circle. The pieces in the left box do not have these shapes, so they cannot fill this outline without gaps or overlaps.
D: A cut is in a different place, so the pieces do not match: one piece here covers about 48% of the shape, but the matching piece in the left box covers about 41%.
Practice 14 of 40 · hard
The left box shows separate flat pieces. Which figure shows how the pieces look when they are fitted together?
Show the answer
Answer: B
Count the pieces first: every figure must use each piece exactly once, with nothing added. Then pick one distinctive piece, such as the largest one or one with a curved or sharply pointed edge, and look for it in each figure; pieces may be turned but never flipped over. A figure whose cut lines are in different places has pieces of different sizes and can be crossed out. Here the pieces fit together into a triangle.
A: A cut is in a different place, so the pieces do not match: one piece here covers about 56% of the shape, but the matching piece in the left box covers about 35%.
B (correct): This triangle is made of exactly the 4 pieces in the left box, each only turned and slid into place.
C: This figure is a right triangle. The pieces in the left box do not have these shapes, so they cannot fill this outline without gaps or overlaps.
D: A cut is in a different place, so the pieces do not match: one piece here covers about 47% of the shape, but the matching piece in the left box covers about 35%.
Practice 15 of 40 · easy
The left box shows separate flat pieces. Which figure shows how the pieces look when they are fitted together?
Show the answer
Answer: A
Count the pieces first: every figure must use each piece exactly once, with nothing added. Then pick one distinctive piece, such as the largest one or one with a curved or sharply pointed edge, and look for it in each figure; pieces may be turned but never flipped over. A figure whose cut lines are in different places has pieces of different sizes and can be crossed out. Here the pieces fit together into a right triangle.
A (correct): This right triangle is made of exactly the 3 pieces in the left box, each only turned and slid into place.
B: A cut is in a different place, so the pieces do not match: one piece here covers about 61% of the shape, but the matching piece in the left box covers about 40%.
C: This figure has 4 pieces, but the left box has 3. Every piece must be used once, and nothing may be added.
D: This figure is a triangle. The pieces in the left box do not have these shapes, so they cannot fill this outline without gaps or overlaps.
Practice 16 of 40 · medium
The left box shows separate flat pieces. Which figure shows how the pieces look when they are fitted together?
Show the answer
Answer: C
Count the pieces first: every figure must use each piece exactly once, with nothing added. Then pick one distinctive piece, such as the largest one or one with a curved or sharply pointed edge, and look for it in each figure; pieces may be turned but never flipped over. A figure whose cut lines are in different places has pieces of different sizes and can be crossed out. Here the pieces fit together into a circle.
A: This figure is a hexagon. The pieces in the left box do not have these shapes, so they cannot fill this outline without gaps or overlaps.
B: This figure has 4 pieces, but the left box has 3. Every piece must be used once, and nothing may be added.
C (correct): This circle is made of exactly the 3 pieces in the left box, each only turned and slid into place.
D: A cut is in a different place, so the pieces do not match: one piece here covers about 13% of the shape, but the matching piece in the left box covers about 21%.
Practice 17 of 40 · hard
The left box shows separate flat pieces. Which figure shows how the pieces look when they are fitted together?
Show the answer
Answer: A
Count the pieces first: every figure must use each piece exactly once, with nothing added. Then pick one distinctive piece, such as the largest one or one with a curved or sharply pointed edge, and look for it in each figure; pieces may be turned but never flipped over. A figure whose cut lines are in different places has pieces of different sizes and can be crossed out. Here the pieces fit together into a diamond.
A (correct): This diamond is made of exactly the 4 pieces in the left box, each only turned and slid into place.
B: This figure is a square. The pieces in the left box do not have these shapes, so they cannot fill this outline without gaps or overlaps.
C: A cut is in a different place, so the pieces do not match: one piece here covers about 13% of the shape, but the matching piece in the left box covers about 22%.
D: A cut is in a different place, so the pieces do not match: one piece here covers about 41% of the shape, but the matching piece in the left box covers about 31%.
Practice 18 of 40 · hard
The left box shows separate flat pieces. Which figure shows how the pieces look when they are fitted together?
Show the answer
Answer: D
Count the pieces first: every figure must use each piece exactly once, with nothing added. Then pick one distinctive piece, such as the largest one or one with a curved or sharply pointed edge, and look for it in each figure; pieces may be turned but never flipped over. A figure whose cut lines are in different places has pieces of different sizes and can be crossed out. Here the pieces fit together into a circle.
A: A cut is in a different place, so the pieces do not match: one piece here covers about 48% of the shape, but the matching piece in the left box covers about 31%.
B: A cut is in a different place, so the pieces do not match: one piece here covers about 17% of the shape, but the matching piece in the left box covers about 25%.
C: This figure is a hexagon. The pieces in the left box do not have these shapes, so they cannot fill this outline without gaps or overlaps.
D (correct): This circle is made of exactly the 4 pieces in the left box, each only turned and slid into place.
Practice 19 of 40 · medium
The left box shows separate flat pieces. Which figure shows how the pieces look when they are fitted together?
Show the answer
Answer: A
Count the pieces first: every figure must use each piece exactly once, with nothing added. Then pick one distinctive piece, such as the largest one or one with a curved or sharply pointed edge, and look for it in each figure; pieces may be turned but never flipped over. A figure whose cut lines are in different places has pieces of different sizes and can be crossed out. Here the pieces fit together into a trapezoid.
A (correct): This trapezoid is made of exactly the 3 pieces in the left box, each only turned and slid into place.
B: A cut is in a different place, so the pieces do not match: one piece here covers about 74% of the shape, but the matching piece in the left box covers about 38%.
C: This figure has 4 pieces, but the left box has 3. Every piece must be used once, and nothing may be added.
D: This figure is a parallelogram. The pieces in the left box do not have these shapes, so they cannot fill this outline without gaps or overlaps.
Practice 20 of 40 · medium
The left box shows separate flat pieces. Which figure shows how the pieces look when they are fitted together?
Show the answer
Answer: A
Count the pieces first: every figure must use each piece exactly once, with nothing added. Then pick one distinctive piece, such as the largest one or one with a curved or sharply pointed edge, and look for it in each figure; pieces may be turned but never flipped over. A figure whose cut lines are in different places has pieces of different sizes and can be crossed out. Here the pieces fit together into a square.
A (correct): This square is made of exactly the 3 pieces in the left box, each only turned and slid into place.
B: A cut is in a different place, so the pieces do not match: one piece here covers about 69% of the shape, but the matching piece in the left box covers about 51%.
C: This figure has 4 pieces, but the left box has 3. Every piece must be used once, and nothing may be added.
D: This figure is a rectangle. The pieces in the left box do not have these shapes, so they cannot fill this outline without gaps or overlaps.
Practice 21 of 40 · medium
The left box shows separate flat pieces. Which figure shows how the pieces look when they are fitted together?
Show the answer
Answer: C
Count the pieces first: every figure must use each piece exactly once, with nothing added. Then pick one distinctive piece, such as the largest one or one with a curved or sharply pointed edge, and look for it in each figure; pieces may be turned but never flipped over. A figure whose cut lines are in different places has pieces of different sizes and can be crossed out. Here the pieces fit together into a diamond.
A: A cut is in a different place, so the pieces do not match: one piece here covers about 24% of the shape, but the matching piece in the left box covers about 32%.
B: A cut is in a different place, so the pieces do not match: one piece here covers about 39% of the shape, but the matching piece in the left box covers about 32%.
C (correct): This diamond is made of exactly the 3 pieces in the left box, each only turned and slid into place.
D: This figure has 4 pieces, but the left box has 3. Every piece must be used once, and nothing may be added.
Practice 22 of 40 · medium
The left box shows separate flat pieces. Which figure shows how the pieces look when they are fitted together?
Show the answer
Answer: C
Count the pieces first: every figure must use each piece exactly once, with nothing added. Then pick one distinctive piece, such as the largest one or one with a curved or sharply pointed edge, and look for it in each figure; pieces may be turned but never flipped over. A figure whose cut lines are in different places has pieces of different sizes and can be crossed out. Here the pieces fit together into a rectangle.
A: A cut is in a different place, so the pieces do not match: one piece here covers about 40% of the shape, but the matching piece in the left box covers about 29%.
B: This figure has 4 pieces, but the left box has 3. Every piece must be used once, and nothing may be added.
C (correct): This rectangle is made of exactly the 3 pieces in the left box, each only turned and slid into place.
D: This figure is a square. The pieces in the left box do not have these shapes, so they cannot fill this outline without gaps or overlaps.
Practice 23 of 40 · hard
The left box shows separate flat pieces. Which figure shows how the pieces look when they are fitted together?
Show the answer
Answer: B
Count the pieces first: every figure must use each piece exactly once, with nothing added. Then pick one distinctive piece, such as the largest one or one with a curved or sharply pointed edge, and look for it in each figure; pieces may be turned but never flipped over. A figure whose cut lines are in different places has pieces of different sizes and can be crossed out. Here the pieces fit together into a right triangle.
A: A cut is in a different place, so the pieces do not match: one piece here covers about 24% of the shape, but the matching piece in the left box covers about 17%.
B (correct): This right triangle is made of exactly the 4 pieces in the left box, each only turned and slid into place.
C: This figure is a triangle. The pieces in the left box do not have these shapes, so they cannot fill this outline without gaps or overlaps.
D: A cut is in a different place, so the pieces do not match: one piece here covers about 26% of the shape, but the matching piece in the left box covers about 34%.
Practice 24 of 40 · medium
The left box shows separate flat pieces. Which figure shows how the pieces look when they are fitted together?
Show the answer
Answer: D
Count the pieces first: every figure must use each piece exactly once, with nothing added. Then pick one distinctive piece, such as the largest one or one with a curved or sharply pointed edge, and look for it in each figure; pieces may be turned but never flipped over. A figure whose cut lines are in different places has pieces of different sizes and can be crossed out. Here the pieces fit together into a half-circle.
A: A cut is in a different place, so the pieces do not match: one piece here covers about 52% of the shape, but the matching piece in the left box covers about 45%.
B: This figure is a trapezoid. The pieces in the left box do not have these shapes, so they cannot fill this outline without gaps or overlaps.
C: This figure has 4 pieces, but the left box has 3. Every piece must be used once, and nothing may be added.
D (correct): This half-circle is made of exactly the 3 pieces in the left box, each only turned and slid into place.
Practice 25 of 40 · medium
The left box shows separate flat pieces. Which figure shows how the pieces look when they are fitted together?
Show the answer
Answer: A
Count the pieces first: every figure must use each piece exactly once, with nothing added. Then pick one distinctive piece, such as the largest one or one with a curved or sharply pointed edge, and look for it in each figure; pieces may be turned but never flipped over. A figure whose cut lines are in different places has pieces of different sizes and can be crossed out. Here the pieces fit together into a pentagon.
A (correct): This pentagon is made of exactly the 3 pieces in the left box, each only turned and slid into place.
B: This figure is a hexagon. The pieces in the left box do not have these shapes, so they cannot fill this outline without gaps or overlaps.
C: A cut is in a different place, so the pieces do not match: one piece here covers about 39% of the shape, but the matching piece in the left box covers about 57%.
D: This figure has 4 pieces, but the left box has 3. Every piece must be used once, and nothing may be added.
Practice 26 of 40 · medium
The left box shows separate flat pieces. Which figure shows how the pieces look when they are fitted together?
Show the answer
Answer: A
Count the pieces first: every figure must use each piece exactly once, with nothing added. Then pick one distinctive piece, such as the largest one or one with a curved or sharply pointed edge, and look for it in each figure; pieces may be turned but never flipped over. A figure whose cut lines are in different places has pieces of different sizes and can be crossed out. Here the pieces fit together into a diamond.
A (correct): This diamond is made of exactly the 3 pieces in the left box, each only turned and slid into place.
B: This figure has 4 pieces, but the left box has 3. Every piece must be used once, and nothing may be added.
C: A cut is in a different place, so the pieces do not match: one piece here covers about 32% of the shape, but the matching piece in the left box covers about 40%.
D: This figure is a square. The pieces in the left box do not have these shapes, so they cannot fill this outline without gaps or overlaps.
Practice 27 of 40 · hard
The left box shows separate flat pieces. Which figure shows how the pieces look when they are fitted together?
Show the answer
Answer: B
Count the pieces first: every figure must use each piece exactly once, with nothing added. Then pick one distinctive piece, such as the largest one or one with a curved or sharply pointed edge, and look for it in each figure; pieces may be turned but never flipped over. A figure whose cut lines are in different places has pieces of different sizes and can be crossed out. Here the pieces fit together into a trapezoid.
A: A cut is in a different place, so the pieces do not match: one piece here covers about 27% of the shape, but the matching piece in the left box covers about 37%.
B (correct): This trapezoid is made of exactly the 4 pieces in the left box, each only turned and slid into place.
C: A cut is in a different place, so the pieces do not match: one piece here covers about 47% of the shape, but the matching piece in the left box covers about 37%.
D: This figure is a parallelogram. The pieces in the left box do not have these shapes, so they cannot fill this outline without gaps or overlaps.
Practice 28 of 40 · hard
The left box shows separate flat pieces. Which figure shows how the pieces look when they are fitted together?
Show the answer
Answer: D
Count the pieces first: every figure must use each piece exactly once, with nothing added. Then pick one distinctive piece, such as the largest one or one with a curved or sharply pointed edge, and look for it in each figure; pieces may be turned but never flipped over. A figure whose cut lines are in different places has pieces of different sizes and can be crossed out. Here the pieces fit together into a circle.
A: This figure is a hexagon. The pieces in the left box do not have these shapes, so they cannot fill this outline without gaps or overlaps.
B: A cut is in a different place, so the pieces do not match: one piece here covers about 33% of the shape, but the matching piece in the left box covers about 19%.
C: A cut is in a different place, so the pieces do not match: one piece here covers about 42% of the shape, but the matching piece in the left box covers about 50%.
D (correct): This circle is made of exactly the 4 pieces in the left box, each only turned and slid into place.
Practice 29 of 40 · medium
The left box shows separate flat pieces. Which figure shows how the pieces look when they are fitted together?
Show the answer
Answer: C
Count the pieces first: every figure must use each piece exactly once, with nothing added. Then pick one distinctive piece, such as the largest one or one with a curved or sharply pointed edge, and look for it in each figure; pieces may be turned but never flipped over. A figure whose cut lines are in different places has pieces of different sizes and can be crossed out. Here the pieces fit together into a half-circle.
A: A cut is in a different place, so the pieces do not match: one piece here covers about 43% of the shape, but the matching piece in the left box covers about 54%.
B: This figure has 4 pieces, but the left box has 3. Every piece must be used once, and nothing may be added.
C (correct): This half-circle is made of exactly the 3 pieces in the left box, each only turned and slid into place.
D: A cut is in a different place, so the pieces do not match: one piece here covers about 62% of the shape, but the matching piece in the left box covers about 54%.
Practice 30 of 40 · hard
The left box shows separate flat pieces. Which figure shows how the pieces look when they are fitted together?
Show the answer
Answer: A
Count the pieces first: every figure must use each piece exactly once, with nothing added. Then pick one distinctive piece, such as the largest one or one with a curved or sharply pointed edge, and look for it in each figure; pieces may be turned but never flipped over. A figure whose cut lines are in different places has pieces of different sizes and can be crossed out. Here the pieces fit together into a hexagon.
A (correct): This hexagon is made of exactly the 4 pieces in the left box, each only turned and slid into place.
B: This figure is a pentagon. The pieces in the left box do not have these shapes, so they cannot fill this outline without gaps or overlaps.
C: A cut is in a different place, so the pieces do not match: one piece here covers about 43% of the shape, but the matching piece in the left box covers about 36%.
D: A cut is in a different place, so the pieces do not match: one piece here covers about 26% of the shape, but the matching piece in the left box covers about 36%.
Practice 31 of 40 · medium
The left box shows separate flat pieces. Which figure shows how the pieces look when they are fitted together?
Show the answer
Answer: C
Count the pieces first: every figure must use each piece exactly once, with nothing added. Then pick one distinctive piece, such as the largest one or one with a curved or sharply pointed edge, and look for it in each figure; pieces may be turned but never flipped over. A figure whose cut lines are in different places has pieces of different sizes and can be crossed out. Here the pieces fit together into a square.
A: This figure is a rectangle. The pieces in the left box do not have these shapes, so they cannot fill this outline without gaps or overlaps.
B: This figure has 4 pieces, but the left box has 3. Every piece must be used once, and nothing may be added.
C (correct): This square is made of exactly the 3 pieces in the left box, each only turned and slid into place.
D: A cut is in a different place, so the pieces do not match: one piece here covers about 41% of the shape, but the matching piece in the left box covers about 31%.
Practice 32 of 40 · easy
The left box shows separate flat pieces. Which figure shows how the pieces look when they are fitted together?
Show the answer
Answer: D
Count the pieces first: every figure must use each piece exactly once, with nothing added. Then pick one distinctive piece, such as the largest one or one with a curved or sharply pointed edge, and look for it in each figure; pieces may be turned but never flipped over. A figure whose cut lines are in different places has pieces of different sizes and can be crossed out. Here the pieces fit together into a half-circle.
A: This figure has 3 pieces, but the left box has 2. Every piece must be used once, and nothing may be added.
B: A cut is in a different place, so the pieces do not match: one piece here covers about 52% of the shape, but the matching piece in the left box covers about 60%.
C: This figure is a trapezoid. The pieces in the left box do not have these shapes, so they cannot fill this outline without gaps or overlaps.
D (correct): This half-circle is made of exactly the 2 pieces in the left box, each only turned and slid into place.
Practice 33 of 40 · medium
The left box shows separate flat pieces. Which figure shows how the pieces look when they are fitted together?
Show the answer
Answer: A
Count the pieces first: every figure must use each piece exactly once, with nothing added. Then pick one distinctive piece, such as the largest one or one with a curved or sharply pointed edge, and look for it in each figure; pieces may be turned but never flipped over. A figure whose cut lines are in different places has pieces of different sizes and can be crossed out. Here the pieces fit together into a circle.
A (correct): This circle is made of exactly the 3 pieces in the left box, each only turned and slid into place.
B: This figure has 4 pieces, but the left box has 3. Every piece must be used once, and nothing may be added.
C: A cut is in a different place, so the pieces do not match: one piece here covers about 33% of the shape, but the matching piece in the left box covers about 26%.
D: A cut is in a different place, so the pieces do not match: one piece here covers about 69% of the shape, but the matching piece in the left box covers about 56%.
Practice 34 of 40 · medium
The left box shows separate flat pieces. Which figure shows how the pieces look when they are fitted together?
Show the answer
Answer: C
Count the pieces first: every figure must use each piece exactly once, with nothing added. Then pick one distinctive piece, such as the largest one or one with a curved or sharply pointed edge, and look for it in each figure; pieces may be turned but never flipped over. A figure whose cut lines are in different places has pieces of different sizes and can be crossed out. Here the pieces fit together into a diamond.
A: A cut is in a different place, so the pieces do not match: one piece here covers about 17% of the shape, but the matching piece in the left box covers about 30%.
B: This figure is a square. The pieces in the left box do not have these shapes, so they cannot fill this outline without gaps or overlaps.
C (correct): This diamond is made of exactly the 3 pieces in the left box, each only turned and slid into place.
D: A cut is in a different place, so the pieces do not match: one piece here covers about 58% of the shape, but the matching piece in the left box covers about 37%.
Practice 35 of 40 · easy
The left box shows separate flat pieces. Which figure shows how the pieces look when they are fitted together?
Show the answer
Answer: D
Count the pieces first: every figure must use each piece exactly once, with nothing added. Then pick one distinctive piece, such as the largest one or one with a curved or sharply pointed edge, and look for it in each figure; pieces may be turned but never flipped over. A figure whose cut lines are in different places has pieces of different sizes and can be crossed out. Here the pieces fit together into a rectangle.
A: A cut is in a different place, so the pieces do not match: one piece here covers about 73% of the shape, but the matching piece in the left box covers about 61%.
B: This figure has 3 pieces, but the left box has 2. Every piece must be used once, and nothing may be added.
C: This figure is a square. The pieces in the left box do not have these shapes, so they cannot fill this outline without gaps or overlaps.
D (correct): This rectangle is made of exactly the 2 pieces in the left box, each only turned and slid into place.
Practice 36 of 40 · hard
The left box shows separate flat pieces. Which figure shows how the pieces look when they are fitted together?
Show the answer
Answer: A
Count the pieces first: every figure must use each piece exactly once, with nothing added. Then pick one distinctive piece, such as the largest one or one with a curved or sharply pointed edge, and look for it in each figure; pieces may be turned but never flipped over. A figure whose cut lines are in different places has pieces of different sizes and can be crossed out. Here the pieces fit together into a right triangle.
A (correct): This right triangle is made of exactly the 4 pieces in the left box, each only turned and slid into place.
B: A cut is in a different place, so the pieces do not match: one piece here covers about 47% of the shape, but the matching piece in the left box covers about 29%.
C: A cut is in a different place, so the pieces do not match: one piece here covers about 40% of the shape, but the matching piece in the left box covers about 29%.
D: This figure is a triangle. The pieces in the left box do not have these shapes, so they cannot fill this outline without gaps or overlaps.
Practice 37 of 40 · medium
The left box shows separate flat pieces. Which figure shows how the pieces look when they are fitted together?
Show the answer
Answer: A
Count the pieces first: every figure must use each piece exactly once, with nothing added. Then pick one distinctive piece, such as the largest one or one with a curved or sharply pointed edge, and look for it in each figure; pieces may be turned but never flipped over. A figure whose cut lines are in different places has pieces of different sizes and can be crossed out. Here the pieces fit together into a trapezoid.
A (correct): This trapezoid is made of exactly the 3 pieces in the left box, each only turned and slid into place.
B: A cut is in a different place, so the pieces do not match: one piece here covers about 32% of the shape, but the matching piece in the left box covers about 22%.
C: This figure has 4 pieces, but the left box has 3. Every piece must be used once, and nothing may be added.
D: A cut is in a different place, so the pieces do not match: one piece here covers about 14% of the shape, but the matching piece in the left box covers about 22%.
Practice 38 of 40 · medium
The left box shows separate flat pieces. Which figure shows how the pieces look when they are fitted together?
Show the answer
Answer: D
Count the pieces first: every figure must use each piece exactly once, with nothing added. Then pick one distinctive piece, such as the largest one or one with a curved or sharply pointed edge, and look for it in each figure; pieces may be turned but never flipped over. A figure whose cut lines are in different places has pieces of different sizes and can be crossed out. Here the pieces fit together into a triangle.
A: This figure has 4 pieces, but the left box has 3. Every piece must be used once, and nothing may be added.
B: A cut is in a different place, so the pieces do not match: one piece here covers about 68% of the shape, but the matching piece in the left box covers about 43%.
C: This figure is a right triangle. The pieces in the left box do not have these shapes, so they cannot fill this outline without gaps or overlaps.
D (correct): This triangle is made of exactly the 3 pieces in the left box, each only turned and slid into place.
Practice 39 of 40 · hard
The left box shows separate flat pieces. Which figure shows how the pieces look when they are fitted together?
Show the answer
Answer: B
Count the pieces first: every figure must use each piece exactly once, with nothing added. Then pick one distinctive piece, such as the largest one or one with a curved or sharply pointed edge, and look for it in each figure; pieces may be turned but never flipped over. A figure whose cut lines are in different places has pieces of different sizes and can be crossed out. Here the pieces fit together into a square.
A: This figure is a rectangle. The pieces in the left box do not have these shapes, so they cannot fill this outline without gaps or overlaps.
B (correct): This square is made of exactly the 4 pieces in the left box, each only turned and slid into place.
C: A cut is in a different place, so the pieces do not match: one piece here covers about 45% of the shape, but the matching piece in the left box covers about 29%.
D: A cut is in a different place, so the pieces do not match: one piece here covers about 55% of the shape, but the matching piece in the left box covers about 29%.
Practice 40 of 40 · medium
The left box shows separate flat pieces. Which figure shows how the pieces look when they are fitted together?
Show the answer
Answer: B
Count the pieces first: every figure must use each piece exactly once, with nothing added. Then pick one distinctive piece, such as the largest one or one with a curved or sharply pointed edge, and look for it in each figure; pieces may be turned but never flipped over. A figure whose cut lines are in different places has pieces of different sizes and can be crossed out. Here the pieces fit together into a right triangle.
A: A cut is in a different place, so the pieces do not match: one piece here covers about 56% of the shape, but the matching piece in the left box covers about 48%.
B (correct): This right triangle is made of exactly the 3 pieces in the left box, each only turned and slid into place.
C: This figure has 4 pieces, but the left box has 3. Every piece must be used once, and nothing may be added.
D: This figure is a triangle. The pieces in the left box do not have these shapes, so they cannot fill this outline without gaps or overlaps.
About this test
Every answer comes with an explanation, so a wrong choice tells you exactly which step slipped: direction, center of rotation, handedness or marker tracking. Read the reasoning even on items you got right, because a lucky guess and a solid method look the same on the score line.
Use your percentage as a study guide rather than a verdict. If most misses involve mirrors, go back to the sections on handedness and why reflections fool the eye; if direction errors dominate, revisit the clockwise and counterclockwise sections and the drills on opposite candidates, then retake the test.
The same 124 lessons, 6,516 questions and 82 timed practice tests on your phone, plus flashcards with spaced review and progress tracking. Free to download, and it works offline.
 ASVAB Camp
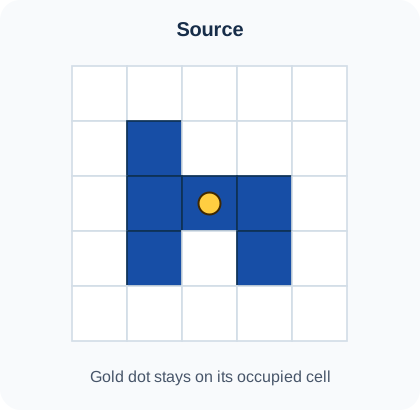
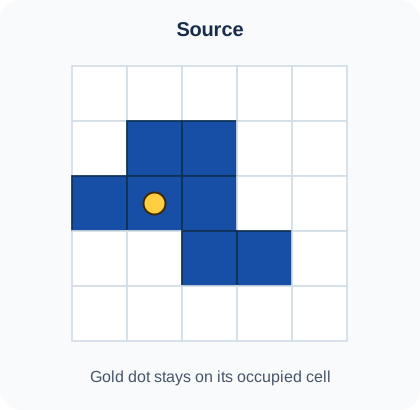
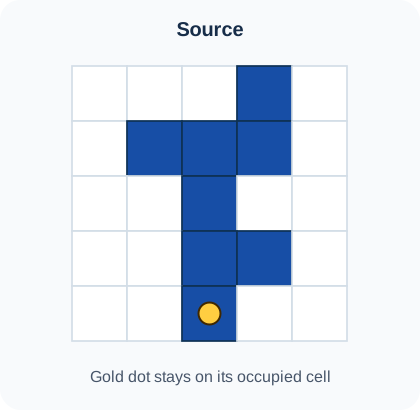
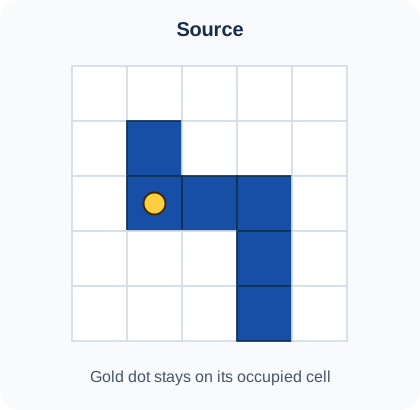
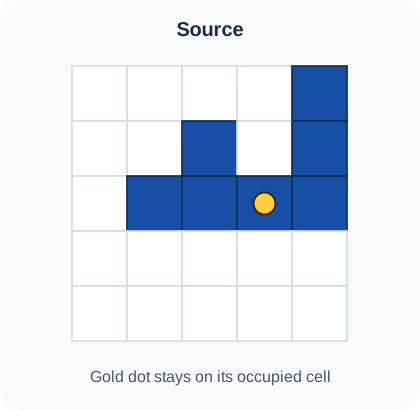
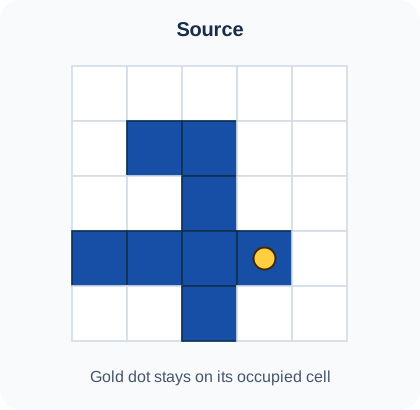
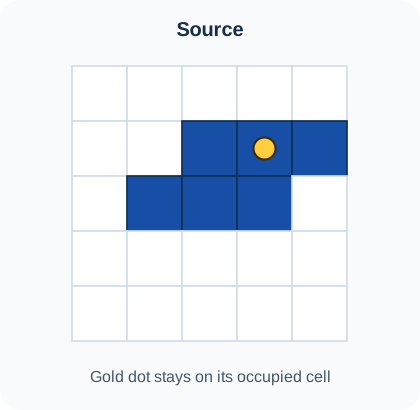
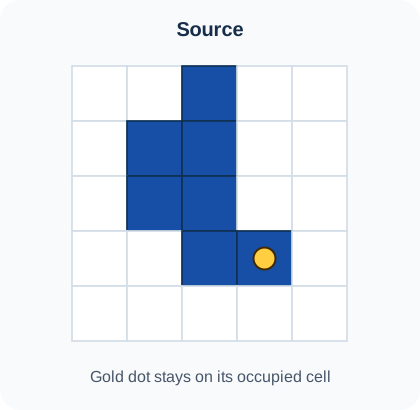
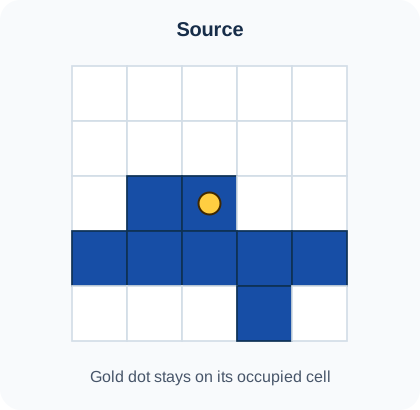
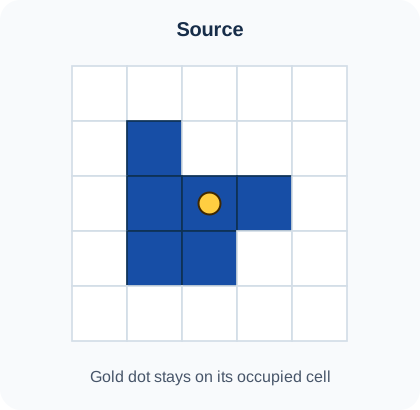
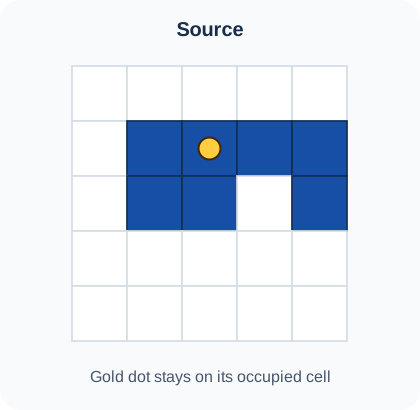
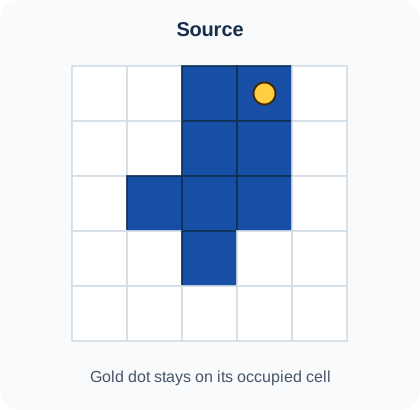
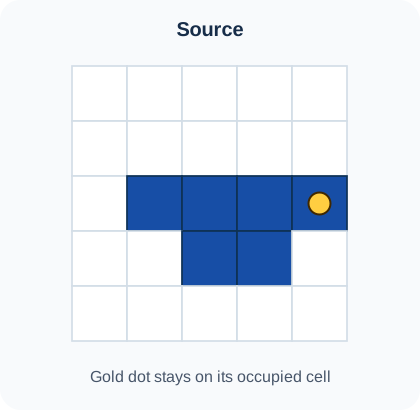
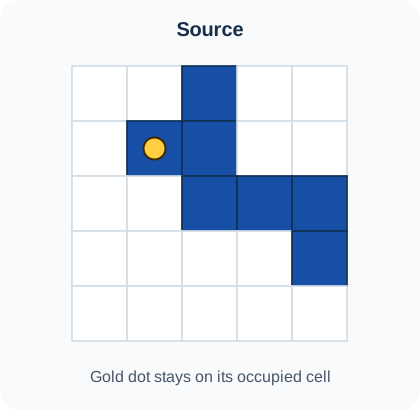
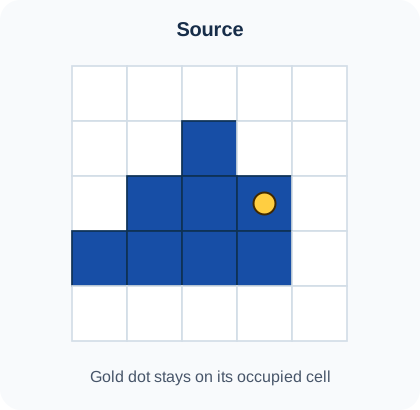
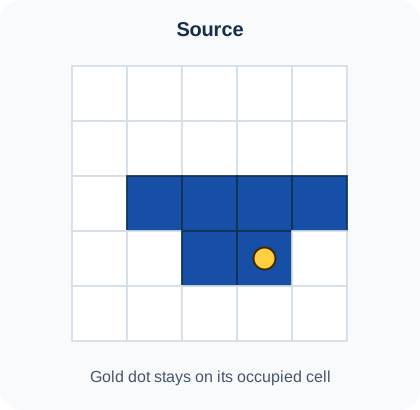
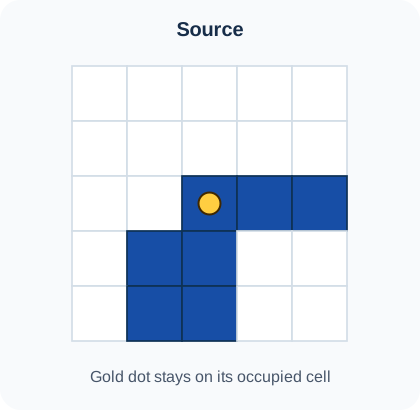
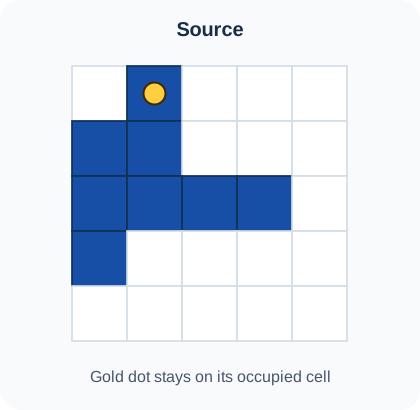
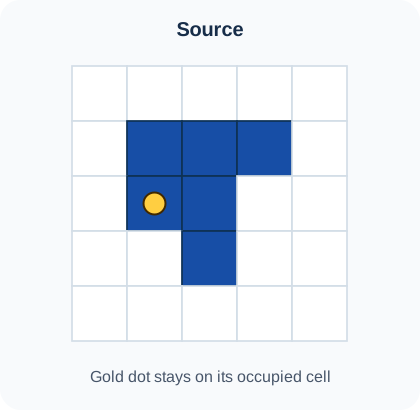
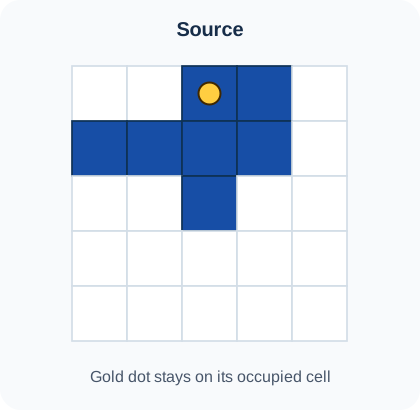
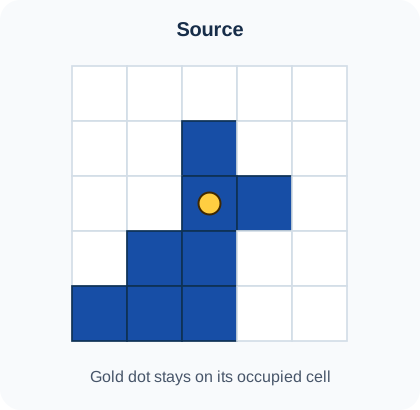
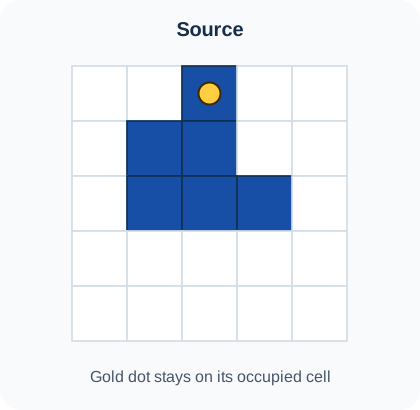
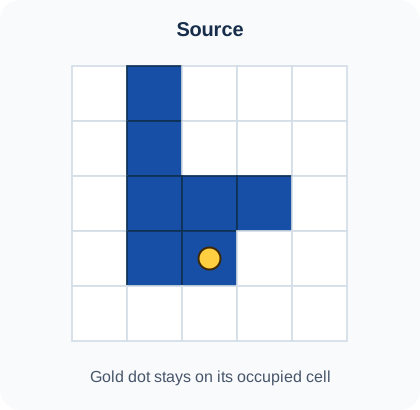
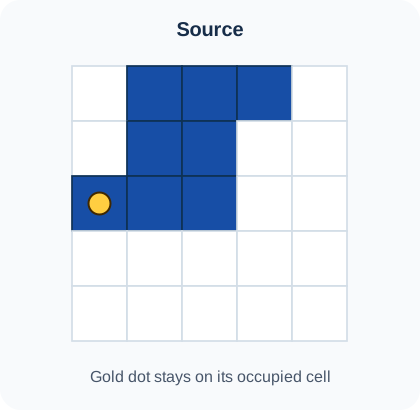
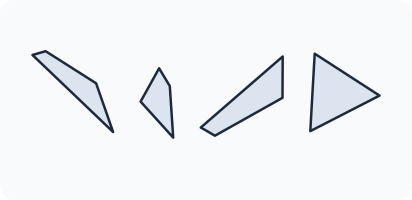
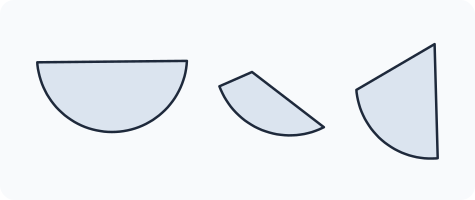
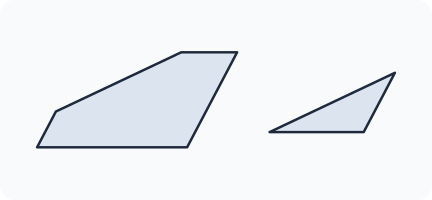
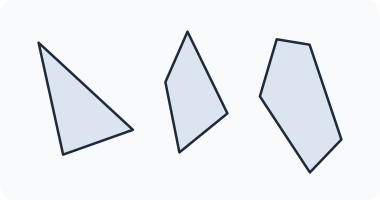
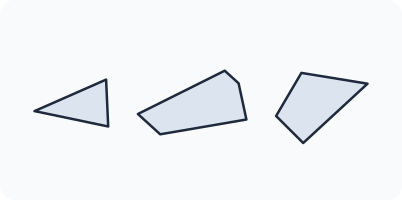
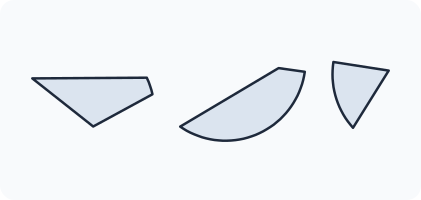
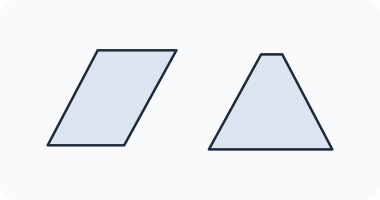
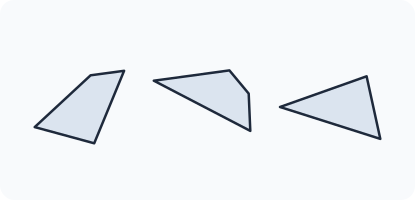
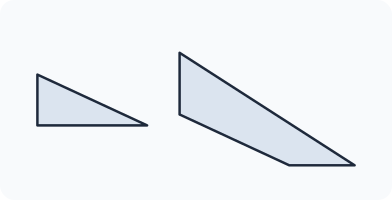
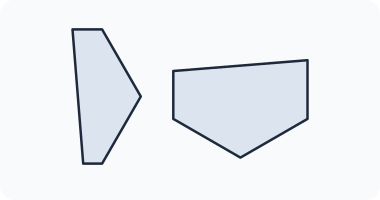
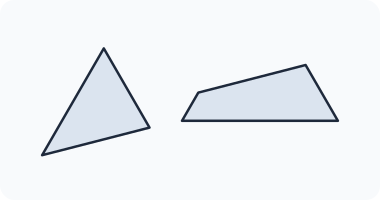
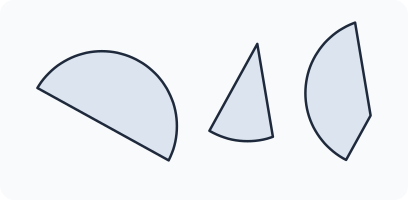
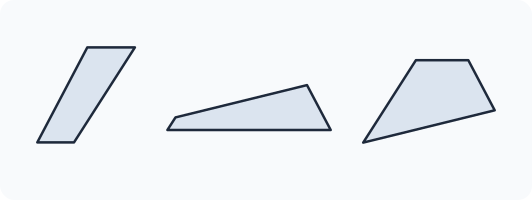
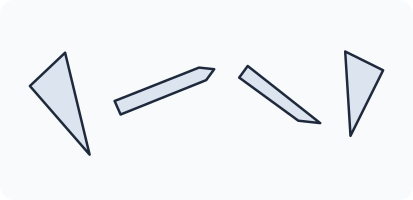
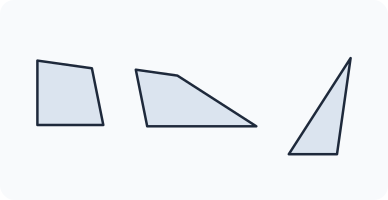
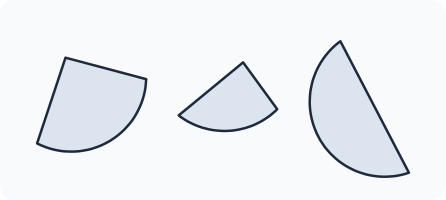
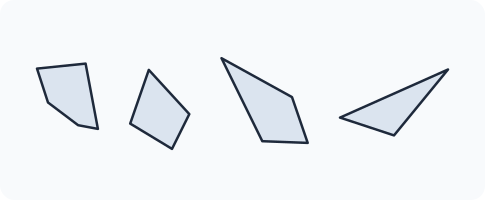
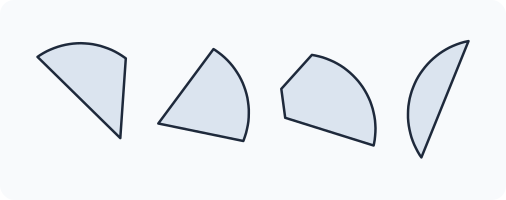
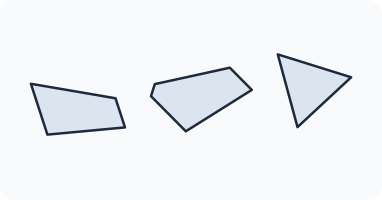
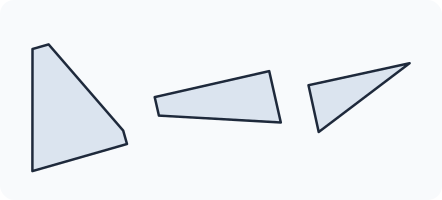
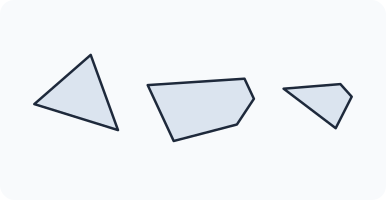
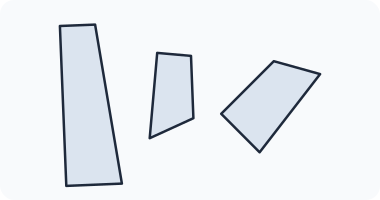
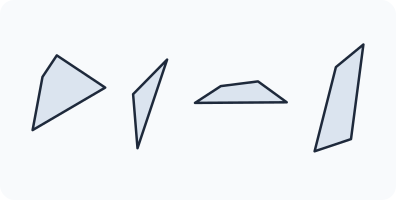
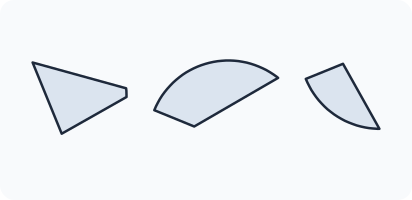
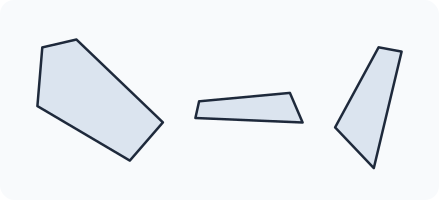
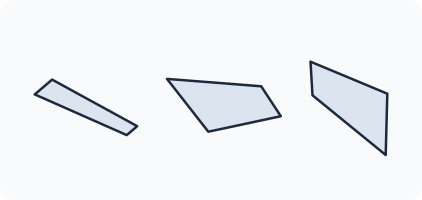
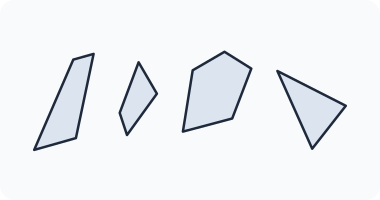
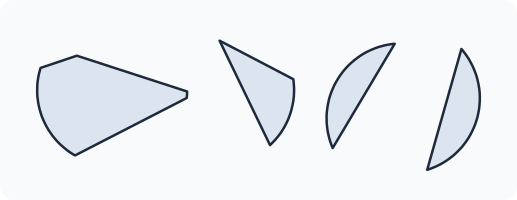
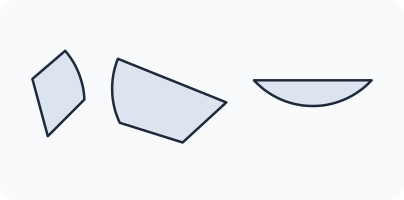
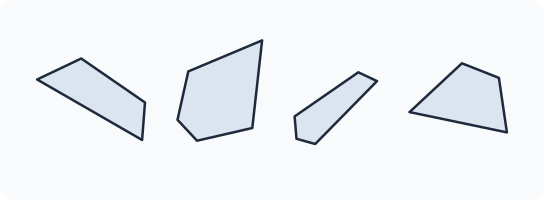
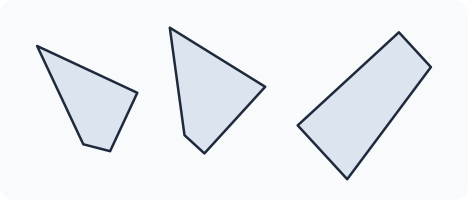
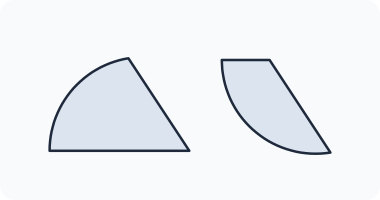
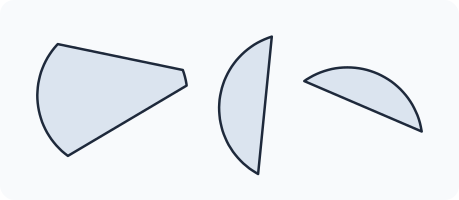
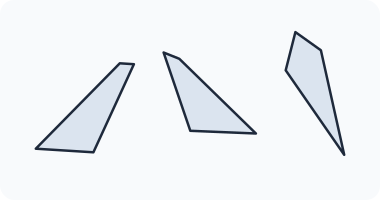
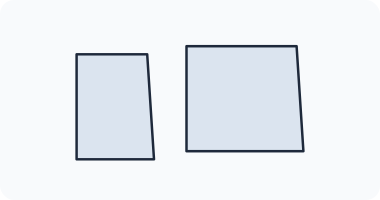
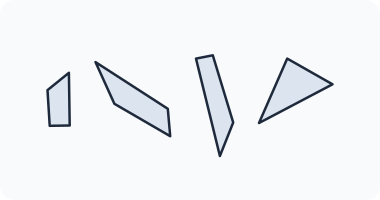
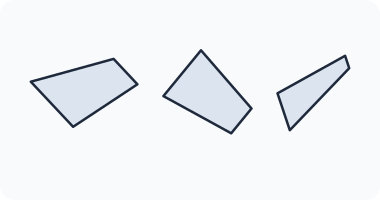
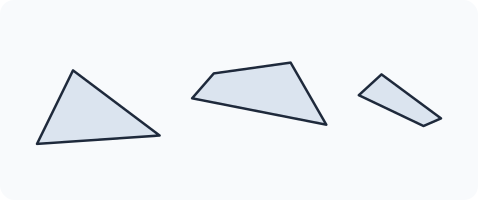
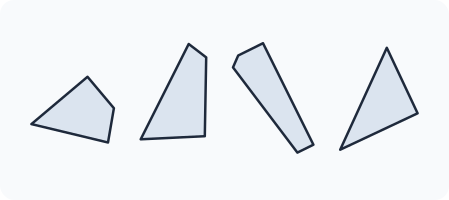
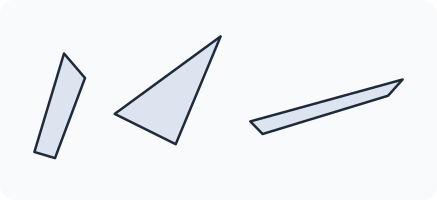
 English ▾