 ASVAB Camp
Learning outcomes
After this lesson, distinguish personal protective equipment from engineering safeguards, match a hazard to the right protection, and prepare a work area for safe operation. You will interpret shop warnings, identify unsafe machine setup, explain energy isolation and solve simple clearance and exposure problems. Treat this lesson as ASVAB Shop Information preparation, not as a substitute for employer training, an equipment manual, or a site-specific hazard assessment.
The shop safety decision sequence
A reliable decision starts with the task, not with the contents of a tool box. Ask what can strike, cut, entangle, burn, crush, shock, poison or overwhelm a worker. Next remove the hazard where feasible, apply guards and other engineering measures, establish safe methods, then select task-appropriate PPE for the remaining exposure. If an operation is uncontrolled, adding gloves or goggles does not make it acceptable.
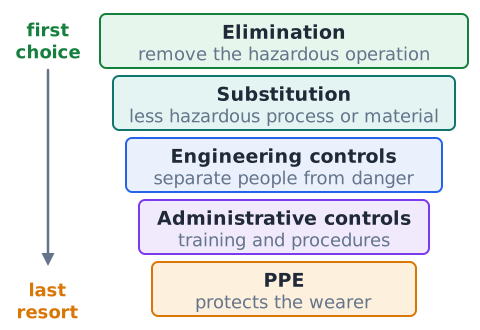
Hierarchy of controls
Elimination removes a hazardous operation; substitution uses a less hazardous process or material; engineering controls physically separate people from danger; administrative controls organize training and procedures; and PPE protects the wearer. A guarded cutting operation is better controlled than one relying solely on a warning label. PPE is important, but it does not cancel the need for guarding, ventilation, or proper energy control.
Inspecting the task and area
Before starting, inspect the intended operation and its surroundings: material condition, stable footing, nearby people, lighting, electrical cords, tool condition, guard condition and the route by which chips or sparks may travel. Consider what could change while the operation is underway, such as workpiece movement or a loosening clamp. A pre-use inspection is a decision point: fix the hazard or stop, rather than accepting an unsafe setup.
Hazard recognition: struck-by risks
Flying chips, broken abrasive particles, ejected workpieces and dropped tools can strike an operator or bystander. The travel direction of chips may change as a cut progresses. Appropriate eye protection, machine guarding, correct work holding and a clear exclusion zone work together. Merely standing a little farther from an unguarded machine does not make the point of operation safe.
Hazard recognition: entanglement
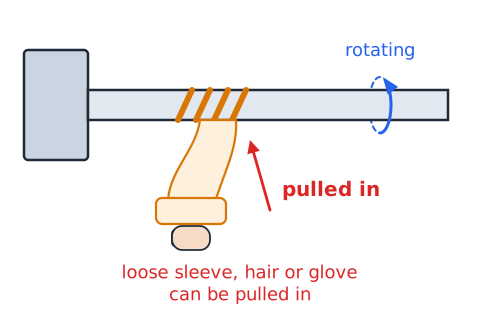
Rotating chucks, drills, shafts and rollers can capture loose sleeves, long hair, jewelry or inappropriate gloves. A moving component may wind fabric inward faster than a person can react. Secure clothing and hair, remove dangling accessories and follow machine-specific glove restrictions. Hand protection against cuts is valuable when handling sharp stock, but a glove close to exposed rotation can introduce a different hazard.
Hazard recognition: pinch and crush
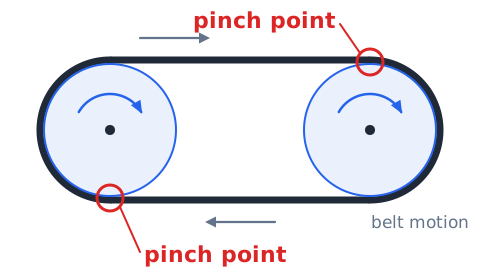
Pinch points form when moving parts meet one another or a fixed surface, such as a belt entering a pulley or rollers gripping stock. Crushing risk also exists beneath a suspended load or between a vise and workpiece. Guards, spacing, correct handling tools and stable fixtures are central controls. A worker should never use fingers to clear a jam near moving parts.
Hazard recognition: heat and chemicals
Welding, hot stock, cutting fluids, solvents and cleaning products create different hazards. Thermal burns require protection compatible with heat; chemical splash demands protection compatible with the substance. Inspect container labels and the safety data sheet (SDS) before selecting gloves or ventilation. A glove that stops abrasion may be penetrated by a solvent, and ordinary safety glasses may not seal adequately against a liquid splash.
What PPE can and cannot do
PPE includes safety eyewear, face protection, gloves, footwear, hearing protection and appropriate respiratory equipment. A helmet, apron or sleeve may be required for specific tasks. PPE must fit properly and be in serviceable condition. It does not prevent a machine from grabbing clothing or remove toxic vapor from the air. Always separate the question of PPE selection from whether the underlying process itself has been made acceptably safe.
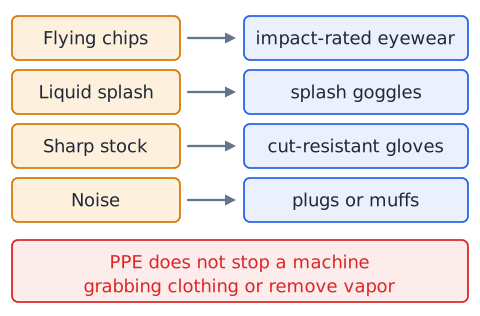
Eye protection for chips
Impact-rated safety eyewear with side protection is indicated when chips or flying particles threaten the eyes. Regular prescription glasses are not automatically impact-rated protection; suitable prescription PPE or protectors designed to fit over prescription lenses may be required. Eye protection should sit securely and allow clear vision. Look for the actual hazard: dust, liquid splash, particles and optical radiation can require different designs.
Safety goggles versus safety glasses
Safety glasses protect against many impact hazards when appropriately rated and fitted. Goggles form a closer perimeter around the eye area, and appropriate models better protect against certain splash or dust exposures. Neither label alone guarantees suitability for every hazard. Check the maker rating, hazard assessment, compatibility with other PPE and whether ventilation openings make a particular goggle inappropriate for the exposure.
Face shields are supplementary
A face shield can protect more facial area from splash or flying debris, but it commonly supplements rather than replaces appropriate eye protection. For a grinding operation, follow the equipment and site requirements for rated impact eyewear even if a shield is also worn. A transparent household visor is not automatically a certified industrial face shield. Protection depends on the exact task, equipment rating and fit.
Welding and radiant-light hazards
Welding and cutting may expose the operator to intense optical radiation and flying hot metal. Filter lenses or helmets must have a shade appropriate to the specific process and conditions. Assistants and bystanders may need protection from reflected light and sparks. Ordinary clear safety glasses are not equivalent to a welding filter. Keep combustible materials away and use appropriate ventilation controls.
Hand protection selection
Choose gloves by hazard and task: cut-resistant material for sharp stationary stock, heat-resistant types for hot work, or chemically compatible material when handling a substance. Resistance varies by material, thickness, temperature, concentration and contact time. Inspect for holes and deterioration. Never assume a single general-purpose glove is suitable for every chemical, and do not use loose gloves near rotating machinery against manufacturer directions.
Gloves and rotating drills
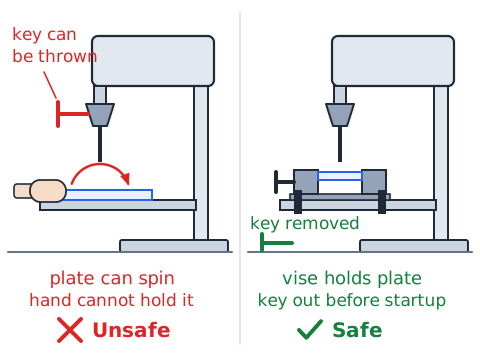
A drill press presents a specific entanglement hazard at the spindle, rotating bit and chuck. The safe answer is to secure the work and keep hands away; do not rely on a glove to hold the workpiece. Remove the chuck key before startup and use clamps or a vise designed for the job. When changing a bit, stop and isolate the machine according to the applicable procedure.
Foot protection and slipping
Safety footwear may be needed for falling objects, sharp scrap or other assessed hazards. Soles and tread also matter where cutting fluid or water creates slipping risk. Steel-toe footwear does not excuse leaving oil on the floor. Restore clean, dry walkways and keep access routes unobstructed. Footwear selection must consider the specific hazard and any electrical or chemical requirements instead of using one style for all conditions.
Clothing, hair and jewelry
Tie back long hair, remove rings and necklaces, and secure sleeves before using rotating tools. Frayed cuffs, hanging straps and dangling lanyards can be drawn into machinery. Avoid loose clothing even if it is otherwise durable. A supervisor’s instruction or an equipment manual may specify additional dress restrictions. The principle is to prevent anything that could be caught from entering the danger zone.
Hearing protection and exposure
Noise hazard depends on sound level and duration, not just whether a machine sounds unpleasant. Properly selected plugs or muffs can reduce exposure; fit matters. Under OSHA general-industry rules an eight-hour time-weighted exposure of 85 dBA is an action level for a hearing conservation program. This is not a universal safe/unsafe border for every brief noise exposure and must not be confused with the 90 dBA permissible exposure limit framework.
Comparing sound levels carefully
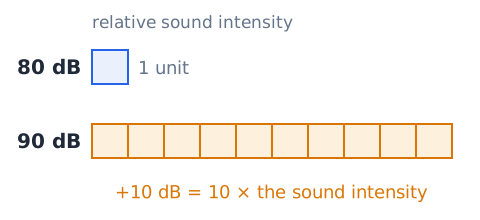
Decibels are logarithmic: doubling acoustic intensity adds about 3 dB, rather than doubling the dB number. A tenfold intensity difference adds 10 dB. These are physical relationships, not a complete method for computing worker noise dose. Real exposure assessment may require sound-level meters, time-weighted calculations and applicable regulatory exchange rates. Hearing protection must not be chosen from an unsupported mental shortcut.
Respirators and dust masks
Respiratory protection is not interchangeable with goggles, ventilation or an ordinary fabric covering. When respirators are required by the employer or necessary to protect health, the OSHA respiratory standard addresses selection, written programs, medical evaluation, training and fit testing of tight-fitting models. The correct respirator depends on the contaminant and exposure conditions. An air-purifying respirator does not supply oxygen.
Ventilation and source capture
Dust and fumes are best controlled at their source where practicable, for example by local exhaust collection compatible with the process. A general fan that spreads dust across a room is not a substitute for source capture. Wood dust, abrasive dust, fumes and solvent vapors do not have identical control requirements. Match collection equipment to the hazard and never allow an improvised vacuum or fan to create ignition or electrical risks.
Identifying equipment guards
A guard physically blocks or controls access to hazardous machine motion. A belt guard covers an in-running nip, a saw guard limits blade exposure, and a grinding-wheel guard helps contain fragments. Machines must be evaluated for the specific point-of-operation risks and guarding requirements. A warning sticker alone is not a guard. Do not remove, prop open or bypass guarding to save time.
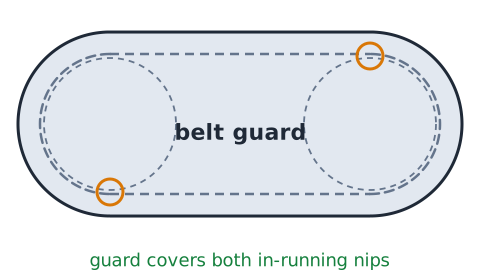
Point of operation
The point of operation is the machine location where work is performed on the material, such as a saw cut, press stroke or drill entry point. This is distinct from a tool’s handle and from the entire shop floor. If the operation exposes workers to injury, appropriate guarding is necessary. The operator’s experience and careful attention do not eliminate the need for safeguards.
Emergency stop is not isolation
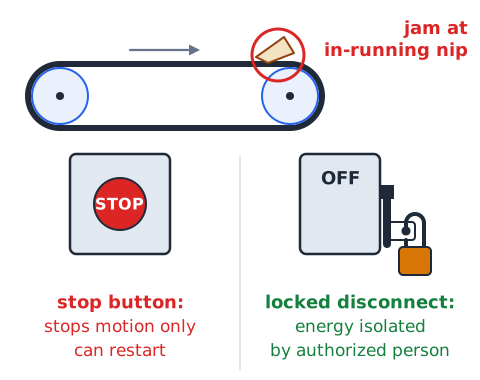
An emergency-stop switch is intended to stop hazardous motion quickly; it does not necessarily disconnect electrical, pneumatic, hydraulic or stored mechanical energy. A stopped machine can restart or release a spring or elevated load unexpectedly. During service requiring hazardous-energy control, the authorized person follows the applicable isolation and verification procedure. Do not treat a red stop button as proof of a de-energized system.
Lockout versus tagout
A lockout device physically holds an energy-isolating device in a safe position. A tagout device warns against operation but does not mechanically prevent operation by itself. Under OSHA general-industry rules, when the isolating device can be locked out, lockout is generally used unless a qualified tagout approach provides full employee protection under the standard. Application is the work of authorized employees, not an improvised student exercise.
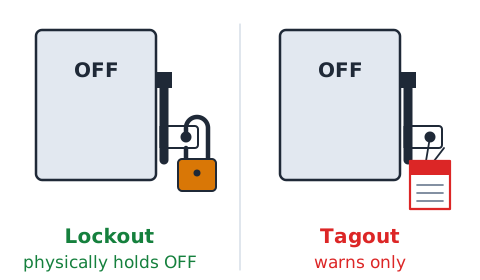
Hazardous energy beyond electricity
Machines may retain pneumatic air pressure, hydraulic fluid pressure, spring force, gravity-loaded motion, thermal energy or a rotating flywheel after power-off. Identify all energy sources, not only the wall plug. In energy control, residual energy must be relieved, disconnected, restrained or otherwise rendered safe. A raised machine component can fall even when its motor cannot start.
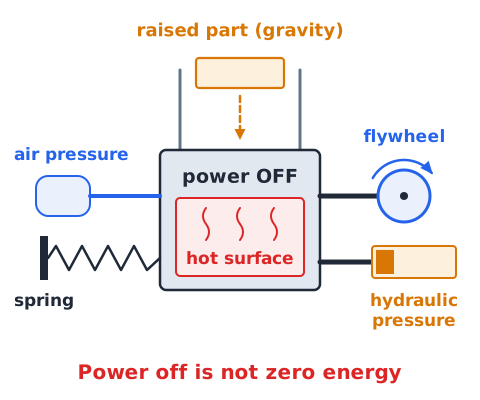
Isolation and verification
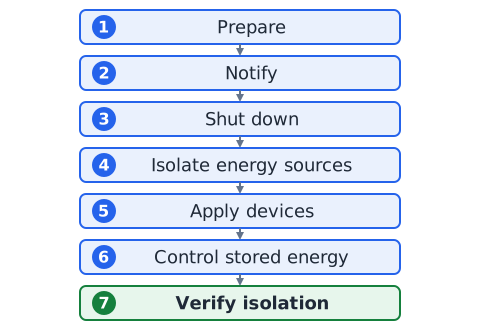
Authorized workers follow a documented energy-control sequence appropriate to the machine: prepare, notify, shut down, isolate energy sources, apply appropriate devices, control stored energy and verify isolation before entering the danger zone. A lamp that goes dark is not always adequate proof. Testing or repositioning during service requires its own controlled procedure. This is conceptual exam knowledge, not authorization to service energized equipment.
When a cord and plug is unplugged
OSHA has a defined exception for cord-and-plug-connected equipment if unexpected energization is controlled by unplugging and the plug remains under the servicing employee’s exclusive control. That exception should not be generalized to large machines, equipment with retained energy or shared work areas. An unplugged tool with a spinning wheel still needs time to stop before handling. Always apply site procedures.
Workholding: clamps and vises
Secure the workpiece with clamps, a vise or an approved fixture before drilling, cutting or grinding as required. A hand gripping a small metal plate cannot reliably resist a drill snagging and spinning the plate. The clamp must be suited to the load and must not interfere with guards or the tool path. Check that the work cannot rock, tip or shift before starting.
Stable tool support and benches
A workbench must be stable and able to support the intended load. Place heavy items so that the bench will not tip and keep the tool’s operating envelope clear. Inspect vises and mounting bolts before applying force. A loose bench grinder or press can walk or vibrate, creating new hazards. OSHA requires fixed machines to be securely anchored when designed for fixed locations.
Drill press preflight
Check drill bit integrity, correct spindle speed for the operation, guard position and workpiece clamping before the machine starts. Remove the chuck key and other setup tools. Position the work so the bit will not contact the vise jaws or table. If chips build up, wait for the machine to stop and use an appropriate brush or tool, not fingers around moving edges.
Bench grinder work rest
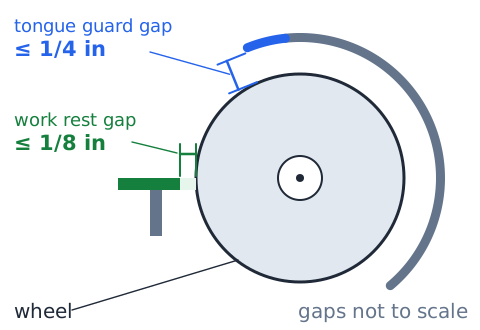
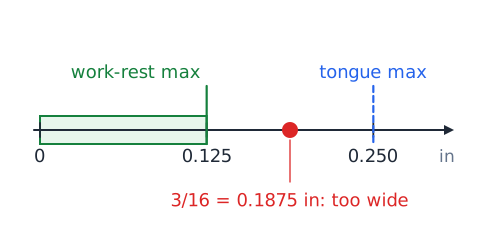
On offhand grinding machines within the OSHA abrasive-wheel standard, the adjustable work rest must be kept close to the wheel with a maximum opening of one-eighth inch. The goal is to keep work from wedging between wheel and support. Secure the rest after adjustment, and make adjustments only using safe shutdown procedures. This number applies to that work-rest gap; it is not the gap for every guard.
Bench grinder upper tongue guard
For applicable adjustable tongue or upper peripheral guards on abrasive-wheel equipment, OSHA identifies a maximum wheel-to-guard distance of one-quarter inch. This is a distinct clearance from the one-eighth-inch work-rest maximum. The two controls address different hazards. Never increase clearances merely because the wheel has worn down; proper adjustments and wheel inspection are needed.
Abrasive-wheel condition and speed
Before grinding, check the wheel and mounting condition and follow manufacturer instructions, including the compatible rated speed. A damaged or improperly mounted wheel can fail violently. The machine guard must be appropriate, and the operator should stand clear of likely fragment paths during initial startup as required by training. A face shield does not replace proper wheel selection, guarding or eye protection.
Portable cutting and grinding tools
Hand-held power tools require an appropriate guard, safe grip, suitable wheel or blade and a stable, supported workpiece. Do not force a wheel to make a cut for which it is not designed. Route cords and hoses away from cutting paths and walking routes. Stop use if the switch sticks, the tool vibrates abnormally or the wheel appears damaged.
Electrical cord inspection
Inspect cables for crushed insulation, exposed conductors, damaged plugs or strain-relief defects before use. Keep cables away from sharp edges, moisture and trip paths. Never continue using a tool simply because it still runs with visible wire damage. De-energize and report faults for properly qualified repair or replacement; do not improvise a repair with tape as a substitute for restoring equipment integrity.
Wet areas and electrical exposure
Water, coolant spills and damaged electrical insulation increase the danger of electrical shock and slips. Use controls suitable for the location and manufacturer requirements, including appropriate ground-fault protection where required. Remove the exposure before starting work. Wearing ordinary rubber gloves is not a substitute for verified electrical protection and qualified procedures.
Compressed air and chips
Do not blast chips off clothing or toward another person. OSHA permits compressed-air cleaning only below 30 psi and with effective chip guarding and PPE under the applicable general-industry rule. The pressure limit is not permission to point air at skin or bypass other precautions. Use a brush, chip hook or approved collection method where practical.
Tool damage and removal from service
A cracked hammer handle, mushroomed chisel head, loose tool head or damaged guard can cause injury even if a tool remains operable. Mark or segregate defective tools according to shop procedure. Do not casually grind, weld or modify safety-critical parts without authorization. Inspections prevent a defect from becoming a sudden failure under load.
Correct tool selection
Use tools for their designed purpose and the specified fastener or material. A screwdriver should not serve as a pry bar unless specifically designed for that use; an incorrect wrench can round fasteners and slip. Tool choice influences both quality and safety. A properly fitted tool reduces unwanted motion, awkward force and flying fragments.
Cutting direction and body position
Keep body parts out of the cutting path and consider where the tool will travel if it slips or the material breaks. Position your feet for balance and avoid overreaching. Establish adequate lighting and a supported workpiece. A sharp tool with controlled motion can be safer than a dull tool requiring excessive force, provided that appropriate handling and protection are maintained.
Pushing tools and push sticks
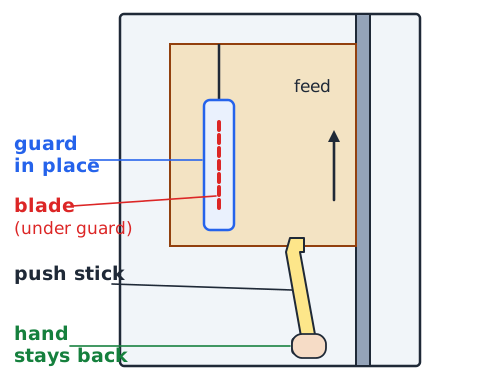
Where a table-saw process calls for a push stick or push block, the purpose is to keep hands a safer distance from the hazardous blade region while maintaining work control. This accessory complements guards and other controls; it does not replace the guard or make an unstable cutting operation safe. Select the correct accessory for the equipment and material.
Keeping aisles clear
Scrap, tools and extension cords in walkways create trip hazards and can block emergency movement. Separate material storage from travel paths. Clear spills promptly with appropriate methods, mark hazards awaiting correction and keep access to exits and emergency controls unobstructed. Shop organization is part of prevention, not a cosmetic finishing step after work.
Cleaning oils and cutting fluids
Oil, grease and coolant can create slippery floors. Some fluids also cause skin or chemical exposure, so consult the SDS and cleanup procedure. Contain the spill, protect the area and use approved absorbents or collection methods. Do not rinse unknown material into a drain, and never use an unsuitable solvent or compressed air simply because cleanup seems faster.
Fire risks around sparks
Hot work, grinding sparks, flammable liquids, dust and combustible storage can interact. Keep ignition sources away from incompatible materials, follow approved hot-work procedures and maintain fire protection suitable for the hazard. A protective apron helps the wearer but does not prevent a spark from landing in hidden dust or packaging. Control both the ignition source and the fuel.
Chemical labeling and SDS
A product identifier, hazard pictogram, signal word and hazard statements communicate hazards. The SDS provides more detailed information about handling, protection, first aid and storage. Do not assume that a harmless-looking liquid in an unlabeled bottle is safe. Employer hazard-communication duties and applicable workplace-labeling rules apply. Learn to locate SDS information rather than guessing based on smell or color.
Chemical compatibility
Different glove polymers resist different substances. A material compatible with water-based cleaners may not withstand an organic solvent. Evaluate the specific chemical, concentration and likely contact time using manufacturer compatibility information and the SDS. A glove that looks thick may still permit permeation. Chemical goggles and suitable clothing may be needed in addition to gloves.
Dust cleanup: do not disperse
Sweeping or blowing accumulated dust can aerosolize particles. Depending on the dust, the cloud may be irritating, toxic or combustible. Use extraction or housekeeping methods designed for the material. Wood, metal and other dusts have different collection compatibility concerns. Follow the facility’s dust-control plan rather than substituting any available household vacuum or compressed-air nozzle.
Ergonomics and lifting
Position a load close to the body and plan the travel route before moving it; obtain assistance or mechanical handling equipment when weight, size or instability warrants it. A safe lifting decision is affected by grip, reach, repetition and footing, not only the stated mass. Avoid trying to catch a falling part with your hands. Protecting fingers from pinch points may require staging fixtures.
Ladders and temporary access
Use approved access equipment rather than a chair, unstable box or rolling cart to reach high storage. Check footing, clear access and load limitations. Do not lean out so far that a stable setup becomes unstable. A technician at height still needs appropriate eye or head protection for the task and should prevent loose tools from falling onto people below.
Communication during setup
Before energizing equipment, make sure nearby workers know what will move and what areas must remain clear. Never assume someone has seen a warning sign. Identify who operates the machine and who is authorized to perform servicing. Stop work when an unexpected person enters a hazardous area. Shared work requires clear coordination, not just individual concentration.
Recognizing warning symbols
A warning sign directs attention to a hazard; it is not itself a physical control. Safety pictograms need their contextual meaning: an exclamation point may indicate a hazard classification on a chemical label, while a machine-specific warning may identify pinch or electrical hazards. Read the surrounding text and workplace procedure rather than assuming one symbol explains all required controls.
Responding to unsafe conditions
When a guard is missing, material is unsecured or a cord is damaged, stop the task and report or correct the hazard through authorized procedures. Do not bypass interlocks or ask another person to hold a part in the danger zone. A near miss is evidence that the process may need re-evaluation. Responsible action includes protecting others from a hazard until it is corrected.
First response versus diagnosis
Know where emergency stop controls, exits, emergency communication and first-aid resources are located. In an injury or chemical exposure emergency, activate the appropriate site response and summon qualified help; do not improvise a treatment beyond training. Isolation of a live electrical or moving-machine hazard may need trained responders. This lesson teaches recognition rather than emergency medical qualification.
Safety calculations: separation
A guard or physical barrier changes exposure by preventing body parts from entering a danger zone; simply calculating a large distance does not prove safety. In a workshop layout example, subtract the width of a blocked aisle from its original clear width to find remaining travel space. Numerical checks are aids to planning, not replacements for applicable clearance codes or a qualified assessment.
Safety calculations: simple percentages
Suppose 40 of 50 checklist items were passed. The descriptive completion percentage is 40 divided by 50 times 100, or 80 percent. That does not mean the shop is 80 percent safe: a single failed critical interlock can stop work. Mathematical accuracy and safety judgment answer different questions; identify which one an ASVAB-style item is asking.
Safety calculations: noise intensity
For an idealized sound field, a 10 dB change represents a tenfold acoustic-intensity ratio. For example, moving from 80 dB to 90 dB corresponds to ten times the physical sound intensity; this does not establish a direct tenfold hazard or calculate OSHA daily exposure. The logarithmic expression reinforces why hearing exposure should be professionally evaluated rather than guessed.
Safety calculations: grinder clearances
Convert fractional inches before comparing: one-eighth inch equals 0.125 inch and one-quarter equals 0.250 inch. If a hypothetical grinding work-rest gap is 0.18 inch, it exceeds 0.125 inch and is not within the cited OSHA maximum for applicable machines. The separate upper-tongue limit is 0.250 inch. Always confirm the type of grinder and its applicable standard.
Worked case: drill press
A student wants to hold a small sheet-metal plate by hand while drilling and remove the chuck key after turning on power. Identify two problems: unrestrained stock may spin, and the key may be thrown from the chuck. Correct the setup by securing the plate and removing the key before startup, checking the machine guard and keeping loose clothing clear. PPE alone would not control these hazards.
Worked case: chip removal
A machinist has chips around a milling tool and considers using fingers while it coasts. Stopping the motor is not enough until hazardous motion has ceased. Follow the prescribed control and use a brush or chip hook after the equipment is safe. A hand near sharp or rotating tooling is exposed to both cutting and entanglement risks. Never assume a glove makes hand-cleaning safe.
Worked case: solvent splash
A worker transfers a cleaning chemical from a labeled container and finds standard impact glasses but no chemical-splash goggles. Check the label, SDS and hazard assessment before proceeding. If splash protection is required, select protection compatible with the chemical and exposure; a face shield may supplement but not automatically replace the needed eye protection. The correct answer may be to delay work until the proper equipment is available.
Worked case: stopped conveyor
A conveyor is stopped with a red control switch but a jam remains at an in-running nip. The risk of unexpected startup or stored energy has not been addressed by the stop button alone. Only an authorized person using the applicable energy-control procedure should service the jam. A tag by itself is not a substitute for the required isolation method merely because it is easy to attach.
Worked case: bench grinder
A grinder has an adjustable rest gap of 3/16 inch. Compare it with the applicable OSHA one-eighth-inch work-rest maximum: 3/16 is 0.1875 inch, greater than 0.125 inch. Stop use and follow safe adjustment procedure. This does not mean the top tongue guard uses the same number; that applicable maximum is one-quarter inch.
Worked case: noisy fabrication shop
A worker wears earbuds for entertainment near loud cutting equipment and assumes they provide hearing protection. Ordinary consumer earbuds are not a validated replacement for task-selected occupational hearing protection. The correct approach is exposure assessment, suitable hearing protection where required and adherence to the employer’s hearing program. Sound level and exposure duration matter more than whether a worker personally finds noise tolerable.
Common ASVAB distractors
Look for options that sound convenient but do not control the hazard: goggles instead of a guard, a stop button instead of energy isolation, bare hands instead of a clamp, or a warning sign instead of housekeeping. Another distractor swaps the one-eighth-inch grinder work-rest limit with the one-quarter-inch upper-tongue limit. Choose the control that addresses the question’s specific risk rather than the broadest-sounding safety slogan.
Exam reasoning: first and best action
When a question asks what to do first, prioritize immediate hazard control and a safe stop rather than repairing equipment while it is running. When it asks which PPE to select, first identify the exposure: flying particles, splash, noise or heat. Do not overextend OSHA workplace-specific rules into a claim that every hobby tool has precisely the same legal requirements. The exam aims to test safety knowledge and practical reasoning.
Final knowledge checklist
You should be able to explain why guards differ from PPE, identify an exposed pinch point, select eye protection for chips versus splash, recognize entanglement hazards, distinguish lockout from tagging, identify residual energy, interpret grinder clearances and apply basic SDS and housekeeping practices. For an actual workplace, use the applicable regulations, equipment manual, competent supervision and site-specific procedures.
 English ▾