ASVAB Camp Get the appGoogle Play
AO · Practice test

ASVAB Assembling Objects Practice Test 6

The sixth Assembling Objects form works well as a capstone after you have studied every AO lesson. It follows the lesson order closely, moving from orientation and connection points through rotation, assembly and occlusion to distractor elimination, speed and visual scanning, and mixed strategy. The format is unchanged at 15 questions and 18 minutes.

  • 15 questions
  • 18 minutes
  • Every answer explained
  1. Pick your answers. You can change them until you check.
  2. Check my answers scores the test by subtest and opens every explanation.
0 / 15 answered

Assembling Objects

15 questions · 18 min on the real test
Question 1 · AO · easy

The left box shows two shapes, each with a lettered point, and a line with the same two letters on its ends. Which figure shows how the shapes connect when each end of the line is attached to the point with the same letter?
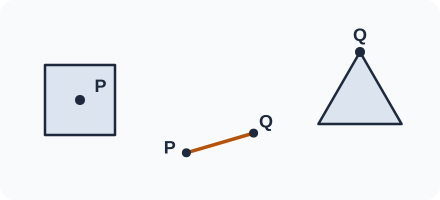
Left box: a square with point P at the center, a triangle with point Q at a corner, and a separate line with end P and end Q.
Show the answer

Answer: B

Check one letter at a time. Point P is at the center of the square, and point Q is at a corner of the triangle. Cross out any figure where either end of the line lands somewhere else or where a shape has changed. The shapes may be turned, so find each point by its place on the shape (corner, middle of a side, center), not by up, down, left or right.

  • A: The line ends in the wrong place: it meets the square at a corner, but point P is at the center.
  • B (correct): The line joins the center of the square to a corner of the triangle, the same spots as points P and Q in the left box; turning a shape does not move a point on it.
  • C: The line ends in the wrong place: it meets the square at the middle of a side, but point P is at the center.
  • D: The line ends in the wrong place: it meets the square at the middle of a side, but point P is at the center and it meets the triangle at the middle of a side, but point Q is at a corner.
Question 2 · AO · easy

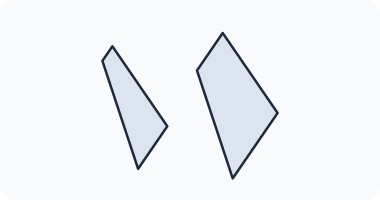
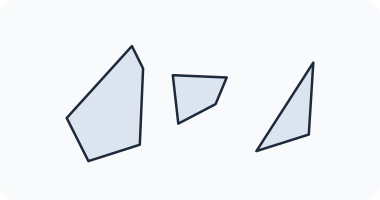
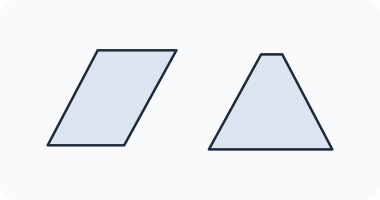
The left box shows separate flat pieces. Which figure shows how the pieces look when they are fitted together?

Left box: 2 separate flat pieces: a four-sided piece (about 52% of the total area), a four-sided piece (about 48% of the total area).
Show the answer

Answer: D

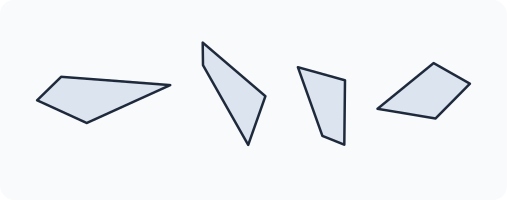
Count the pieces first: every figure must use each piece exactly once, with nothing added. Then pick one distinctive piece, such as the largest one or one with a curved or sharply pointed edge, and look for it in each figure; pieces may be turned but never flipped over. A figure whose cut lines are in different places has pieces of different sizes and can be crossed out. Here the pieces fit together into a trapezoid.

  • A: This figure has 3 pieces, but the left box has 2. Every piece must be used once, and nothing may be added.
  • B: This figure is a parallelogram. The pieces in the left box do not have these shapes, so they cannot fill this outline without gaps or overlaps.
  • C: A cut is in a different place, so the pieces do not match: one piece here covers about 13% of the shape, but the matching piece in the left box covers about 48%.
  • D (correct): This trapezoid is made of exactly the 2 pieces in the left box, each only turned and slid into place.
Question 3 · AO · easy

The left box shows separate flat pieces. Which figure shows how the pieces look when they are fitted together?

Left box: 2 separate flat pieces: a four-sided piece (about 64% of the total area), a four-sided piece (about 36% of the total area).
Show the answer

Answer: B

Count the pieces first: every figure must use each piece exactly once, with nothing added. Then pick one distinctive piece, such as the largest one or one with a curved or sharply pointed edge, and look for it in each figure; pieces may be turned but never flipped over. A figure whose cut lines are in different places has pieces of different sizes and can be crossed out. Here the pieces fit together into a diamond.

  • A: A cut is in a different place, so the pieces do not match: one piece here covers about 86% of the shape, but the matching piece in the left box covers about 64%.
  • B (correct): This diamond is made of exactly the 2 pieces in the left box, each only turned and slid into place.
  • C: This figure has 3 pieces, but the left box has 2. Every piece must be used once, and nothing may be added.
  • D: This figure is a square. The pieces in the left box do not have these shapes, so they cannot fill this outline without gaps or overlaps.
Question 4 · AO · easy

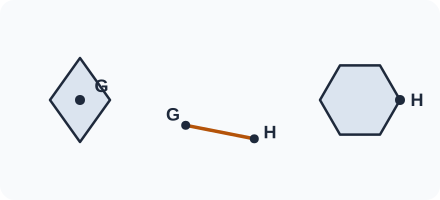
The left box shows two shapes, each with a lettered point, and a line with the same two letters on its ends. Which figure shows how the shapes connect when each end of the line is attached to the point with the same letter?

Left box: a diamond with point G at the center, a hexagon with point H at a corner, and a separate line with end G and end H.
Show the answer

Answer: D

Check one letter at a time. Point G is at the center of the diamond, and point H is at a corner of the hexagon. Cross out any figure where either end of the line lands somewhere else or where a shape has changed. The shapes may be turned, so find each point by its place on the shape (corner, middle of a side, center), not by up, down, left or right.

  • A: The line ends in the wrong place: it meets the diamond at the middle of a side, but point G is at the center.
  • B: The line ends in the wrong place: it meets the diamond at a wide corner, but point G is at the center.
  • C: The line ends in the wrong place: it meets the diamond at a sharp corner, but point G is at the center and it meets the hexagon at the center, but point H is at a corner.
  • D (correct): The line joins the center of the diamond to a corner of the hexagon, the same spots as points G and H in the left box; turning a shape does not move a point on it.
Question 5 · AO · medium

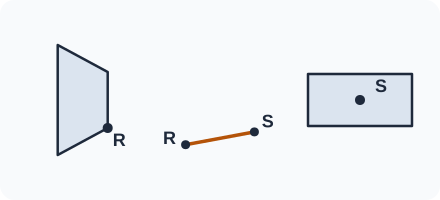
The left box shows two shapes, each with a lettered point, and a line with the same two letters on its ends. Which figure shows how the shapes connect when each end of the line is attached to the point with the same letter?

Left box: a trapezoid with point R at a corner of the short side, a rectangle with point S at the center, and a separate line with end R and end S.
Show the answer

Answer: A

Check one letter at a time. Point R is at a corner of the short side of the trapezoid, and point S is at the center of the rectangle. Cross out any figure where either end of the line lands somewhere else or where a shape has changed. The shapes may be turned, so find each point by its place on the shape (corner, middle of a side, center), not by up, down, left or right.

  • A (correct): The line joins a corner of the short side of the trapezoid to the center of the rectangle, the same spots as points R and S in the left box; turning a shape does not move a point on it.
  • B: The line ends in the wrong place: it meets the rectangle at the middle of a long side, but point S is at the center.
  • C: The line ends in the wrong place: it meets the rectangle at a corner, but point S is at the center.
  • D: One of the shapes here is a square, but the left box has a rectangle. Joining parts never changes a shape.
Question 6 · AO · medium

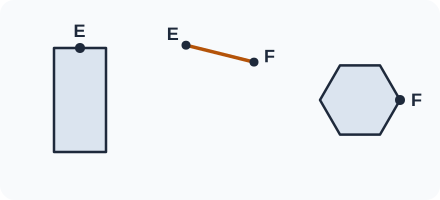
The left box shows two shapes, each with a lettered point, and a line with the same two letters on its ends. Which figure shows how the shapes connect when each end of the line is attached to the point with the same letter?

Left box: a rectangle with point E at the middle of a short side, a hexagon with point F at a corner, and a separate line with end E and end F.
Show the answer

Answer: D

Check one letter at a time. Point E is at the middle of a short side of the rectangle, and point F is at a corner of the hexagon. Cross out any figure where either end of the line lands somewhere else or where a shape has changed. The shapes may be turned, so find each point by its place on the shape (corner, middle of a side, center), not by up, down, left or right.

  • A: The line ends in the wrong place: it meets the hexagon at the middle of a side, but point F is at a corner.
  • B: The line ends in the wrong place: it meets the rectangle at the middle of a long side, but point E is at the middle of a short side.
  • C: One of the shapes here is a parallelogram, but the left box has a rectangle. Joining parts never changes a shape.
  • D (correct): The line joins the middle of a short side of the rectangle to a corner of the hexagon, the same spots as points E and F in the left box; turning a shape does not move a point on it.
Question 7 · AO · medium

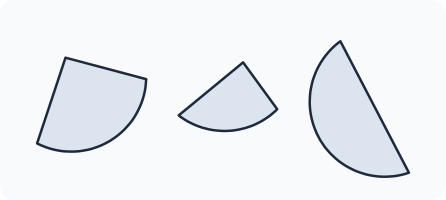
The left box shows separate flat pieces. Which figure shows how the pieces look when they are fitted together?

Left box: 3 separate flat pieces: a piece with a curved side (about 40% of the total area), a piece with a curved side (about 39% of the total area), a piece with a curved side (about 21% of the total area).
Show the answer

Answer: C

Count the pieces first: every figure must use each piece exactly once, with nothing added. Then pick one distinctive piece, such as the largest one or one with a curved or sharply pointed edge, and look for it in each figure; pieces may be turned but never flipped over. A figure whose cut lines are in different places has pieces of different sizes and can be crossed out. Here the pieces fit together into a circle.

  • A: This figure is a hexagon. The pieces in the left box do not have these shapes, so they cannot fill this outline without gaps or overlaps.
  • B: This figure has 4 pieces, but the left box has 3. Every piece must be used once, and nothing may be added.
  • C (correct): This circle is made of exactly the 3 pieces in the left box, each only turned and slid into place.
  • D: A cut is in a different place, so the pieces do not match: one piece here covers about 13% of the shape, but the matching piece in the left box covers about 21%.
Question 8 · AO · medium

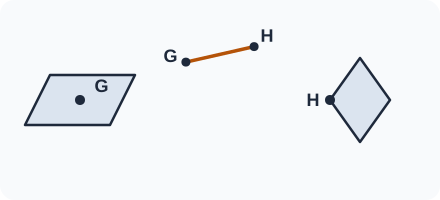
The left box shows two shapes, each with a lettered point, and a line with the same two letters on its ends. Which figure shows how the shapes connect when each end of the line is attached to the point with the same letter?

Left box: a parallelogram with point G at the center, a diamond with point H at a wide corner, and a separate line with end G and end H.
Show the answer

Answer: C

Check one letter at a time. Point G is at the center of the parallelogram, and point H is at a wide corner of the diamond. Cross out any figure where either end of the line lands somewhere else or where a shape has changed. The shapes may be turned, so find each point by its place on the shape (corner, middle of a side, center), not by up, down, left or right.

  • A: One of the shapes here is a rectangle, but the left box has a parallelogram. Joining parts never changes a shape.
  • B: The line ends in the wrong place: it meets the parallelogram at a sharp corner, but point G is at the center.
  • C (correct): The line joins the center of the parallelogram to a wide corner of the diamond, the same spots as points G and H in the left box; turning a shape does not move a point on it.
  • D: The line ends in the wrong place: it meets the diamond at a sharp corner, but point H is at a wide corner.
Question 9 · AO · medium

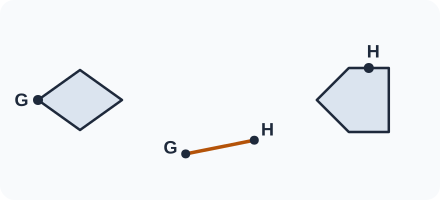
The left box shows two shapes, each with a lettered point, and a line with the same two letters on its ends. Which figure shows how the shapes connect when each end of the line is attached to the point with the same letter?

Left box: a diamond with point G at a sharp corner, a house shape with point H at the middle of a wall, and a separate line with end G and end H.
Show the answer

Answer: B

Check one letter at a time. Point G is at a sharp corner of the diamond, and point H is at the middle of a wall of the house shape. Cross out any figure where either end of the line lands somewhere else or where a shape has changed. The shapes may be turned, so find each point by its place on the shape (corner, middle of a side, center), not by up, down, left or right.

  • A: The line ends in the wrong place: it meets the diamond at the center, but point G is at a sharp corner and it meets the house shape at the peak of the roof, but point H is at the middle of a wall.
  • B (correct): The line joins a sharp corner of the diamond to the middle of a wall of the house shape, the same spots as points G and H in the left box; turning a shape does not move a point on it.
  • C: The line ends in the wrong place: it meets the diamond at a wide corner, but point G is at a sharp corner.
  • D: The line ends in the wrong place: it meets the house shape at a bottom corner, but point H is at the middle of a wall.
Question 10 · AO · medium

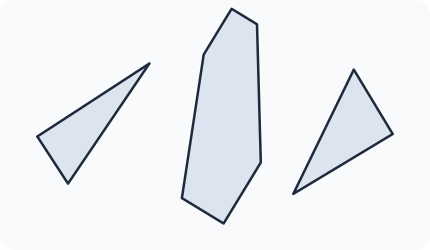
The left box shows separate flat pieces. Which figure shows how the pieces look when they are fitted together?

Left box: 3 separate flat pieces: a six-sided piece (about 59% of the total area), a triangle (about 22% of the total area), a triangle (about 19% of the total area).
Show the answer

Answer: B

Count the pieces first: every figure must use each piece exactly once, with nothing added. Then pick one distinctive piece, such as the largest one or one with a curved or sharply pointed edge, and look for it in each figure; pieces may be turned but never flipped over. A figure whose cut lines are in different places has pieces of different sizes and can be crossed out. Here the pieces fit together into a rectangle.

  • A: This figure has 4 pieces, but the left box has 3. Every piece must be used once, and nothing may be added.
  • B (correct): This rectangle is made of exactly the 3 pieces in the left box, each only turned and slid into place.
  • C: A cut is in a different place, so the pieces do not match: one piece here covers about 34% of the shape, but the matching piece in the left box covers about 22%.
  • D: This figure is a square. The pieces in the left box do not have these shapes, so they cannot fill this outline without gaps or overlaps.
Question 11 · AO · medium

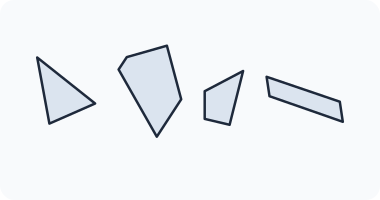
The left box shows separate flat pieces. Which figure shows how the pieces look when they are fitted together?

Left box: 3 separate flat pieces: a five-sided piece (about 60% of the total area), a triangle (about 21% of the total area), a four-sided piece (about 19% of the total area).
Show the answer

Answer: C

Count the pieces first: every figure must use each piece exactly once, with nothing added. Then pick one distinctive piece, such as the largest one or one with a curved or sharply pointed edge, and look for it in each figure; pieces may be turned but never flipped over. A figure whose cut lines are in different places has pieces of different sizes and can be crossed out. Here the pieces fit together into a diamond.

  • A: A cut is in a different place, so the pieces do not match: one piece here covers about 49% of the shape, but the matching piece in the left box covers about 60%.
  • B: This figure has 4 pieces, but the left box has 3. Every piece must be used once, and nothing may be added.
  • C (correct): This diamond is made of exactly the 3 pieces in the left box, each only turned and slid into place.
  • D: This figure is a square. The pieces in the left box do not have these shapes, so they cannot fill this outline without gaps or overlaps.
Question 12 · AO · hard

The left box shows separate flat pieces. Which figure shows how the pieces look when they are fitted together?

Left box: 4 separate flat pieces: a four-sided piece (about 31% of the total area), a four-sided piece (about 25% of the total area), a four-sided piece (about 24% of the total area), a four-sided piece (about 21% of the total area).
Show the answer

Answer: C

Count the pieces first: every figure must use each piece exactly once, with nothing added. Then pick one distinctive piece, such as the largest one or one with a curved or sharply pointed edge, and look for it in each figure; pieces may be turned but never flipped over. A figure whose cut lines are in different places has pieces of different sizes and can be crossed out. Here the pieces fit together into a diamond.

  • A: A cut is in a different place, so the pieces do not match: one piece here covers about 14% of the shape, but the matching piece in the left box covers about 24%.
  • B: A cut is in a different place, so the pieces do not match: one piece here covers about 41% of the shape, but the matching piece in the left box covers about 31%.
  • C (correct): This diamond is made of exactly the 4 pieces in the left box, each only turned and slid into place.
  • D: This figure is a square. The pieces in the left box do not have these shapes, so they cannot fill this outline without gaps or overlaps.
Question 13 · AO · hard

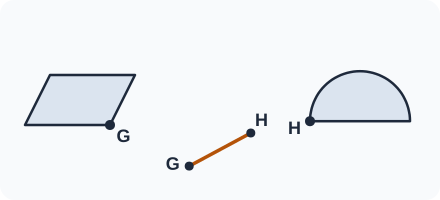
The left box shows two shapes, each with a lettered point, and a line with the same two letters on its ends. Which figure shows how the shapes connect when each end of the line is attached to the point with the same letter?

Left box: a parallelogram with point G at a wide corner, a half-circle with point H at a corner of the flat side, and a separate line with end G and end H.
Show the answer

Answer: A

Check one letter at a time. Point G is at a wide corner of the parallelogram, and point H is at a corner of the flat side of the half-circle. Cross out any figure where either end of the line lands somewhere else or where a shape has changed. The shapes may be turned, so find each point by its place on the shape (corner, middle of a side, center), not by up, down, left or right.

  • A (correct): The line joins a wide corner of the parallelogram to a corner of the flat side of the half-circle, the same spots as points G and H in the left box; turning a shape does not move a point on it.
  • B: The line ends in the wrong place: it meets the parallelogram at the center, but point G is at a wide corner and it meets the half-circle at the middle of the flat side, but point H is at a corner of the flat side.
  • C: The line ends in the wrong place: it meets the half-circle at the top of the curved side, but point H is at a corner of the flat side.
  • D: The line ends in the wrong place: it meets the parallelogram at the center, but point G is at a wide corner.
Question 14 · AO · hard

The left box shows separate flat pieces. Which figure shows how the pieces look when they are fitted together?

Left box: 4 separate flat pieces: a five-sided piece (about 43% of the total area), a triangle (about 22% of the total area), a four-sided piece (about 18% of the total area), a four-sided piece (about 17% of the total area).
Show the answer

Answer: D

Count the pieces first: every figure must use each piece exactly once, with nothing added. Then pick one distinctive piece, such as the largest one or one with a curved or sharply pointed edge, and look for it in each figure; pieces may be turned but never flipped over. A figure whose cut lines are in different places has pieces of different sizes and can be crossed out. Here the pieces fit together into a parallelogram.

  • A: A cut is in a different place, so the pieces do not match: one piece here covers about 32% of the shape, but the matching piece in the left box covers about 22%.
  • B: A cut is in a different place, so the pieces do not match: one piece here covers about 35% of the shape, but the matching piece in the left box covers about 43%.
  • C: This figure is a rectangle. The pieces in the left box do not have these shapes, so they cannot fill this outline without gaps or overlaps.
  • D (correct): This parallelogram is made of exactly the 4 pieces in the left box, each only turned and slid into place.
Question 15 · AO · hard

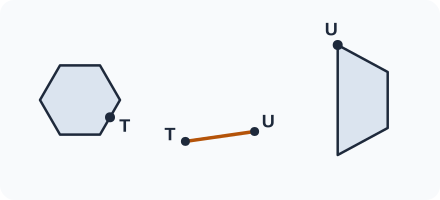
The left box shows two shapes, each with a lettered point, and a line with the same two letters on its ends. Which figure shows how the shapes connect when each end of the line is attached to the point with the same letter?

Left box: a hexagon with point T at the middle of a side, a trapezoid with point U at a corner of the long side, and a separate line with end T and end U.
Show the answer

Answer: C

Check one letter at a time. Point T is at the middle of a side of the hexagon, and point U is at a corner of the long side of the trapezoid. Cross out any figure where either end of the line lands somewhere else or where a shape has changed. The shapes may be turned, so find each point by its place on the shape (corner, middle of a side, center), not by up, down, left or right.

  • A: The line ends in the wrong place: it meets the trapezoid at the middle of a slanted side, but point U is at a corner of the long side.
  • B: One of the shapes here is a pentagon, but the left box has a hexagon. Joining parts never changes a shape.
  • C (correct): The line joins the middle of a side of the hexagon to a corner of the long side of the trapezoid, the same spots as points T and U in the left box; turning a shape does not move a point on it.
  • D: The line ends in the wrong place: it meets the trapezoid at a corner of the short side, but point U is at a corner of the long side.

Finished?

See your score by subtest, which questions you missed and the lesson to review for each one.

Some questions are unanswered

Unanswered questions count as wrong. You can go back and answer them, or check your answers now.

About this test

Because it samples the whole unit evenly, this test shows whether any single skill still lags behind the rest. Its difficulty spread is 4 easy, 7 medium and 4 hard. As with the other forms, every puzzle is original and unique to this test, so a strong showing here is not the result of having seen the items before.

Take it under the same conditions you plan to have on test day: quiet room, timer running, no pauses. When you are done, compare your misses with your earlier AO forms to see which patterns persist, and read each explanation carefully. The final number is your practice accuracy on Test 6, not an ASVAB score of any kind.

Take it with you: the free app

The same 124 lessons, 6,516 questions and 82 timed practice tests on your phone, plus flashcards with spaced review and progress tracking. Free to download, and it works offline.

  • Works offline
  • Spaced-review flashcards
  • Progress for every subtest
  • Menus in 59 languages
ASVAB Camp appGoogle Play